

1⁄35Fixing the Halftrack
11
Comments
The suspension
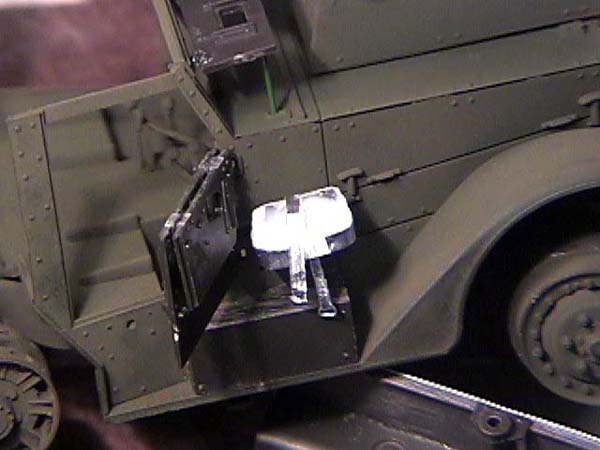
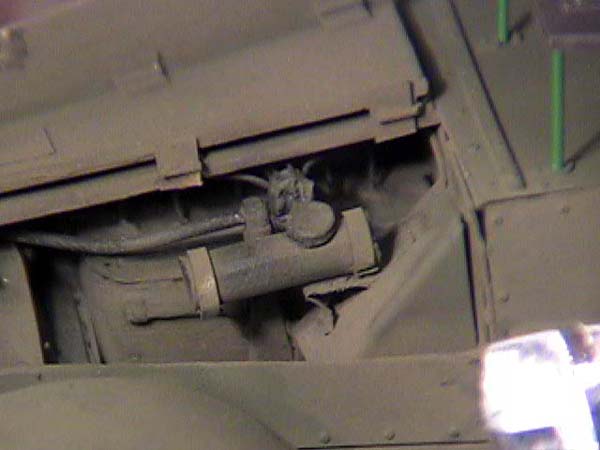
I then decided to work on the suspension. It is so inaccurate and toy looking. I started with the front end by wrapping muffler tape around the ditch roller. I do that to hide seams on the roller (leaves only one seam which I try to hide) and it gives the benefit of having a metal finish that looks really cool when you scrap the paint away to expose it or to give a very light coat of paint over to convey that it is metal beneath. I also replaced the springs on both sides with wire wrapped around the green wire used in flower arrangements. The rear suspension required quite a bit of work. I had to drill holes in the roller wheels then square the holes with a hobby blade. I thought about building them from scratch with a jig, but threw that idea out the window. I didnt want to forget that modeling is fun, not surgery. The rear horizontal shock is a ball pen with wire wrapped around it. I wrapped the end of the exhaust pipe with muffler tape to reproduce the thin pipe on the end.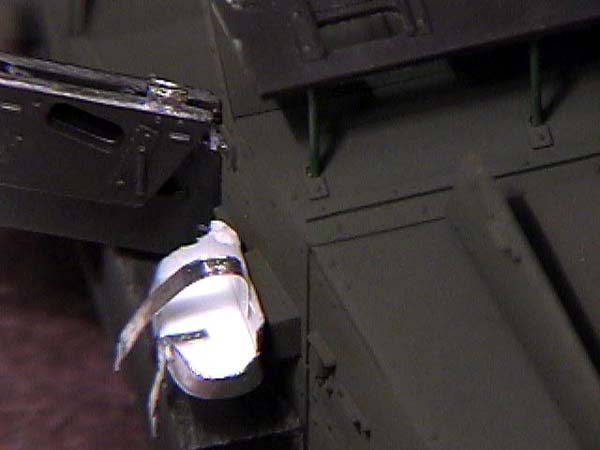
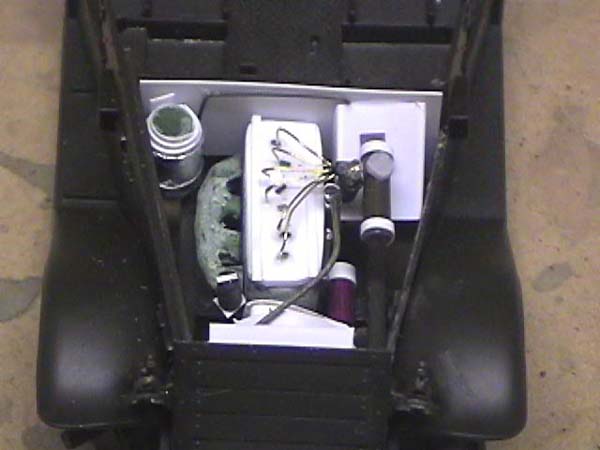
The other parts
The other parts that I was to reproduce were the fine details that were so heavily molded by Tamiya. I made the jerry can holders by cutting plastic card for a bottom pattern, and then wrapping the muffler tape around the card. I then trimmed it to size with fine scissors I stole Uh; I mean that my wife donated from her pedicure kit. The same system was used with the storage bins within the compartment. I sanded all the molded in features on exterior walls of the aft compartment and then simply glued plastic card to the sides. I know it throws the scale off, but again, its the impression Im looking for. I should have used muffler tape to slab the sides, but I didnt think of it until after I had glued the plastic sheet already. I added the rivets with white glue. The last thing I wanted to discuss were the hinges on the vehicle. I create them by sanding the joints flat; cutting a square piece of muffler tape to size and then gluing stretched sprue across the center of the square. I like the look of them when finished and painted.Conclusion
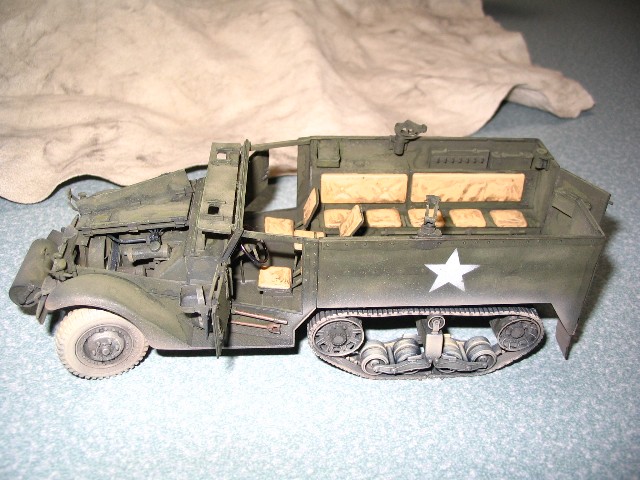
I painted the model and finished it for the Move It campaign. I really like the way it came out. I could have purchased AM parts for the engine and the rear suspension, and the model would have definitely come out better, but the sense of satisfaction of scratching it made for a much more fun modeling experience.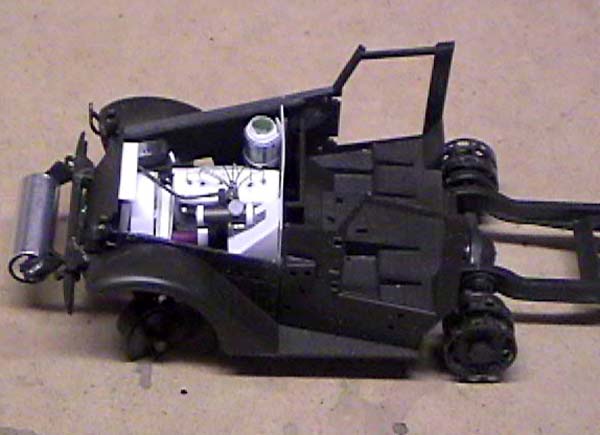
About the Author


FROM: FLORIDA, UNITED STATES
My name is Rob and I am a 42 year old, married, with two children. I am retired US Navy and now a Base Police Officer at NAS Pensacola, Florida. My main interest is WWII figures, but I do occassionally branch out into other periods. My concentration in WWII is the Sicilian/Italy campaign.
Comments

The article is nice, but I miss 1 thing.....
Photo's of the completed model
With such a project it's nice to see the whole thing finished!
Martin
MAY 06, 2005 - 09:24 AM

Thanks a lot for posting this. Are there any photos of this one completed? Would love to see them.
MAY 06, 2005 - 12:08 PM

Rob,
Very cool project. Can't wait to see the final product...
I really like the scratch built details for the engine.
Show us some more of your work.
Tim
MAY 06, 2005 - 12:47 PM
Nice article but it seems to focus on only a few things is there a part 2 in the works.. :>
MAY 06, 2005 - 02:02 PM

Very good article and wonderful looking work! Like the others I would love to see the model completed! It must be very, very good!
Cheers and happy modelling!
Prato
MAY 07, 2005 - 12:21 PM

Rob mentions in the article that he build the halftrack for the 'move it' campaign... I would imagine that a pic of the finished vehicle can be found in either the campaign gallery or his own gallery..
Good looking scratch build, and some nice use of everyday and some not so everyday items..
Cheers
Henk
MAY 07, 2005 - 04:06 PM

Very innovative use of materials and an interesting article. More pictures would definitely be appreciated
MAY 10, 2005 - 03:10 AM

Ciao everyone,
Thanks for the nod for the article. Thanks to Vinnie for posted it and doing the best he could with my pitiful attempts at photography.
Delbert - there will be no part 2. I was just trying to give an idea of what we, as modelers, can do with ordinary things to make our models better. I'm not anti-resin or anti-aftermarket, I just can't afford it.
Again, thank you and here is a picture. At least this one was taken with my new digital camera.
 Ciao for now
Rob
Ciao for now
Rob
Ciao for now
RobMAY 10, 2005 - 05:06 AM

Rob -
Nice job - really enjoy seeing some good old fashioned scratchbuilding ! !
As you mentioned you like to use inexpensive materials, I was wondering if you have ever tried soda-can (aka beer-can) aluminum. It cuts with scissors, Xactos or single edge razor blades, can be scored and snapped like styrene, and folds up just like the sheet metal it is. If you lightly sand it (wet or dry, wet) before gluing (use ACC of course) it bonds super strong. To flatten it, roll it on a workpad with an old piston pin (mine is small block Chevrolet, I think). Any smooth metal rod will do though (like the big Xacto handle).
The trick to bending it is to hold down one half of the bend with a ruler or other flat object, and then slip a single edge razor blade or other thin flat object under the other half, and lift it to make the bend, sort of an improvised 'sheet metal brake' You see this technique illustrated on instructions for some of the photo etch sheets. One downside - you get one sharp 90 degree bend in any single location on a piece before the material will start to stress crack - fortunately it is free, and the scrap part can be used as a pattern for the next attempt. If the bend has a radius to it, the mateial is MUCH more foregiving.
Other sources of thin sheet aluminum are good too, but the alloy and effects of the manufacturing process on the soda-can aluminum makes it harder and tougher than most aluminum sheet, which is often dead soft.
Konrad
MAY 12, 2005 - 02:20 AM
Ciao Konrad,
Thanks for the compliment. I appreciate it.
I have heard that people use aluminum cans, wine bottle foil, etc., and I have used most of them at least once. But, I still stand behind my muffler tape. I just love the stuff. I do like it because it is soft to work with. I carefully fold it, and then smash or bend it once it is glued on.
Again, thanks for the compliment.
Ciao for now
Rob
MAY 12, 2005 - 03:21 AM
Copyright ©2021 by Rob Lively. Images and/or videos also by copyright holder unless otherwise noted. The views and opinions expressed herein are solely the views and opinions of the authors and/or contributors to this Web site and do not necessarily represent the views and/or opinions of Armorama, KitMaker Network, or Silver Star Enterrpises. All rights reserved. Originally published on: 2005-05-06 00:00:00. Unique Reads: 12547

WEB HOSTING BY


Copyright ©2021 Armorama and Kitmaker Network, a subsidiary of Silver Star Enterprises
All Rights Reserved. Please read our Conditions of Use and Privacy Policy.
All Rights Reserved. Please read our Conditions of Use and Privacy Policy.