

1⁄35Stealing Time
23
Comments
The Base
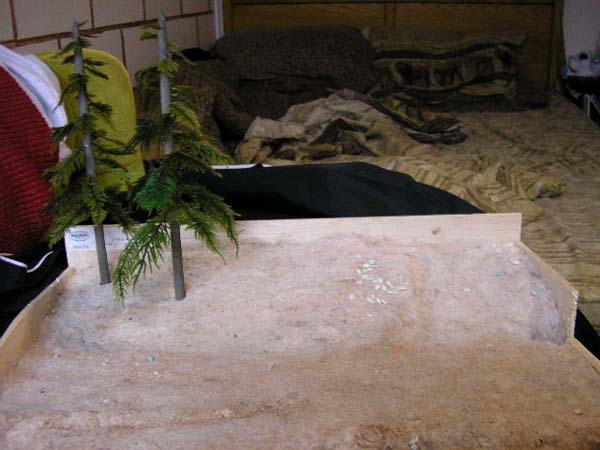
With this I started to figure out how big the base would have to be. For my purposes I decided on an oak picture frame with inside dimensions of 16 X 12 inches (40,6 cm x 30,5 cm). I then drew a diagram of what I wanted the diorama to look like, and went about picking figures and details to fill the space. The first thing I do when starting with a picture frame is to cut out some 1/4 inch underlayment to fill the space in the frame. This is then glued into place and varnished with two coats on each side of the board. Then a box is built that is butted up to the inside lip of the frame using balsa wood sheet. This is simply what I refer to as the ground work box.The next step is to fill in the ground work box with foam. This can either be the white foam or the pink insulation foam. While looking at my drawing, I try to replicate the contours of the landscape that was envisioned. After getting the basic contours and heights that Im after, I mix up some celluclay with a couple squirts of brown oxide craft paint and some white glue. I spread this over the foam base. Once I have suitable terrain I sprinkle beach sand all over my ground work and press it down into the celluclay. This is to give it a texture like dirt. The base is then set aside to dry completely.
Once the base is dry it's time to paint the dirt colors. I usually thin down the same brown oxide craft paint and paint the base again. Once thats dry, I take Trail Tan craft paint and coat the whole diorama with a thinned coat. This will be the dirt base color. Next I add two different washes of burnt sienna and raw umber. Follow this with drybrushing the Trail Tan and also do a second and third drybrush that will lighten the Trail Tan. The next step is to airbrush Tamiya Buff along the wheel paths of the vehicle paths.
Vegetation
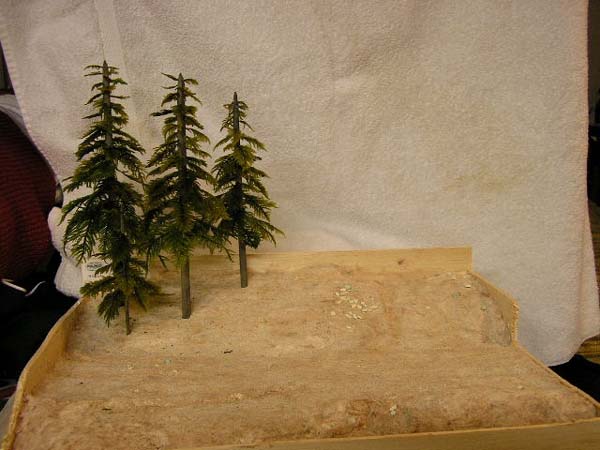
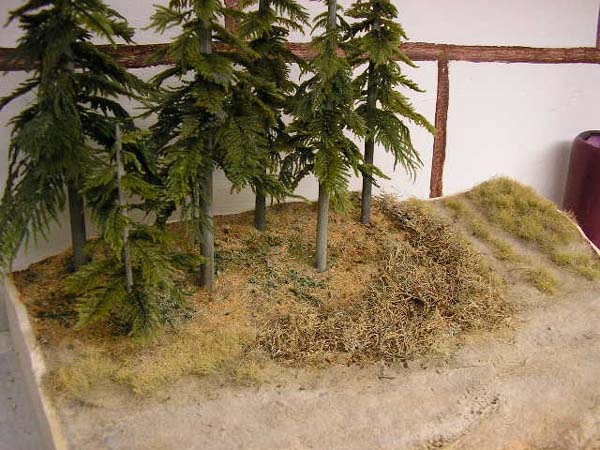
Since there are trees in this diorama, thats where I start the vegetation. These trees are evergreen trees and will be made of very few things. Well first take some hard wood dowels and, using a Dremel, we turn these into tapering trunks. Since all I had to use was a cordless Dremel my tree trunks arent as tapered as I would have liked, but I feel they will do. These trunks were next scored with a hacksaw blade and then stained a grey color. After they had dried they were submerged in a bath of black ink and alcohol. After that they were set aside to dry, the black bath was to give life to the texturing done by the hacksaw blade.For the branches I decided to use Bragdon evergreen branches. These are natural plants that look incredibly like pine boughs. When the trunks where dry, I picked where I wanted the branches to start and I started to drill holes (just bigger than the branches) spiralling upward along the trunk until I reached the peak. I then started with longer branches at the bottom and began gluing the branches in the trunk. I made sure the branches where getting smaller as they reached the peak. I repeated this for each tree. Note the dowels were of various diameters as the trees all werent meant to be same height. Once the trees were done it was time to put them in the locations I wanted. This was accomplished by drilling the appropriate holes in the base that matched the dowel diameter. The trees were glued in using white glue.
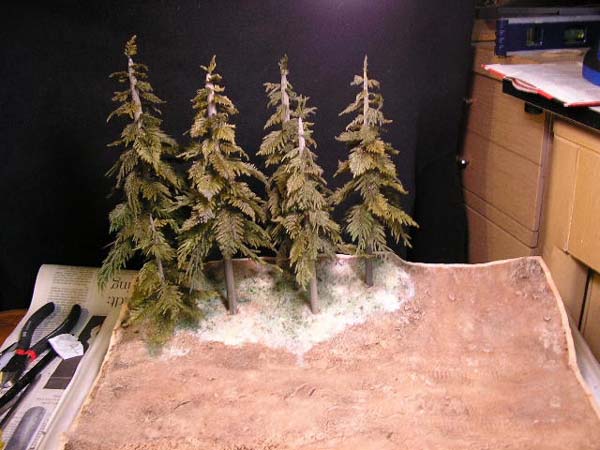
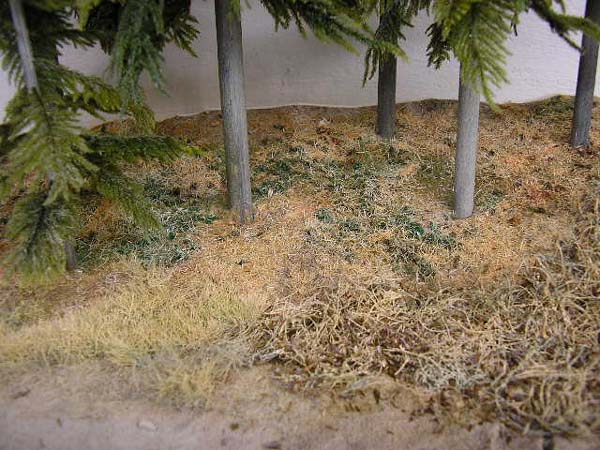
Now we move onto the pine needles and mosses I wanted growing under the evergreens. First I took both Woodland Scenics (WS) fine and coarse turf and scattered it in a few places on the forest floor. I then applied WS Field grass (the tan brown one); using a pair of scissors, I cut it off very, very short. I collected the cut grass in a bowl trying to make it as short as possible as this is going to appear as fallen needles. Once the needles were glued in place, I started with thicker washes of burnt sienna and very thin washes of raw umber to add that reddish yellow pine needle color. I added fallen branches and pine cones from the Bragdon branches. Moving along the forest edge, I decided to use a product I hadnt used much: Rubberized Horsehair. It is a wonderful product to make brambles with. I first painted it a tan color and simply pulled it apart and glued it into place. I added some ground up dead flowers to give it some ground scatter underneath. The other grasses that are used are a mix of WS static grasses in Burnt grass and Wild honey. These were used along the road ways and other grassy areas. This was followed up with Heki grass that I had painted in a dormant grass color. I placed tufts of this around the diorama in different places. I also mixed in some dormant WS field grasses and some hemp rope tufts as well.
Next came the trees in front that are being run over by the Sherman. These are made from a craft or dollar store item known as a Cinnamon Broom. I cut these off to the correct length and then drilled holes in the base and planted them. After these were planted I took plant roots and bunched them to make a couple of bushes. Under the trees I placed Hudson and Allen forest litter. The bushes got silver birch catkins for the forest litter. Next I built a barb wire fence to finish off the rear right corner of the diorama and with this I completed almost all of the ground work.
About the Author


FROM: NEBRASKA, UNITED STATES
When I was a kid I built my first tank at around 10 years old it was a 1/48 scale tamiya m60 motorized. I did a few 1/48 bandai kits as well. then I jumped to model cars for the next few years, around the age of 15 I started back into armor and mostly did the 1/32 monogram stuff. I quit modeling whe...
Comments

Fantastic dio and great article...congrats bro. The final is perfect as always.
JUL 10, 2005 - 08:22 PM

Super work.
The trees look great, along with the rest of the groundwork.
The Wolf figures add to the cold look of things!
Cheers
Andy
JUL 12, 2005 - 11:28 AM

Thats a very fine piece of work. Its always nice to see b/w photos of dios. They seem more realistic and fantastic than they already are.
Thanks for sharing
Simon
JUL 12, 2005 - 09:12 PM

Jackhammer,
Outstanding work!
The pines and ground cover are excellent! Good to see someone else who is espousing model railroad supplies. Last week I was at the NMRA 2005 Nat Con and watched Mr. Bragdon demonstrate some of his products. Bought a bag of the pine boughs. I was considering doing a review of them, would you consider it, as you already have the pix and "how-to"?
I'll be viewing more of this diorama. Appears that your figures are more in natural posture than usual. Great job!
JUL 15, 2005 - 11:52 AM

It's an awesome dio! Lots of realism and action going on in small groups that draw the attention of the viewer! Very well built! Very well painted and weathered! what can one say more! A marvel! Congratulations!
Cheers and happy modelling!
Prato
JUL 16, 2005 - 05:50 AM

Hi Everyone, I am really glad you like the article. I am glad it came out easy to read and follow. Fred, as far as the bragdon branches go...I'm out of them I would have loved to do a review on them but I am busy working on a couple more grass reviews and some other items I have seen in railroad sections of the hobby shops and having been brain storming with my lhs owner, so there are going to be some more coming from me in this area. I would love to see you do the bragdon review. If there are any questions I can help with please let me know. Cheers Kevin
JUL 16, 2005 - 08:47 AM

I'm amazed! I've printed this off and am using it as guidance for my first dio ever, which will be of the Battle of the Bulge.
MAY 29, 2007 - 09:10 PM

Sam, it's nice to see you going through the feature section, and finding useful, and helpful articles.
MAY 29, 2007 - 11:09 PM
Sam, just checked, seems you already got some great and simple suggestions. Good luck, and hopefully you'll post some photos of those trees after you make them.
MAY 30, 2007 - 04:49 AM
Copyright ©2021 by Kevin Gardner. Images and/or videos also by copyright holder unless otherwise noted. The views and opinions expressed herein are solely the views and opinions of the authors and/or contributors to this Web site and do not necessarily represent the views and/or opinions of Armorama, KitMaker Network, or Silver Star Enterrpises. All rights reserved. Originally published on: 2005-07-07 00:00:00. Unique Reads: 33094

WEB HOSTING BY


Copyright ©2021 Armorama and Kitmaker Network, a subsidiary of Silver Star Enterprises
All Rights Reserved. Please read our Conditions of Use and Privacy Policy.
All Rights Reserved. Please read our Conditions of Use and Privacy Policy.