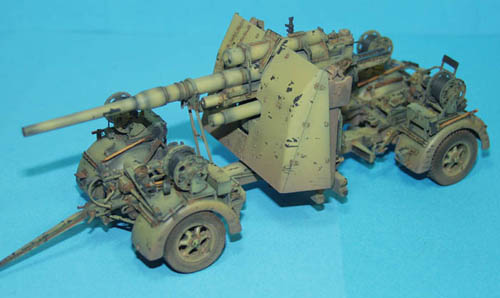
1⁄35Dragon Fires Again - Flak 37
13
Comments

Assembly – Stages 34 to 36
Final construction and assembly of the shield, it’s attachments, the travel lock, and ammunition cases. You have a choice here of which brackets to hold the cable reels with on top of each fender. Having no definitive references, I went with the box art and used the solid brackets. The presses shield I think, looks great and so I had decided earlier to go with this. In an attempt to better represent the thickness of the shield, all the shields in the kit have bevelled edges. With a new number 23 blade and a bit of fine wet and dry these bevels can be removed, but I have to wonder why this isn’t done in the mould?All the separate parts were now painted and weathered in exactly the same manner as the main gun, with the addition of some Mig pigment (European dust) to tie everything together. When dry, the various sub-assemblies were attached to each other with absolutely no fit problems, and photographed!
in conclusion
A beautiful kit. Not without problems, but nothing huge or insurmountable. A complicated build that is best built and painted as sub-assemblies, and is very definitely not for the beginner. For an in-box review of the Dragon 88mm Flak 37: look here Thankyou to Dragon for the review sample.Comments
I agree with the others intirely! What a work.
What should I say?? I love to see your work. This one should be in a dio.
A salute for you!!
NOV 30, 2005 - 01:02 AM
Hi Vinnie,
Fantastic job on the flak gun, you're a constant source of motivation.....
Frank
NOV 30, 2005 - 05:34 PM
Excellent review, Vinnie. Looks like an outstanding model of the 8.8cm Flak 37. Think I might just have to check one out myself
I have the Dragon 8.8cm Flak 36 kit, and that is amazing as well, but have yet to build it. After reading your review, and seeing all the in-progress shots of your kit, I would like to get one.
I wonder why they didnt include a crew with this kit ? Maybe Dragon has a future plan to help us with this ?
Cheers !!
Alpen
DEC 01, 2005 - 12:44 AM
Beautiful work Vinnie, thanks for sharing with us! I must say, I've not had any interest in this kit until seeing yours. I'm now more interested in getting this kit, you're as much an asset to Dragon as you are to Armorama. lol
DEC 01, 2005 - 05:29 AM
Great build/review Vinnie. Your work always is something to behold. I hope you do not give your students as much homework as you seem to enjoy with your building!
Patrick
DEC 01, 2005 - 07:23 AM
great buildup article, Vinnie..
and well presented,too
keep up the nice work..
Best,
Nick
DEC 02, 2005 - 04:41 AM
This is the only Axis kit I have ever had an eye on. I built the ancient Tamiya one many years ago. This new one from DML looks like it would fit quite nicely on the DW Trailer.
Very nice job there Vinnie. Now, either one of two things, get back to work... err never mind, carry on.
DEC 02, 2005 - 01:56 PM
Really, really great build... If only mine looked like this.
The reason I write at all is that I studied a lot of photos (archive and recent), and saw a gun in life.
The chains as I found out on the gun are for chaining the legs when in travelling position - only after building my kit did I saw that particular photo. Also: there is a seam running along in the middle of all legs on the real thing as well (at least on one I actually saw.) - so eliminating them might not be necessary.
I didn't find much photos on Africacorps guns, and the reference books are not much help either in this respect, but I think the real guns were never as worn and weathered. Only after sitting 50 years in front of a museum do they get so battered. (It's just a personal opinion, and doesn't mean I don't awe you and look for all the builds you publish...)
FEB 12, 2006 - 12:53 AM
Hi Vinnie. You really do fantastic work. You know what would set those clear dials off? A little hazyness around the very outside edge. If you ever look at dials on real eqipment that operates outdoors you'll see what I mean. A good place to look is any forklift or construction equipment that work in dirty out in the weather conditions. Just a tip. Your work is very inspiring. Thanks
BH
FEB 12, 2006 - 02:11 AM
Fantastic piece of Artillery there! (Is it possible to even fit one more detail on this thing!) Great job man! I'm at a loss for words...
(I'd love to know, what exactly is your wash made up of...The rust is just so realistic!)
MAR 04, 2006 - 10:04 AM
Copyright ©2021 by Vinnie Branigan. Images and/or videos also by copyright holder unless otherwise noted. The views and opinions expressed herein are solely the views and opinions of the authors and/or contributors to this Web site and do not necessarily represent the views and/or opinions of Armorama, KitMaker Network, or Silver Star Enterrpises. All rights reserved. Originally published on: 2005-11-30 00:00:00. Unique Reads: 24440


