


Hosted by Darren Baker
Project: Sd.Kfz. 7 w.sFH 18 in tow

LonCray

Joined: August 24, 2005
KitMaker: 348 posts
Armorama: 256 posts

Posted: Wednesday, February 13, 2008 - 09:14 PM UTC
Y'know, Dragon has got to be watching this thread and waiting. Once they see maximum effort put into correcting your Tamiya Sd.Kfz 7, they'll announce a new one. Probably a Premium kit, with tons of brass and all accurate and stuff. It'll be absolutely perfect - and just in time to make you want to throw your beautiful accurized Tamiya piece of art at the wall (but don't!)

pipodekloon

Joined: October 12, 2006
KitMaker: 13 posts
Armorama: 12 posts
Posted: Thursday, February 14, 2008 - 01:38 PM UTC
Quoted Text
know, Dragon has got to be watching this thread and waiting. Once they see maximum effort put into correcting your Tamiya Sd.Kfz 7, they'll announce a new one. Probably a Premium kit, with tons of brass and all accurate and stuff. It'll be absolutely perfect
Even the best Dragon kits need a lot of aftermarket sets these days. So I don't worry.
We are making our own aftermarket set.

Bye,
Pipo de Kloon
A Sdkfz 7/1 Crusader


210cav
Joined: February 05, 2002
KitMaker: 6,149 posts
Armorama: 4,573 posts
Posted: Thursday, February 14, 2008 - 07:45 PM UTC
Bill-- what a great job! Very written introduction and follow-on. Appreciate your workmanship.
DJ
DJ
bill_c
Joined: January 09, 2008
KitMaker: 10,553 posts
Armorama: 8,109 posts
Posted: Thursday, February 14, 2008 - 08:45 PM UTC
RE: Dragon making a Sd.Kfz 7: BRING IT ON! How can the prime mover of the Wehrmacht be out-of-print? I've spent $100 total on two kits from eBay sellers, and that doesn't include the after-market upgrades.
Dragon kits need help, too: I put a lot of extra time and money into my projects (not bragging, just a fact), but the Dragon sFH 18 was built mostly out-of-the-box, and is a great model with few errors. I'm confident Dragon could turn out an Sd.Kfz. 7 that would be satisfying to many hobbyists even if it wasn't perfect. After all, unless you're willing to put on brass latches, there will always be room for kits that look good but can still be improved by Lion Roar/Voyager/Eduard, etc.
As to those who like what I've done so far, I'm terribly flattered. There are so many great modelers here on this site, I'm extremely nervous putting my work up for this kind of exposure, and am only doing it so that others can profit from the mistakes I'm making (just learned that the dashboard is wrong and has too much of a gap and needs fixing).
Bill

Outerarm

Joined: September 20, 2007
KitMaker: 240 posts
Armorama: 233 posts

Posted: Monday, February 18, 2008 - 03:09 AM UTC
Hi Bill,
This is probably a little late for you, but here is a link to a pic of the Friulmodel sprocket and links:
There is some really nice detail in the sprocket and the links look pretty good too.
Look forward to seeing more of the build,
Cheers,
Ian
Quoted Text
And finally, here are the Modelkasten road wheels (minus the sprocket wheel, which I haven't decided whether to use or replace with the Friulmodel version).
This is probably a little late for you, but here is a link to a pic of the Friulmodel sprocket and links:
There is some really nice detail in the sprocket and the links look pretty good too.
Look forward to seeing more of the build,
Cheers,
Ian
bill_c
Joined: January 09, 2008
KitMaker: 10,553 posts
Armorama: 8,109 posts
Posted: Monday, February 18, 2008 - 03:27 AM UTC
Ian, the image is too small to view, and clicking on it, the KitMaker forum asks for a password. I'm registered in that forum, but can't make the link to the photo, which I'd very much like to see.
I would purchase the Friulmodel sprocket if I thought it was worth it.
Bill
I would purchase the Friulmodel sprocket if I thought it was worth it.
Bill
Outerarm
Joined: September 20, 2007
KitMaker: 240 posts
Armorama: 233 posts
Posted: Monday, February 18, 2008 - 04:04 AM UTC
Hi Bill,
Ah... uploaded the pic somewhere else, so here you go:

and a detail of the sprocket:

These pics are of the parts straight out of the bag (they turned up today) and the flash is still present on the sprocket, though the links are pretty neat. The sprocket comes in two parts and has a nice knurled effect on the sprocket ring and rivet detail on the inside of the rim. The only thing it doesn't have is the rivets on the inside of the ring.
If you want more pics, please let me know and I'll post some more.
Cheers,
Ian
Quoted Text
Ian, the image is too small to view, and clicking on it, the KitMaker forum asks for a password. I'm registered in that forum, but can't make the link to the photo, which I'd very much like to see.
Ah... uploaded the pic somewhere else, so here you go:
and a detail of the sprocket:
These pics are of the parts straight out of the bag (they turned up today) and the flash is still present on the sprocket, though the links are pretty neat. The sprocket comes in two parts and has a nice knurled effect on the sprocket ring and rivet detail on the inside of the rim. The only thing it doesn't have is the rivets on the inside of the ring.
If you want more pics, please let me know and I'll post some more.
Cheers,
Ian

LUMILO

Joined: February 19, 2008
KitMaker: 8 posts
Armorama: 7 posts
Posted: Monday, February 18, 2008 - 10:54 PM UTC
Hi
i´m Luis
From Bogota, colombia
I am currently developing this project, this topic I will be of much help to resolve some drawbacks and doubts about updates there for sdkfz 7.
i´m Luis
From Bogota, colombia
I am currently developing this project, this topic I will be of much help to resolve some drawbacks and doubts about updates there for sdkfz 7.
Outerarm
Joined: September 20, 2007
KitMaker: 240 posts
Armorama: 233 posts
Posted: Tuesday, February 19, 2008 - 03:20 AM UTC
Hi Luis,
Welcome aboard! As you say, there are quite a few issues with the kits and hopefully between us all we should be able to solve most of the issues. I look forward to seeing your work.
I haven't started my build yet (I'm still in the process of gathering parts and information) but I'm pretty sure I know what I'll need to change. Aside from the AM items, there is lots of scratch buildomh work to be done on the engine compartment, drivers compartment, floor panels, rear and side tool / ammo storage and chassis. TBH, I'm really looking forward to when I start!
Cheers,
Ian
Quoted Text
I am currently developing this project, this topic I will be of much help to resolve some drawbacks and doubts about updates there for sdkfz 7.
Welcome aboard! As you say, there are quite a few issues with the kits and hopefully between us all we should be able to solve most of the issues. I look forward to seeing your work.
I haven't started my build yet (I'm still in the process of gathering parts and information) but I'm pretty sure I know what I'll need to change. Aside from the AM items, there is lots of scratch buildomh work to be done on the engine compartment, drivers compartment, floor panels, rear and side tool / ammo storage and chassis. TBH, I'm really looking forward to when I start!
Cheers,
Ian
bill_c
Joined: January 09, 2008
KitMaker: 10,553 posts
Armorama: 8,109 posts
Posted: Tuesday, February 19, 2008 - 03:40 AM UTC
Quoted Text
Aside from the AM items, there is lots of scratch buildomh work to be done on the engine compartment, drivers compartment, floor panels, rear and side tool / ammo storage and chassis.
Ian, the good news with this project is that builders have choices about how far they want to go. In my case, I am ordering a resin Maffei engine, but am not putting it in this build (I have a second Sd.Kfz. 7 for a PAK 36 88mm Winter Ostfront dio). I have the Eduard tool box upgrade, but am saving that one for the second build as well, since I don't want to bite off more than I can chew to start with.
This discussion is good, because it allows comparisons. I was leaning to the Friulmodel tracks, but started assembling the Modelkasten versions that come with the wheel upgrade today, and I think they will do nicely for both kits. I will include the Friul drive sproket, as it's more accurate than the Modelkasten version-- and will save me snipping off the inner ring and replacing it with the Eduard PE upgrade. Making PE brass into a perfect circle is too much work for me.
Outerarm
Joined: September 20, 2007
KitMaker: 240 posts
Armorama: 233 posts
Posted: Tuesday, February 19, 2008 - 03:57 AM UTC
Hi Bill,
Sounds very familiar! As well as collecting info and parts, I'm also getting in some practice for the build. My list of scratch building was what I want to put into the model -- it will be in a dio with a FlaK 88 in firing position, with the crew unloading ammo, working on the engine and working on the pulley. To get it looking good will require quite a bit of rework on the kit, but I'm sure it will be a fun ride and well worth it at the end.
As for parts, I'm currently waiting for the Modelkasten roadwheels, the R&J engine and sand tires, the Signifier drive track and the Eduard PE. However, having looked over the Eduard stuff, I'm not sure how much I'll end up using.
Indeed, this is my favourite forum thread at the mo! The Friul sprocket is almost identical to the reference pictures I've seen, right down to the mini rollers on the teeth and the small indented circle on the wheel. The only difference I've spotted is that there are more teeth than on the real thing, but I think I can live with that!
I look forward to seeing more of your build -- looking good so far.
Cheers,
Ian
Quoted Text
Ian, the good news with this project is that builders have choices about how far they want to go. In my case, I am ordering a resin Maffei engine, but am not putting it in this build (I have a second Sd.Kfz. 7 for a PAK 36 88mm Winter Ostfront dio). I have the Eduard tool box upgrade, but am saving that one for the second build as well, since I don't want to bite off more than I can chew to start with.
Sounds very familiar! As well as collecting info and parts, I'm also getting in some practice for the build. My list of scratch building was what I want to put into the model -- it will be in a dio with a FlaK 88 in firing position, with the crew unloading ammo, working on the engine and working on the pulley. To get it looking good will require quite a bit of rework on the kit, but I'm sure it will be a fun ride and well worth it at the end.
As for parts, I'm currently waiting for the Modelkasten roadwheels, the R&J engine and sand tires, the Signifier drive track and the Eduard PE. However, having looked over the Eduard stuff, I'm not sure how much I'll end up using.
Quoted Text
This discussion is good, because it allows comparisons. I was leaning to the Friulmodel tracks, but started assembling the Modelkasten versions that come with the wheel upgrade today, and I think they will do nicely for both kits. I will include the Friul drive sproket, as it's more accurate than the Modelkasten version-- and will save me snipping off the inner ring and replacing it with the Eduard PE upgrade. Making PE brass into a perfect circle is too much work for me.
Indeed, this is my favourite forum thread at the mo! The Friul sprocket is almost identical to the reference pictures I've seen, right down to the mini rollers on the teeth and the small indented circle on the wheel. The only difference I've spotted is that there are more teeth than on the real thing, but I think I can live with that!
I look forward to seeing more of your build -- looking good so far.
Cheers,
Ian
bill_c
Joined: January 09, 2008
KitMaker: 10,553 posts
Armorama: 8,109 posts
Posted: Tuesday, February 19, 2008 - 04:27 AM UTC
Quoted Text
However, having looked over the Eduard stuff, I'm not sure how much I'll end up using.
Generally, I'm not as impressed with the Eduard PE material (the engine latches are wrong, for example, as well as the handles for the tool hatches). The good news about Eduard stuff is it's slightly heavier gauge. The Voyager PE, for example, can't take much bending before it snaps off.
Quoted Text
Indeed, this is my favourite forum thread at the mo! The Friul sprocket is almost identical to the reference pictures I've seen, right down to the mini rollers on the teeth and the small indented circle on the wheel. The only difference I've spotted is that there are more teeth than on the real thing, but I think I can live with that!
I'm glad you like it, Ian! I'm having a ball with the project, though its complexity is daunting. Glad I did the sFH 18 oob first.
That's annoying about the teeth on the Friulmodel drive sproket, as otherwise it's much better than the Modelkasten for detail. I guess the question is whether anyone will be counting sprocket teeth!?!
Bill
Outerarm
Joined: September 20, 2007
KitMaker: 240 posts
Armorama: 233 posts
Posted: Tuesday, February 19, 2008 - 05:07 AM UTC
Quoted Text
That's annoying about the teeth on the Friulmodel drive sproket, as otherwise it's much better than the Modelkasten for detail. I guess the question is whether anyone will be counting sprocket teeth!?!
Hehe, you know they will! Actually, I think I made a mistake... There are 14 teeth on the Fruil sprocket, and I think there are 14 on the real thing. It is difficult to check from this pick bit if there is a tooth at each spoke, then there are 14 teeth.
Cheers,
Ian
Outerarm
Joined: September 20, 2007
KitMaker: 240 posts
Armorama: 233 posts
Posted: Tuesday, February 19, 2008 - 06:35 AM UTC
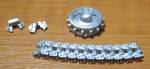
Overhead view of the Friul sprocket:

As I mentioned before, it's pretty accurate.
Cheers,
Ian
As I mentioned before, it's pretty accurate.
Cheers,
Ian
bill_c
Joined: January 09, 2008
KitMaker: 10,553 posts
Armorama: 8,109 posts
Posted: Wednesday, February 20, 2008 - 07:02 AM UTC
Well, I'm ordering the Friulmodel sprockets as they look pretty damn accurate.
Here are some more photos:
This is the drive train with the Modelkasten tracks

Tracks mounted to the road wheels (minus drive sprocket)

PE mounting racks for rifles, anti-skid plates and scratch-built hand grips

Detail of same without clean-up (I'm not satisfied with the bend in the Plastrut rounds for the handrail and may rip out and do over, so I haven't filed the filler putty off yet)

Here are some more photos:
This is the drive train with the Modelkasten tracks
Tracks mounted to the road wheels (minus drive sprocket)
PE mounting racks for rifles, anti-skid plates and scratch-built hand grips
Detail of same without clean-up (I'm not satisfied with the bend in the Plastrut rounds for the handrail and may rip out and do over, so I haven't filed the filler putty off yet)
Outerarm
Joined: September 20, 2007
KitMaker: 240 posts
Armorama: 233 posts
Posted: Wednesday, February 20, 2008 - 09:54 PM UTC
Looking good, Bill. Have you considered brass for the hand rails? May be easier to bend into shape.
Cheers,
Ian
Cheers,
Ian
bill_c
Joined: January 09, 2008
KitMaker: 10,553 posts
Armorama: 8,109 posts
Posted: Thursday, February 21, 2008 - 02:43 AM UTC
Quoted Text
Looking good, Bill. Have you considered brass for the hand rails? May be easier to bend into shape.
I had NOT, Ian, but that might be an option. I was hoping one of our resident masters would have a suggestion on bending plastic (hair dryer?).

mark197205

Joined: November 10, 2003
KitMaker: 1,593 posts
Armorama: 1,465 posts

Posted: Thursday, February 21, 2008 - 03:10 AM UTC
I'm really enjoying following this one Bill, I've got 5 of the various Sdkfz7 kits (2 each the flak and one of the prime mover) in the stash awaiting their turn, I can see it being an expensive business bringing them all up to scratch..... 
On a different note, and I know its too late for your howitzer build but Griffon Model have just announced a set for it see HERE for pics....
On a different note, and I know its too late for your howitzer build but Griffon Model have just announced a set for it see HERE for pics....
bill_c
Joined: January 09, 2008
KitMaker: 10,553 posts
Armorama: 8,109 posts
Posted: Thursday, February 21, 2008 - 03:45 AM UTC
Thanks, Mark, for the bad news about the howitzer!
Seriously, I have added it to my "wish list," though I'm not sure about it for two reasons. First of all, the Dragon kit is very good already, though this upgrade has some nice touches (though at US$26, it's pricey). And second, the diorama I have in mind will make use of camo on the gun and it will be in limber, so the details will be less-visible even to someone looking up-close.
Still, I thank you for pointing this out. Maybe I'll build a second version of the damn thing in battery!
Bill
bill_c
Joined: January 09, 2008
KitMaker: 10,553 posts
Armorama: 8,109 posts
Posted: Thursday, February 21, 2008 - 03:46 AM UTC
PS. Anyone got good photos of the undercarriage of the Sd.Kfz. showing the support I-beams and the drive shafts? The Tamiya kit looks like it was designed to have a small motor drive and gears to make the sucker run.
Outerarm
Joined: September 20, 2007
KitMaker: 240 posts
Armorama: 233 posts
Posted: Thursday, February 21, 2008 - 03:55 AM UTC
Quoted Text
PS. Anyone got good photos of the undercarriage of the Sd.Kfz. showing the support I-beams and the drive shafts? The Tamiya kit looks like it was designed to have a small motor drive and gears to make the sucker run.
I'm still looking for good pics or information sources on this... There are a few examples in the Toadman Sd.Kfz. pics (look at sdkfz7_51, sdkfz7_60, sdkfz7_64 to sdkfz7_71 and sdkfz7_76 to sdkfz7_88) but these are open to interpretation.
Also I think the Tamiya FAMO kit can give some help... have a look at this blog for some pics of the drive shaft and I beam supports (on the second page). Not clear, but some details.
I'll let you know if I find any more.
Cheers,
Ian
bill_c
Joined: January 09, 2008
KitMaker: 10,553 posts
Armorama: 8,109 posts
Posted: Thursday, February 21, 2008 - 04:50 AM UTC
I agree with you, Ian, that the Toadman's photos are not definitive, but the FAMO build photos are helpful about the drive train. Thanks! 
bill_c
Joined: January 09, 2008
KitMaker: 10,553 posts
Armorama: 8,109 posts
Posted: Monday, April 28, 2008 - 11:54 AM UTC
OK, it's been awhile, I apologize for the delay, but if something's worth doing, it's worth RE-doing....
I decided midway through that:
1.) I did not like the Modelkasten plastic tracks (nor their drive sprocket which has one 12 teeth instead of 13 on the real one);
2.) I did not like plastic handles (so I went for brass).
That necessitated doing Friuls, and ripping out the handles. I then decided the grab handles on the side should be there, instead of the open holes on the Tamiya kit. Too bad I didn't fill the holes first!
Then I got intimidated by Marcel's Sd.Kfz. 7/2. What a project!
https://armorama.kitmaker.net/forums/116067&page=1
But I knew I'd started this, so I plugged on.
I also realized I couldn't use the Tamiya undercarriage, so I made a compromise and put in correct struts, but left the "box" frame that runs most of the way inside them. I have no dimensions to the frame, and figured I would be risking trading one innaccuracy for another. My scratch-built struts are larger and thicker than if made with brass, but I simply lacked the tools (and skill) to use real metal. Once the coach is on top, they'll just be shadows under the body.
Here are the photos without cosmetics-- I made a conscious (and agonizing) decision to show my work with no paint, no primer, naked. I'm really nervous because the blemishes all show, and this place has some amazing modelers. Yet I wanted anyone else who's following this to know what I scratch-built and what comes with the aged kit.
First, the overview:

Here is the chassis with the support pylons:


The undercarriage with the AM front-end (poly metal parts and resin tires):

Coach work:


I left the Tamiya gear bins from the kit, but whittled down their oversize a bit. Again, it seemed too much to scratch build new ones, especially as the rear of the vehicle will be covered in camoflage.
Handles (first the plastic ones I ripped out, followed by a close-up of the brass ones):

The handles are slightly out-of-scale, but the next size brass wire down from this one is too thin and won't hold its shape over a length this long.
Tracks (Modelkasten v. Friul). I realize it's an unfair comparison, since the Friuls have been treated with Blacken-It.

Next comes some painting to make this mess look presentable and like the workhorse of the Wehrmacht it is.
I decided midway through that:
1.) I did not like the Modelkasten plastic tracks (nor their drive sprocket which has one 12 teeth instead of 13 on the real one);
2.) I did not like plastic handles (so I went for brass).
That necessitated doing Friuls, and ripping out the handles. I then decided the grab handles on the side should be there, instead of the open holes on the Tamiya kit. Too bad I didn't fill the holes first!
Then I got intimidated by Marcel's Sd.Kfz. 7/2. What a project!
https://armorama.kitmaker.net/forums/116067&page=1
But I knew I'd started this, so I plugged on.
I also realized I couldn't use the Tamiya undercarriage, so I made a compromise and put in correct struts, but left the "box" frame that runs most of the way inside them. I have no dimensions to the frame, and figured I would be risking trading one innaccuracy for another. My scratch-built struts are larger and thicker than if made with brass, but I simply lacked the tools (and skill) to use real metal. Once the coach is on top, they'll just be shadows under the body.
Here are the photos without cosmetics-- I made a conscious (and agonizing) decision to show my work with no paint, no primer, naked. I'm really nervous because the blemishes all show, and this place has some amazing modelers. Yet I wanted anyone else who's following this to know what I scratch-built and what comes with the aged kit.
First, the overview:
Here is the chassis with the support pylons:
The undercarriage with the AM front-end (poly metal parts and resin tires):
Coach work:
I left the Tamiya gear bins from the kit, but whittled down their oversize a bit. Again, it seemed too much to scratch build new ones, especially as the rear of the vehicle will be covered in camoflage.
Handles (first the plastic ones I ripped out, followed by a close-up of the brass ones):
The handles are slightly out-of-scale, but the next size brass wire down from this one is too thin and won't hold its shape over a length this long.
Tracks (Modelkasten v. Friul). I realize it's an unfair comparison, since the Friuls have been treated with Blacken-It.
Next comes some painting to make this mess look presentable and like the workhorse of the Wehrmacht it is.
Outerarm
Joined: September 20, 2007
KitMaker: 240 posts
Armorama: 233 posts
Posted: Tuesday, April 29, 2008 - 01:00 AM UTC
Glad to see that you have picked this one up again Bill. Have to say its looking good and you've done a great job on the struts. Looking forward to the painting!
Cheers,
Ian
Cheers,
Ian
bill_c
Joined: January 09, 2008
KitMaker: 10,553 posts
Armorama: 8,109 posts
Posted: Tuesday, April 29, 2008 - 01:21 AM UTC
Thanks, Ian. Much work still to do, but I feel the worst is behind me. Am looking forward to Trumpeter's version when it comes out in June. Can't be any harder!
 |

WEB HOSTING BY


Copyright ©2021 Armorama and Kitmaker Network, a subsidiary of Silver Star Enterprises
All Rights Reserved. Please read our Conditions of Use and Privacy Policy.
All Rights Reserved. Please read our Conditions of Use and Privacy Policy.