Armor/AFV: Allied - WWII
Armor and ground forces of the Allied forces during World War II.
Hosted by Darren Baker
Build Log - Tamiya 1/35 Char B1 bis
Spiff
Visit this Community
Nevada, United States
Joined: September 07, 2002
KitMaker: 807 posts
Armorama: 671 posts
Posted: Monday, October 27, 2008 - 10:13 AM UTC

Quoted Text

Beautiful build and blog, Scott. Looking forward to the finish (get it done by the 1st!)


Thanks guys. And I'm tryin' man, I'm tryin'! Non-hobby stuff keeps getting in the way!
Spiff
Visit this Community
Nevada, United States
Joined: September 07, 2002
KitMaker: 807 posts
Armorama: 671 posts
Posted: Tuesday, October 28, 2008 - 04:17 AM UTC
The decals are finished on the lower hull. I ran into a problem with the turret though. There are three big blue heart decals that need to go on the sides and back of the turret. Unfortunately, there is a lifting hook on the left side that is right where one of the hearts is supposed to go. I had to pry the hook off so I could get the decal on, and was planning on just reattaching the hook after and painting it blue. I managed to damage the side of the turret in the process as the lifting hook was very securely attached to the turret. I applied Mr. Surfacer last night (two applications), sanded it down this morning and repainted that side. Hopefully the paint will be dried and stable enough to get the decals on as soon as I get home tonight. I'm going to go ahead and start weathering the hull, which is fine because it's going to be a lot filthier than the turret.


Spiff
Visit this Community
Nevada, United States
Joined: September 07, 2002
KitMaker: 807 posts
Armorama: 671 posts
Posted: Friday, October 31, 2008 - 05:44 AM UTC
I had minor surgery yesterday to remove a cyst which was the result of a spider bit about 18 years ago. :shock: The surgery went fine and the pain isn't too bad... yet... the Vicodin have been seeing to that. :8:

Here are a few photos after the dust coat from the other day. I was way too busy yesterday to get these posted. I'm actually much farther along than these photos show. Several oil washes have been done and I'm just about to apply another dust coat (which will be the first on the turret). I was finally able to get the blue heart decal to settle down over the hatch/visor on the turret. The lifting hook has been reattached over the decal and painted blue as well. I'll post the new pics in a little bit. We're going to go early vote (McCain!) this morning and its my wife's birthday today!


spongya
Staff MemberAssociate Editor
MODELGEEK
Visit this Community
Budapest, Hungary
Joined: February 01, 2005
KitMaker: 2,365 posts
Armorama: 1,709 posts
Posted: Friday, October 31, 2008 - 06:14 AM UTC
Damn it. Now I have to get one of these things, too
Beautiful tank, Scott. I really like it, and it's coming together pretty nicely.
(Incidentally, there are no interiors available, are there?)
SIRNEIL
Visit this Community
England - South East, United Kingdom
Joined: July 30, 2007
KitMaker: 658 posts
Armorama: 599 posts
Posted: Friday, October 31, 2008 - 06:36 AM UTC
hi scott

the b1 is looking really good now. that light dust coat has really toned down the decals and camo.
looking forward to more pictures..............
neil....
Spiff
Visit this Community
Nevada, United States
Joined: September 07, 2002
KitMaker: 807 posts
Armorama: 671 posts
Posted: Friday, October 31, 2008 - 06:41 AM UTC
Thanks guys, just wait until you see the next series of photos. The oil washes are really adding a lot to the look, as is the dust coat I'm about to apply. More pics in a bit.
Spiff
Visit this Community
Nevada, United States
Joined: September 07, 2002
KitMaker: 807 posts
Armorama: 671 posts
Posted: Friday, October 31, 2008 - 08:03 AM UTC
Here are some updated photos as my Char appeared yesterday evening. Keep in mind no weathering had been done on the turret at this point as I was still in the process of repairing the damage from removing the lifting hook and getting the heart decals to hunker down. The hull has received a couple of oil washes using turpenoid and burnt umber oils.

I went to put on the tracks, only to find the runs 4 links short! That's what I get for following the instructions and not dry fitting...... I've quickly assemble the sections, painted them, dry brushed and applied a wash. I'll be putting the track sections on shortly. Then comes another dust coat and some dot/streak washes.


Spiff
Visit this Community
Nevada, United States
Joined: September 07, 2002
KitMaker: 807 posts
Armorama: 671 posts
Posted: Friday, October 31, 2008 - 10:56 AM UTC
Cruising right along. The tracks have been installed and I put down another dust coat making it heavier as you go down the sides of the tank. I still need to do some oil washes on the turret and next up will be an attempt to get the streaks of mud and goo going down the huge flanks before we go early vote and take my wife out to dinner for her birthday.


ppawlak1
Visit this Community
Victoria, Australia
Joined: March 14, 2006
KitMaker: 1,973 posts
Armorama: 1,843 posts
Posted: Friday, October 31, 2008 - 11:03 AM UTC
Scott lovely work !

You gotta love the Char B1 bis it is such a great looking tank and yours is awesome.

The rest of the weathering etc will be interesting to see.

spongya
Staff MemberAssociate Editor
MODELGEEK
Visit this Community
Budapest, Hungary
Joined: February 01, 2005
KitMaker: 2,365 posts
Armorama: 1,709 posts
Posted: Friday, October 31, 2008 - 11:27 AM UTC
Hi,
I just read your posts (not just skipping over the text, and looking at the photos)... I hope you're OK after the operation (what spider causes cysts??).
It's a really nice model as it is now; very good work.
One question: when you refer to dusting, do you spray dust color/tan over lightly, or actually use pigments?
Thanks
Spiff
Visit this Community
Nevada, United States
Joined: September 07, 2002
KitMaker: 807 posts
Armorama: 671 posts
Posted: Friday, October 31, 2008 - 01:07 PM UTC

Quoted Text

Hi,
I just read your posts (not just skipping over the text, and looking at the photos)... I hope you're OK after the operation (what spider causes cysts??).
It's a really nice model as it is now; very good work.
One question: when you refer to dusting, do you spray dust color/tan over lightly, or actually use pigments?
Thanks


Thanks guys. The cyst I would imagine is a result of the pocket of "dead" flesh. It must have been a pretty foul spider. Can you believe that sucker is still haunting me 18 years later?!?

For the dust coats I usually use Tamiya XF-60 Dark Yellow or XF-57 Buff depending on the tint I want for the dust. I usually use about 2ml of X-20A thinner in the cup and add .1 to .2ml of paint. I keep if very thin. Then I just lightly dust the entire tank, keeping the airbrush moving so the thinner doesn't build up and pool. I also focus more attention on the lower half, especially on this vehicle as those slab sides we're usually very filthy from dust and mud.
pzcreations
Visit this Community
Georgia, United States
Joined: May 24, 2006
KitMaker: 2,106 posts
Armorama: 1,116 posts
Posted: Saturday, November 01, 2008 - 04:01 AM UTC
awesome build... I mustve missed this post until today ..since Ive been working on one of these the past few days.. I was surprised at the ease of this kit.. I finished assembly in a mere six hours..including the tracks and cleanup of all parts! cant wait to see yours finished. the paint looks great!
Spiff
Visit this Community
Nevada, United States
Joined: September 07, 2002
KitMaker: 807 posts
Armorama: 671 posts
Posted: Saturday, November 01, 2008 - 04:24 AM UTC
Thanks Tim!

Here are a few shots after some "mud washes". I wish I had some MIG pigments in the stash as I think they would be perfect for the effect I'm looking for. Unfortunately I was building the Char for the Blitzkrieg GB over at Armorama and didn't think of using them until it was too late to order them in time. Basically what I did for the mud streaks is put little blobs of Burnt Umber and Raw Sienna oils on the top of the slab sides just under the tracks. Then using just straight turpenoid and a wide brush I dabbed the turpenoid loaded brush along the edge of blogs so the pigments would run down the sides. I also put a blob of burnt umber in each of the mud shoots and ran turpenoid through the shoots from the top (since I had opened them up earlier in the build [:)] )


marsiascout
Visit this Community
Noord-Brabant, Netherlands
Joined: March 24, 2008
KitMaker: 1,247 posts
Armorama: 913 posts
Posted: Saturday, November 01, 2008 - 06:54 AM UTC
Though I don't know if this is realistic, I do know it looks damn good!

Lars
Spiff
Visit this Community
Nevada, United States
Joined: September 07, 2002
KitMaker: 807 posts
Armorama: 671 posts
Posted: Saturday, November 01, 2008 - 07:01 AM UTC

Quoted Text

Though I don't know if this is realistic, I do know it looks damn good!

Lars


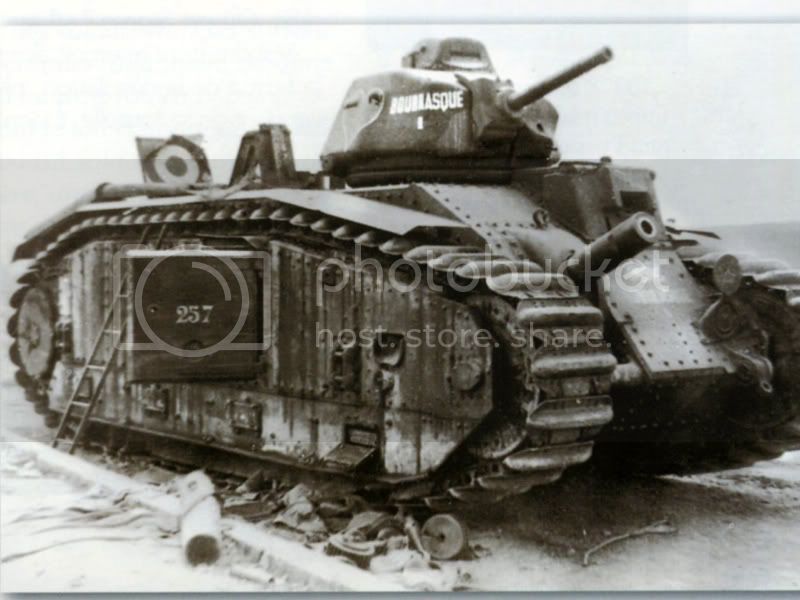
Here's another great pic of Bourrasque as it appeared at the time of it's capture. I'd love to be able to replicate the streaks of mud and goo coming down the sides like this. I'm just going to have to keep building up the layers.


c5flies
Visit this Community
California, United States
Joined: October 21, 2007
KitMaker: 3,684 posts
Armorama: 2,938 posts
Posted: Saturday, November 01, 2008 - 07:21 AM UTC
Scott, one of your best, and that's saying a lot! Excellent job, and you got it done within a deadline Looking forward to seeing some mud on the brute.
c5flies
Visit this Community
California, United States
Joined: October 21, 2007
KitMaker: 3,684 posts
Armorama: 2,938 posts
Posted: Saturday, November 01, 2008 - 07:23 AM UTC
Oh, and wish Mrs. Spiff a happy birthday

(just had another of those awful things myself!)
Spiff
Visit this Community
Nevada, United States
Joined: September 07, 2002
KitMaker: 807 posts
Armorama: 671 posts
Posted: Saturday, November 01, 2008 - 11:03 AM UTC
Thanks James, I appreciate it. I'm really happy with the way it's turning out. I was a bit nervous after having hand painted the camo. Now that the time pressure is off of me I may try to get some MIG pigments ordered and use them to finish up the mud applications.
Spiff
Visit this Community
Nevada, United States
Joined: September 07, 2002
KitMaker: 807 posts
Armorama: 671 posts
Posted: Monday, November 03, 2008 - 04:55 AM UTC
I just ordered some Warpigs pigments so there will be more updates to this build log in the near future. Thanks for the recommendation James, great review!
Spiff
Visit this Community
Nevada, United States
Joined: September 07, 2002
KitMaker: 807 posts
Armorama: 671 posts
Posted: Sunday, November 09, 2008 - 05:28 PM UTC
The pigments arrived on Friday. I just applied another dust coat and am going in for the kill shortly with the pigments. Here are some shots of the dust coat prior to the final mud applications.


Spiff
Visit this Community
Nevada, United States
Joined: September 07, 2002
KitMaker: 807 posts
Armorama: 671 posts
Posted: Tuesday, November 11, 2008 - 04:47 AM UTC
This was my first time using pigments for weathering and I had a ball with them! I did a little basic experimenting so I could get the hang of applying them dry, wet and dry onto a wet surface. Once I got the feel for how they worked I really went to town developing streaks down those slab sided flanks. I used a combination of techniques and three different shades of pigments from the Warpigs "earth" set - Natural Umber, Natural Sienna and either Light Sienna or Natural Yellow, can't remember which right now (I'm at the office [;)])

Using a wide brush I lightly wetted one section at a time with turpenoid, tipped the tank about halfway on it's side supported by a big bottle cap and a plate edge, then dipped a dry, wide brush into some pigment then gently stroked the brush in downward strokes along the sides gently brushing the pigments in straight lines down the flanks. I continued with that process all they way accross, then repeated for the other side. This gave it the overall basic downward streaking I was looking for as a base, with heavier emphasis on the upper parts.

Using a smaller round brush with a fairly precise point at the end I dipped it into a mix of some darker pigments in a beer bottle cap with just a little turpenoid and more or less painted the darker streaks individually down the sides.

Used more dry pigments and dabbed them all over the tank in random batches using three different colors of pigments. Using a dry short, stiff brush I dabbed it all over the tank to create a good general effect of dryed dirt and mud all over.

With dry pigments and a big brush, I flicked pigments down the sides starting at the trackes on top. Pigment then slid down the sides and stopped along the tops of all the raised surfaces. Using a small, round brush I wicked just a little turpenoid in the areas where the pigments had piled up so the "dirt" would stay and give the 3 dimensional effect of having loose dirt piling up.

Using a mix of turpenoid and pigments I grubbied up the lower part of the tank, especially on the rubber boots at the bottom.

Wetted spots like the drive sprockets with a little turpenoid, dipped a big soft brush in the pigments then flicked the brush at the sprockets without actually touching them. The pigments fleck off just right and look like mud spatters after they hit the wetted sprockets.
I also wicked turpenoid along all the seams and raised detail, again to simulate streaking of water, oil etc. I also just flicked some clean turpenoid in various areas to simulate various stains etc.

I wetted up the chain pretty good and slathered it up with a dry brush dipped in the pigments.

For a first attempt using pigments I am pleased with the results and have a much better understanding of the different ways to apply them and the effect they create. What do you guys think?


marsiascout
Visit this Community
Noord-Brabant, Netherlands
Joined: March 24, 2008
KitMaker: 1,247 posts
Armorama: 913 posts
Posted: Tuesday, November 11, 2008 - 08:21 AM UTC
This is amazing work! The dusting made this vehicle complete and a price winner!

Lars
DAK66
Visit this Community
Tennessee, United States
Joined: April 28, 2006
KitMaker: 286 posts
Armorama: 120 posts
Posted: Tuesday, November 11, 2008 - 09:00 AM UTC
Scott it looks great but i see something that you might want to fix drybrush or brush some silver on the sprocket teeth they look a little unused other than that looks real good .
bill_c
Staff MemberCampaigns Administrator
MODEL SHIPWRIGHTS
Visit this Community
New Jersey, United States
Joined: January 09, 2008
KitMaker: 10,553 posts
Armorama: 8,109 posts
Posted: Tuesday, November 11, 2008 - 09:06 AM UTC
Nifty. Very nice OOB.
SIRNEIL
Visit this Community
England - South East, United Kingdom
Joined: July 30, 2007
KitMaker: 658 posts
Armorama: 599 posts
Posted: Tuesday, November 11, 2008 - 09:24 AM UTC
the B1 looks great scott i like the way that the pigments tone down the whole model but just one thing that i would like to see is for you to make the tracks look metallic.maybe a dry brush or some graphite....
neil......