_GOTOBOTTOM
Armor/AFV: Allied - WWII
Armor and ground forces of the Allied forces during World War II.
Hosted by Darren Baker
Build Log - Tamiya 1/35 Char B1 bis
Spiff
Visit this Community
Nevada, United States
Joined: September 07, 2002
KitMaker: 807 posts
Armorama: 671 posts
Posted: Wednesday, September 24, 2008 - 10:50 AM UTC
I began working on this kit a couple months ago for the Blitzkrieg Group Build and figured I should post this in a build log for those who are interested. I must say this is a really interesting vehicle and has sparked my interest not only with the early days of Germany's Blitzkrieg, but also French Armor, which at the time were more heavily armed and armored than Germany's tanks. The research has been fun as I had known virtually nothing about the Char B1 bis until now.


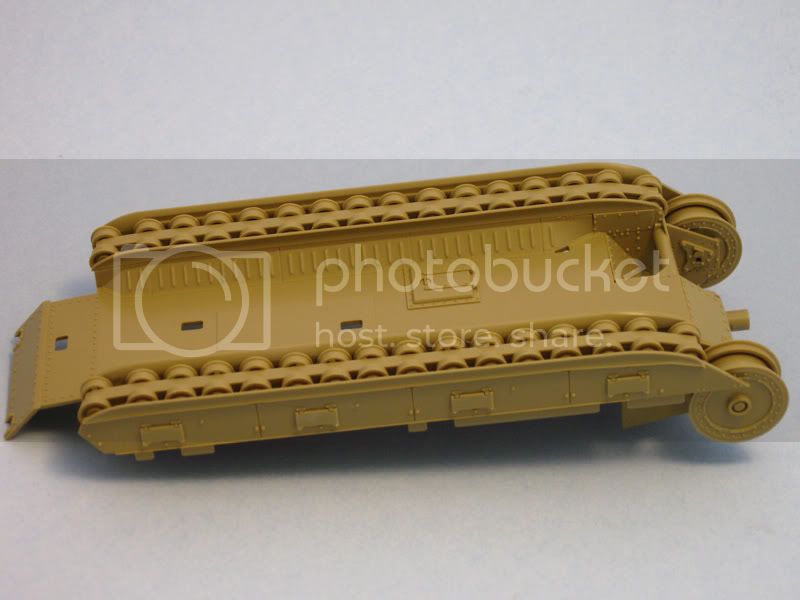
The wheels weren't too difficult. The sprue attachement point on each wheel is right along the edge of the thinnest part. Why they engineered it that way that way I'll never know because it made cleanup a bit tedious as you have to sand the outside of the thin rim, the inside and the outer edge. However, the wheels are pretty much hidden so you don't have to get too carried away with the cleanup because no one will ever notice. I cleaned them up carefully anyway because, well, I felt like being a bit anal about it and it was good practice. Ya, that's what it was.... LOL

The running gear was a little tricky as you have to set the lower hull section onto the rail just right, then carefully flip it all over so it can be glued. I just slid the folded instruction sheet underneath the wheels/rail to keep them from flying everywhere while carefully holding the lower hull section so the wheels stayed put. To keep it simple I did one side at a time.


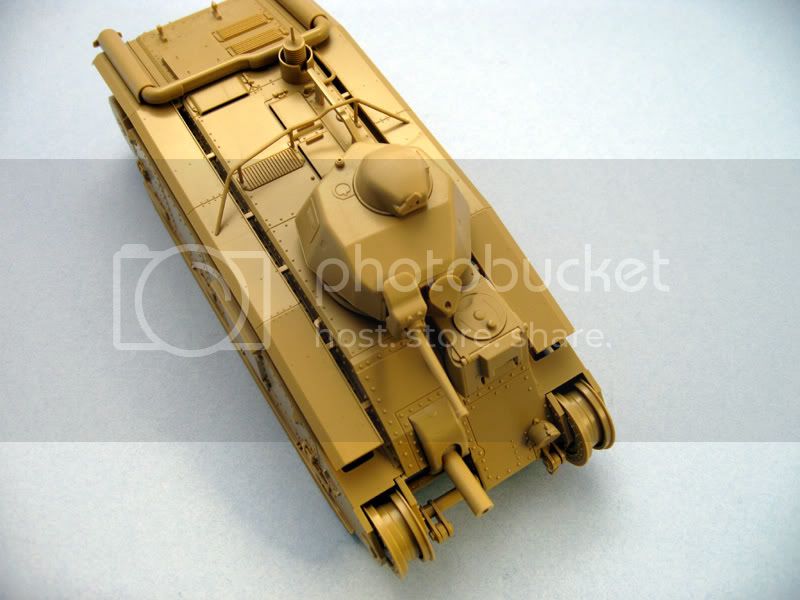
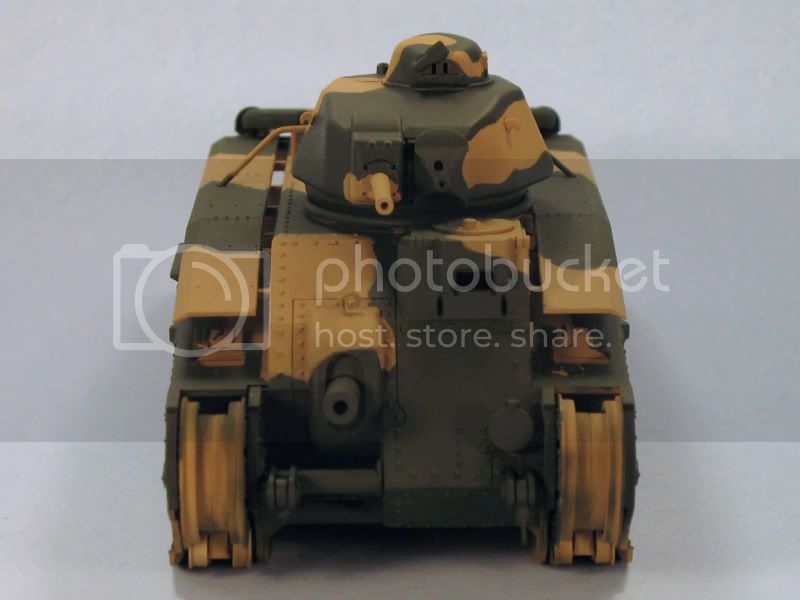
The 75mm gun assembly is very simple, but as always, when there are two barrel halves involved there will be seam work. I carefully cemented the barrel halves together being sure to line them up to minimize the sanding work to keep the barrel round. I used Mr. Surfacer applied with a toothpick which I laid along the seam lines, waited for it to dry then carefully worked away at it with fine grit sandpaper to smooth everything out and keep the barrel round.


The gun assembly attaches very positively into the lower hull section so you'd really have to go out of your way to not install it properly. The lower skirts, skids and hatches were attached at this point as well.


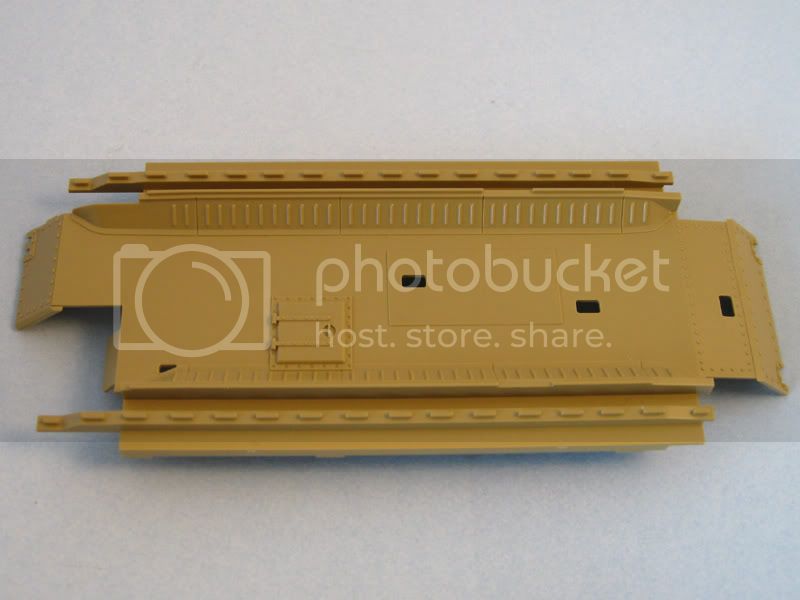
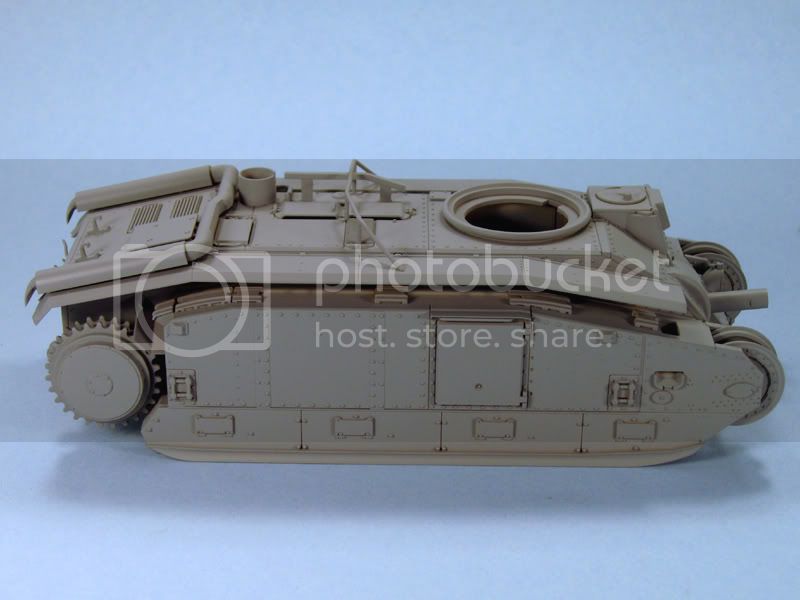
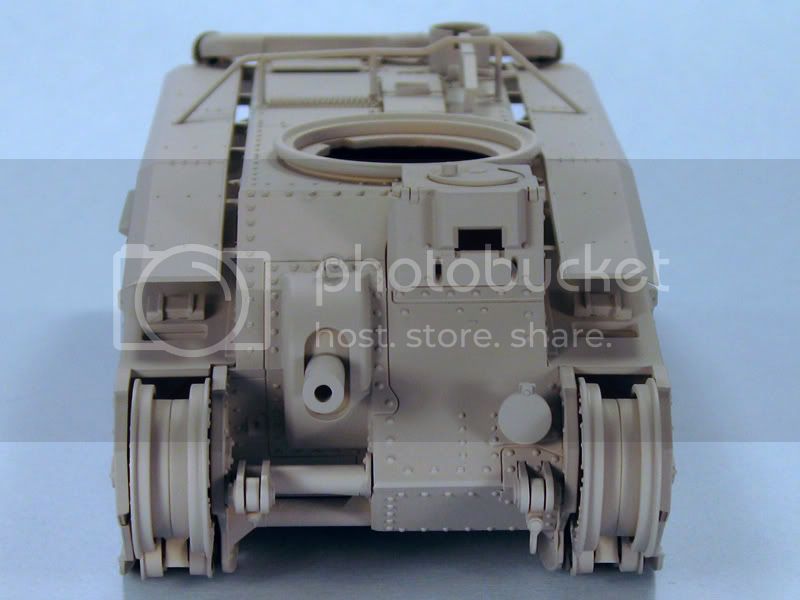
Here are a couple of photos with the hull dry fitted to the lower hull assembly. There are 26 holes that needed to be drilled in the upper hull to provide locating holes for the various parts that will be added in the next steps. If you have a pin vise with a 1mm bit this will go very quickly. There were indentations on the underside of the upper hull section which made it impossible to drill a hole in the wrong place, in theory.


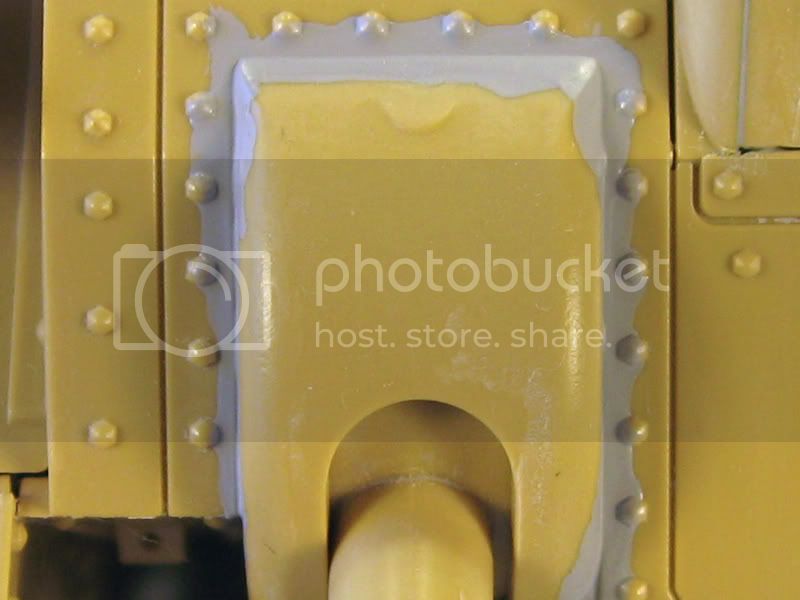
I decided to go ahead and cut out the opening for the mud shoots on the upper housing for the suspension components. I simply used a 1mm bit in my pin vise and used it to create a perforated rectangle slightly smaller than the opening. It was very easy to cut the piece of plastic out with an X-acto knife after having made the perforations. I then carefully used flat and rounded files, in addition to sanding sticks to clear the opening right up to edge of its correct shape. I'm glad I did that as it really adds a lot to the look of the mud shoots, in fact you can see right through them now... way cool. I find it odd that Tamiya makes no mention of cutting out the openings, even though the opening is framed on the underside and clearly should be cut out.


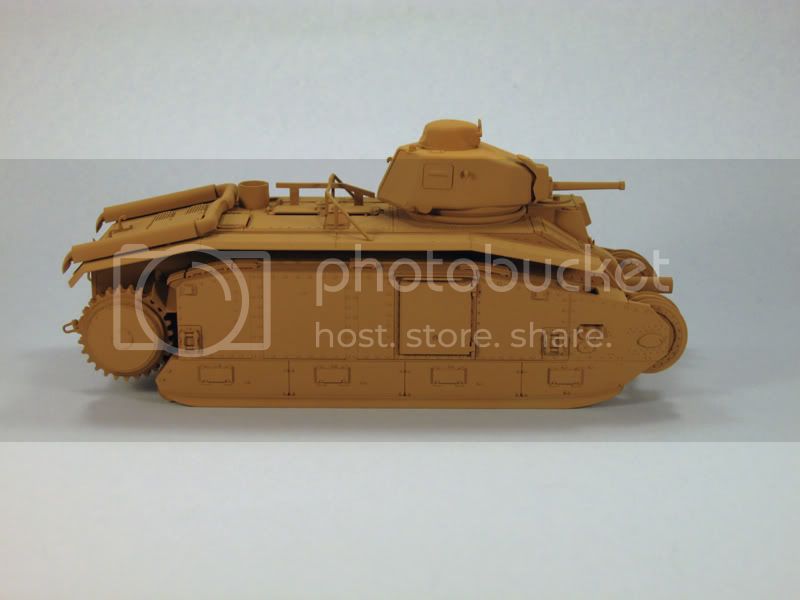
There are a few more detail parts to attach, such as the rear turret hatch, jacks, lifting hooks etc. I also need to fix the seam between the turret and the turret ring. The tow chain will be attached later after painting, but before weathering. This puppy should be ready for paint within the next couple of days.

It sure feels good to be actively modeling again!!!


bill_c
Staff MemberCampaigns Administrator
MODEL SHIPWRIGHTS
Visit this Community
New Jersey, United States
Joined: January 09, 2008
KitMaker: 10,553 posts
Armorama: 8,109 posts
Posted: Wednesday, September 24, 2008 - 10:55 AM UTC
Looking good, Scott. I've been thinking about doing one of these. OOB, eh?
white4doc
#429
Visit this Community
Massachusetts, United States
Joined: October 14, 2003
KitMaker: 1,086 posts
Armorama: 964 posts
Posted: Wednesday, September 24, 2008 - 11:25 AM UTC
Your Char is coming along nicely, Scott. I've been working on mine, too. Unfortunately it's only been off and on for the past month, between working on a couple commission jobs I've been building. I like the kit, and the camo patterns you get to choose from are different than the NATO tri color I'm used to. I really like the no glue indie links, have you gotten to them yet?
Spiff
Visit this Community
Nevada, United States
Joined: September 07, 2002
KitMaker: 807 posts
Armorama: 671 posts
Posted: Wednesday, September 24, 2008 - 11:30 AM UTC
Thanks guys, I appreciate the comments and the interest.

Bill C - Yup, OOB

John Wypyszinski - I'm just about ready to get to work on the links. I've read that they're pretty easy to do, so it should be relatively painless.
ericadeane
Visit this Community
Michigan, United States
Joined: October 28, 2002
KitMaker: 4,021 posts
Armorama: 3,947 posts
Posted: Wednesday, September 24, 2008 - 05:11 PM UTC
Scott: A simple but needed correction to the great Tamiya kit: you need to fill two seams on the driver's armored station. The seam to the immediate right and lower edge of the driver's viewport -- they should be filled in. The entire hood was a single cast piece. The boxtop artwork correctly shows no seams -- you can use that as a reference. If you want a picture, drop me a line OK?
Valerka
Visit this Community
St. Petersburg, Russia
Joined: September 21, 2008
KitMaker: 47 posts
Armorama: 46 posts
Posted: Wednesday, September 24, 2008 - 11:26 PM UTC
Looks good, but will it be easy to paint it fully assembled?
210cav
Visit this Community
Virginia, United States
Joined: February 05, 2002
KitMaker: 6,149 posts
Armorama: 4,573 posts
Posted: Thursday, September 25, 2008 - 12:22 AM UTC
Outstanding work. I am looking forward to seeing how the track and your paint job proceed. Great job!
DJ
Spiff
Visit this Community
Nevada, United States
Joined: September 07, 2002
KitMaker: 807 posts
Armorama: 671 posts
Posted: Thursday, September 25, 2008 - 05:41 AM UTC

Quoted Text

Scott: A simple but needed correction to the great Tamiya kit: you need to fill two seams on the driver's armored station. The seam to the immediate right and lower edge of the driver's viewport -- they should be filled in. The entire hood was a single cast piece. The boxtop artwork correctly shows no seams -- you can use that as a reference. If you want a picture, drop me a line OK?


Thanks for the heads up! I'll take a look at it when I get home and come up with a plan of attack to fix that.
Spiff
Visit this Community
Nevada, United States
Joined: September 07, 2002
KitMaker: 807 posts
Armorama: 671 posts
Posted: Thursday, September 25, 2008 - 05:45 AM UTC

Quoted Text

Looks good, but will it be easy to paint it fully assembled?


Ya, I was a bit concerned about that too, until after I read Bill Plunk's feature article on building this same kit. Normally I would leave things off to facilitate masking and painting. Hopefully I can pull it off!

Thanks for the interest and the comments gentlemen, I appreciate it and it helps keep me motivated!
jimz66
Visit this Community
Connecticut, United States
Joined: December 15, 2006
KitMaker: 1,165 posts
Armorama: 1,105 posts
Posted: Thursday, September 25, 2008 - 07:43 AM UTC
Looking good Scott. I never saw your finished Panther.
Spiff
Visit this Community
Nevada, United States
Joined: September 07, 2002
KitMaker: 807 posts
Armorama: 671 posts
Posted: Thursday, September 25, 2008 - 08:10 AM UTC

Quoted Text

Looking good Scott. I never saw your finished Panther.


Thanks! I'm not finished with the Panther yet, I suddenly got in the mood to finish up the Char B1 bis to clear some space on my staging table (the Blitzkrieg GB deadline was a big motivator here ).
Spiff
Visit this Community
Nevada, United States
Joined: September 07, 2002
KitMaker: 807 posts
Armorama: 671 posts
Posted: Thursday, September 25, 2008 - 09:10 AM UTC

Quoted Text


Quoted Text

Scott: A simple but needed correction to the great Tamiya kit: you need to fill two seams on the driver's armored station. The seam to the immediate right and lower edge of the driver's viewport -- they should be filled in. The entire hood was a single cast piece. The boxtop artwork correctly shows no seams -- you can use that as a reference. If you want a picture, drop me a line OK?


Thanks for the heads up! I'll take a look at it when I get home and come up with a plan of attack to fix that.


I was digging through my Char B1 bis references and noticed that the edge you mentioned just to the right of the drivers view port should be a rounded corner with no "corner" on the edge at all. It should be a smooth, cast curve that starts on the side and curves around to the front and is flush with the front. I'll get that seam filled in and do some careful sanding to blend the curve into the front.

Thanks again for the heads up!
SIRNEIL
Visit this Community
England - South East, United Kingdom
Joined: July 30, 2007
KitMaker: 658 posts
Armorama: 599 posts
Posted: Thursday, September 25, 2008 - 09:38 AM UTC
hi scott

great looking char you have got youself there.
have you seen the latest edition of military minitures in review ? there is a four part article on the char b1 and all are painted in different camo schemes.imo well worth looking into.

neil........
C[ ]
Spiff
Visit this Community
Nevada, United States
Joined: September 07, 2002
KitMaker: 807 posts
Armorama: 671 posts
Posted: Friday, September 26, 2008 - 09:05 AM UTC

Quoted Text

hi scott

great looking char you have got youself there.
have you seen the latest edition of military minitures in review ? there is a four part article on the char b1 and all are painted in different camo schemes.imo well worth looking into.

neil........
C[ ]


Thanks for the tip! I picked up the issue from my LHS today and read the Char B1 bis article during lunch. Mike Rinaldi did a great job on all four of them! I'm going to try a couple of his weathering techniques on this build.

I still need to add the pigtail lifting hook above the 75mm gun and I've also decided to add the bolts around the 75mm gun mantlet. There should also be some bolts around the bottom edge of the commanders viewing cupola. I think I'm going to add the mud scrapers too.

This is going to be a fun weekend of modeling!
Spiff
Visit this Community
Nevada, United States
Joined: September 07, 2002
KitMaker: 807 posts
Armorama: 671 posts
Posted: Monday, October 20, 2008 - 10:26 AM UTC
Man oh man.... I've been dealing with some major problems at our rental property due to the previous tenants and have been tied up with that for almost 3 weeks. It all culminated with some major plumbing/sewer line problems at our rental house which we weren't able to wrap up until late Saturday evening. Needless to say I spent my free time yesterday working on the Char B1 bis, and really needed the break as I was physically pretty wiped out from all the hard labor in addition to working my normal day job. Anyway......

I replicated the pigtail lifting hook for Bourrasque using a wire type item from my wife's misc. craft supply box that already had loops of about the right size in them. It worked perfectly. I just pulled the end of the loop out a bit, carefully filed the tip to a point and then gently bent it back in (but not all the way). I drilled a hole into the plastic to mount it above the 75mm gun on the top of the mantlet assembly and voila, the pigtail lifting hook is good to go! Looking at my reference photos, it was apparent to me that the lifting hooks were crafted individually, and mounted in all sorts of ways so that each tank was unique. Bourrasque's was installed parallel with the front of the tank, with the pigtail point on the front. Other Char's had them flipped the opposite way, or even perpendicular to the front, so check your reference photos if you're building one of these.


I am rapidly running out of time as I'm building this tank for the Blitzkrieg Group Build which ends at the end of this month, so I think I'm going to skip rest of the corrections I had planned (the 6 bolts on the 75mm gun mantlet and the mud scrapers).

The seam corrections are complete as well. I used Mr. Surfacer 1000, Q-tips and 91% Isopropyl Alcohol to fill in the seam errors with this kit. This is a great technique for filling in seams, especially if there is delicate detail in the area or there are hard to reach places. This way you won't damage anything, unlike the fill and sand technique. Just apply the Mr. Surfacer with a toothpick or small brush. After it has dried simply dip the end of a Q-tip in the 91% Isopropyl Alcohol (squeeze a bit off so you don't flood the model) then just gently rub the area where the seam is. It may take a few moments for the alcohol to begin dissolving the Mr. Surfacer, longer if it has thoroughly dried and cured. You may need to apply more Mr. Surfacer and repeat the process a couple of times until the seams are filled to your satisfaction. I did one more application after these photos and carefully cleaned up any Mr. Surfacer residue using Q-tips and the alcohol.


I sprayed on a coat of Tamiya gray primer yesterday evening so now it's ready for the base coat.


GaryKato
Visit this Community
California, United States
Joined: December 06, 2004
KitMaker: 3,694 posts
Armorama: 2,693 posts
Posted: Monday, October 20, 2008 - 01:27 PM UTC
I was going through an armor modeling book and saw a similar technique for filling in small seams. The author (Terry Ashey) used white glue, q-tips, and water (well, spit actually). The holes for the front tow hook mounts on my UE (also for the Blitzkrieg campaign) are a tad bit wider than the part. I was thinking of adding shims to the tow hook mounts but they are really really tiny parts. I'm wondering if I should use the white glue method.

It looks like the coverage of the primer is good with the hull all assembled. I was wondering if you'd get good coverage under the fenders.
wbill76
Visit this Community
Texas, United States
Joined: May 02, 2006
KitMaker: 5,425 posts
Armorama: 4,659 posts
Posted: Monday, October 20, 2008 - 04:36 PM UTC
A neat technique Scott, have to file that one away for future use for tight corners like this. Nice to see you getting in some more bench time on this project, looking forward to the finish!
Spiff
Visit this Community
Nevada, United States
Joined: September 07, 2002
KitMaker: 807 posts
Armorama: 671 posts
Posted: Tuesday, October 21, 2008 - 04:14 AM UTC
Thanks guys. It feels great to FINALLY get in some build time!

I can't take credit for the technique though, I picked it up from the excellent Master Class Model Building Video "Building the Bf 109G-6" by Floyd S. Werner Jr.

The tracks are assembled and I must say, these have got to be the easiest individual track links, they simply snap together. The joins are very strong which allows you to handle the tracks as much as you want without coming apart. I used a medium sanding stick to scuff the highest part of the track links to simulate the scuffing that appears from the tank driving over hard surfaces which can clearly be seen in most good photos of the Char B1 bis.


Spiff
Visit this Community
Nevada, United States
Joined: September 07, 2002
KitMaker: 807 posts
Armorama: 671 posts
Posted: Wednesday, October 22, 2008 - 04:07 AM UTC
The painting has begun! I use Tamiya Acrylics exclusively. The tracks have been sprayed with a 1 to 1 ratio of XF-56 Metallic Gray/XF-64 Red Brown. That mixture was then thinned with X-20A Tamiya thinner in approximately a 50/50 ratio. The base coat has also been sprayed. I used a 2 to 1 ratio of XF-59 and XF-60 Desert Yellow XF-60 Dark Yellow, again thinned to about a 50/50 mix with Tamiya X-20A thinner.


Spiff
Visit this Community
Nevada, United States
Joined: September 07, 2002
KitMaker: 807 posts
Armorama: 671 posts
Posted: Monday, October 27, 2008 - 03:49 AM UTC
Thanks guys. I appreciate the comments and the interest. The tracks were an absolute dream to assemble. They've been painted, and metallic gray has been dry brushed on the upper surfaces.

The camouflage has been painted. Much of it was done by hand so the pattern would have a hard edge to it. I used Tamiya Acrylics (as always) and thinned it a bit more than 50% so it would flow well and be brush mark free. I then painted the outlines for the green striping so I could fill them in using the airbrush, although the turret was done entirely by hand. I got the idea of hand painting the outlines from an excellent article that Mike Rinaldi did documenting his builds of 4 different Char B1 bis in MMiR. I had to go back over some of the tan areas, again with highly thinned paint to fix a bit of the green over spray here and there. Up next, decals!


NICK-NAUPLIO
Visit this Community
Argolis, Greece / Ελλάδα
Joined: March 14, 2008
KitMaker: 67 posts
Armorama: 57 posts
Posted: Monday, October 27, 2008 - 05:13 AM UTC
I like it. Are you going to put any figures on the tank when finished?
TuomasH
Visit this Community
Turku ja Pori, Finland
Joined: September 10, 2008
KitMaker: 470 posts
Armorama: 175 posts
Posted: Monday, October 27, 2008 - 05:19 AM UTC
Nice build of a nice model and nice example, are you going for 2-tone or 3-tone camouflage?
Spiff
Visit this Community
Nevada, United States
Joined: September 07, 2002
KitMaker: 807 posts
Armorama: 671 posts
Posted: Monday, October 27, 2008 - 06:59 AM UTC
Thanks guys. This will be 2 tone, with lots of mud and oil streaking down the sides.
muddyfields
Visit this Community
Scotland, United Kingdom
Joined: February 04, 2006
KitMaker: 884 posts
Armorama: 622 posts
Posted: Monday, October 27, 2008 - 09:37 AM UTC
Hi
Great build. Like what you've done so far.
Camo looks like it will be interesting when finished.
might be tempted to build mine after seeing this build.
c5flies
Visit this Community
California, United States
Joined: October 21, 2007
KitMaker: 3,684 posts
Armorama: 2,938 posts
Posted: Monday, October 27, 2008 - 09:59 AM UTC
Beautiful build and blog, Scott. Looking forward to the finish (get it done by the 1st!)
 _GOTOTOP