_GOTOBOTTOM
Armor/AFV: Axis - WWII
Armor and ground forces of the Axis forces during World War II.
Hosted by Darren Baker
Dragon Tiger 1 Late Prod. w/Zimmerit
Merlin
Staff MemberSenior Editor
AEROSCALE
#017
Visit this Community
United Kingdom
Joined: June 11, 2003
KitMaker: 17,582 posts
Armorama: 903 posts
Posted: Saturday, November 22, 2008 - 07:26 AM UTC


Hi there

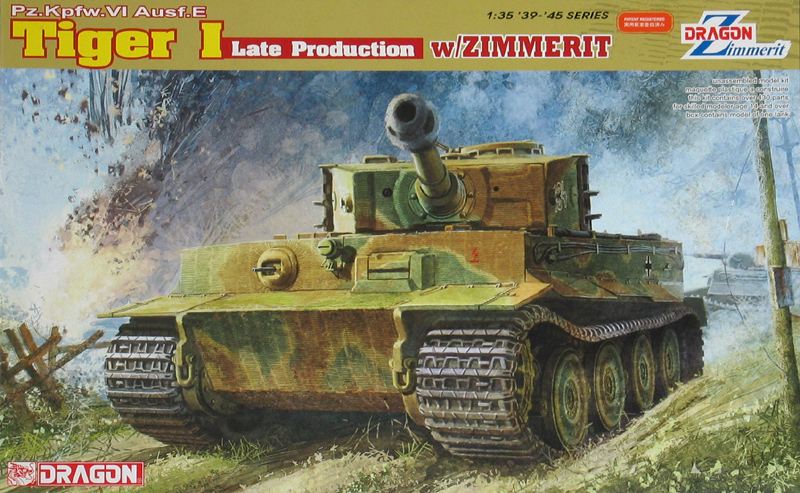
I've made a start on the new version of Dragon's Tiger, reviewed HERE. Being primarily an Aircraft modeller, this will all be pretty much new territory for me, so I hope you'll make the necessary allowances.

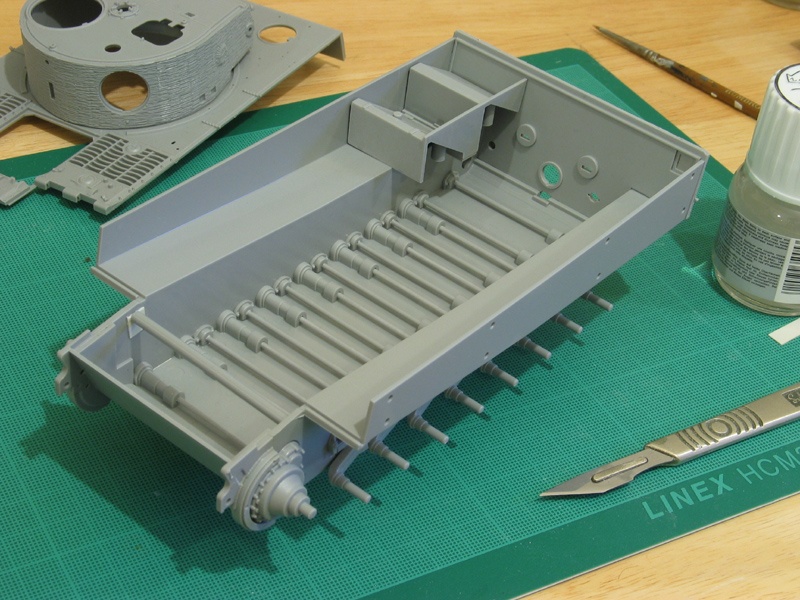
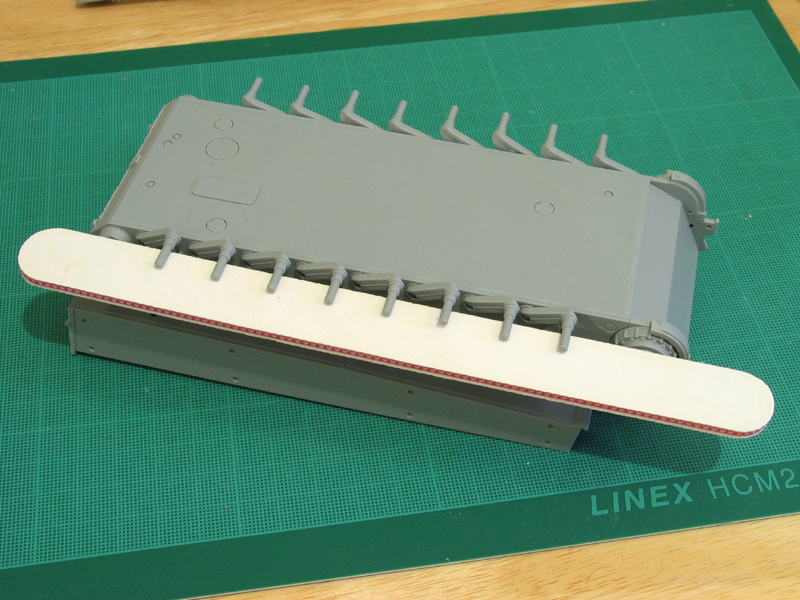
The main hull and suspension has gone together neatly enough:


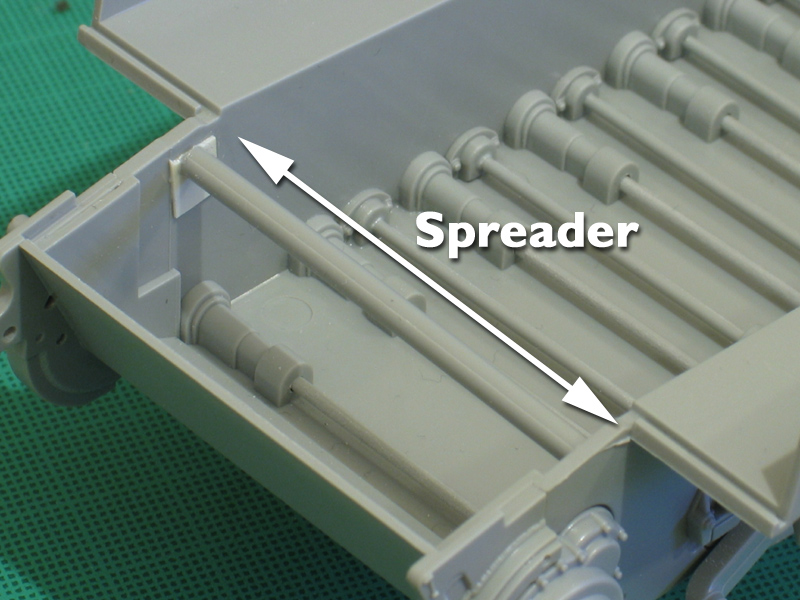
As I noted in the review, the hull sides bow inwards. The rear is taken care of when the end section (Part D3) is added, but I've fitted a spreader bar at the front to help keep things parallel:


To begin with, I only attached the suspension rods with a drop of cement at the far end. This allows the arms to flex somewhat and I thought it might allow a realistic degree of movement. But as the day's gone on, I've begun to worry that, left like that, the suspension will be too flimsy and slowly sag under the weight of the finished model - the arms are already settling at noticeably different angles. Therefore I've decided to level everything up, using a sanding stick as a guide, and cement the arms firmly in place:


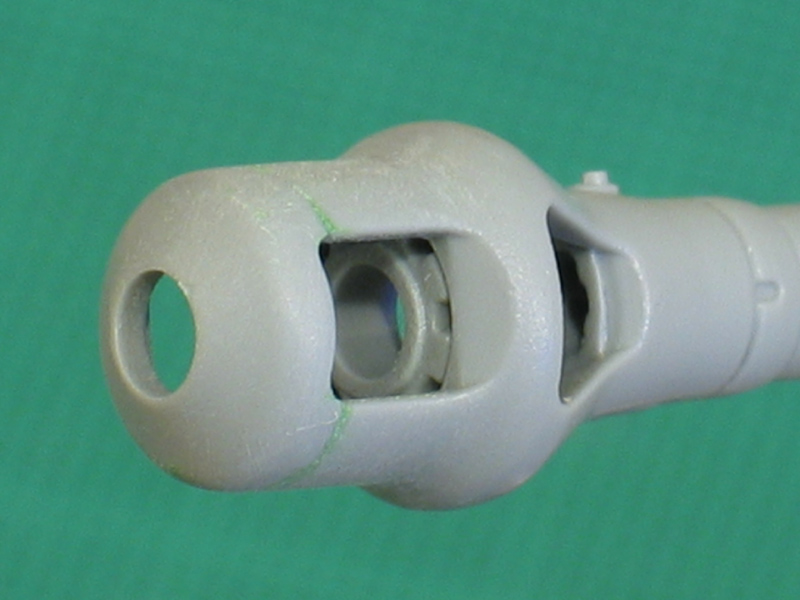
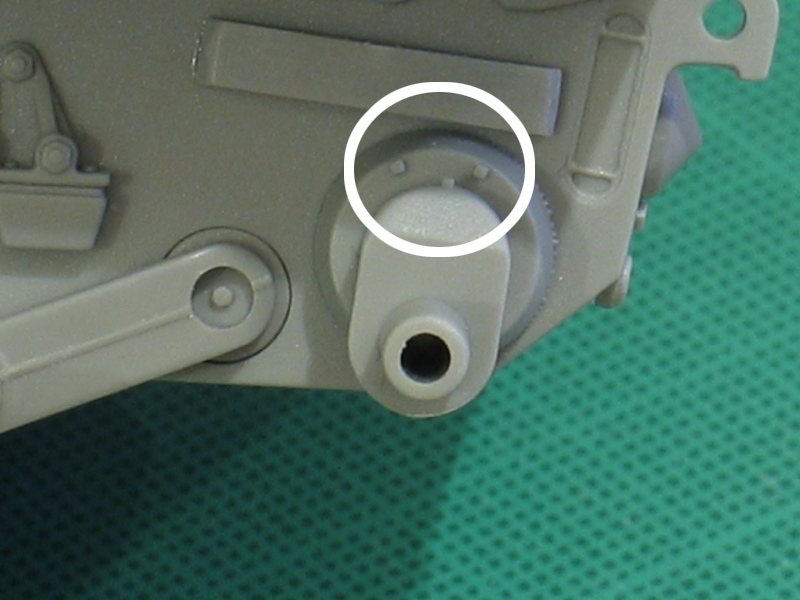
Now here I'll have to risk showing my ignorance of tank anatomy. I presume the full-sized rear tensioning wheel was adjustable between the two raised stops? The kit parts (B26) are loose with a much greater arc of travel. Anyway, here's my beginner's question before I cement them in place: Was there a standard "neutral" position for a tank at rest, or is anything between the stops fine (presumably the same on both sides...)?


All the best - and I'll blunder on now...

Rowan

wbill76
Visit this Community
Texas, United States
Joined: May 02, 2006
KitMaker: 5,425 posts
Armorama: 4,659 posts
Posted: Saturday, November 22, 2008 - 07:38 AM UTC
Rowan,

I strongly recommend not gluing the idler post into position until you're ready to fit the tracks. I can't answer your question about the "real" limit of travel between the two bump stops but, in order to get the right sag with the DS tracks, leavin the idler able to be positioned freely will save you some headaches when it comes time to secure everything in place. Having the idler in the right tensioned position can make or break this area and if you fix it in the wrong spot, you're stuck!
Byrden
Visit this Community
Wien, Austria
Joined: July 12, 2005
KitMaker: 2,233 posts
Armorama: 2,221 posts
Posted: Saturday, November 22, 2008 - 07:45 AM UTC
As Bill says, don't glue until you're doing the tracks - just like the real thing. And you will have to cut off at least one link. Here's an explanaiton .

David
Merlin
Staff MemberSenior Editor
AEROSCALE
#017
Visit this Community
United Kingdom
Joined: June 11, 2003
KitMaker: 17,582 posts
Armorama: 903 posts
Posted: Saturday, November 22, 2008 - 07:53 AM UTC
Hi Bill and David

Many thanks for that - I'll definitely heed your advice!

All the best

Rowan
bizzychicken
Visit this Community
Wales, United Kingdom
Joined: September 06, 2008
KitMaker: 967 posts
Armorama: 842 posts
Posted: Saturday, November 22, 2008 - 08:00 AM UTC
Hi Rowan , if you hand fixed just 2 of the suspenion arms then the rest could still move and represent ground travel without the Tiger sagging, sort of ballance the fixed arms. 1st and Last, middle 2 depending on contours of the ground work. No problems fixing all of them. The Beast is parked on solid ground Enjoy building her. I am watching, big time. Intrested in getting one of these kits, we will see
SIRNEIL
Visit this Community
England - South East, United Kingdom
Joined: July 30, 2007
KitMaker: 658 posts
Armorama: 599 posts
Posted: Saturday, November 22, 2008 - 08:22 AM UTC
hello rowan

when i first built the dragon tiger late without zimmerit (6406) i wanted to use the ds tracks and i read that if the rear idler is set at its furthest point back (the first plastic notch) then you do not have to cut a link from the track.i then thought about the track sag and how to achieve this with the ds track and i used the magic track former that comes with the kit.i held the ds around the front former and heated it gently with a hair dryer and the ds held its shape when placed around the front drive sprocket.
im looking forward to looking in on this one.
good luck
neil
panamadan
Visit this Community
Minnesota, United States
Joined: July 20, 2004
KitMaker: 1,513 posts
Armorama: 1,449 posts
Posted: Saturday, November 22, 2008 - 11:25 AM UTC
Rowan, I was just thinking of starting one of Dragon's Tiger's, so this will be fun to watch! Dan
Merlin
Staff MemberSenior Editor
AEROSCALE
#017
Visit this Community
United Kingdom
Joined: June 11, 2003
KitMaker: 17,582 posts
Armorama: 903 posts
Posted: Saturday, November 22, 2008 - 11:12 PM UTC
Thanks for the encouragement everyone, it's much appreciated.


Quoted Text

Hi Rowan , if you hand fixed just 2 of the suspenion arms then the rest could still move and represent ground travel without the Tiger sagging...


Hi Geraint. Many thanks for the tip - I'll certainly remember it for future armour builds. Of course, Sodd's Law meant I went ahead a cemented everything solid straight after I logged off, so it's too late for my Tiger - but it will be a shelf-model, so there's no real harm done.


Quoted Text

... i then thought about the track sag and how to achieve this with the ds track and i used the magic track former that comes with the kit.


Thanks Neil - I'll give that a try too. (I have to admit, I was wondering what Parts D23/24 were! (They're shown as not needed for this release.)

Anyway, while the suspension was setting solid(!) , I skipped ahead to Stage 13 in the instructions and built the 88mm gun. Everything went together fine, including the rather pointless (in my opinion) spring-loaded "recoil". Some people seem fed up that Dragon haven't included a turned metal barrel this time, but not having one to compare, I can't comment. The styrene version does have light mould-lines along the barrel, but they disappear with a couple of swipes of a padded sander and the mould halves are perfectly aligned, so the barrel parts have a true circular cross-section:


More later - all the best

Rowan
Byrden
Visit this Community
Wien, Austria
Joined: July 12, 2005
KitMaker: 2,233 posts
Armorama: 2,221 posts
Posted: Sunday, November 23, 2008 - 12:13 AM UTC
For accuracy, you might want to fill that seam at the top rear of the mantlet.

David
Merlin
Staff MemberSenior Editor
AEROSCALE
#017
Visit this Community
United Kingdom
Joined: June 11, 2003
KitMaker: 17,582 posts
Armorama: 903 posts
Posted: Sunday, November 23, 2008 - 12:31 AM UTC
Thanks David - will do.

All the best

Rowan
Merlin
Staff MemberSenior Editor
AEROSCALE
#017
Visit this Community
United Kingdom
Joined: June 11, 2003
KitMaker: 17,582 posts
Armorama: 903 posts
Posted: Sunday, November 23, 2008 - 01:00 AM UTC
Hi again David

I was just exploring your Tiger Info website further - absolutely fantastic! I was wondering if the turret escape hatch sits too proud - probably because of the Zimmerit where the hinge fits? There's actually a gap at the edge allowing you to see inside...


All the best

Rowan
Canjuaan
Visit this Community
Baden-Württemberg, Germany
Joined: June 08, 2007
KitMaker: 228 posts
Armorama: 223 posts
Posted: Sunday, November 23, 2008 - 01:02 AM UTC
Very nice work so far. I'll keep looking on this one.

Regarding the turret's Zimmerit; it may not be the common pattern, but I like the small ridges better, anyway. So I'm pretty happy with the Dragon kit. And who knows if they offer another kit with the bigger turret pattern...
Byrden
Visit this Community
Wien, Austria
Joined: July 12, 2005
KitMaker: 2,233 posts
Armorama: 2,221 posts
Posted: Sunday, November 23, 2008 - 01:17 AM UTC
Something's wrong there... it should sit level with the armour, at the middle.
I suspect they've put zimmerit under the hinge.
Here's a cross-section of how it should be:


David
DAK66
Visit this Community
Tennessee, United States
Joined: April 28, 2006
KitMaker: 286 posts
Armorama: 120 posts
Posted: Sunday, November 23, 2008 - 01:18 AM UTC
Nice build so far Merlin
I would bet that a aftermarket company has already started work on a turret shell replacement for this kit with the larger style corrugations in the zimmerit .
redcobra04
Visit this Community
Virginia, United States
Joined: August 23, 2008
KitMaker: 235 posts
Armorama: 133 posts
Posted: Sunday, November 23, 2008 - 02:33 AM UTC
I dont pretend to know everthimg about Tiger Tanks. I tried something different with part number B26. Took a piece of 1/48 leftover sprue and basically built another torsion bar. Had to sand it down to fit in part B26 also to fit thru the cutout in the hull. Sand alittle at a time until had a snug fit, Glue B26 to the sprue rod and slip thru hull to other side. Leave the other side B26 loose for now. Put on the tracks Set your tension the way you want it . Then you can glue it in place from inside the hull. The secret is make sure to have a snug fit with the Fake Torsion Bar. To loose wont work. Once the hull is on you cant see it anyway.
Merlin
Staff MemberSenior Editor
AEROSCALE
#017
Visit this Community
United Kingdom
Joined: June 11, 2003
KitMaker: 17,582 posts
Armorama: 903 posts
Posted: Sunday, November 23, 2008 - 07:11 AM UTC
Hi Andy

That's a neat idea. Thanks.

It opens up what is probably an obvious question for experienced armour builders: when to fit the tracks? Dragon show fitted in the last stage, after the hull's all sealed up. Would you fit them before attaching the top deck, or is either way good?

All the best

Rowan
redcobra04
Visit this Community
Virginia, United States
Joined: August 23, 2008
KitMaker: 235 posts
Armorama: 133 posts
Posted: Sunday, November 23, 2008 - 07:42 AM UTC
I usally have everthing dry fitted where i paint what i need to the base color. Then i slip it apart. Put my tracks on and adjust the tension and sag.. Then glue B26 from the inside. After its dry reasemble and glue tank together. Once i had the spreader bar in the front every thing went togther easily. Im working on which camo scheme i want, so have not finished painting yet. Yes i did paint my tracks before i installed them. Will do final weathering later.. This item works on this tank, maybe others not sure.
Merlin
Staff MemberSenior Editor
AEROSCALE
#017
Visit this Community
United Kingdom
Joined: June 11, 2003
KitMaker: 17,582 posts
Armorama: 903 posts
Posted: Sunday, November 23, 2008 - 07:29 PM UTC
Thanks Andy

That makes sense. I sprayed a base-coat on the area behind the wheels and the inner faces of the wheels themselves yesterday, so I'll hope to have a bit more progress to show soon.

All the best

Rowan
H_Ackermans
Visit this Community
Gelderland, Netherlands
Joined: July 11, 2006
KitMaker: 2,229 posts
Armorama: 2,221 posts
Posted: Monday, November 24, 2008 - 12:47 AM UTC

Quoted Text

Something's wrong there... it should sit level with the armour, at the middle.
I suspect they've put zimmerit under the hinge.
Here's a cross-section of how it should be:


David


I'm quite a DML-fan, but that would be just too stupid if they did that!

Could you take a picture of the hatch opening in the turret to show if there is an opening in the Zimmerit for the hinge?

[EDIT]
I've already seen it at the first photo here, jeesh, there's no gap.

How is the hinge part itself?

[EDIT 2]
Just checked the parts pics of the inbox review. If E-26 is the part to use, than it is an unmodified hingeparts.

I guess the Xacto knife will be needed, or a micro-chisel.
Merlin
Staff MemberSenior Editor
AEROSCALE
#017
Visit this Community
United Kingdom
Joined: June 11, 2003
KitMaker: 17,582 posts
Armorama: 903 posts
Posted: Monday, November 24, 2008 - 02:29 AM UTC

Quoted Text

Just checked the parts pics of the inbox review. If E-26 is the part to use, than it is an unmodified hingeparts.

I guess the Xacto knife will be needed, or a micro-chisel.


Hi Herbert

The instructions state a choice of E26/E28 for the hinge - both on one of the original (non-Zimmerit) sprues. Yes, I think a little chiselling will be needed to sit the hinge deeper, as though the Zimmerit is applied around it.

All the best

Rowan
bill_c
Staff MemberCampaigns Administrator
MODEL SHIPWRIGHTS
Visit this Community
New Jersey, United States
Joined: January 09, 2008
KitMaker: 10,553 posts
Armorama: 8,109 posts
Posted: Monday, November 24, 2008 - 03:24 AM UTC
Nice work, Rowan, especially for an avowed fly boy!

One comment on the gun: the turned barrel is less of an issue for me now than the muzzle brake. While styrene has come a long way in that regard, I don't see the detail in this particular version to inhibit me from getting an AM barrel for this beauty. I'll know better in the next day or two, but it's just another component from previous DML models that's MIA (including Magic Tracks).
H_Ackermans
Visit this Community
Gelderland, Netherlands
Joined: July 11, 2006
KitMaker: 2,229 posts
Armorama: 2,221 posts
Posted: Monday, November 24, 2008 - 07:29 AM UTC
I think a company starting to offer just the brass muzzlebrakes will have a good take on the market, plastic one piece barrels are just as good as turned aluminum ones, only the intricacy that the metal brakes have is something not yet matched by plastic.

Merlin
Staff MemberSenior Editor
AEROSCALE
#017
Visit this Community
United Kingdom
Joined: June 11, 2003
KitMaker: 17,582 posts
Armorama: 903 posts
Posted: Monday, November 24, 2008 - 08:55 AM UTC
Hi Bill and Herbert

This is how Dragon have tackled the muzzle brake in styrene:


A note of caution: Dragon seem to have got the drawings reversed, because I've used Parts A11, A17 & A18 and they are definitely the larger of the two styles:


I don't know if that also means the parts call-out for the colour schemes is wrong - I don't have any references to go by. That's one for the experts.

Talking of muzzle brakes.. this is a good excuse to ask you - would the inside be polished metal?

All the best

Rowan
H_Ackermans
Visit this Community
Gelderland, Netherlands
Joined: July 11, 2006
KitMaker: 2,229 posts
Armorama: 2,221 posts
Posted: Monday, November 24, 2008 - 09:24 AM UTC
There's just that bit more finesse in etched parts for the inner ring, the detailing is much more delicate. Remember, the muzzle brakes from Aber, Armourscale and such consists of up to 9 or 10 parts, that's not doable in plastic with current methods.

As to the interior of the brake, cleaning barrels is a regular task. Wether that leads to polished barrels, I wouldn't dare to say, my personal idea is not exactly.
bill_c
Staff MemberCampaigns Administrator
MODEL SHIPWRIGHTS
Visit this Community
New Jersey, United States
Joined: January 09, 2008
KitMaker: 10,553 posts
Armorama: 8,109 posts
Posted: Monday, November 24, 2008 - 09:27 AM UTC
Rowan, thanks for showing that.

The problem is the crispness of the molding. As Herbert points out, the one-piece slide-molded barrel is great (though it sounds like Dragon did NOT go that more expensive route in this kit), but styrene can't hold the detail of turned brass like this Armorscale Tiger I (late) barrel:


http://www.armorscale.com/#

I for one would definitely purchase AM muzzle brakes for kits.

Another alternative is to use Tank Workshop's (http://www.tankworkshop.com/Shop/agora.cgi) "flash suppressors" (what we REAL English speakers call "muzzle brakes") for tanks not in combat:


On the question of what color the muzzle would be, they are, of course, silver when new, but even smokeless modern powder will leave some discoloration from scorching and heat, even with cleaning.
 _GOTOTOP