todayīs update:
I got 2 bags with finer material, which I used for covering the whole frame.
Itīs a light-weighting material, perfect to use!
- big bag: "arable land, brown"
- small bag: "scatter material"
At first I mixed the both materials with water and wood-glue, then applied on the frame.
Later I mixed only the glue with water and put it onto the frame, then I scattered the dark-brown material from the small bag on it.
The problem was, to catch the correct color with my cam. Later I will make some more photos, when itīs dry.
Soeren
Armor/AFV
For discussions on tanks, artillery, jeeps, etc.
Hosted by Darren Baker, Mario Matijasic
Trumpeter 10cm s.K. 18 cannon
Gorizont
Sachsen, Germany
Joined: November 28, 2007
KitMaker: 1,462 posts
Armorama: 1,289 posts
Joined: November 28, 2007
KitMaker: 1,462 posts
Armorama: 1,289 posts
Posted: Monday, February 02, 2009 - 08:22 AM UTC
Gorizont
Sachsen, Germany
Joined: November 28, 2007
KitMaker: 1,462 posts
Armorama: 1,289 posts
Joined: November 28, 2007
KitMaker: 1,462 posts
Armorama: 1,289 posts
Posted: Thursday, February 12, 2009 - 08:30 AM UTC
Perhaps some of you had seen it... I unfortunely changed the plans for my dio.
At first, I had the idea, to use a nearly flat plane for the ground; now I have a "rough" terrain. ;-)
One year ago, I bought a small packet with "snow" from "Busch".
For painting the gun, I want to use Revellīs "Panzergrau" using an airbrush.
The white-wash is planned with a matted white, using a simple shortened brush or something like that.
Perhaps the gun gets a light snow covering, after all.
Soeren
Gorizont
Sachsen, Germany
Joined: November 28, 2007
KitMaker: 1,462 posts
Armorama: 1,289 posts
Joined: November 28, 2007
KitMaker: 1,462 posts
Armorama: 1,289 posts
Posted: Friday, February 13, 2009 - 03:40 AM UTC
Again I deleted some pictures to get more store-space.
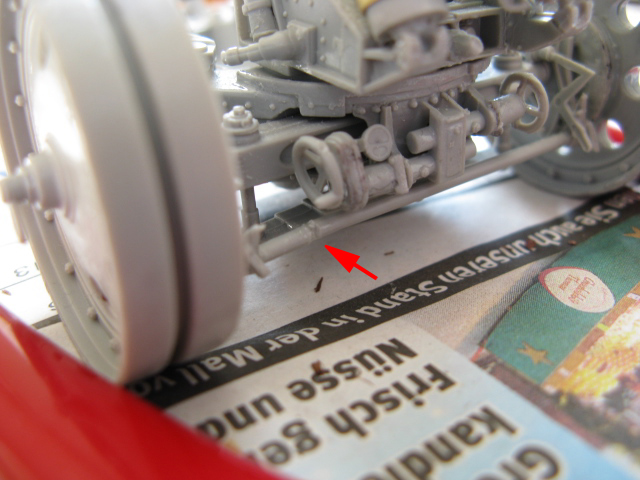
The next step before painting, I carefully removed the rubber-rims from all wheels and corrected the wheel-adjustment. I cut away a small part from the rod, which is probably too long, and/or wrong glued by me.
Now there is less "resistance" to the wheels. Perhaps I can hide the "result" with some dirt or snow. (see red arrow)
The main-weels lost their track-accuracy over the time, which looked a bit strange. Also on other Trumpeter and Dragon-kits, I saw this "phenomenon".
Gorizont
Sachsen, Germany
Joined: November 28, 2007
KitMaker: 1,462 posts
Armorama: 1,289 posts
Joined: November 28, 2007
KitMaker: 1,462 posts
Armorama: 1,289 posts
Posted: Saturday, February 21, 2009 - 09:05 AM UTC
next update.
Yesterday, I covered my dio-ground with a first layer of Busch-snow-powder. The next session will follow, when the gun is completed. Also I can make some small repairs or adjustents for the place of the gun itself. (flat parts and some tracks in the snow !)
I applied the powder using thinned wood-glue on a thick bush. Then its easy to pour the powder with a "metallic filter" (round kitchen-tool) over the terrain.
...let it snow...
With the new Revell-colors, I painted today the gun with my Badger-100 airbrush. The colors are very fine!
Fast-drying (1-3 hours), easy to use and nearly "in-smell-able". ;-) My last use of the airbrush with older colors was some years ago.
my airbrush (Badger-100GXF)
painted gun
For tomorrow, I planned to make a whitewash of the gun using a simple bush.
Comments are welcome.
Soeren
Gorizont
Sachsen, Germany
Joined: November 28, 2007
KitMaker: 1,462 posts
Armorama: 1,289 posts
Joined: November 28, 2007
KitMaker: 1,462 posts
Armorama: 1,289 posts
Posted: Sunday, February 22, 2009 - 09:12 AM UTC
Today, Iīve painted the gun and the limber with thinned white. Later I added the rubber-rims to the wheels.
For the gun-cradle I used a simple brush and for reaching covered parts, my airbrush.
nice contrast of the parts
the limber
painted gun with rubber-rims added and darkened barrel-end
The base gets later another covering with "snow" and some refinements.
Also Iīm not sure with painting the rods on the sides of the trail-arms. (I will try it ;-) )
Soeren
Gorizont
Sachsen, Germany
Joined: November 28, 2007
KitMaker: 1,462 posts
Armorama: 1,289 posts
Joined: November 28, 2007
KitMaker: 1,462 posts
Armorama: 1,289 posts
Posted: Saturday, February 28, 2009 - 09:02 AM UTC
the last update... so I think ;-)
Again I covered the base with a snow-layer, for smoothing some parts of it. Also some refinements were made; especially for the parts, where the earth-spades are digged in the ground.
Then I painted parts of the base with a light-grey (mixed of the two colors, which I used for the gun too), to make something like a contrast. When the next layer of snow is applied, the darker contrast-color should partly be visible - so my idea.
But I made a mistake while scattering the "finishing" snow-layer over the terrain. It was to much of it, so that the light grey painted base was no more visible. I decided to use my light-brown scattering-material, which I applied with a brush. (mixed with wood-glue and water)
Also the gun got a covering of snow.
I mixed it with water and painted with a brush, then scratched away to get a special effect.
Because it was a "cruel" to put the rubber-rims back onto the wheels, I also covered them with snow, then scratched away to make a coloring difference.
I didnīt painted the rods and tools on the trailarms. This should be better done before glueing them to the gun. ;-)
Also the shooting-chart (for elevating data, on the left side) has no decals and I donīt have a photo-etched variant.
With this low elevation, my gun has the appearance of a bigger anti-tank gun. ;-)
It was fun to build and perhaps my next project is one of Trumpeterīs announced towed artillery beasts, standing in the desert.
Soeren
PS: (a build-feature will follow)
the base after smoothing with a layer of snow
refinements...
refinements (2)
... tracks in the (wet) snow-powder
underside
after painting with the white-grey mixture
completed dio, after finishing with the scatter-material
completed with gun and limber
overview...
the limber
Posted: Saturday, February 28, 2009 - 09:17 PM UTC
Hallo Sören
looks very nice!!
Maybe you should consider to add some diorama stuff: ammunition, figures, personal equipment ...
all the best
Steffen
looks very nice!!
Maybe you should consider to add some diorama stuff: ammunition, figures, personal equipment ...
all the best
Steffen
Gorizont
Sachsen, Germany
Joined: November 28, 2007
KitMaker: 1,462 posts
Armorama: 1,289 posts
Joined: November 28, 2007
KitMaker: 1,462 posts
Armorama: 1,289 posts
Posted: Sunday, March 01, 2009 - 09:48 PM UTC
Hi Steffen, nice to see you here! ;-)
My idea was, to display the gun itself... without ammo, figures or equipment.
Not to compare with this:
Precision Modelsī sK18 in an "dug position" (gegrabene Stellung)
But some dry plants would be best, to add some "life" into the scene.
(also the painted rods and tools on the sides of the trailarms would be a better look)
greetings from Saxony...
Gorizont
Sachsen, Germany
Joined: November 28, 2007
KitMaker: 1,462 posts
Armorama: 1,289 posts
Joined: November 28, 2007
KitMaker: 1,462 posts
Armorama: 1,289 posts
Posted: Friday, March 13, 2009 - 06:38 AM UTC
Again, I reworked my dio.
Because some parts of the terrain are to smooth, I made some paint-tests with earth-brown colors for a little contrast.
Also I added some small stones. (dark-brown scatter material)
Then I painted parts of the terrain with thinned-wood-glue and partly covered it again with a layer of snow. This time, its finer. Also the gun got some glue and a fine layer of snow.
Now it looks better. ;-)
Photos will follow this weekend.
Soeren
Gorizont
Sachsen, Germany
Joined: November 28, 2007
KitMaker: 1,462 posts
Armorama: 1,289 posts
Joined: November 28, 2007
KitMaker: 1,462 posts
Armorama: 1,289 posts
Posted: Monday, March 16, 2009 - 11:59 AM UTC
Sorry for the delay!
As I wrote, I made some changes with the dio.
At first I painted some parts for a "color-difference" to the brown acre-field.
The wet greenish-brown looks a bit like the "things" from cows. ;-)
In of the photos can be seen one of my two incompleted Proton -rocket models, made of resin. This one gets a new head-part. ;-)
I will paint both (using airbrush) with revellīs new colors.
after painting
wet color looks a bit greenish
after "snowing" ;-)
(frosted limber
earth-spade detail
its new place behind glass
including one of the incompleted rocket models...
overview...
background was covered...
comments are welcome!
greetings...
Soeren
As I wrote, I made some changes with the dio.
At first I painted some parts for a "color-difference" to the brown acre-field.
The wet greenish-brown looks a bit like the "things" from cows. ;-)
In of the photos can be seen one of my two incompleted Proton -rocket models, made of resin. This one gets a new head-part. ;-)
I will paint both (using airbrush) with revellīs new colors.
after painting
wet color looks a bit greenish
after "snowing" ;-)
(frosted limber
earth-spade detail
its new place behind glass
including one of the incompleted rocket models...
overview...
background was covered...
comments are welcome!
greetings...
Soeren
Kastanova
Victoria, Australia
Joined: May 10, 2008
KitMaker: 150 posts
Armorama: 135 posts
Joined: May 10, 2008
KitMaker: 150 posts
Armorama: 135 posts
Posted: Monday, June 15, 2009 - 07:03 PM UTC
You really caught the lone strangth of the weapon, figures would make it busy / like its doing something, its looks great all alone.
cheers,
mat
cheers,
mat
HK_AFV
Hong Kong S.A.R. / 繁體
Joined: April 25, 2009
KitMaker: 454 posts
Armorama: 431 posts
Joined: April 25, 2009
KitMaker: 454 posts
Armorama: 431 posts
Posted: Monday, June 15, 2009 - 07:23 PM UTC
Frankly speaking,
Effort 10/10
Result 6/10 - Over-done with the snow
Diorama 6/10 - Could add a figure or two, equipment, empty shells . . .etc
Paul
Effort 10/10
Result 6/10 - Over-done with the snow
Diorama 6/10 - Could add a figure or two, equipment, empty shells . . .etc
Paul
bill_c
Campaigns Administrator
New Jersey, United States
Joined: January 09, 2008
KitMaker: 10,553 posts
Armorama: 8,109 posts
Joined: January 09, 2008
KitMaker: 10,553 posts
Armorama: 8,109 posts
Posted: Tuesday, June 16, 2009 - 03:15 AM UTC
Nice replication of the painting! Is this the same cradle as their sFH 18 kit?
Gorizont
Sachsen, Germany
Joined: November 28, 2007
KitMaker: 1,462 posts
Armorama: 1,289 posts
Joined: November 28, 2007
KitMaker: 1,462 posts
Armorama: 1,289 posts
Posted: Thursday, June 18, 2009 - 08:39 AM UTC
Nice replication of the painting! Thanks! This was my first try, "covering" the base-paint.
Is this the same cradle as their sFH 18 kit? Yes, both Trumpeter-kits are identical ... except for the barrels (and breech-parts) and the rubber wheel-parts.
Although the dio is finished (I think so), I will add some empty shells... but no crew. I purchased an ammo-set from "big-E". Perhaps a small wooden fence... If I know, where I should place it.
I donīt like "in action"-scenes, so I will not add a crew. Sorry.
It should be a (peaceful) after war find, or the crew were captured or left the gun for some reason.
Iīm not sure, how to add the empty shells. One or two could be partly stuck in the ground. I will see.
Also I have 3 small (1/72) guns, for which I plan to build a scene.
Soeren
PS: I write a build-feature, which is nearly finished. Now I do some "sorting out" the pictures, which I could include. Not every step of building should be shown there.
Also with the content of the text I have some "problems", itīs not really easy for me.
Gorizont
Sachsen, Germany
Joined: November 28, 2007
KitMaker: 1,462 posts
Armorama: 1,289 posts
Joined: November 28, 2007
KitMaker: 1,462 posts
Armorama: 1,289 posts
Posted: Friday, June 19, 2009 - 11:01 AM UTC
Hello to all, some pics for the theme "snow in russia" from Ace-modelīs website:
Also for the 3 other small-scale model kits, I planned small dioramas.
For one of them I printed a drawing on a DIN-A4 page and now itīs ready for acting as a reference for the build.
It would be a shame, to throw away the kits.
greetings...
Soeren
Also for the 3 other small-scale model kits, I planned small dioramas.
For one of them I printed a drawing on a DIN-A4 page and now itīs ready for acting as a reference for the build.
It would be a shame, to throw away the kits.
greetings...
Soeren
Gorizont
Sachsen, Germany
Joined: November 28, 2007
KitMaker: 1,462 posts
Armorama: 1,289 posts
Joined: November 28, 2007
KitMaker: 1,462 posts
Armorama: 1,289 posts
Posted: Thursday, July 02, 2009 - 08:27 PM UTC
Next update...
Some days ago, I purchased my Armorscale ammunition. I decided, to use 2 or 3 empty shells, which are partly covered by snow and mud. Also I could use unused ammo, but Iīm not sure with this. Painting the ammo is very... complex.
Also I tried to scratch-build a partly destroyed wooden-box for the empty shells.
I built a plastic-variant and the other one was made of "thick paper", but was not stable enough.
The wheels will get some rework in addition with the snow. Now I have some nice reference-photos of russian winter and I will try to use them.
Here is an overview of the ammo-set. Left side are 6 armour-piercing-types... right side are high-explosive ones.
greetings...
Soeren
Gorizont
Sachsen, Germany
Joined: November 28, 2007
KitMaker: 1,462 posts
Armorama: 1,289 posts
Joined: November 28, 2007
KitMaker: 1,462 posts
Armorama: 1,289 posts
Posted: Thursday, July 16, 2009 - 01:53 AM UTC
After a break, I continued my work.
I painted 3 empty shells, one was left clean.
Also I planned to make a small wooden transport-box. (made of plastic and "paper")
After some tries, it was stable a bit. The box should only partly be visible, with the empty cartridge inside.
I tried to paint some ammo, but that was not possible. So I will not use them. Also some of the ammo should only be partly visible.
greetings...
Soeren
sgtreef
Oklahoma, United States
Joined: March 01, 2002
KitMaker: 6,043 posts
Armorama: 4,347 posts
Joined: March 01, 2002
KitMaker: 6,043 posts
Armorama: 4,347 posts
Posted: Wednesday, August 26, 2009 - 01:11 PM UTC
Good Job Soeren.
Looking good.
Looking good.
Gorizont
Sachsen, Germany
Joined: November 28, 2007
KitMaker: 1,462 posts
Armorama: 1,289 posts
Joined: November 28, 2007
KitMaker: 1,462 posts
Armorama: 1,289 posts
Posted: Tuesday, September 29, 2009 - 02:13 AM UTC
Back again, in near future I will add the missing pictures and make a small change to another picturehoster and I will "rework" all linked pictures.
Also at the next weekend Iīll try to buy some grass for the landscape and I hope to continue my dio.
greetings...
Soeren
Also at the next weekend Iīll try to buy some grass for the landscape and I hope to continue my dio.
greetings...
Soeren
GALILEO1
Maryland, United States
Joined: April 18, 2006
KitMaker: 1,794 posts
Armorama: 1,431 posts
Joined: April 18, 2006
KitMaker: 1,794 posts
Armorama: 1,431 posts
Posted: Tuesday, September 29, 2009 - 02:24 AM UTC
Hi Soeren,
This thing is looking really good. I thought you were done with it but I see you're still at it. I really like how it came out. I looks just like the boxart. I'm kind of stuck on my Dragon sFH 18 at the moment as I broke both trail arms when I accidentally sat on them (left them on the chair to clean up the bench). I'm planning to use another kit I'll be getting soon for spares so I can finish this thing so I'll be posting to my blog whenever I make some progress.
By the way, those Armorscale pieces look really good! I may have to get some for mine on the next kit I build as the one I'm working on now will be on transport mode.
Again, nice work on this!!
Rob
Gorizont
Sachsen, Germany
Joined: November 28, 2007
KitMaker: 1,462 posts
Armorama: 1,289 posts
Joined: November 28, 2007
KitMaker: 1,462 posts
Armorama: 1,289 posts
Posted: Sunday, October 04, 2009 - 07:47 AM UTC
Quoted Text
Hi Soeren,
This thing is looking really good. I thought you were done with it but I see you're still at it. I really like how it came out. I looks just like the boxart. I'm kind of stuck on my Dragon sFH 18 at the moment as I broke both trail arms when I accidentally sat on them (left them on the chair to clean up the bench). I'm planning to use another kit I'll be getting soon for spares so I can finish this thing so I'll be posting to my blog whenever I make some progress.
By the way, those Armorscale pieces look really good! I may have to get some for mine on the next kit I build as the one I'm working on now will be on transport mode.
Again, nice work on this!!
Rob
Hi, thanks for the nice comments.
I also hat the problem, with a destroyed kit or parts, while cleaning the "work-desk".
Yes, some months ago, I also thought, I would be ready. But I think, I can do some work or refinements on this.
The Armorscale-ammo looks really good, but on my parts, I can not fit the projectiles into the cartridges/shells. But I will only use the cartridges/shells, so I donīt need to paint them.
Yesterday I bought one small bag with 2 wooden boxes, made of wood. So my (plastic) wood-box, which I begun, is no longer for use on the dio-plans.
(Manufacturer: Peddinghaus-decals)
For my other project I bought other nice things, real Basalt (stone).
First picture is the completed box, from the manufacturers webpage.
This is the content, there can be made wood-boxes from the kit. (2 of the wood parts are in the kit!)
Also the next days I will get a packet with more "accesoires" for the dio: some leafes and grass-patches.
I will update and relink the missing photos the next days.
greetings...
Soeren
Gorizont
Sachsen, Germany
Joined: November 28, 2007
KitMaker: 1,462 posts
Armorama: 1,289 posts
Joined: November 28, 2007
KitMaker: 1,462 posts
Armorama: 1,289 posts
Posted: Wednesday, October 07, 2009 - 04:01 AM UTC
Yesterday I got the other things:
Some tree-leaves and grass-patches.
Photos were made through the clear package.
I will see, where to place the grass-patches and what to do with the leaves.
greetings...
Soeren
Some tree-leaves and grass-patches.
Photos were made through the clear package.
I will see, where to place the grass-patches and what to do with the leaves.
greetings...
Soeren
Gorizont
Sachsen, Germany
Joined: November 28, 2007
KitMaker: 1,462 posts
Armorama: 1,289 posts
Joined: November 28, 2007
KitMaker: 1,462 posts
Armorama: 1,289 posts
Posted: Wednesday, October 07, 2009 - 04:17 AM UTC
The first part oft the missing pictures from page 1 were added.
greetings...
Soeren
greetings...
Soeren
Gorizont
Sachsen, Germany
Joined: November 28, 2007
KitMaker: 1,462 posts
Armorama: 1,289 posts
Joined: November 28, 2007
KitMaker: 1,462 posts
Armorama: 1,289 posts
Posted: Wednesday, October 07, 2009 - 08:30 AM UTC
Iīve added the other missing photos from page 1. Thanks to photobucket! ;-)
For placing the grass-patches, I have to remove some snow..
But from the leaves, I would use only a few. The rest of the package I could use for a later dio. (perhaps only a tree in the "scene")
:-)-><
greetings...
Soeren
For placing the grass-patches, I have to remove some snow..
But from the leaves, I would use only a few. The rest of the package I could use for a later dio. (perhaps only a tree in the "scene")
:-)-><
greetings...
Soeren
Gorizont
Sachsen, Germany
Joined: November 28, 2007
KitMaker: 1,462 posts
Armorama: 1,289 posts
Joined: November 28, 2007
KitMaker: 1,462 posts
Armorama: 1,289 posts
Posted: Monday, October 12, 2009 - 10:16 AM UTC
Today, I have added some grass-patches to the ground. Before applying them, some of the light-covered snow was removed to have a solid base.
A new home for the gun.
The grass looks really nice, but the photos cannot show the "look".
The gun is used as a reference-point. (can be seen in the background)
greetings...
Soeren
A new home for the gun.
The grass looks really nice, but the photos cannot show the "look".
The gun is used as a reference-point. (can be seen in the background)
greetings...
Soeren