

Hosted by Darren Baker
DML#6383 Tiger 1 Turret Zimmerit Mod

jimz66

Joined: December 15, 2006
KitMaker: 1,165 posts
Armorama: 1,105 posts
Posted: Sunday, January 04, 2009 - 02:34 AM UTC
Looking very good Phil thanks for taking the time to show us the ins and outs of Zimmeret. Very nice build log.
barkmann424

Joined: November 23, 2008
KitMaker: 357 posts
Armorama: 353 posts

Posted: Sunday, January 04, 2009 - 10:59 PM UTC
Hi James!  And welcome onboard, this crazy Tiger fest!
  Thanks for the words of encouragement, much appreciated.
Right I would like to ask a question of you all! Is there anything else that you would like to see used and compared on this build? As I have been asked if I will be comparing 'after-market' stuff against each other! I never intended this to become a Tiger build dual between AM companies! Thinking about getting the turrets towards completion, has made me think... Barrels, and do we need a comparison on these? I know that a lot of Tiger 1 fans have been grumbling about the lack of DML's excellent metal barrels in some of the recent releases of Tigers, while a lot of modellers are happy with the crisp slide moulded offerings, along with the muzzle brakes that are supplied. I have a supply of DML barrels and a couple of spare Armourscale and Aber sets to hand, I could squeeze in a fourth Tiger for build comparison purposes, but this would have to be seconded back to it's original unit for painting... maybe?
So if anybody can think of anything to compare within this build log, now we are going all the way! I will be very happy to hear from you
  , with your suggestions...
 Phil
Phil
And welcome onboard, this crazy Tiger fest! Thanks for the words of encouragement, much appreciated.Right I would like to ask a question of you all! Is there anything else that you would like to see used and compared on this build? As I have been asked if I will be comparing 'after-market' stuff against each other! I never intended this to become a Tiger build dual between AM companies!
Thinking about getting the turrets towards completion, has made me think... Barrels, and do we need a comparison on these? I know that a lot of Tiger 1 fans have been grumbling about the lack of DML's excellent metal barrels in some of the recent releases of Tigers, while a lot of modellers are happy with the crisp slide moulded offerings, along with the muzzle brakes that are supplied. I have a supply of DML barrels and a couple of spare Armourscale and Aber sets to hand, I could squeeze in a fourth Tiger for build comparison purposes, but this would have to be seconded back to it's original unit for painting... maybe? So if anybody can think of anything to compare within this build log, now we are going all the way!
I will be very happy to hear from you , with your suggestions... Phil 
Warning
Joined: August 15, 2008
KitMaker: 107 posts
Armorama: 76 posts
KitMaker: 107 posts
Armorama: 76 posts
Posted: Monday, January 05, 2009 - 12:13 AM UTC
Quoted Text
Right I would like to ask a question of you all! Is there anything else that you would like to see used and compared on this build?
How about a fully finished and weathered DML OOB zimmed Tiger compared to a fully finished and weathered DML Tiger with your own zimmerit, just so we can see the difference in zimm quality once paint and weathering have been applied.
That might be a lot of work though so maybe just comparing finished and weathered parts might be enough...
barkmann424
Joined: November 23, 2008
KitMaker: 357 posts
Armorama: 353 posts
Posted: Monday, January 05, 2009 - 11:56 PM UTC
Hi Warning! I intend to build three Tigers #6383 with minor mods relating to areas of the zimmerit, just to try and releive that 'wallpaper' look it has mostly around the edges of the parts, it just seems to end abruptly as if it was rendered then skinned onto the parts. So what I intend is to modify small areas to de-clone it! Though it will be in direct comparison with #6406 & #6416 that I will paste myself in the two generaly 'accepted' Tiger 1 zimmerit patterns, I think maybe if the 'Fates' will allow me another #6383 to do the OOB'ie doobie with (it's a Roy Orbison kinda thang!) I could splice it in somewhere, though from what I understand these kitty's are flying off the shelf at a fair old pace, so it could take a couple of weeks to request and recieve! Thanks for the suggestion, and after a short spell doing some 'real work' the kind that pays!  I will post where I am up to later.
On the topic of weathering, has anybody got to the final stages of this on #6363 yet? As with the texture and pattern of the zimmerit being quite sharp and deep, I was thinking about how light the base and wash should be, as natural light will 'shade' such heavy texture more than normal maybe?
Anymore suggestions? Phil.
I intend to build three Tigers #6383 with minor mods relating to areas of the zimmerit, just to try and releive that 'wallpaper' look it has mostly around the edges of the parts, it just seems to end abruptly as if it was rendered then skinned onto the parts. So what I intend is to modify small areas to de-clone it! Though it will be in direct comparison with #6406 & #6416 that I will paste myself in the two generaly 'accepted' Tiger 1 zimmerit patterns, I think maybe if the 'Fates' will allow me another #6383 to do the OOB'ie doobie with (it's a Roy Orbison kinda thang!) I could splice it in somewhere, though from what I understand these kitty's are flying off the shelf at a fair old pace, so it could take a couple of weeks to request and recieve! Thanks for the suggestion, and after a short spell doing some 'real work' the kind that pays! I will post where I am up to later.On the topic of weathering, has anybody got to the final stages of this on #6363 yet? As with the texture and pattern of the zimmerit being quite sharp and deep, I was thinking about how light the base and wash should be, as natural light will 'shade' such heavy texture more than normal maybe?
Anymore suggestions? Phil.
SIRNEIL

Joined: July 30, 2007
KitMaker: 658 posts
Armorama: 599 posts

Posted: Tuesday, January 06, 2009 - 07:52 AM UTC
hi phil
will you be adding any aftermarket extras along the lines of photo etch,tracks & figures....
neil.........

will you be adding any aftermarket extras along the lines of photo etch,tracks & figures....
neil.........

bizzychicken

Joined: September 06, 2008
KitMaker: 967 posts
Armorama: 842 posts

Posted: Tuesday, January 06, 2009 - 08:30 AM UTC
Phil thanks for the wicked thread! Real pleasure to watch., so informative. zimmerit can make or break a build. Bought the Panther D with Zim and have struggled to find real Panther D's with the pattern, found a few. Love the look of the Lion Rior tool, looks alot like the Zim found on late A's and G's. What tools have you found that would be good to use to create the check'red, square pattern found on a lot of A's. Thanks KEEP IT UP great thread Geraint. Love Tiger's too  Also what do you think of the differant stamps out there to make the other patterns like Waffle etc? Looking forward to see paint on your patterns, cant wait, sorry I know thats along way off. I'll just have to keep watching and asking more questions. Cheers and why not make it a Tiger fest, the thread is that good. It would be great to see all the differant AM stuff
Also what do you think of the differant stamps out there to make the other patterns like Waffle etc? Looking forward to see paint on your patterns, cant wait, sorry I know thats along way off. I'll just have to keep watching and asking more questions. Cheers and why not make it a Tiger fest, the thread is that good. It would be great to see all the differant AM stuffbizzychicken
Joined: September 06, 2008
KitMaker: 967 posts
Armorama: 842 posts
Posted: Tuesday, January 06, 2009 - 08:49 AM UTC
Phil, its worth having a look at Spits KT with Zim.The thread is called Bohemian Ends. I think he went for quite light base colours to start, hope this helps with the finnish and weathering.

jlecoure
Joined: December 26, 2008
KitMaker: 8 posts
Armorama: 7 posts

Posted: Tuesday, January 06, 2009 - 12:41 PM UTC
Thank you so much for this incredibly informative thread! Great resource - and the pics and explanations are superb.
barkmann424
Joined: November 23, 2008
KitMaker: 357 posts
Armorama: 353 posts
Posted: Wednesday, January 07, 2009 - 10:16 AM UTC
Hello Neil, Geraint and Jason, thanks for the heads up on the KT weathering, definitely worth a go. I have been looking also at Anthony Sheedy's 'Short Tracked' KT in AFV '40', he used a similar method to finish his excellent Tiger II, colour modulation also crossed mind, due to the light of a bright summers morning in Normandy!

I will use the AM barrels for this along with Voyager and Aber PE sets for the late DML Tiger 1. Figures... Hmmm. I have a few sets destined for this, (I'll list them when I find the boxes) they consist of Tri-star and Dragon, I have been trying to source others that will suit the juxtaposition of the imagery, needed to contrive a scene of spreading alert,anxiety and action as the alarm of approaching foes spreads through the men of the 2./s.SS.Pz.-Abt.101's 'parked' Tigers going about their mornings routines and 'duties'. I was thinking of adding quite a bit of 'humour' into the scene as the men are stopped in their 'tracks' doing whatever they were 'doing'! Alpine and Hornet will definitely be used on this also.
Right onwards into oblivion then...
The second Mantlet has been 'pasted' and here it is, not so far away from the other 'puttied' Mantlet, but not a 'doppelganger'. After a bit of practice you find that you can closely replicate the pattern to suit. You can get a real lot of practice on the 'spare' mantlets you get with Dragon Tigers!

Putty applied in 'pea' sized amounts to either side of the mantlet. With the tools we will be using again!


After a 'rough' application with the artists pallete knife, it is ready for manipulating with a moistened cocktail stick (what would the modeller do without these wonder impliments?) this is done by combining a pushing and rolling method into the 'nooks and crannies' of the complex form of the mantlet and with a similar motion used to push the excess putty away to the edges.


Then after a smoothish (probably not a real word either!) surface is achieved, and to a depth of putty that is about .3 to .5mm deep, the pattern can be simulated with the Lion Roar tools. (I called these die's previously, my mistake they are actually called doe's).


And there you have it! Another zimmerited mantlet! Spellbinding stuff eh! On the last image of the mantlets top surface you will see the pattern has been 'rollered' along the complete upper edge from one side to the other in one continous motion. A lot of AM manufactures produce the pattern on thier resin mantlets rotated the other way through 90 degrees with the pattern continuing in rows. But I have chosen to depict it this in a 'longitudinal' manner to mimic the image of the Mantlet's top shown in the 'Bundesarchiv' image of Wittmann and other Tiger Commanders during the famous 'propaganda' photo shoot.


Once again this area of the Tiger is a little 'camera-shy', I am not saying all Tiger 1's with zimmerit applied had the pattern this way, but some of them did! As we can see on at least this very famous but anonymous Tiger. . Next up is some work to the top edges of the zimmerit on #6383's turret ,assembly of barrels, mantlet,sleeve, gun assembley, hatches and spare track link holders.
Thanks for looking, Phil.
I will use the AM barrels for this along with Voyager and Aber PE sets for the late DML Tiger 1. Figures... Hmmm. I have a few sets destined for this, (I'll list them when I find the boxes) they consist of Tri-star and Dragon, I have been trying to source others that will suit the juxtaposition of the imagery, needed to contrive a scene of spreading alert,anxiety and action as the alarm of approaching foes spreads through the men of the 2./s.SS.Pz.-Abt.101's 'parked' Tigers going about their mornings routines and 'duties'. I was thinking of adding quite a bit of 'humour' into the scene as the men are stopped in their 'tracks' doing whatever they were 'doing'! Alpine and Hornet will definitely be used on this also.
Right onwards into oblivion then...
The second Mantlet has been 'pasted' and here it is, not so far away from the other 'puttied' Mantlet, but not a 'doppelganger'. After a bit of practice you find that you can closely replicate the pattern to suit. You can get a real lot of practice on the 'spare' mantlets you get with Dragon Tigers!
Putty applied in 'pea' sized amounts to either side of the mantlet. With the tools we will be using again!
After a 'rough' application with the artists pallete knife, it is ready for manipulating with a moistened cocktail stick (what would the modeller do without these wonder impliments?) this is done by combining a pushing and rolling method into the 'nooks and crannies' of the complex form of the mantlet and with a similar motion used to push the excess putty away to the edges.
Then after a smoothish (probably not a real word either!) surface is achieved, and to a depth of putty that is about .3 to .5mm deep, the pattern can be simulated with the Lion Roar tools. (I called these die's previously,
my mistake they are actually called doe's).And there you have it!
Another zimmerited mantlet! Spellbinding stuff eh! On the last image of the mantlets top surface you will see the pattern has been 'rollered' along the complete upper edge from one side to the other in one continous motion. A lot of AM manufactures produce the pattern on thier resin mantlets rotated the other way through 90 degrees with the pattern continuing in rows. But I have chosen to depict it this in a 'longitudinal' manner to mimic the image of the Mantlet's top shown in the 'Bundesarchiv' image of Wittmann and other Tiger Commanders during the famous 'propaganda' photo shoot.Once again this area of the Tiger is a little 'camera-shy', I am not saying all Tiger 1's with zimmerit applied had the pattern this way, but some of them did! As we can see on at least this very famous but anonymous Tiger.
. Next up is some work to the top edges of the zimmerit on #6383's turret ,assembly of barrels, mantlet,sleeve, gun assembley, hatches and spare track link holders.Thanks for looking, Phil.
bizzychicken
Joined: September 06, 2008
KitMaker: 967 posts
Armorama: 842 posts
Posted: Thursday, January 08, 2009 - 05:58 AM UTC
Hi Phil . Keep it up, got to get me one of those Lion roar tools. Looking good . Cheers Geraint
barkmann424
Joined: November 23, 2008
KitMaker: 357 posts
Armorama: 353 posts
Posted: Thursday, January 08, 2009 - 11:15 AM UTC
Good evening Geraint! Evening all!
Nothing further to post today as I have not yet uploaded the progress made on the 3 turrets, apparently... I don't know if it is true but you are not supposed to model or talk about Tigers on your anniversary? The mantlets, gun assemblies, lifting pintles etc have been fitted, and photographed, I'll crop and chop them in the morning, and get them posted. So somebody asked about '411' so here it is! I am currently building and fitting CMK and other interior goodies to fill out the fighting compartment and engine bay on this Ko'd abandonned hybrid Tiger,

This is now a lot further on with running gear and barrel detailing completed, and ready to be fitted.
Here are 2 'pasted Tiger 1's the first being the Pershing Killer 'The Elsdorf Tiger' This has also be built on further since the images were taken, it has it's running gear fitted, a revised debris shield over the mantlet, (thanks to a timely intervention by David Byrden with corrected plans and dimensions for the attachment) this is on hold till I source parts for the engines starter assembly, as I cannot find a manufacturer who includes the drive gears and chains needed, plus othe commiments!

Another one! Yup it's a Tiger 1, but a real nice one... With vertical zimmerit! An early mid of the SSTK that had a variety of crossover production upgrades along with othe parts associated more with the eary production Tiger 1. This now also has running gear, and finally a pistol plug for the turret, not as easy as I thought.
And thats what else I have 'on the go' along with othe s.SS.Pz.-Abt.101 Tigers, (in boxes)
Thanks for asking what else I build. Update in the morning. Phil
Nothing further to post today as I have not yet uploaded the progress made on the 3 turrets, apparently... I don't know if it is true but you are not supposed to model or talk about Tigers on your anniversary?
The mantlets, gun assemblies, lifting pintles etc have been fitted, and photographed, I'll crop and chop them in the morning, and get them posted. So somebody asked about '411' so here it is! I am currently building and fitting CMK and other interior goodies to fill out the fighting compartment and engine bay on this Ko'd abandonned hybrid Tiger, This is now a lot further on with running gear and barrel detailing completed, and ready to be fitted.
Here are 2 'pasted Tiger 1's the first being the Pershing Killer 'The Elsdorf Tiger' This has also be built on further since the images were taken, it has it's running gear fitted, a revised debris shield over the mantlet, (thanks to a timely intervention by David Byrden with corrected plans and dimensions for the attachment) this is on hold till I source parts for the engines starter assembly, as I cannot find a manufacturer who includes the drive gears and chains needed, plus othe commiments!
Another one! Yup it's a Tiger 1, but a real nice one... With vertical zimmerit! An early mid of the SSTK that had a variety of crossover production upgrades along with othe parts associated more with the eary production Tiger 1. This now also has running gear, and finally a pistol plug for the turret, not as easy as I thought.
And thats what else I have 'on the go' along with othe s.SS.Pz.-Abt.101 Tigers, (in boxes)
Thanks for asking what else I build. Update in the morning. Phil
bizzychicken
Joined: September 06, 2008
KitMaker: 967 posts
Armorama: 842 posts
Posted: Friday, January 09, 2009 - 07:13 AM UTC
Nice one Phil. its safe to say you love Tigers. I like Panthers but have'nt got the zim right yet. Hopefully after watching this, all my pathers can get plastered in a Panther party Geraint
GeraintLAH1SS

Joined: August 02, 2008
KitMaker: 231 posts
Armorama: 171 posts
Posted: Friday, January 09, 2009 - 10:40 AM UTC
Excellent thread Phill, please keep the information and build progress coming. Like yourself, i love the tiger tank and look forward to anything that can help me in perfecting or making a model look accurate. Thank you again
barkmann424
Joined: November 23, 2008
KitMaker: 357 posts
Armorama: 353 posts
Posted: Saturday, January 10, 2009 - 10:44 AM UTC
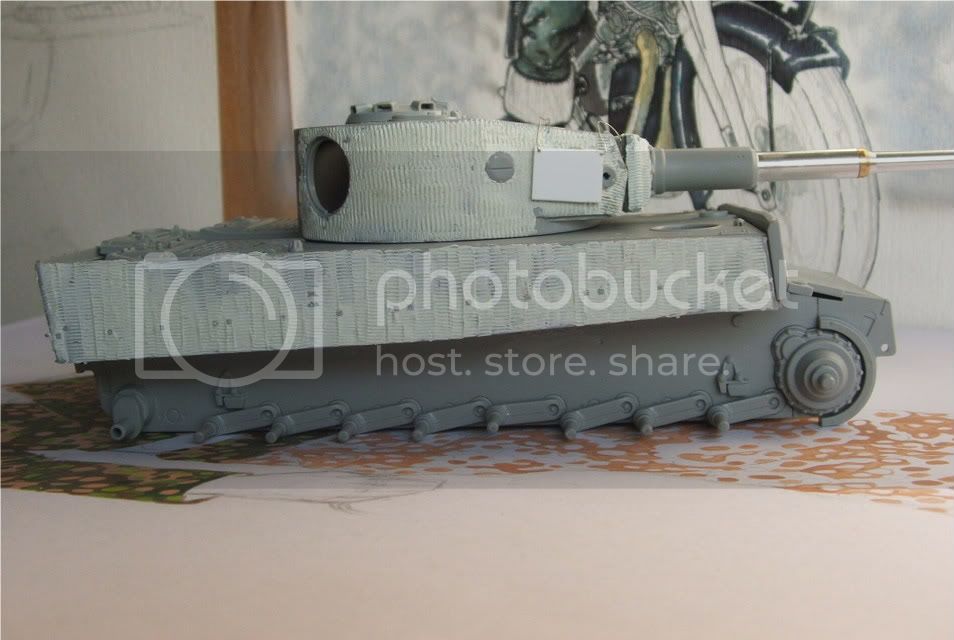
Hello! Geraint and welcome aboard Stephen! Glad to have you onboard. .I have been selecting turret fittings, things such as loaders hatches, spare track hangers, turret bins etc. Just to add a little extra to the build of these three Tigers whilst awaiting the arrival of the #6383 that is to be built OOB without tweaks . I filled in the outside second hole for the gun sight on the DML #6383 sculpted zimmerit mantlet, along with an application of epoxy putty zimmerit along the top horizontal edge of the mantlat also. This helps cover some of, what looks like moulding distortion that this mantlet has compared to all the un-pasted ones from all the kits. Some deliberation upon my part has been taking place over which Tiger of the 2./s.SS.Pz.-Abt.1o1 to depict for the 'pasted' Tiger with the finer pattern type. I think it will have to be the mount accredited to 'Bobby Warbrunn' destroyed by the Brithish on the 27th of June '44' (I will post a shot of this in the morning) this Tiger the earlier 'flat' hull side front ends, steel-roadwheels, binocular gun sight aperture in the mantlet, a later forged loaders hatch with offset handle, and what should be a 25mm roof (perhaps I need David Byrden to interject upon this matter, as from the angle I cannont see if it has a 25mm or a 40mm roof, though by all accounts it should be 25mm that befits it's other production features, though at this period of production on the Tiger 1 it appears that a few 'out of sync' vehicles turn up! Particulary with this bunch!!!) so thats that really onto the photo's. The first set are for comparitive purposes as the parts are selected for finishin the turrets.
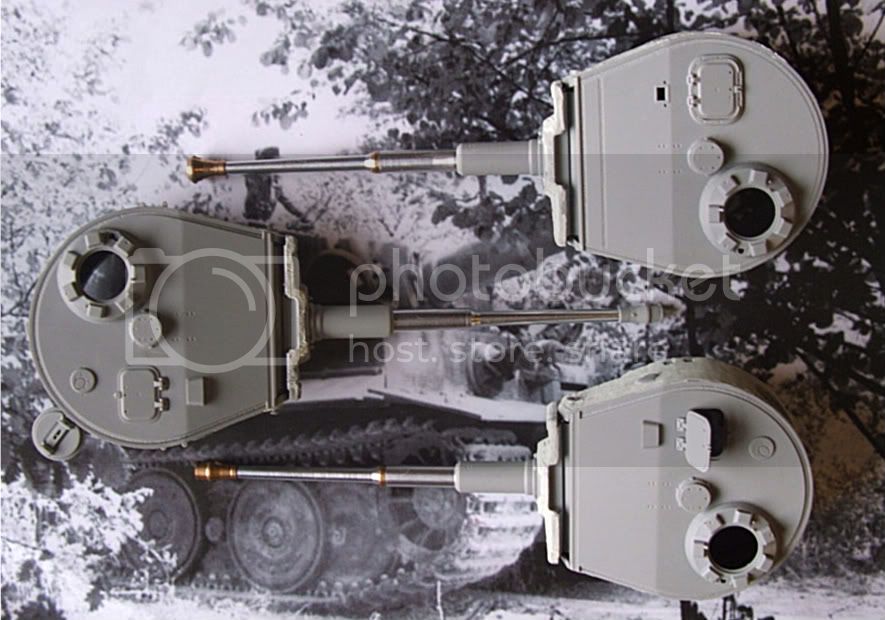


With this set showing the small modifications and 'fettling' needed to bring the #6383 sculpted turret to it's current state of appearance.


With this last set being used to compare the eefect of the applied and modified zimmerit on all three Tigers.


Next post more of the fittings are to be ... well 'fitted' along with some slight wear to the parts of the turrets zimmerit that would have been 'lightly worn' due to these Tigers not yet being involved in ground combat, and coming through the advance to the Normandy front, pretty much unhidered by air assaults, unlike the 3rd kompanie of the s.SS.Pz.-Abt.101 on their march to the front.
Cheers for looking Phil.
.I have been selecting turret fittings, things such as loaders hatches, spare track hangers, turret bins etc. Just to add a little extra to the build of these three Tigers whilst awaiting the arrival of the #6383 that is to be built OOB without tweaks . I filled in the outside second hole for the gun sight on the DML #6383 sculpted zimmerit mantlet, along with an application of epoxy putty zimmerit along the top horizontal edge of the mantlat also. This helps cover some of, what looks like moulding distortion that this mantlet has compared to all the un-pasted ones from all the kits. Some deliberation upon my part has been taking place over which Tiger of the 2./s.SS.Pz.-Abt.1o1 to depict for the 'pasted' Tiger with the finer pattern type. I think it will have to be the mount accredited to 'Bobby Warbrunn' destroyed by the Brithish on the 27th of June '44' (I will post a shot of this in the morning) this Tiger the earlier 'flat' hull side front ends, steel-roadwheels, binocular gun sight aperture in the mantlet, a later forged loaders hatch with offset handle, and what should be a 25mm roof (perhaps I need David Byrden to interject upon this matter, as from the angle I cannont see if it has a 25mm or a 40mm roof, though by all accounts it should be 25mm that befits it's other production features, though at this period of production on the Tiger 1 it appears that a few 'out of sync' vehicles turn up! Particulary with this bunch!!!) so thats that really onto the photo's. The first set are for comparitive purposes as the parts are selected for finishin the turrets.With this set showing the small modifications and 'fettling' needed to bring the #6383 sculpted turret to it's current state of appearance.
With this last set being used to compare the eefect of the applied and modified zimmerit on all three Tigers.
Next post more of the fittings are to be ... well 'fitted' along with some slight wear to the parts of the turrets zimmerit that would have been 'lightly worn' due to these Tigers not yet being involved in ground combat, and coming through the advance to the Normandy front, pretty much unhidered by air assaults, unlike the 3rd kompanie of the s.SS.Pz.-Abt.101 on their march to the front.
Cheers for looking Phil.
barkmann424
Joined: November 23, 2008
KitMaker: 357 posts
Armorama: 353 posts
Posted: Saturday, January 10, 2009 - 11:46 AM UTC

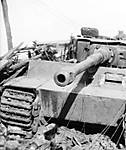
Here is the Image, of the supposed Ko'd 'Warbrunn' mount, as you can see it has the smaller of the two common turret patterns along with some 'earlier' features, a real imterim perhaps!.. The tactical markings in the case of turret numerals are also at the centre of indepth discussions for this 2.Kompanie Tiger also with 'Warbrunns' hypothetical Tiger '214' having the heavier zimmerit texture on the turret, when photographed within the confines of an Allied vehicle collection area. One Tiger that has been mooted as fitting this identikit Tiger is '213' belonging to Hans Hofflinger, but this was not present with the other 2.kompanie Tigers alongside the N175, apparently due to mechanical troubles on the roadmarch. As was the case for Wittmann's true mount '205'. And as you can (can't in my case) the turret roof is barely visable, to the 'honed' eye not fitted with 'Zeiss' optics, so any direction on roof type would be a real 'boon'.
Cheers in advance err... David... Phil.
LAH1SS
Joined: August 02, 2008
KitMaker: 231 posts
Armorama: 171 posts
Posted: Saturday, January 10, 2009 - 01:54 PM UTC
The loaders hatch appears to be the 15mm thick hatch as seen on the tiger 2. This was seen on the 4th version March 44 production tiger one. This turret also had the thickness of the turret roof increased from 25mm to a 40 mm roof . The mantlet has the binocular gun sight fitted. Another intersting feature to note is the front drive sprocket. If you notice the main bolt pattern has a star shaped peice of metal under the bolt's. This was added to secure the sprocket against vibration furthermore, it was introduced in June 44 from chassis number 251 205. I hope this helps date the tiger a little for you. David please add to my post or correct me if i am wrong

Byrden

Joined: July 12, 2005
KitMaker: 2,233 posts
Armorama: 2,221 posts
Posted: Saturday, January 10, 2009 - 10:03 PM UTC
All Tiger 1 loader's hatches were 15mm thick. We have no photographs of any Tiger 1 with a Tiger II loader's hatch. This tank has the forged lid with the offset handle, a standard for Tiger 1.
This tank does indeed have a 40mm roof and the binocular gunsight, which dates the turret neatly to March 1944.
The star at the center of the sprocket was added back in April 1943. The other change made in June 1944 concerned the outer bolts for the toothed ring.
The hull of this Tiger is problematic. The straight hull front edge should have stopped in January 1944, but the steel wheels were supposedly added in February. If we can't pin down the tank's manufacture over a 3-month period, then we don't know if it has a turret protector ring, a large idler or a gun travel lock. Modelling it accurately becomes a problem.
David
LAH1SS
Joined: August 02, 2008
KitMaker: 231 posts
Armorama: 171 posts
Posted: Saturday, January 10, 2009 - 10:46 PM UTC
Quoted Text
All Tiger 1 loader's hatches were 15mm thick. We have no photographs of any Tiger 1 with a Tiger II loader's hatch. This tank has the forged lid with the offset handle, a standard for Tiger 1.
This tank does indeed have a 40mm roof and the binocular gunsight, which dates the turret neatly to March 1944.
The star at the center of the sprocket was added back in April 1943. The other change made in June 1944 concerned the outer bolts for the toothed ring.
The hull of this Tiger is problematic. The straight hull front edge should have stopped in January 1944, but the steel wheels were supposedly added in February. If we can't pin down the tank's manufacture over a 3-month period, then we don't know if it has a turret protector ring, a large idler or a gun travel lock. Modelling it accurately becomes a problem.
David
Thanks for the post David. Just a question? I was always led to believe the hub on the drive sprocket was machined flat in April 43 and the star shaped reinforcement was added in June 44 according to Jentz and Doyle do you have any more information that can help this possible misinformation. I should have also been very clear on the loaders hatch it is the final version of the loaders hatch and was seen on the tiger 2 until the 40mm loaders hatch was introduced. Thanks for the post David
barkmann424
Joined: November 23, 2008
KitMaker: 357 posts
Armorama: 353 posts
Posted: Saturday, January 10, 2009 - 11:03 PM UTC
Hello David! I can certainly pick them eh!.. Thanks Stephen for the heads up on the spocket, fixings, I sort of missed that. I thought it might be the 40mm roof as a slight step can be seen just above the turrets side top edge, unfortunately all the kits being used for this Tiger madness have the turret protection ring, though if you woul like this removed for a bit of interest David, I'm sure I could manage it, with a power tool,plane and Mr Surface. Any other suggestions and corrections are more than welcome anytime David also. Thanks for the interest it sure is easier with the collective minds of the Tiger Hive on board.
Right then paranonia diminished somewhat, onto the pasted turret hatches. On the #6383 hatch some of the pattern was removed from the hatch's hinge arm at the bottom, just so it has the opportunity to be workable! The corresponding underlying pattern that cpvers the area where kit part #E26 should sit on the bare turret was marked with a fine soft technical pencil, then with cuts being scored into the inside edge of the marked area the pattern was removed. It is best to keep test fitting this until you get a good snug fit.

When you are 'happy as Larry' with the fit a bit of Tamiya Extra Thin at each side will secure the hinge plate onto the turret. Filling if needed can then be done around the time of final finishing on the turret.

Here is the hinge plate secured. .
The naked hatches #E6 are then prepared for the patterns to be applied by spreading the putty with an artists pallette knife onto the hatch whilst it is still attached to the E sprue. This makes it easier to handle while the 'zimmerit' is applied, clean up and damage representation can be done when the putty has hardened, without any damage to the textured surface. The Lion Roar tool is used along with the 'wonder gear' as it has now been named!


I will fix them up with their interior mechanisms when they are 'cured' and mount them onto the turrets, along with other parts not attached yet!
Cheers again for keeping up interest, Thanks again David, on the upshot of this I've got anothe 25mm roof for the 'pot' ... Hmm '232' could yet make an apperance!
Phil.
Right then paranonia diminished somewhat, onto the pasted turret hatches. On the #6383 hatch some of the pattern was removed from the hatch's hinge arm at the bottom, just so it has the opportunity to be workable! The corresponding underlying pattern that cpvers the area where kit part #E26 should sit on the bare turret was marked with a fine soft technical pencil, then with cuts being scored into the inside edge of the marked area the pattern was removed. It is best to keep test fitting this until you get a good snug fit.
When you are 'happy as Larry' with the fit a bit of Tamiya Extra Thin at each side will secure the hinge plate onto the turret. Filling if needed can then be done around the time of final finishing on the turret.
Here is the hinge plate secured.
.The naked hatches #E6 are then prepared for the patterns to be applied by spreading the putty with an artists pallette knife onto the hatch whilst it is still attached to the E sprue. This makes it easier to handle while the 'zimmerit' is applied, clean up and damage representation can be done when the putty has hardened, without any damage to the textured surface. The Lion Roar tool is used along with the 'wonder gear' as it has now been named!
I will fix them up with their interior mechanisms when they are 'cured' and mount them onto the turrets, along with other parts not attached yet!
Cheers again for keeping up interest, Thanks again David, on the upshot of this I've got anothe 25mm roof for the 'pot' ... Hmm '232' could yet make an apperance!
Phil.
Byrden
Joined: July 12, 2005
KitMaker: 2,233 posts
Armorama: 2,221 posts
Posted: Sunday, January 11, 2009 - 03:23 AM UTC
Jentz and Doyle don't say the star-shaped bolt holder was added in June.
I have found photos of it on Early Tigers so I assume it came with the flat sprocket hub.
David
I have found photos of it on Early Tigers so I assume it came with the flat sprocket hub.
David
Removed by original poster on 01/11/09 - 23:37:26 (GMT).
LAH1SS
Joined: August 02, 2008
KitMaker: 231 posts
Armorama: 171 posts
Posted: Sunday, January 11, 2009 - 11:36 AM UTC
Quoted Text
Jentz and Doyle don't say the star-shaped bolt holder was added in June.
I have found photos of it on Early Tigers so I assume it came with the flat sprocket hub.
David
My mistake i read more into it sorry David. I would like to see these photo's you have at some stage David thanks again
barkmann424
Joined: November 23, 2008
KitMaker: 357 posts
Armorama: 353 posts
Posted: Tuesday, January 13, 2009 - 04:41 AM UTC
Hello All! The turret hatches are now in place with fittings, the one for the finer pattern zimmerit, has been fitted with the 'cut down' hinge plate for the moment, as this can easily be retrofitted with some stock styrene, if anybody can 'decide' for me if the hull will have the turret ring protector or not. At this point I am inclined to go with David and remove it for the accurcie of build and for a bit of interest, to shuffle the Tiger pack a little. This I feel is the greatest part about DML Tigers it's a bit like having a 'styrene pallette' to work with... Now if only the early and mid would break cover!
Okay back to the task at hand, finishing the turrets. The cured epoxy putty has to be removed first from the area behind the hinge plate, and for seating of the turret stowage bin.

With this now done the hingeplate and hatch can now be fitted flush, not unlike the way that the #6383 hatch and hinge plate are fitted.

The same procedure is followed for the heavy pattern zimmerit turret, giving us this result.

So there we have it the Tigers 'back door' completed on all three, so here they are stacked for comparison.


Once again thanks for following this W.I.P. Blog, hopefully I can get back to speed again.
Cheers Phil, I think we will 'paste up' the hulls next!
Okay back to the task at hand, finishing the turrets. The cured epoxy putty has to be removed first from the area behind the hinge plate, and for seating of the turret stowage bin.
With this now done the hingeplate and hatch can now be fitted flush, not unlike the way that the #6383 hatch and hinge plate are fitted.
The same procedure is followed for the heavy pattern zimmerit turret, giving us this result.
So there we have it the Tigers 'back door' completed on all three, so here they are stacked for comparison.
Once again thanks for following this W.I.P. Blog, hopefully I can get back to speed again.
Cheers Phil, I think we will 'paste up' the hulls next!
barkmann424
Joined: November 23, 2008
KitMaker: 357 posts
Armorama: 353 posts
Posted: Thursday, January 15, 2009 - 09:49 AM UTC
Hello all! Chaos truly rules us all. Anyway back to the task at hand. The turret vision slits/portals come under scrutiny next. As these turrets have been progressing through the 'pasting' stages the #6383 sculpted one have really been niggling me... Because of the depth and size of the pattern rendered upon them they appear to be to proud from the surface of the turret side, they also seem to have lost the assymetrical location of the slot/slit aperture, that now appears to be central! Upon the majority of zimmerited mid and late Tiger 1's we can see from available images (no one knows of any secret vault containing evidence of a different pattern upon them do they?) the application of the zimmerit was applied with the 'smaller' tool type, and might I add 'a bit haphazard' by all accounts. This is why I have chosen to revisit them before moving on to 'pasting the hulls.
Here is the #6383 offering!

And here is a real ife one!

As you can see there is a slight difference... And another just to be certain.

So without much further ado! We will attempt to replicate the pattern on this area of #6406 and #6416
with no other than two of the scale armour worlds wonder materials, Gunze Sangyo Mr Surfacer 500 and a toothpick/or blunted safety pin... It depends on what you prefer really!

Taking a 'newish' brush of a size you are comfortable with apply a layer of the Mr Surfacer a bit thicker and 'undiluted' than you would for exhaust stippling or cast armour simulation purposes.

Giving it a little time to cure (usually just a couple of minutes) you can now apply your pattern into the Mr Surfacer, giving you a more subtle 'in scale' appearance.

And with the process repeated upon the lower portion of the vision aperture. You have a closer to the 'real thing' look for your Tigers turret side vision port!

And that's that bit really, have a practice withe the mediums and tools if you are not comfortable with trying it out on a kit. I use all sorts of things that are flat and made of some kind of plastic substance. Next up is the hull portions of the kits. Then a bit of light damage representation on the edges etc!
Hope you are still finding this useful, and not mind numbingly boring yet? The life of a 'ridge counter' oh the joys!
Cheers Phil.
Here is the #6383 offering!
And here is a real ife one!
As you can see there is a slight difference... And another just to be certain.
So without much further ado! We will attempt to replicate the pattern on this area of #6406 and #6416
with no other than two of the scale armour worlds wonder materials, Gunze Sangyo Mr Surfacer 500 and a toothpick/or blunted safety pin... It depends on what you prefer really!
Taking a 'newish' brush of a size you are comfortable with apply a layer of the Mr Surfacer a bit thicker and 'undiluted' than you would for exhaust stippling or cast armour simulation purposes.
Giving it a little time to cure (usually just a couple of minutes) you can now apply your pattern into the Mr Surfacer, giving you a more subtle 'in scale' appearance.
And with the process repeated upon the lower portion of the vision aperture. You have a closer to the 'real thing' look for your Tigers turret side vision port!
And that's that bit really, have a practice withe the mediums and tools if you are not comfortable with trying it out on a kit. I use all sorts of things that are flat and made of some kind of plastic substance. Next up is the hull portions of the kits. Then a bit of light damage representation on the edges etc!
Hope you are still finding this useful, and not mind numbingly boring yet? The life of a 'ridge counter' oh the joys!
Cheers Phil.

lespauljames

Joined: January 06, 2007
KitMaker: 3,661 posts
Armorama: 2,764 posts

Posted: Thursday, January 15, 2009 - 10:28 AM UTC
ATTENTION. i have an announcement, this thread makes applying zimm look easy. that is all.
he, great job, i really wanna get a lion roar tool now:D
he, great job, i really wanna get a lion roar tool now:D

 |

WEB HOSTING BY


Copyright ©2021 Armorama and Kitmaker Network, a subsidiary of Silver Star Enterprises
All Rights Reserved. Please read our Conditions of Use and Privacy Policy.
All Rights Reserved. Please read our Conditions of Use and Privacy Policy.