Thank to all for the comments and interest,
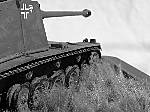
Marc as far as i know from what i have read it faired poorly across country only having around a foot of ground clearance and being heavy for this chassisbut on the flat it did ok, the interior got me bogged down but its done so i can move with it heh.
Thanks John

Pawel i have seen your painting and weathering and you dont need help from me my friend i love what you do i am going to try log the painting and weathering of this build as much as possible so maybe if it comes out ok i will submit the article

Rick, Neo, Dean and Ron thanks for taking the time to check it out
Here is the interior in step by step for anyone who is interested there are quite a few steps, i didnt name the colours of washes because they are mixed by sight so i posted pics of them instead and all pics were taken immediatly after the washes were applied to show how they went on.
Step 1, basecoat white.

Step 2, first oil wash.

Step 3, some details painted and a second oil wash applied.

Step 4, some chipping and scuffing was done using a dark brown mix applied with a scrap of sponge.

Step 5, A all over drybrushing using shadowed steel.

Step 6, i used a dark wash to dab on the chipping and a dirty wash on the floor.

Step 7, how it looks up to now.


Step 8, dark pigments placed around the floor dry.

Step 9, i used a brush to drop a dirty wash on the pigments.

Step 10, lighter pigments were then added to the still wet floor here and there.

Step 11, the engine bay was painted and weathered basecoat black and odd washes and pigments just for the sake of it.

Step 12, once the floor was almost dry but not completely i took a brush and began blending it together this pic shows the front blend and the back still to do.

Step 12b, all blended.

Step 13, the floor was drybrushed with shadowed steel.

Step 14, a pin wash of ivory black was added to pop up the details.

And the finished thing.


Ron.


 cant wait to see this one finished


 Too groovy.