_GOTOBOTTOM
Яusso-Soviэt Forum: Cold War Soviet Armor
For discussions related to cold war era Russo-Soviet armor.
KSC 2009 TacFireGuru's BTR 70 2S14 Zhalo
TacFireGuru
Visit this Community
Colorado, United States
Joined: December 25, 2004
KitMaker: 3,770 posts
Armorama: 2,263 posts
Posted: Saturday, February 14, 2009 - 02:04 PM UTC
Hey all!

Alrighty then! Kit Maker Staff Challenge 2009. Up for the build is DML's BTR-70, SP Design's 2S14 Zhalo 85mm Self-Propelled Gun and their Armored Hubs:


More to follow real soon as it's on the bench and being worked.

Mike
TacFireGuru
Visit this Community
Colorado, United States
Joined: December 25, 2004
KitMaker: 3,770 posts
Armorama: 2,263 posts
Posted: Saturday, February 14, 2009 - 02:25 PM UTC
As promised, here's a couple of pictures of the basic progress so far.

First up, as the Dragon instructions call for, the upper hull is the first thing to work on. The SP Design's upper hull has a large pour-block that needs to be removed. Because it was rather long, I used the X-Acto razor saw as it had a longer blade than my other uber-fine saw:


And the resin "saw dust."


Once the pour-block was removed, I started by going through the instructions and circling the items that would get attached to the new hull and "X'ing" through those that would not.

At this point, I've gotten through steps one and two:


I've not run into any major problems, however, the grab handles from the Dragon kit will ultimately be removed and I'll replace them with wire. The SP hull calls for, basically, four of the C18 handle....hmmmm, there were only three in the kit. Additionally, there will be three small lift handles on the three access panels above the engine. I don't feel like scrapping and cleaning the Dragon parts so I'll make those out of wire too.

Fingers crossed, I'll have a couple of hours to "play" tomorrow.

Mike
c5flies
Visit this Community
California, United States
Joined: October 21, 2007
KitMaker: 3,684 posts
Armorama: 2,938 posts
Posted: Saturday, February 14, 2009 - 06:08 PM UTC
Quick start, Mike, moving right along on this. Looking good so far, cool looking kit
Jurjen
Visit this Community
Groningen, Netherlands
Joined: September 21, 2003
KitMaker: 3,040 posts
Armorama: 1,016 posts
Posted: Saturday, February 14, 2009 - 08:36 PM UTC
Hi Mike,

I really like this kind of builds. Good job sofar and keep us updated!

Jurjen
DT61
Visit this Community
Ontario, Canada
Joined: September 18, 2005
KitMaker: 1,226 posts
Armorama: 819 posts
Posted: Saturday, February 14, 2009 - 11:34 PM UTC
Mike,

Interesting building. Will be following your progress.
Darryl
Jacques
Visit this Community
Minnesota, United States
Joined: March 04, 2003
KitMaker: 4,630 posts
Armorama: 4,498 posts
Posted: Sunday, February 15, 2009 - 04:01 AM UTC
I am looking forward to seeing how this build goes. Glad to see you putting it up on here.
TacFireGuru
Visit this Community
Colorado, United States
Joined: December 25, 2004
KitMaker: 3,770 posts
Armorama: 2,263 posts
Posted: Sunday, February 15, 2009 - 08:37 AM UTC
James, Jurgen, Darryl...thanks for stopping in. The DML BTR's are pretty boring, but with this SPG conversion, it "gives it something."

Jacques, hoping you'd pop in. 
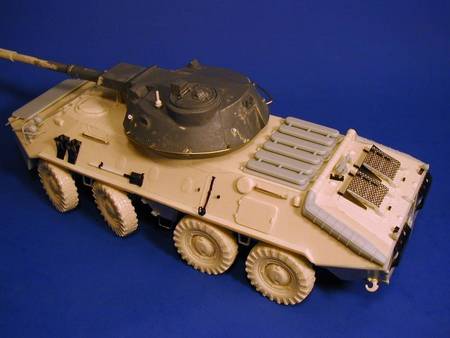
All things considered, this is a really nice conversion. I can't wait to get my hands on the 2S23 Nona SVK 120mm conversion for the -80. The only real worry I have is the barrel...slight warpage....so I'm hoping the hot water treatment will do the trick.

As an FYI, I plan to shoot this with Polly Scale Soviet Green....hope that'll work fine.

Mike
rv1963
Visit this Community
New York, United States
Joined: December 07, 2004
KitMaker: 1,888 posts
Armorama: 315 posts
Posted: Sunday, February 15, 2009 - 09:21 AM UTC
Cool Mike i am glad to see you started this so soon, yes i voted for this one to because you had all those nice conversion parts. I will be watching this all the way through the build.
TacFireGuru
Visit this Community
Colorado, United States
Joined: December 25, 2004
KitMaker: 3,770 posts
Armorama: 2,263 posts
Posted: Sunday, February 15, 2009 - 12:45 PM UTC
An update to the Zhalo:

Spent about two hours working on the suspension. Gawd, what a pain. Dragon's instructions call for the front two wheels to be "steerable." I've done that. I also had to drill out the "axle" holes for the SP wheels. No biggie, but SP had an "indent" of about 1mm....the kit's axles were at least 5. A "numbered" bit made quick work of that.

This pic shows the uderside of the multiple parts.


An upper view of the same:


And, a side view:


Mike
TacFireGuru
Visit this Community
Colorado, United States
Joined: December 25, 2004
KitMaker: 3,770 posts
Armorama: 2,263 posts
Posted: Tuesday, February 17, 2009 - 04:41 PM UTC
Silly dog wasn't ready to go to sleep, so I got some more done.

I dry fit the upper and lower hulls, and without seeing too much in the way of issues, I clamped the pieces and used a combination of super thin and gap filling CA glue to assemble the halves:


And one with the partially assembled turret sitting there:


And these four hooks. They are part of the Zhalo kit....but the instructions don't show where they go. There are no noticible marks or indents for them, so I'm wondering....where do they go?


The fit between upper and lower is pretty darn good. There will be a little bit of putty at the nose and I've dry-fit the rear piece and that's looking like there will be some putty needed too.

I'll need to make the turret grab handles, but will need to see if I have any really stiff brass wire or rod. The stuff I used for the hull handles is too soft for something that long.

I think that once I've got the SP wheels set up (not glued), I'll glue the front suspension so that they are turned (that'll keep them from "flopping about").

Hope to get some more time on this tomorrow....really want to get it primed.

Mike
Jurjen
Visit this Community
Groningen, Netherlands
Joined: September 21, 2003
KitMaker: 3,040 posts
Armorama: 1,016 posts
Posted: Tuesday, February 17, 2009 - 08:11 PM UTC
Wow! It looks very good. I have no clue where the hooks need to be placed but I'm sure someone here can point you in the right direction. Keep us updated!
TacFireGuru
Visit this Community
Colorado, United States
Joined: December 25, 2004
KitMaker: 3,770 posts
Armorama: 2,263 posts
Posted: Wednesday, February 18, 2009 - 12:53 PM UTC
Nothing much worth a picture this evening.

I've installed the back end of the BTR with gap filling GA and styrene glue. The fit is pretty decent but as I had thought, there will be some filling needed.

I've also drilled out the axle holes on the SP wheels. Oddly enough, the front four required a hole one size larger than the rear four wheels. Hmmmm...Dragon's molding process I guess. The SP wheels each had a pour-lug to remove which was no issue. And, I really like this, each wheel is labeled with either an "R" or an "L" for right and left...keep us dummies from pulling a "Doh!" moment and getting the tire pattern headed the wrong way. Very nice (hint to other AM companies). The real issue with the SP wheels is it would appear that the molding halves were off a tad...there's a noticible "shift" in each that required the use of a new sanding stick. I'll find out once I've primed them if I got it or not.

I'll get some pictures up tomorrow I hope showing some more work on it.

Mike
Jacques
Visit this Community
Minnesota, United States
Joined: March 04, 2003
KitMaker: 4,630 posts
Armorama: 4,498 posts
Posted: Wednesday, February 18, 2009 - 05:27 PM UTC
Hiya

The four hooks go in place of the extreemly inadequate DML offerings on the rear plate and lower front hull. Here is a pic of my build to give you a hint:


(However, I put my engine louvre covers on upside-down, so you didn't see that... )
TacFireGuru
Visit this Community
Colorado, United States
Joined: December 25, 2004
KitMaker: 3,770 posts
Armorama: 2,263 posts
Posted: Thursday, February 19, 2009 - 01:28 PM UTC
Thanks Jacques, appreciate it and yep, I can see why. Covers upside down? Nah.

Two of the SP hooks had air bubbles at the bolts, so those have putty in them...and I'll probably use a couple of Verlinden nut/studs to finish those off.

Right now Squadron Green is filling and drying in the minor gaps between the upper and lower hull halves. Tomorrow being Friday, I should have time to sand putty, add the remaining bits, and the barrel...then get some pictures of it primed, up that night. I'm actually surprised at how well and quickly it's moving along (kind of misnomers for my builds ).

MTF tomorrow!

Mike
TacFireGuru
Visit this Community
Colorado, United States
Joined: December 25, 2004
KitMaker: 3,770 posts
Armorama: 2,263 posts
Posted: Friday, February 20, 2009 - 11:56 AM UTC
Ola ya'll. Did manage to get some done this afternoon.

First off, unedited.....

The wheels are not permanently affixed...just there for "show." Same with the barrel. (which will get some attention of a micro bit for the "fumigator/extractor/whateverit'scalled thing)


Prior to priming, all that's really left is adding the tow hooks (thanks Jacques) and the grab rail around the turret. I did have some thin brass rod, so I'll make the handle out of that...woohoo....solder time!

Mike

betheyn
Staff MemberSenior Editor
AEROSCALE
#019
Visit this Community
England - South East, United Kingdom
Joined: October 14, 2004
KitMaker: 4,560 posts
Armorama: 510 posts
Posted: Friday, February 20, 2009 - 12:10 PM UTC
Looking good Mike. Definitely something different to what we usually see.
Looks a heavy kit?
Andy
TacFireGuru
Visit this Community
Colorado, United States
Joined: December 25, 2004
KitMaker: 3,770 posts
Armorama: 2,263 posts
Posted: Friday, February 20, 2009 - 12:27 PM UTC

Quoted Text

Looks a heavy kit?


Andy, no, not really.....it's heavier than the plastic's of the Dragon....considering the full-cast turret...but not so much as to make a major difference.

The advantage to the additional weight will be when it comes time to align the SP wheels and the Dragon suspension. Ultimately, I'll probably add some additional weight just to flatten/adjust/tweak/force/cajole that part of it.

Mike
newfish
Visit this Community
England - West Midlands, United Kingdom
Joined: June 23, 2008
KitMaker: 2,329 posts
Armorama: 2,110 posts
Posted: Friday, February 20, 2009 - 01:07 PM UTC
Mike i didnt notice you'd started already.

Good start to the kit


looks like you've turned something boring into an intereasting vehicle


chefchris
Visit this Community
North Carolina, United States
Joined: February 06, 2006
KitMaker: 1,544 posts
Armorama: 1,464 posts
Posted: Friday, February 20, 2009 - 01:23 PM UTC
Mike,
What a great subject! I have noticed this kit on the SP designs site, but sadly the pictures just dont do it justice. It looks bubble and warp free as well.

I have the Kubinka Fraser Gray book and the Zhalo is in it - your model looks the part for sure,

Chris
Jacques
Visit this Community
Minnesota, United States
Joined: March 04, 2003
KitMaker: 4,630 posts
Armorama: 4,498 posts
Posted: Friday, February 20, 2009 - 04:12 PM UTC

Quoted Text

I have noticed this kit on the SP designs site, but sadly the pictures just dont do it justice. It looks bubble and warp free as well.


Hey now, no cheap shots!

I admit that I am limited on the SAAM site as the storage space for free accounts is SMALL. So I try to post the best pics here on Armorama...when I can build, that is.

Don't let a lack of photo quality stop anyone from ASKING me for something better. I have it.

And I think Mike is doing the kit justice as well...
TacFireGuru
Visit this Community
Colorado, United States
Joined: December 25, 2004
KitMaker: 3,770 posts
Armorama: 2,263 posts
Posted: Saturday, February 21, 2009 - 04:01 PM UTC
More done tonight. Getting there!

Primed the lower hull, top and bottom and the wheels. Added the light guards and the turret's grab handles:


If all goes well, I'll be shooting the Soviet Green (Polly Scale) tomorrow.

Mike
Reiter960
Visit this Community
California, United States
Joined: June 24, 2007
KitMaker: 503 posts
Armorama: 500 posts
Posted: Saturday, February 21, 2009 - 04:16 PM UTC
Wow this build is moving fast. Where is the drama of deep cut fingers and sleepless nights trying to fix plastic's flaws. Seriously though, good job on this virtually unknown prototype kit.
TacFireGuru
Visit this Community
Colorado, United States
Joined: December 25, 2004
KitMaker: 3,770 posts
Armorama: 2,263 posts
Posted: Sunday, February 22, 2009 - 02:08 AM UTC
George,

Thanks for the comments....and, surprises me too at how quickly this is moving along. Heheheh, no cuts yet! Although I have managed to break a few of the Dragon parts (part of the light guards were replaced with wire).

The bore evacuator(?) was drilled out and preshaded with gun metal...gives it a lot more definition.


Quoted Text

"Open your eyes, open your mind!" Guano Apes


Oh yea!!! Excellent group!

Mike
tjkelly
Visit this Community
Maryland, United States
Joined: May 04, 2007
KitMaker: 1,132 posts
Armorama: 1,123 posts
Posted: Wednesday, February 25, 2009 - 05:46 AM UTC
Fantastic work Mike! Haven't visited this particular forum for a while, need to check it more often, as you've got a great project going here. Nice conversion, looking forward to seeing some color on this baby!

Thanks for sharing your build log. Cheers -

Tim
TacFireGuru
Visit this Community
Colorado, United States
Joined: December 25, 2004
KitMaker: 3,770 posts
Armorama: 2,263 posts
Posted: Thursday, February 26, 2009 - 02:53 PM UTC
Well Tim, here's some color:


I've used Polly Scale's Soviet Green. Hmmmmm.....not sure how I like this particular color. It's almost like a pale or faded OD? Yea, well, I am color blind....so maybe this is proper? Turret/barrel are still primer gray....(ya don't say )

Mike
 _GOTOTOP