_GOTOBOTTOM
Armor/AFV: Allied - WWII
Armor and ground forces of the Allied forces during World War II.
Hosted by Darren Baker
Started my M4A3E8 From Dragon
Rubicon
Visit this Community
California, United States
Joined: February 18, 2009
KitMaker: 125 posts
Armorama: 111 posts
Posted: Friday, February 20, 2009 - 05:07 PM UTC
I couldn't wait to start this kit, and was doing ok until I broke the kit rear light guards I think I made some ok looking ones from tiny brass rod.


I really like this kit, although the instructions are not all that clear at times.

Fun stuff, except when the darn tweezers slip and shoot a part across the room lol. So far I have found every thing that has flown from the Sherman. I wasn't so lucky with Tiger I am doing lol.
Beans
Visit this Community
California, United States
Joined: February 04, 2005
KitMaker: 84 posts
Armorama: 30 posts
Posted: Friday, February 20, 2009 - 05:37 PM UTC
That's pretty cool, good luck with the build! I have one too, but I haven't started yet.
I guess I'll be following you on this one.
Cruiser114
Visit this Community
Montana, United States
Joined: November 21, 2008
KitMaker: 32 posts
Armorama: 28 posts
Posted: Friday, February 20, 2009 - 07:45 PM UTC
i just finished this kit and had a great time with it, i fought the tracks and the suspension a little but overall i had a really good time.
Rubicon
Visit this Community
California, United States
Joined: February 18, 2009
KitMaker: 125 posts
Armorama: 111 posts
Posted: Friday, February 20, 2009 - 08:15 PM UTC
Yeah the tracks seem daunting, I was kinda hoping I could find some Dragon Styrene like tracks for it...

I have never done tracks like this.

I really like the kit so far, even with all the shaving and drilling. I like all the options and the parascope mounts are really cool.

tjkelly
Visit this Community
Maryland, United States
Joined: May 04, 2007
KitMaker: 1,132 posts
Armorama: 1,123 posts
Posted: Friday, February 20, 2009 - 09:05 PM UTC
Those light guards look great. Nicely done, keep at it!

Cheers-

Tim
exer
Visit this Community
Dublin, Ireland
Joined: November 27, 2004
KitMaker: 6,048 posts
Armorama: 4,619 posts
Posted: Friday, February 20, 2009 - 10:18 PM UTC
Hi Jon I did a review and a build feature on this kit here on Armorama which might help. There are a few odd things in the instructions that I noted in the build.

As for tracks - there are DS tracks in the M4A3E8 105 but leaves you needing tracks for that kit

review

Build Feature

Are you going to use the kit decals or go aftermarket.
russamotto
Visit this Community
Utah, United States
Joined: December 14, 2007
KitMaker: 3,389 posts
Armorama: 2,054 posts
Posted: Saturday, February 21, 2009 - 01:58 AM UTC
Check the build review for help with the HVSS suspension. The directions are hard to follow and appear to have you putting things in the wrong place. I did what I thought they said and glued things in the wrong place.
Rubicon
Visit this Community
California, United States
Joined: February 18, 2009
KitMaker: 125 posts
Armorama: 111 posts
Posted: Saturday, February 21, 2009 - 04:59 AM UTC

Quoted Text

Hi Jon I did a review and a build feature on this kit here on Armorama which might help. There are a few odd things in the instructions that I noted in the build.

As for tracks - there are DS tracks in the M4A3E8 105 but leaves you needing tracks for that kit

review

Build Feature


Are you going to use the kit decals or go aftermarket.


Pat
Your review is what brought me to this site and inspired me to get the kit. I had not seen the Feature you did. Fantastic stuff. I think I am going to end up building this kit a few times... I really want to do a standard M4A3E8 without the add-on armor.

Prolly the kit decals, though I kinda like the idea of getting some stencils.


Rubicon
Visit this Community
California, United States
Joined: February 18, 2009
KitMaker: 125 posts
Armorama: 111 posts
Posted: Saturday, February 21, 2009 - 07:42 PM UTC
another shot of the upper hull with the fenders on. I used to micro saw blades and a small vice grip and C clamp to bend them.

Rubicon
Visit this Community
California, United States
Joined: February 18, 2009
KitMaker: 125 posts
Armorama: 111 posts
Posted: Sunday, February 22, 2009 - 07:39 PM UTC
Here are a few more shots showing the what I got done this afternoon.

This kit has taken over 3 times longer then the Tamiya M26 so far. I really want to build it again as a standard late version with no add-on armor.

I do have a question or two. I really like the separate Parascopes and assumed you would be able to put the in them in turned to the side, but the tabs on the bottom seem to on work strait ahead. I should just be able to trim that back and then glue it in the direction I want right?

The suspension is interesting, but frustrating. Maybe I am doing something wrong but the tiny springs work their way over the plastic part you glue onto the spring perch, sometimes it slides over it jamming the spring in the tube and making the suspension jam. It was so bad on one, I left out one spring.

On the next I just glued the springs to the part it was slipping over and that helped, but this is annoying on a design with tracks you have to glue together. I think maybe the next time I build it I will leave the springs out. Or maybe do what Tamiya did with the Pershing and only spring the front and rear boggy sets.

The instructions are really not that good on the suspension part, the first picture makes it look like your putting parts in wholes they don't go in.

Most of the time in the 3 hours working on the 4 units I got done was cleaning up the parts. I need to get a good sprue cutter. Buying a small file set was a really good idea, some things a round file works great on some things a flat or square are nice for. You can do things with files you cant with a knife or sanding.

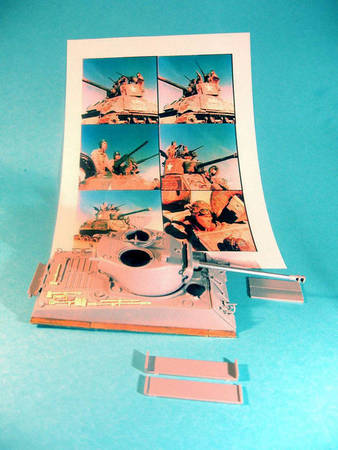
Getting the muzzle brake on the aluminum barrel sucked. Had to hold it for about 5 minutes. The turret fit I thought was going to be a pain, but it turned out good once I got it glued, I worked on the seem with a file. I think it wont show after paint.

Im going to spray the suspension and hull separately, cause I am not sure you can get the tires on if the hub and suspension are mounted. so the suspension tires and upper hull all get a coat of primer and maybe paint. I am going to tape off the inside of each tire outer part of the wheel.

Suspension.


Turret and hull at the end of the night, all I did after these shots was add the masking tape over the points on the hull the suspension units glue on.


lucer105
Visit this Community
Texas, United States
Joined: March 07, 2008
KitMaker: 189 posts
Armorama: 188 posts
Posted: Monday, February 23, 2009 - 10:03 AM UTC
Great!

And also this is a great kit right?

But I want to remind you my friend if you want to make it as thunderbolt VII, the extra armor plate on both sides of the upper hull is wrong in style
Rubicon
Visit this Community
California, United States
Joined: February 18, 2009
KitMaker: 125 posts
Armorama: 111 posts
Posted: Monday, February 23, 2009 - 05:04 PM UTC

Quoted Text

Great!

And also this is a great kit right?

But I want to remind you my friend if you want to make it as thunderbolt VII, the extra armor plate on both sides of the upper hull is wrong in style


Oh I love the kit.

thanks for the tip, I may not use the thunderbolt decals, but I am going to use the supplied turret armor. It prolly wont be all that accurate.

Once I get building and paint back down I can spend more time on research and matching photos hehe small steps for me.

I really appreciate the tips though!
lucer105
Visit this Community
Texas, United States
Joined: March 07, 2008
KitMaker: 189 posts
Armorama: 188 posts
Posted: Monday, February 23, 2009 - 05:33 PM UTC

Quoted Text


Quoted Text

Great!

And also this is a great kit right?

But I want to remind you my friend if you want to make it as thunderbolt VII, the extra armor plate on both sides of the upper hull is wrong in style


Oh I love the kit.

thanks for the tip, I may not use the thunderbolt decals, but I am going to use the supplied turret armor. It prolly wont be all that accurate.

Once I get building and paint back down I can spend more time on research and matching photos hehe small steps for me.

I really appreciate the tips though!


I have ever built this kit and I wanted to make it thunderbolt VII, but i neglect a series problems and to some degree I screwed this good kit. Look at mine. Suspension is wrong


Rubicon
Visit this Community
California, United States
Joined: February 18, 2009
KitMaker: 125 posts
Armorama: 111 posts
Posted: Monday, February 23, 2009 - 05:54 PM UTC
That looks really nice, I like the chipped paint on the edge of the front add-on armor on the hull. it looks very good. Also like the missing and dented front fenders.

I think I may see the suspension issue, but If you had not have said anything I would have missed it.

exer
Visit this Community
Dublin, Ireland
Joined: November 27, 2004
KitMaker: 6,048 posts
Armorama: 4,619 posts
Posted: Monday, February 23, 2009 - 11:31 PM UTC

Quoted Text

But I want to remind you my friend if you want to make it as thunderbolt VII, the extra armor plate on both sides of the upper hull is wrong in style


Do you mean that it stands too far out or something else

lucer105
Visit this Community
Texas, United States
Joined: March 07, 2008
KitMaker: 189 posts
Armorama: 188 posts
Posted: Tuesday, February 24, 2009 - 06:42 AM UTC

Quoted Text


Quoted Text

But I want to remind you my friend if you want to make it as thunderbolt VII, the extra armor plate on both sides of the upper hull is wrong in style


Do you mean that it stands too far out or something else


Yes, I think it is too far out. I have ever watched a video about sherman tank and thunderbolt VII appeared there, the armor plate is not like the kit provides
Violetrock
Visit this Community
European Union
Joined: March 09, 2003
KitMaker: 831 posts
Armorama: 791 posts
Posted: Tuesday, February 24, 2009 - 09:25 AM UTC
Take a look here

Have a look on image 10 on the right side regarding the additional armour.

Thomas
padawan_82
Visit this Community
United Kingdom
Joined: December 10, 2008
KitMaker: 817 posts
Armorama: 555 posts
Posted: Tuesday, February 24, 2009 - 09:45 AM UTC
nice build so far Jon i've got this kit sitting in my stash, but haven't started it yet (other builds on the go and all that) but i'm impressed with your thread, i think once my home pc is finally up and running (should be next month fingers crossed) i might do my own blog can't wait to see this finished. good luck with the rest of your build. Ant
exer
Visit this Community
Dublin, Ireland
Joined: November 27, 2004
KitMaker: 6,048 posts
Armorama: 4,619 posts
Posted: Tuesday, February 24, 2009 - 10:13 AM UTC

Quoted Text

Yes, I think it is too far out. I have ever watched a video about sherman tank and thunderbolt VII appeared there, the armor plate is not like the kit provides


I agree, in the build feature I cut it down but hey this is a great excuse to link to this Sherman video on Youtube.

Thunderbolt VII appears at 2.43 but if you are into Shermans watch the whole video.
Rubicon
Visit this Community
California, United States
Joined: February 18, 2009
KitMaker: 125 posts
Armorama: 111 posts
Posted: Tuesday, February 24, 2009 - 11:24 AM UTC
Nice Video, thanks for sharing.

I did cut down the side, armor. Not enough though. I was tempted to cut the hole side part of so it laid flat.

I have been spraying the turret and hull today. Also working on all the road wheel rubber tires. I am going to slip them on a paper tube and spray all black at once.

I discovered today Tamiya Khaki looks just like Model master Olive drab. Tamiya Olive drab seems way dark to me. I thought I read somewhere WW2 olive drab is darker then say Korea or Vietnam Olive drab?
exer
Visit this Community
Dublin, Ireland
Joined: November 27, 2004
KitMaker: 6,048 posts
Armorama: 4,619 posts
Posted: Tuesday, February 24, 2009 - 11:37 AM UTC

Quoted Text

I discovered today Tamiya Khaki looks just like Model master Olive drab. Tamiya Olive drab seems way dark to me. I thought I read somewhere WW2 olive drab is darker then say Korea or Vietnam Olive drab?


Yes but you have to take into account (Well you don't have to - it's just a suggestion) scale effect which is that an object viewed at a distance will not appear as dark as if viewed up close- better explanation here (Although this is about 1/72 models the same effect applies in 1/35 scale but to a lesser degree)

Steve Zaloga reckons that Tamiya Olive Drab Lightened with Dark Yellow XF60 is a close match for WW2 faded OD.
lucer105
Visit this Community
Texas, United States
Joined: March 07, 2008
KitMaker: 189 posts
Armorama: 188 posts
Posted: Tuesday, February 24, 2009 - 12:40 PM UTC

Quoted Text


Quoted Text

Yes, I think it is too far out. I have ever watched a video about sherman tank and thunderbolt VII appeared there, the armor plate is not like the kit provides


I agree, in the build feature I cut it down but hey this is a great excuse to link to this Sherman video on Youtube.

Thunderbolt VII appears at 2.43 but if you are into Shermans watch the whole video.


That is really cool!
Rubicon
Visit this Community
California, United States
Joined: February 18, 2009
KitMaker: 125 posts
Armorama: 111 posts
Posted: Tuesday, February 24, 2009 - 05:15 PM UTC
The base paint color..

This to me looks almost like Model Master Olive drab.

I will be spraying on light coats of a lighted Tamiya Olive drab along the side of the hull and the bottom of the turret...

The M26 looked just like this before trying the the idea above on it. I have much better lighting now where the airbrush is so I should be able t get a better look.
Rubicon
Visit this Community
California, United States
Joined: February 18, 2009
KitMaker: 125 posts
Armorama: 111 posts
Posted: Tuesday, February 24, 2009 - 07:18 PM UTC
Few more shots, I couldn't resist and decided to try and do the tracks.

I got them all cleaned up and separated, into sets of 80 links. I only have time for one side tonight.

it was not hard to do at all. Though I am glad I didn't glue the boggie sets in.

I am sure the tracks with the side links you have to glue on suck, but these where ok. Next time I build this kit, I am leaving out the stupid little springs in the suspension and gluing the it all together.


lucer105
Visit this Community
Texas, United States
Joined: March 07, 2008
KitMaker: 189 posts
Armorama: 188 posts
Posted: Wednesday, February 25, 2009 - 05:19 PM UTC
Nice work so far?

Do you plan to spray a highlight? i think that will generate a beautiful art effect.

Plus I think the M26 is a little bit gloss. Oil paint pigment can make it flat. I do not know which kind of solvent you use for wash and maybe filter, I suggest to use ZIPPO oil, it is perfect to be used in filtering.

Looking forward to your new progress!
 _GOTOTOP