Resicast - Airborne Signals Jeep
England - East Anglia, United Kingdom
Joined: August 12, 2005
KitMaker: 14,499 posts
Armorama: 11,675 posts
Posted: Saturday, July 11, 2009 - 11:53 PM UTC
Hi Guys,
Well with the airborne trailers pretty much complete I'm about ready to move on to the 2nd of my Airborne Jeeps for the Op Market Garden Campaign. It runs until December if you have a mind to join up;
Link here
http://armorama.kitmaker.net/forums/136186&page=1 This is time I'm going to try the SIgnals version and James should be publishing a review on this soon.
Just a flavour of the kit as I still have to upload all the images etc.

Al
'Action this Day'
Winston Spencer Churchill
Ohio, United States
Joined: June 12, 2009
KitMaker: 516 posts
Armorama: 391 posts
Posted: Sunday, July 12, 2009 - 01:16 AM UTC
Al,
Cool, another jeep!
Tony

On the Bench:
M2A3 Bradley
It's not a sin to get knocked down;It's a sin to stay down
"Master Chief Boatswains Mate Carl Brashear"
England - East Anglia, United Kingdom
Joined: August 12, 2005
KitMaker: 14,499 posts
Armorama: 11,675 posts
Posted: Sunday, July 12, 2009 - 04:02 AM UTC
Hi Tony,
Yip

, have a bit of a jeep thing going on at the moment.
The donor Kit;


The missing part of the 2nd spur are the drivers parts I have passed on to a good home.
I shall probably use these for the crew

plus the para radio Operator I have already built
Al
'Action this Day'
Winston Spencer Churchill
England - North West, United Kingdom
Joined: January 02, 2007
KitMaker: 781 posts
Armorama: 676 posts
Posted: Sunday, July 12, 2009 - 04:21 AM UTC
hey alan this looks great and yet another jeep =]
im buyin bulk of the willy's jeep when i gather some money together and will be turned into airborne jeeps =]
but for now just an s.a.s jeep north africa ( tamiya ) will surfice for now
ill keep an eye on this
good look
tony
England - East Anglia, United Kingdom
Joined: August 12, 2005
KitMaker: 14,499 posts
Armorama: 11,675 posts
Posted: Sunday, July 12, 2009 - 07:52 AM UTC
Hi Tony,
Remember if money is a bit tight you could use the standard Tamiya kit as an airborne jeep. Echlon troops has standard British issue equipment only those jeeps designated for airborne drop would have been altered as far as I am aware.
Al
'Action this Day'
Winston Spencer Churchill
Ohio, United States
Joined: June 12, 2009
KitMaker: 516 posts
Armorama: 391 posts
Posted: Sunday, July 12, 2009 - 04:26 PM UTC
Hello Al,
I am building the Tamyia kit for the Wheels campaign.

My daughter bought the kit for me for Father's Day. I think I will be building it straight from the box with some minor add ons. I am looking forward to watching the progress of this kit.
Tony
edit for spelling error
On the Bench:
M2A3 Bradley
It's not a sin to get knocked down;It's a sin to stay down
"Master Chief Boatswains Mate Carl Brashear"
British Columbia, Canada
Joined: August 27, 2006
KitMaker: 2,012 posts
Armorama: 1,949 posts
Posted: Sunday, July 12, 2009 - 06:47 PM UTC
Quoted Text
hey alan this looks great and yet another jeep =]
im buyin bulk of the willy's jeep when i gather some money together and will be turned into airborne jeeps =]
but for now just an s.a.s jeep north africa ( tamiya ) will surfice for now
ill keep an eye on this
good look
tony
Hey Tony,
You should consider picking up MiniArts British Staff Car w/Crew kit #35050 when it becomes available.
It's the same Bantam BRC 40 Jeep as the one with a Russian crew, kit #35048 or the U.S. crew, kit #35014:


I picked up the Russian kit and looks like a nice build.
FYI - Not many were built but the Bantam Jeeps were give to Britain, the Commonwealth and the Soviet Union when they were in production, as well as the Willys and Ford versions.
Russian Bantams Bantam Jeep Photo Album 
Quoted Text
Hi Tony,
Remember if money is a bit tight you could use the standard Tamiya kit as an airborne jeep. Echlon troops has standard British issue equipment only those jeeps designated for airborne drop would have been altered as far as I am aware.
Al
Hey Al,
Certainly using a great deal of your expendable income of late on these Resicast kits !!

You are certainly on a Jeep kick of late !!!
Looking forward to see the completed Jeep with the trailer.
Cheers

jjumbo

Arthur Hamilton Jukes
July 6th, 1922 - June 20th, 2009
Dad, it's been a year now but your love will always be with us.
The Canadian Scottish (Princess Mary's)
Motto - "DEAS GU CATH" - Ready for the Fray
March - Blue Bonnets Over The Border
England - East Anglia, United Kingdom
Joined: August 12, 2005
KitMaker: 14,499 posts
Armorama: 11,675 posts
Posted: Monday, July 13, 2009 - 04:21 AM UTC
Hi John,
You know I tend to build things in 2s/3s or even 4s lol, lol. There are several carriers pending and at least 2 more jeeps lol, lol.
Researching Market Garden opened up the possiblity of a Para U/C too
which might be fun.
Cheers
Al
'Action this Day'
Winston Spencer Churchill
British Columbia, Canada
Joined: August 27, 2006
KitMaker: 2,012 posts
Armorama: 1,949 posts
Posted: Monday, July 13, 2009 - 09:19 AM UTC
Hey Al,
A British Airborne UC

That's a new one, never heard of the Paras using carriers, definitely would like to read up on that.
I know that 19 - 20 Tetrarchs were carried by Hamilcar gliders during the Normandy airdrops for the British 6th Airborne Armoured Recce Regiment.
Also that the 6th AARR replaced the Tetrarchs with Cromwells in August 1944 but also used some Lend Lease M22 Locust light tanks in Operation Varsity in March 1945.
And that the Tetrarch was further developed into the improved Harry Hopkins variant.
I'd love to see anything you have on the "Parrier" !!
Cheers
jjumbo
Arthur Hamilton Jukes
July 6th, 1922 - June 20th, 2009
Dad, it's been a year now but your love will always be with us.
The Canadian Scottish (Princess Mary's)
Motto - "DEAS GU CATH" - Ready for the Fray
March - Blue Bonnets Over The Border
England - East Anglia, United Kingdom
Joined: August 12, 2005
KitMaker: 14,499 posts
Armorama: 11,675 posts
Posted: Monday, July 13, 2009 - 10:27 AM UTC
Hi John,
They landed 10 carriers during Op Market garden, 2 per Battalion
Al
'Action this Day'
Winston Spencer Churchill
England - East Anglia, United Kingdom
Joined: August 12, 2005
KitMaker: 14,499 posts
Armorama: 11,675 posts
Posted: Tuesday, July 14, 2009 - 06:33 AM UTC
Hi John,
Here's one that might interest you, a Dingo of 6th Airborne, and a nice set of Vickers MG Carriers. Thanks to KT.

Al
'Action this Day'
Winston Spencer Churchill
England - East Anglia, United Kingdom
Joined: August 12, 2005
KitMaker: 14,499 posts
Armorama: 11,675 posts
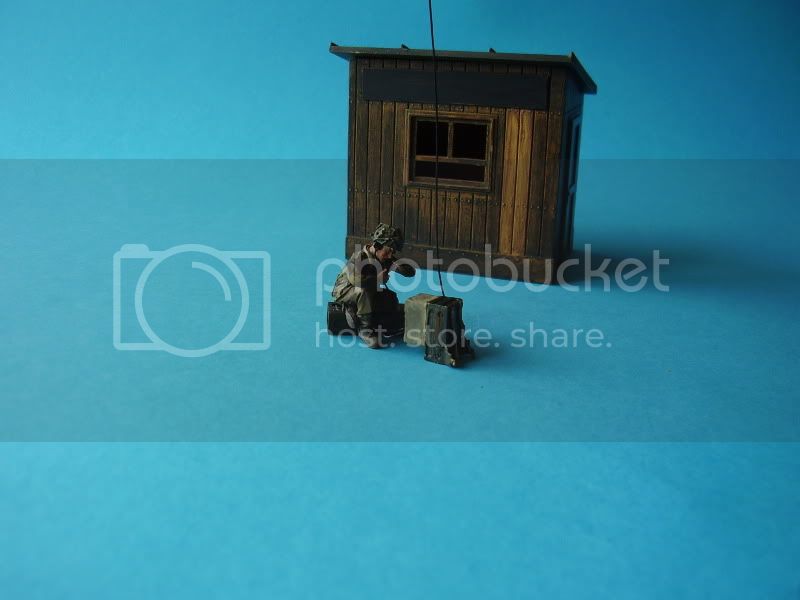
Posted: Tuesday, July 14, 2009 - 07:29 AM UTC
thought I'd start on the crew first, progress so far and a test fit in the RA Jeep


Al
'Action this Day'
Winston Spencer Churchill
England - North West, United Kingdom
Joined: January 02, 2007
KitMaker: 781 posts
Armorama: 676 posts
Posted: Tuesday, July 14, 2009 - 09:17 AM UTC
hi alan
this looks great =]
so your saying if i am going to build an airborne jeep i need to buy the resin kit for the axles etc because they were modified??
this picture of the dingo and vickers carrier looks great where about did you come across these??
cheers
tony
England - East Anglia, United Kingdom
Joined: August 12, 2005
KitMaker: 14,499 posts
Armorama: 11,675 posts
Posted: Tuesday, July 14, 2009 - 09:58 AM UTC
Hi Tony,
No, but you will have to alter the bumpers and the bonnet, add the fittings for the rifles. strengthened supports inside, alter the dash board, and a few other things depending on which version you decide to build. If you look at the RA build blog you will see what needs altered and added on the basic vehicle.
The axels only allow you to position the wheels at an angle, so are not necessary if you do not want to do that. You will need to make the other alterations from plastic sheet/rod and add the front bumper tools and rear fittings. You could make all these from plastic if you choose.
What I said was that if you were short of monies you could do a rear echlon vehicle as these were only the standard British jeep the most noticeable alterations being the side lights on the bonnet..
Hope that helps.
Al
'Action this Day'
Winston Spencer Churchill
Ohio, United States
Joined: June 12, 2009
KitMaker: 516 posts
Armorama: 391 posts
Posted: Tuesday, July 14, 2009 - 11:35 AM UTC
Al,
Looks really great so far. It's fun watching the progress. I like the figures you've chosen.
Tony
On the Bench:
M2A3 Bradley
It's not a sin to get knocked down;It's a sin to stay down
"Master Chief Boatswains Mate Carl Brashear"
England - East Anglia, United Kingdom
Joined: August 12, 2005
KitMaker: 14,499 posts
Armorama: 11,675 posts
Posted: Wednesday, July 15, 2009 - 07:06 AM UTC
Hi Tony,
Thanks, glad you enjoyed the last blog.
If anyone is particularly interested in the signals Jeep you might want to check out this link:
http://www.visualcollector.com/OBLI/JeepSignals.htm Made a start on the chassis and underside, removing the sink marks and flattening off the rear bumper. Also cut away the offside step. Instructions part 1:

Al
'Action this Day'
Winston Spencer Churchill
Ohio, United States
Joined: June 12, 2009
KitMaker: 516 posts
Armorama: 391 posts
Posted: Wednesday, July 15, 2009 - 07:31 AM UTC
Thanks for the link. Very informative.
Tony
On the Bench:
M2A3 Bradley
It's not a sin to get knocked down;It's a sin to stay down
"Master Chief Boatswains Mate Carl Brashear"
England - East Anglia, United Kingdom
Joined: August 12, 2005
KitMaker: 14,499 posts
Armorama: 11,675 posts
Posted: Friday, July 17, 2009 - 03:20 AM UTC
Hi Tony,
A review of the jeep can be found here:
https://armorama.kitmaker.net/review/4324 Some work on the chassis. Added the replecement front axel, that will allow the positionable wheels, also the reduced repalcement front bumper along with the springs and exhause. The rear bumper has been flattened and thinned down a little.

Some cleaning up of the sink marks:

and a test fit of the parts

the kit has a nice set of wheels but you do get a replacement spare in the conversion set.

Finally a little mroe work on the figs

Al
'Action this Day'
Winston Spencer Churchill
Ohio, United States
Joined: June 12, 2009
KitMaker: 516 posts
Armorama: 391 posts
Posted: Friday, July 17, 2009 - 06:17 AM UTC
Al,
Good review. Thanks for sharing. Where did you get that little map the figure on the left is holding?
Tony
On the Bench:
M2A3 Bradley
It's not a sin to get knocked down;It's a sin to stay down
"Master Chief Boatswains Mate Carl Brashear"
England - East Anglia, United Kingdom
Joined: August 12, 2005
KitMaker: 14,499 posts
Armorama: 11,675 posts
Posted: Friday, July 17, 2009 - 06:35 AM UTC
Hi Tony'
Thanks, the map comes with the figures, there is enough to make 2 maps.
For Tony Roberts.
Scratch build details.
Hi Tony,
Iif you are following this and want to convert your jeep without the kit, then follow these steps. Remove the two projections on the rear bumper. Sand it smooth. Use the Tamiya front axel as normal and build the chassis. On the front bumper saw off each end at the point on the rear where the fitting bracket is (either side). The front bumper should be 25mm in length, then attach 2 small lifting handles (3mm in length) either side of the the starting handle hole. The hole will need moved so that it is central in the bumber. (Also just to clarify the starting handle hole is correct but you need a central point of reference to work from .) Look on the reverse and you will seen a small injection mark. The hole on my example if about a mm off, so drill another to give you a central point of reference.
Saw off the right hand step up on the jeep as shown - OK so far? On some examples of the jeep both steps were removed but it was the right hand one that caused the problem getting the jeep loaded into the Horsa so it was always removed.
Tidy up and seems lines etc on the chassis as normal. Clean up the injection/sink marks on the main frame of the vehicle. That will give youo the squat square look the jeeps had.
Al
Edit : Oh, and drill out the end of the exhaust.
'Action this Day'
Winston Spencer Churchill
England - East Anglia, United Kingdom
Joined: August 12, 2005
KitMaker: 14,499 posts
Armorama: 11,675 posts
Posted: Saturday, July 18, 2009 - 10:20 AM UTC
Hi Tony R,
If you're looking in here's an alternative front bumper. I sanded one of my edges at a bit of an angle so replaced the ends to square it up but if you're careful this shouldn't be necessary. You will need to add a support bar to the rear I used a bit of H beam.


One the build side I've removed and stored the side light from the radiator and fitted the dash, so not much done today.
Al
'Action this Day'
Winston Spencer Churchill
England - East Anglia, United Kingdom
Joined: August 12, 2005
KitMaker: 14,499 posts
Armorama: 11,675 posts
Posted: Saturday, July 18, 2009 - 11:22 PM UTC
Hi Guys
well as mentioned above not a lot done yesterday build wise, just fitted the replacement dashboard and removed the side lights on the radiator.

However, I did have a bit of fun trying to convert the Tamiya parts,
The rim on the bonnet will need reduced by about 0.5mm but I only had 1mm L bean so used that. For fixation points I just used plastic rod although H beam might work better. Width 22mm length 19mm, depth 0.5mm.
The dashboard needs altered to fit the airborne configureation, and still needs some rivets on the 3 panels. I added some slightly larger switches and also the missing horne The tandem towing bar was an experiment from the last RA build in case I messed up the PE part.

Al
'Action this Day'
Winston Spencer Churchill
Warszawa, Poland
Joined: September 13, 2008
KitMaker: 23 posts
Armorama: 22 posts
Posted: Sunday, July 19, 2009 - 12:31 AM UTC
Hi Al!
Jeep is looking very nice.
I hope You will paint it as well as You build this Jeep.
I make
Ardenns diorama 1945 (1/35)

#003
Donegal, Ireland
Joined: May 14, 2002
KitMaker: 9,763 posts
Armorama: 7,444 posts
Posted: Sunday, July 19, 2009 - 01:07 AM UTC
Nice build so far Alan. Im enjoying these conversions.

IPMS Stockholm
"The problem with common sense, is that it is not that common"
England - East Anglia, United Kingdom
Joined: August 12, 2005
KitMaker: 14,499 posts
Armorama: 11,675 posts
Posted: Sunday, July 19, 2009 - 02:09 AM UTC
Hi Frank,
Thanks for looking in.
Added the engine and battery. Part a17 comes with the battery attached to it so probably best to cut it off and glue it as a separate item.


Some work on the kit parts, added the 12 rivets to the 3 small panels on the dashboard along with some more switches and knobs and finished off the bonnet box.

Hi Karol,
Painting is painting, I hand paint every thing so I don't get that perfect finish but then that's not what I'm after, won't be quite like this:

more like this:

The setting is just having come off the gliders so the jeeps would have been fairly clean with just a little dust and normal wear and tear.
Cheers
Al
'Action this Day'
Winston Spencer Churchill


