_GOTOBOTTOM
Armor/AFV: Axis - WWII
Armor and ground forces of the Axis forces during World War II.
Hosted by Darren Baker
Carro Armato L6/40 build log
Dangeroo
#023
Visit this Community
Zurich, Switzerland
Joined: March 13, 2009
KitMaker: 2,058 posts
Armorama: 1,656 posts
Posted: Tuesday, July 28, 2009 - 09:39 AM UTC
Alright, as promised in the discussion to the review here's the buildlog to see how the rest of the kit goes together.

For those who haven't seen it, here's the review:

https://armorama.kitmaker.net/review/4328

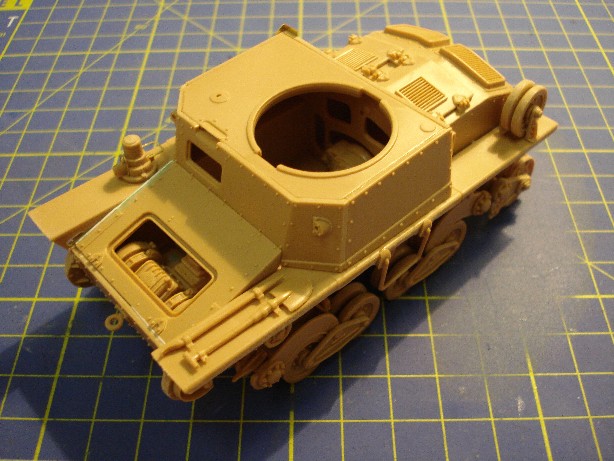
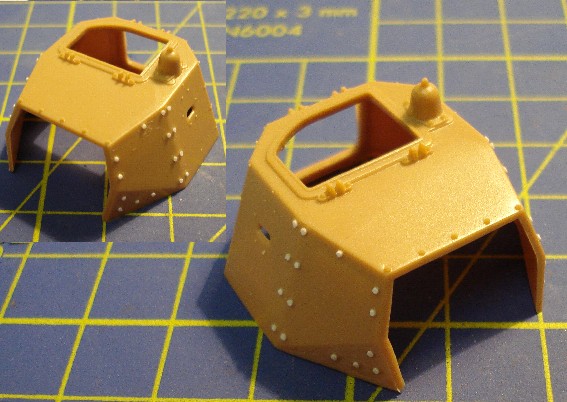
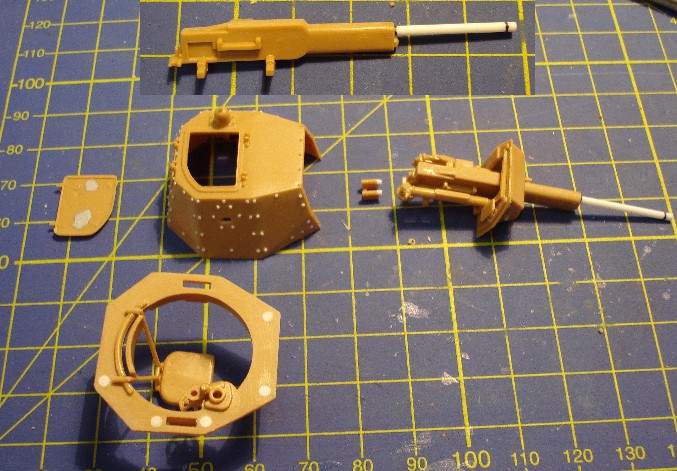
First up a glimpse of the interior. Can't really tell how accurate or well detailed it is since references are scarce. But I think it's good enough for what can be seen through the hatches.


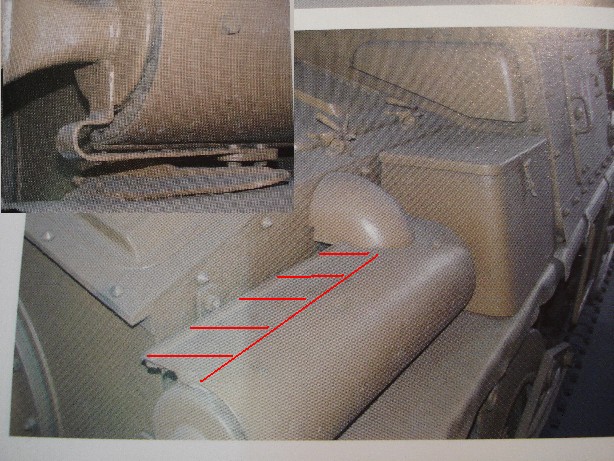
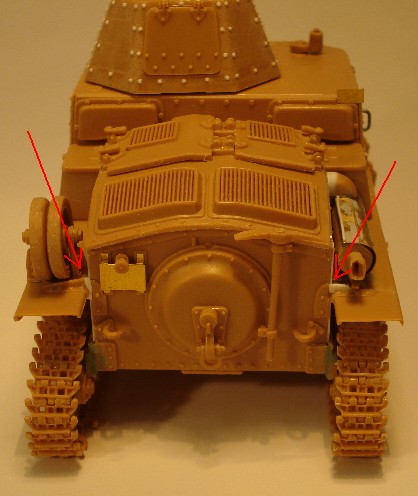
A little filler was needed at the back:


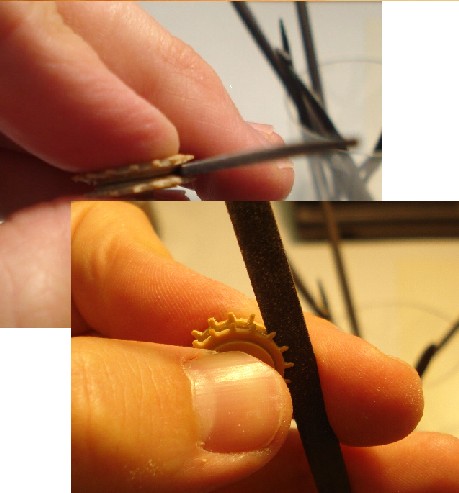
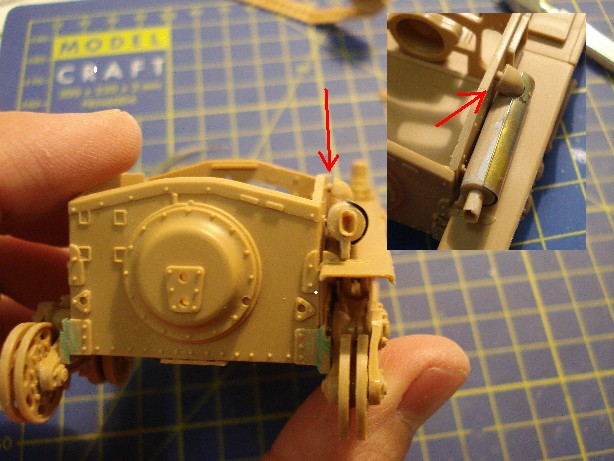
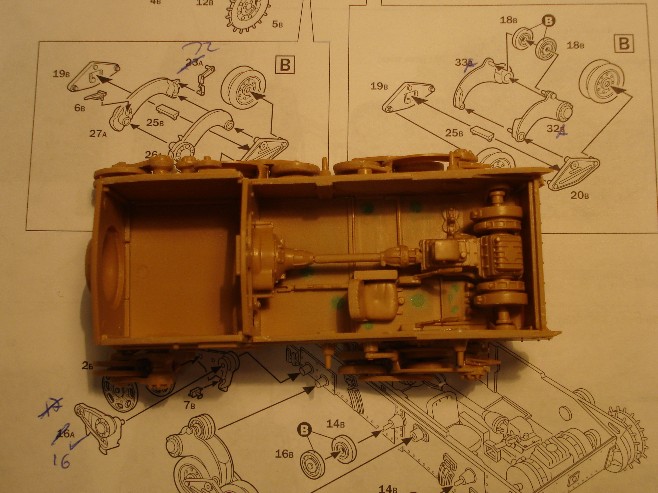
Next another glitch I found in the instructions. In the idler wheel asembly parts A14 and A15 should be the other way around.


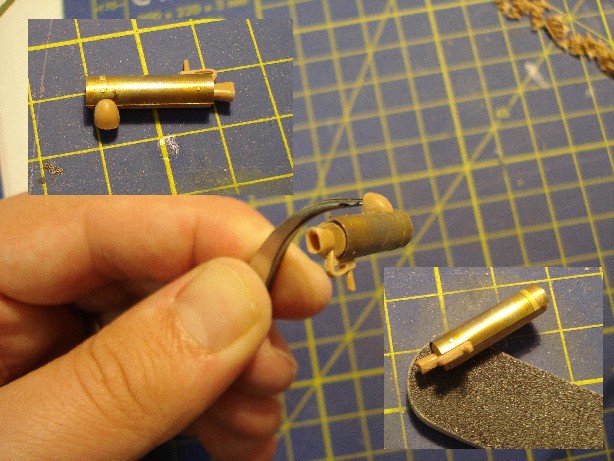
The suspension is a bit fiddly but goes together without any problems. First the parts layout for the middle bogie:


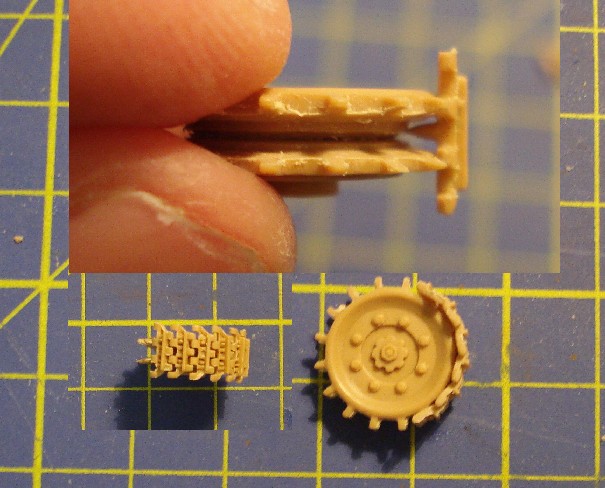
The drive sprocket is built in a way that it can't be turned after assembly as the little cap that goes inside the wheel goes through the other side so is not trapped. I decided not to attach the drive sprockets for now so I can align it with the tracks later on.


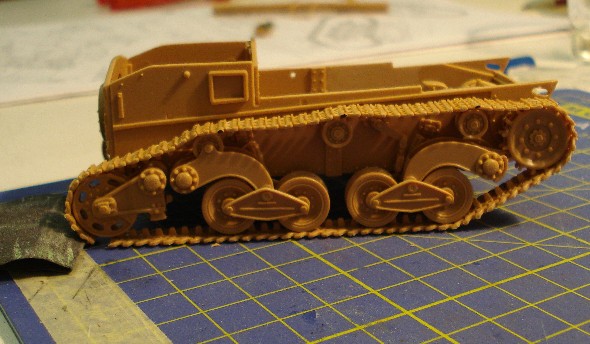
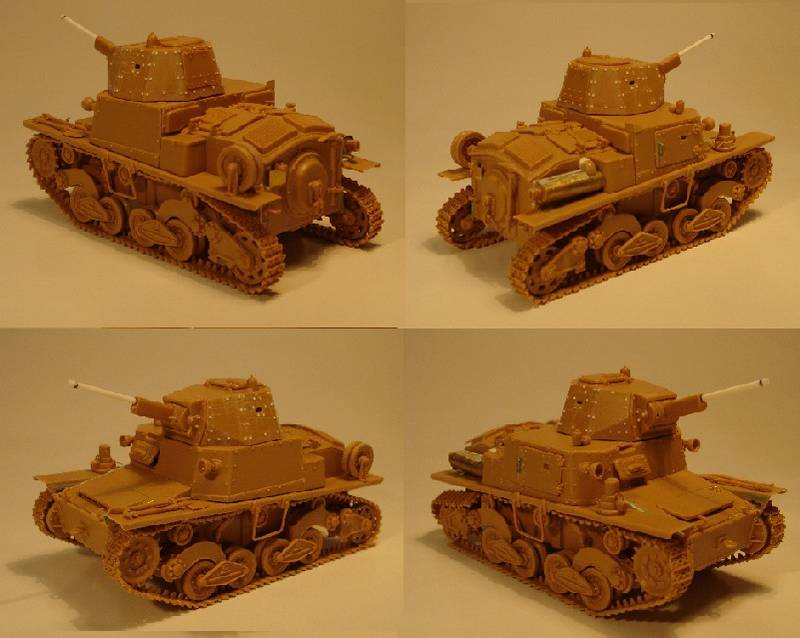
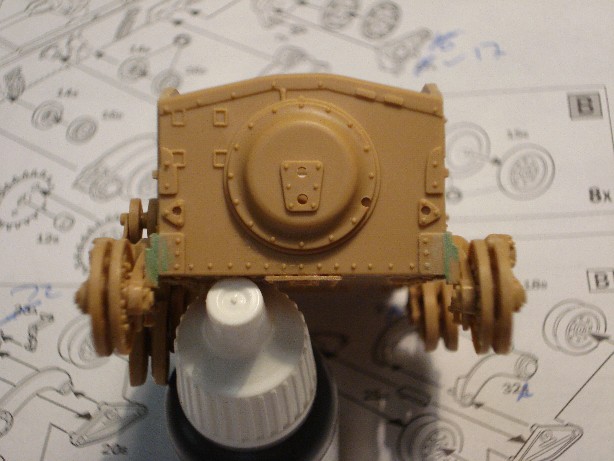
The complete suspension:


Next up: Track fit...
Dangeroo
#023
Visit this Community
Zurich, Switzerland
Joined: March 13, 2009
KitMaker: 2,058 posts
Armorama: 1,656 posts
Posted: Tuesday, July 28, 2009 - 09:44 AM UTC
As pointed out by Javier in the discussion to the review, there is a fit issue with the track on the sprocket:


It's either too small holes or too large pins on the wheels. I decided to take a file to the wheels and sanded a bit on all four sides. The result was this:


So it is possible, but like I said in the review I'm skeptical on track sag. Maybe a case fot the friul tracks after all? I'll tell you once I'm through with step 4:


Not a pleasant sight, the tracks are more like 1/72 scale, but oh well, I'll manage...

To be continued!
Cheers
Stef

PS. Of course any comments welcome!
GaryKato
Visit this Community
California, United States
Joined: December 06, 2004
KitMaker: 3,694 posts
Armorama: 2,693 posts
Posted: Tuesday, July 28, 2009 - 11:20 AM UTC
Italeri seems to have a rather odd take on "link and length" tracks design. I liked the much simpler "link and length" that came with Tamiya's UE where the top run was one length with molded-in sag.
Tarok
Visit this Community
Victoria, Australia
Joined: July 28, 2004
KitMaker: 10,889 posts
Armorama: 3,245 posts
Posted: Tuesday, July 28, 2009 - 12:35 PM UTC
Stefan,

You should definitely ask the editors to update your review with this information and these photos once you're done with the build - IMO all of this should be in the review.

Rudi
Dangeroo
#023
Visit this Community
Zurich, Switzerland
Joined: March 13, 2009
KitMaker: 2,058 posts
Armorama: 1,656 posts
Posted: Tuesday, July 28, 2009 - 07:30 PM UTC
Gary and Rudi

Thanks for your comments. Not to be mistaken, I think the tracks themselves are fine (detailwise). The fit on the sprocket can be resolved. The track sag is an issue I will get to later. But I do like Tamiya's approach to track sag better.

I'll definitely ask for an update of the review if necessary.

Cheers
Stef
rvdvos
Visit this Community
Zuid-Holland, Netherlands
Joined: August 25, 2007
KitMaker: 25 posts
Armorama: 17 posts
Posted: Tuesday, July 28, 2009 - 10:06 PM UTC
Hi Stefan,

I bought the Model Victoria track set (no. 4082)

great set, with new sprocket and idler wheels (more detail) and suspension update parts.
and the tracks fit like a glove.

greetings

René
Dangeroo
#023
Visit this Community
Zurich, Switzerland
Joined: March 13, 2009
KitMaker: 2,058 posts
Armorama: 1,656 posts
Posted: Tuesday, July 28, 2009 - 11:38 PM UTC
René thanks for the hint. Looks good and at a reasonable price too! They also have many other bits for the L6/40 (like a complete interior with engine):

http://www.modelvictoria.it/en.htm

For now I'll try to build it oob to complete the review, but I might get that for a remake later (and maybe add a review of that as well...)

Cheers!
Stef
alanmac
Visit this Community
United Kingdom
Joined: February 25, 2007
KitMaker: 3,033 posts
Armorama: 2,953 posts
Posted: Wednesday, July 29, 2009 - 12:41 AM UTC
Hi

To be honest I think if you add up the cost of Model Victoria interior, tracks and other details to improve the Italeri kit you might as well just buy the more detailed Model Victoria kit of this anyway.

Good that you are continuing with a out of the box build to show what can be achieved with just the Italeri kit and some modelling skills.

Alan
Dangeroo
#023
Visit this Community
Zurich, Switzerland
Joined: March 13, 2009
KitMaker: 2,058 posts
Armorama: 1,656 posts
Posted: Tuesday, August 04, 2009 - 08:03 AM UTC
Alan, I agree, if you want to have the full interior and new tracks you'd probably better get the whole kit from Model Victoria - if it includes all these goodies.

For me the only thing would be a new track set as I'm not a great fan of interiors.

But (with one T), it isn't necessary, as we shall see in the next episode of this spaghetti western:

First the tracks. Last post I was a bit in a hurry and thought I had found a solution. But as I returned, I noticed the track still wouldn't sit correctly. Then I noticed that the guide teeth of the track didn't fit, it wasn't a question of the sprocket teeth... Simple solution: Take a file between the two halves of the sprocket:


The result is a good fit, no filing on any teeths is necessary:


The rest of the track is a breeze, if you don't count cleaning up the tracks which is mor like 1/72 but manageable...


As for the sag it is possible as well. After fitting them together and letting them dry I marked the links that would be on top of the return rollers and then used raw violence on the lengts - I just bent them to the desired shape (it remains to be seen if they still look like this when I get back to my cave...):


(I know there's one link missin, I'll add that as soon as I know everything sits correctly.)


That's it for the tracks, on to the muffler. Stay tuned for episode 4...
Dangeroo
#023
Visit this Community
Zurich, Switzerland
Joined: March 13, 2009
KitMaker: 2,058 posts
Armorama: 1,656 posts
Posted: Tuesday, August 04, 2009 - 08:12 AM UTC
L6/40 episode 4: Muffler Wars Episode I

Plan and parts:


Notice the first etch part to be used. It has to be bent around the tube on the lower right whick of course doesn't really work unless you flame grill the etch part first to get the tension out. Then it works like a breeze. The muffler itsself requires a bit of filler but nothing too fancy. Finished muffler:


And now... Fitting the muffler to the vehicle. As you can see in the pic above the Etch part fits exactly to both corners. But when I add it, the muffler is either crooked, or there is a substantial gap between muffler and engine bay:


Not nice... I will have to decide when I fix it permanently if I will correct the muffler or add some filler... But thats for Episode II of the Muffler Wars.

Now on a lighter note... I also finished the jack. Here's another glitch as the instructions tell you to make holes in the wrong places. The correct places are here:


Right! That's it for now! I shall now return to my cave for further investigations.

Watson out!
Dangeroo
#023
Visit this Community
Zurich, Switzerland
Joined: March 13, 2009
KitMaker: 2,058 posts
Armorama: 1,656 posts
Posted: Sunday, August 09, 2009 - 07:10 AM UTC
Back for another Update...

Muffler Wars II: Italeri strikes back!

The Muffler is worse than I thought at first. This is what it's supposed to look like:


And this is what it looks like in the kit:


So I added some leftover PE sprue to enlarge the muffler cover and to make a new attachment. The result is this:


So much for the muffler wars. Luckily it didn't make it to Episode III...

Next were the track guards, everything smooth there:


The engine deck was a bit warped on my example but fit well when held down with a tape while the glue settled.


Yet another glitch in the instructions when it comes to the towing lug an the front, it should be turned 90°:


The upper hull goes together well, no problems there. The one ejector pin mark was easily taken care of with a punch and dies set and some plastic card:


But then the front glacis has a gaps front and left side that had to be filled with plastic card (Could be that these are due to my not being careful enough when building the hull in the first place...) :


In the end the upper hull comes out well and fits well to the whole assembly:


All in all up to now I have to say I'm thoroughly enjoying myself, although it's not a shake and bake, the basic assembly fits well and it offers a little bit of a challenge. Something I like once in a while!

That's it for now, next episode next week. We'll get to the turret! Cheerio!
exer
Visit this Community
Dublin, Ireland
Joined: November 27, 2004
KitMaker: 6,048 posts
Armorama: 4,619 posts
Posted: Sunday, August 09, 2009 - 08:34 AM UTC
Good work Stefan. Great step by step and really useful photos too. Any chance you could take a photo of a 1/35 scale figure beside what you've built so far to give an idea of the size please?
alanmac
Visit this Community
United Kingdom
Joined: February 25, 2007
KitMaker: 3,033 posts
Armorama: 2,953 posts
Posted: Sunday, August 09, 2009 - 11:00 AM UTC
Hi Stefan.

Nice work on the model, and a good fix on the track problem. It's been mentioned in other builds but nobody seemed to pick up on the issue being the inside of the sprocket diameter being to big. Well done.

I don't wish to be a smart *ss but as regards the muffler gap problem I'm inclined not to put that down to the kit as it seemed perfectly fine in this build by Antonio over on planetarmor
L6/40 Italeri Limited Edition. but from your picture the piece of PE does appear to be wrong.

Growing to like the Italian armour more and more these days despite there poor performance in comparison to the other AFV's of the time. Guess it's the need for something different from all the Tigers, Panthers and Shermans.

Alan
Dangeroo
#023
Visit this Community
Zurich, Switzerland
Joined: March 13, 2009
KitMaker: 2,058 posts
Armorama: 1,656 posts
Posted: Tuesday, August 11, 2009 - 07:58 PM UTC
Pat,
Thanks for the heads up. I will post a picture with a figure or something, but I'm currently out of town, so it could be a few more days.

Alan,
I'm more than ready to take the blame on my shoulders but in this case I really can't find what I could have done wrong. As you can see in the picture below, part 20A is aligned with the partition of parts 12A and 11A. That's how I assembled it and there is no other way.


The photo etch part fits exactly with the round and square cutouts as you can see in this picture:


And as you can see in this picture, the muffler is fitted at a right angle to the track guard:


So in my eyes, there is no room for doubt in favor of the accused... The link you added (thanks for that by the way!) doesn't mention anything about the muffler, but in the painted pictures the hull attechment looks larger than the original Italeri part. I assume he corrected it without mentioning.

Thanks again for your comments! Update next weekend!
Cheerio!
fussball
Visit this Community
Harju, Estonia
Joined: June 30, 2008
KitMaker: 50 posts
Armorama: 48 posts
Posted: Tuesday, August 11, 2009 - 09:06 PM UTC
You are doing a great job with this kit Stefan.
Here's a link to a build, where a fellow Estonian modeller fully scratchbuilt the L6 (1/35 scale). I know, you can't understand the text, but maybe the pictures can give you some pointers. http://www.militaar.net/phpBB2/viewtopic.php?t=12284&postdays=0&postorder=asc&start=0
On the eight page, he has also pointed out some of the inaccuracies with the Italeris kit. For example, the hull is too wide and the angles of the superstructure(?) are wrong.
Keep it up
Karel
Dangeroo
#023
Visit this Community
Zurich, Switzerland
Joined: March 13, 2009
KitMaker: 2,058 posts
Armorama: 1,656 posts
Posted: Wednesday, August 12, 2009 - 01:08 AM UTC
Karel,

Thanks for the Info. Great link! Looks like my review and rating just proved to be waaay too high... My sources were limited, so I couldn't say anything about the overall dimensions. Oh well, that's the way it goes... I guess I'll have to correct the review eventually.

But I will continue the build despite these inaccuracies, fixing them would be too much for me...

Over and out!
Stef
Dangeroo
#023
Visit this Community
Zurich, Switzerland
Joined: March 13, 2009
KitMaker: 2,058 posts
Armorama: 1,656 posts
Posted: Sunday, August 23, 2009 - 04:49 AM UTC
Hi all!

Back again. Only little progress as I was distracted by my project for the ancestors in scale campaign, finally got another project finished...

Anyway, here's the promised comparison, for which I added the AB41 turret. Next to an Italeri Tiger I built a few years back and an old Verlinden figure:


Some details added to the backside:


Some rivets on the gun mantlet are (contrary to what I said in the review) added with a PE-part but I decided it would be easier to just add some styrene rivets:


And I started adding some rivets on the turred and replacing the others:


More to come!

Cheerio!
Stef
csmanning
Visit this Community
Alberta, Canada
Joined: March 23, 2008
KitMaker: 333 posts
Armorama: 321 posts
Posted: Sunday, August 23, 2009 - 05:32 AM UTC
Great work Stefan!

I've also built this kit and had the exact same issues. The warped engine deck, the poor fit of the front armour. I've got it constructed but I'm grateful I didn't start painting it yet as I didn't even notice the missing rivets on the turret... I'll have to fix that. I'll follow your build log. Cheers mate!!
rolf
Visit this Community
Washington, United States
Joined: August 17, 2004
KitMaker: 301 posts
Armorama: 250 posts
Posted: Tuesday, August 25, 2009 - 05:46 AM UTC
Stefan, you are doing a great job on this piece of cr_p kit. For a 2009 release kit from a well established manufacturer like Italeri, there is no excuse for it being this bad. I did a review for it on AMPS and tried to be as nice as possible but it was hard. I caught all the problems you did except the mounting points for the jack (I cut them off my jack and just placed it where it should go). I noticed one thing in your build that I also came across was that you have about a .5mm lip along the rear hull (where the engine deck and rear plate mate with the right lower hull side). This is, I believe, either from the floor plate being slightly too wide are the rear hull plate and engie deck not being wide enough. But that lip sholdn't be there. Another thing you will run across is the rear turret hatch. I had to scratch build one as the kit one was too small and didn't fit properly. I also replaced the gun barrels on the canon and coax MG with brass tube. About the canon. There should be no flare on the end of the barrel. The barrel on the museum tank in the included guide is not correct. It should be just a straight barrel. Again great job on tackeling this kit.

Roy

Roy
Dangeroo
#023
Visit this Community
Zurich, Switzerland
Joined: March 13, 2009
KitMaker: 2,058 posts
Armorama: 1,656 posts
Posted: Tuesday, August 25, 2009 - 06:46 AM UTC
Carmen and Roy, thanks for the heads up!

Yeah the kit is certainly not 21st century, but then I like a challenge once in a while so I don't really mind. I will however definitely have to review my review... I'd still give it some 65% right now, for one thing because it's the only game in town (in plastic that is...).

Hadn't even noticed the lip you mentioned. A piece of plastic card should take care of that...

By the way, you're all welcome to post some pics of your builds!

Off to get some more rivets done now... Cheerio!
rolf
Visit this Community
Washington, United States
Joined: August 17, 2004
KitMaker: 301 posts
Armorama: 250 posts
Posted: Thursday, August 27, 2009 - 11:10 AM UTC
Stefan, I like that you are replacing all the rivits on the turret (it needs it) but I believe they should be conicle rivits. Your's look to flat.

Roy
Dangeroo
#023
Visit this Community
Zurich, Switzerland
Joined: March 13, 2009
KitMaker: 2,058 posts
Armorama: 1,656 posts
Posted: Thursday, August 27, 2009 - 07:25 PM UTC
Roy

Thanks for the hint, I know they should be conical, but I don't know how to produce such rivets (unless I buy them). I'll sacrifice some accuracy for convenience... It still is closer to the real thing then what Italeri provided... After those 2 sentences I should probably go hide somewhere...

I'm getting closer to the finish line on this build, the rivets are done and the other track is ready for mounting. Just fitted the track guards and will have to do some sanding in the front to get them right. I'll post some pics this weekend and have the review updated as well.

Cheerio!
Stef
csmanning
Visit this Community
Alberta, Canada
Joined: March 23, 2008
KitMaker: 333 posts
Armorama: 321 posts
Posted: Friday, August 28, 2009 - 08:54 AM UTC
Stefan

I purchased a Beading Set from a jewellery shop... not the store, a jewellery shop that sells jewellery suppies. The beading tool acts much like a punch and die set but produces conical domes perfect for rivets. I found a set with 24 different size "domes" for $25 CDN... shop around and see what you can find. I built a British Mark IV just over a year ago and replaced most of the rivets and that set was a God send. Give me some time and I can show you what this set looks like... I'll post a picture soon... Good luck mate!!

Carmen
csmanning
Visit this Community
Alberta, Canada
Joined: March 23, 2008
KitMaker: 333 posts
Armorama: 321 posts
Posted: Friday, August 28, 2009 - 09:00 AM UTC
This is the set that I have:

http://www.lacywest.com/53160.jpe

http://www.lacywest.com/20grave.htm

At the end of all the tips are different size cone shaped indents and when pucnhed through styrene produces a dome shaped piece that looks like a rivet. You'll need a hard piece of rubber like a hockey puck or vulcanized rubber or your punched rivet will be punched into the rubber. I hope this helps!! This tool is awesome and highly recommended for rivet making!!
Dangeroo
#023
Visit this Community
Zurich, Switzerland
Joined: March 13, 2009
KitMaker: 2,058 posts
Armorama: 1,656 posts
Posted: Saturday, August 29, 2009 - 03:46 AM UTC
Carmen, thanks for the tip. Looks like it's a swiss product as well, so I'll just have to look around if I can find it. For now I just sanded the edges of the rivets (and none fell off too!! ) and I hope this will turn out well. Here's the completed turret before sanding the rivets. Had no problems at all with the back hatch by the way:


Filled the "gap" in the back with some plastic card:


Here are all the turret parts with the new gun tube added:


A pic from the back where you can see the gaps filled in the track guard attachments (the two methods possible):


And here's an overview of the finished L6/40:


So, that concludes the build. An updated review will follow shortly and then the painting will begin. Sometime. After I've worked on some of the other projects that have been neglected for a while now...

Cheers and thanks for looking!
Stef
 _GOTOTOP