_GOTOBOTTOM
Armor/AFV: Axis - WWII
Armor and ground forces of the Axis forces during World War II.
Hosted by Darren Baker
Who's afraid of a Pzkpfw IV conversion?
Jamesite
Visit this Community
United Kingdom
Joined: December 05, 2006
KitMaker: 2,208 posts
Armorama: 2,152 posts
Posted: Wednesday, August 26, 2009 - 12:48 AM UTC

Quoted Text

And at the other end of the model spectrum I've started a modern Tamiya kit. The Leopard 2A5. And that's almost all I'll be using.

I'm gonna enjoy following this Panzer on her road to completion. Because I don't have nearly enough courage to try something as crazy as this.

Good luck James. I'm cheering for ya!

Matt


lol Matt, I try and build OOTB but always end up adding something!

Glad to have you along and I appreciate the support.

James
Jamesite
Visit this Community
United Kingdom
Joined: December 05, 2006
KitMaker: 2,208 posts
Armorama: 2,152 posts
Posted: Wednesday, August 26, 2009 - 01:16 AM UTC
Update time!

As Frank suggested, one night I just grabbed my saw and started cutting, resulting in this:


Turing into this:


Aaaaaaahhhhhh!

Fortunately with a bit of love I was able to turn the monster into this:


Phew!

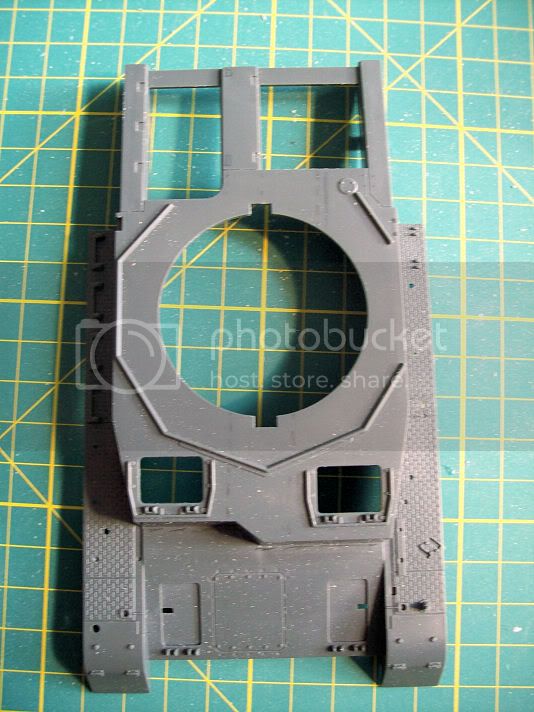
Accuracy wise, i'm not going to make any major claims, The new dimensions are based on the DML hull and glacis plates, as it'll need to fit them.
For that reason some plastic card was added as a shim to the drivers glacis area:


Getting up-armoured already! So far it's looking ok, I need to re-build the splash strip around the turret ring which will be fun.

Not so pretty inside though:


The plastic sheet allowed me to mate the hulls together squarely, and won't be viewable on the finished thing.

So here's a little 'blu-tak and balance' mock-up of the main construction so far:


Thanks for looking and please leave me some feedback!

James
alfa10
Visit this Community
Massachusetts, United States
Joined: January 15, 2009
KitMaker: 121 posts
Armorama: 120 posts
Posted: Wednesday, August 26, 2009 - 01:44 AM UTC
An amazingly ambitious undertaking, and one that is sure to garner loads of interest. I'll enjoy watching your progress. Thanks very much for sharing this.
spitfire303
Visit this Community
Vendee, France
Joined: December 22, 2006
KitMaker: 1,437 posts
Armorama: 1,406 posts
Posted: Wednesday, August 26, 2009 - 09:26 AM UTC
wow, great job James, very nice cutting and gluing all up again, the additional armor looks good.

Keep up the good work and don't cut too much

spit
f1matt
Visit this Community
Manitoba, Canada
Joined: August 13, 2006
KitMaker: 1,021 posts
Armorama: 805 posts
Posted: Wednesday, August 26, 2009 - 10:27 AM UTC
This already looks great. It won't even need paint to be an eye catcher.

Matt
wbill76
Visit this Community
Texas, United States
Joined: May 02, 2006
KitMaker: 5,425 posts
Armorama: 4,659 posts
Posted: Wednesday, August 26, 2009 - 11:39 AM UTC
Surgery looks like it was a success! Making good progress so far James, the scars are very well hidden.
Jamesite
Visit this Community
United Kingdom
Joined: December 05, 2006
KitMaker: 2,208 posts
Armorama: 2,152 posts
Posted: Wednesday, August 26, 2009 - 10:36 PM UTC

Quoted Text

An amazingly ambitious undertaking, and one that is sure to garner loads of interest. I'll enjoy watching your progress. Thanks very much for sharing this.


Thanks, so far i'm very pleased with the response i've had, I really appreciate all the comments. It is a bit ambitious, but I figure thats how you learn new modelling skills, so i'm happy to share it with you.


Quoted Text

wow, great job James, very nice cutting and gluing all up again, the additional armor looks good.
Keep up the good work and don't cut too much
spit


Cheers mate, That was the scariest part of the build so i'm glad it's completed, no stopping me now! It's not really additional armour on the glacis, I was only joking, it is more correcting the shape of the Tamiya kit to match the DML glacis plate.
I'm hoping most of the major surgery is over, however, the turret still needs some work!


Quoted Text

This already looks great. It won't even need paint to be an eye catcher.
Matt


Thanks Matt, a nice point you make, I do sometimes think these real kit-bashes look more interesting without paint as you can see the work involved. Take Tom Cockle's conversions in his modelling the panzer IV books, they really are something.
However, I think i'll have to cover this one up


Quoted Text

Surgery looks like it was a success! Making good progress so far James, the scars are very well hidden.


Cheers Bill, it was, and the patient is recovering nicely - (The surgeon is not doing so well though!) Need to do a bit more cleaning up on what you see here, but once all the exterior bits and bobs are added it hopefully will have little scarring visible.

Thanks to you all for commenting!

James
Jamesite
Visit this Community
United Kingdom
Joined: December 05, 2006
KitMaker: 2,208 posts
Armorama: 2,152 posts
Posted: Friday, August 28, 2009 - 02:42 AM UTC
Ok, with the re-sizing of the upper hull complete, it was time to begin on the interior.
Most of this will be scratch built (certainly in the lower hull) however, one of the main peices; the transmission was aquired from tank workshop.

I must say that after examining the TWS casting I was disapointed, the detail in places is quite crude and the quality of the casting is quite poor, and some details are missing or the wrong shape.
I therefore decided to fix what I could and re-cast the part with the new details added.
First up, a shot of the transmission being detailled:


(note lead rivets, putty and some white plastic)

With this done, the transmission was enclosed in a plastic box made from sheet styrene:


Next I mixed the silocone rubber compound (10-1) and after a day leaving it to set was able to extract my own mould of a Pzkpfw IV transmission!


With this done I was able to mix the resin (1-1) and pour it in, and after 30 mins had my own version:


While generally a success, this is my first ever casting and I think I have a lot to learn, many of the smaller details were not re-created due to the resin not filling the mould properly, but the general impression is there:


And trimmed and filled as neccesary we end up with the beginings of the lower hull interior:


I have since had another go and produced a slightly better version, which i'll be using instead, however, I don't think this resin casting is as easy as I had led myself to beleive, so perhaps I won't be casting the entire turret interior up. We shall see.

That'll have to keep you entertained over the weekend (It's a bank holiday in the UK so I get Monday off! )

Thanks,

James
shrodo3
Visit this Community
Victoria, Australia
Joined: August 30, 2009
KitMaker: 5 posts
Armorama: 4 posts
Posted: Saturday, August 29, 2009 - 04:11 PM UTC
hi james...as others have already said what a great job you have done so far...ive only got back into the hobby after a long break so ive a lot to learn...i will be watching your construction and modifying techniques with interest... regards shane
bizzychicken
Visit this Community
Wales, United Kingdom
Joined: September 06, 2008
KitMaker: 967 posts
Armorama: 842 posts
Posted: Monday, August 31, 2009 - 04:29 AM UTC
James Fair play that cut and shunt on the old tamiya top hull would make some of the car ringers gasp The whole top hull fits great to Dragons lower hull, great workmanship. To be honest I think the Resin moulding of the Transmision looks good, I'm sure the more times you experiment with Resin casting the better results you'll get, dont give up on it. Try and dig some casting techniques off the net, I'm sure you will find some good help/results. looking forward to learning seeing more of this upgunned workhorse, you're on to a winner. Much rather see one made like this oposed to buying Dragons upguned PZ IV kit LOL Geraint
spitfire303
Visit this Community
Vendee, France
Joined: December 22, 2006
KitMaker: 1,437 posts
Armorama: 1,406 posts
Posted: Monday, August 31, 2009 - 09:02 AM UTC
great looking till now. this casting of yours is really looking good. What the hell. Cast the turret man Seriously speaking I really like the job you've done here. Can't wait the paint.


Quoted Text

looking forward to learning seeing more of this upgunned workhorse ,


You Mr you owe me 1$ for the copyright

cheers gang

spit
AlxUSMC
Visit this Community
Armed Forces Europe, United States
Joined: December 04, 2008
KitMaker: 216 posts
Armorama: 132 posts
Posted: Monday, August 31, 2009 - 10:04 AM UTC
only because I am still learning.....whats the benefit of casting the engine vice using the plastic one??
Jamesite
Visit this Community
United Kingdom
Joined: December 05, 2006
KitMaker: 2,208 posts
Armorama: 2,152 posts
Posted: Tuesday, September 01, 2009 - 12:39 AM UTC

Quoted Text

hi james...as others have already said what a great job you have done so far...ive only got back into the hobby after a long break so ive a lot to learn...i will be watching your construction and modifying techniques with interest... regards shane


Thanks Shane,

I hope you can learn something from my blog, but if you are begining i'd advise you start with something simpler!


Quoted Text

James Fair play that cut and shunt on the old tamiya top hull would make some of the car ringers gasp The whole top hull fits great to Dragons lower hull, great workmanship. To be honest I think the Resin moulding of the Transmision looks good, I'm sure the more times you experiment with Resin casting the better results you'll get, dont give up on it. Try and dig some casting techniques off the net, I'm sure you will find some good help/results. looking forward to learning seeing more of this upgunned workhorse, you're on to a winner. Much rather see one made like this oposed to buying Dragons upguned PZ IV kit LOL Geraint


Thanks mate, hopefully i'll have no nasty surprises later down the line with it! I did some more resin casting and at teh minute I reckon I have a 50% success rate, Mould design is halft of it and the way I pour the resin the rest, still I don't believe i'll ever get up to 100% though. I'd much rather build this than buy Dragon's kit!


Quoted Text

great looking till now. this casting of yours is really looking good. What the hell. Cast the turret man Seriously speaking I really like the job you've done here. Can't wait the paint.

You Mr you owe me 1$ for the copyright

cheers gang
spit


lol! As I said to geraint, the casting is a learning curve so we'll see how I get on, I think where I can i'll cast, but I may have to do without elsewhere. The paint is a way off yet!
I think you owe the panzerwaffe a few $'s for copywrite Pawel!


Quoted Text

only because I am still learning.....whats the benefit of casting the engine vice using the plastic one??


Hi Alex, Good to have you along.
The part in question is the transmission (gearbox) not the engine, and the one I have is already a resin casting by a company. The only reason I am copying it is so that I can create my own for future builds as this chassis was used for numerous variants throughout the war and so will be useful.

Cheers guys!

James
AlxUSMC
Visit this Community
Armed Forces Europe, United States
Joined: December 04, 2008
KitMaker: 216 posts
Armorama: 132 posts
Posted: Tuesday, September 01, 2009 - 03:25 AM UTC
Thanks James! So how about in general, whats the benefit of getting resin pieces? I see a lot of modelers use resin AM pieces in their builds, but I dont see the difference in detail sometimes or is it the detail? whats the real benefit?
Jamesite
Visit this Community
United Kingdom
Joined: December 05, 2006
KitMaker: 2,208 posts
Armorama: 2,152 posts
Posted: Tuesday, September 01, 2009 - 08:56 AM UTC

Quoted Text

Thanks James! So how about in general, whats the benefit of getting resin pieces? I see a lot of modelers use resin AM pieces in their builds, but I dont see the difference in detail sometimes or is it the detail? whats the real benefit?


It boils down to two main reasons mate:

1. The parts/kit are not available in styrene plastic and so are only available from smaller companies who find resin easier to produce.

2. With resin csting it is possible to reproduce much more detail at times, particularly with things like heads or stowage items like tarpaulins.

My reason is that it is the only feasible way for me to copy parts I make, and use them for future builds.

Hope that helps,

James
Jamesite
Visit this Community
United Kingdom
Joined: December 05, 2006
KitMaker: 2,208 posts
Armorama: 2,152 posts
Posted: Wednesday, September 09, 2009 - 02:43 AM UTC
Some progress for you (at last!)

First up I have added the splash guards around the turret on the upper hull. They were cut to size using evergreen 1/4 round rod with the curved part carefully sanded flat from scale plans and added accordingly.
I still need to drill out the ends as these were hollow. Something often overlooked by modellers.


The major work has been involved with scratchbuilding the interior. Here are all of the main components:


I know the transmission looks a bit of a mess, I wired up the instrument panel only to find it didn't fit with the glacis when the upper hull was added and so had to remove it resulting in the mess of wire you see here!

The major parts oin the drivers area were built from sheet styrene, and angled rod, or adapted from parts in the spares bin.


All in together and it's begining to take shape!


In other news I have received the Tiger Model Design early driver and RO's hatches which have internal detail on the signal port unlike the Tamiya items.


Whoops, look what else has arrived this week:


But that's another story...........

James
wbill76
Visit this Community
Texas, United States
Joined: May 02, 2006
KitMaker: 5,425 posts
Armorama: 4,659 posts
Posted: Wednesday, September 09, 2009 - 07:42 AM UTC
Wow James, you're making some good progress with this one...just don't get distracted by the shiny new stuff that arrived and you should be ok!
Jamesite
Visit this Community
United Kingdom
Joined: December 05, 2006
KitMaker: 2,208 posts
Armorama: 2,152 posts
Posted: Thursday, September 10, 2009 - 11:49 PM UTC

Quoted Text

Wow James, you're making some good progress with this one...just don't get distracted by the shiny new stuff that arrived and you should be ok!


Cheers Bill. It is coming along, the lower hull interior has been trying but fun at the same time, getting there now.
I'm afraid the shiny new stuff was bought with the express intention of distracting me as progress is slow, I like to have something that is going together quickly to make me feel i'm acomplishing something! The theory is however, that because they are so similar they can be build in tandem and still keep me on track......... at least thats the idea!

Cheers,

James
spitfire303
Visit this Community
Vendee, France
Joined: December 22, 2006
KitMaker: 1,437 posts
Armorama: 1,406 posts
Posted: Friday, September 11, 2009 - 12:54 AM UTC
very good progress James, your scratch build skills are really top notch.
It's interesting to see that you'll put tu barrels into that turret

spit
Jamesite
Visit this Community
United Kingdom
Joined: December 05, 2006
KitMaker: 2,208 posts
Armorama: 2,152 posts
Posted: Sunday, September 13, 2009 - 10:29 PM UTC

Quoted Text

very good progress James, your scratch build skills are really top notch.
It's interesting to see that you'll put tu barrels into that turret

spit


Thanks mate, i'm learning all the time, this is certainly a more ambitious interior to build than my Renault UE!

Two barrels, hmmm, perhaps i'll leave that for the '1946 what if modellers!' One is for the F2 I hope to update you all on soon, and the other is for a future project of an Ausf J final, but don't get excited about that one yet!

Cheers,

James
lespauljames
Visit this Community
England - South West, United Kingdom
Joined: January 06, 2007
KitMaker: 3,661 posts
Armorama: 2,764 posts
Posted: Tuesday, September 15, 2009 - 09:48 PM UTC
looks great work.! and looks fun with the " not so intense build"
PM on the way over original message
keep the updates comin!
milojko
Visit this Community
British Columbia, Canada
Joined: July 24, 2002
KitMaker: 143 posts
Armorama: 124 posts
Posted: Sunday, August 02, 2015 - 09:39 PM UTC
Has this project been abandoned ?
 _GOTOTOP