_GOTOBOTTOM
Armor/AFV: Axis - WWII
Armor and ground forces of the Axis forces during World War II.
Hosted by Darren Baker
Who's afraid of a Pzkpfw IV conversion?
Jamesite
Visit this Community
United Kingdom
Joined: December 05, 2006
KitMaker: 2,208 posts
Armorama: 2,152 posts
Posted: Tuesday, August 18, 2009 - 02:27 AM UTC
I am!

Welcome to a project that in my own typical style has got waaaaaay out of hand.
I'm attempting to turn this:


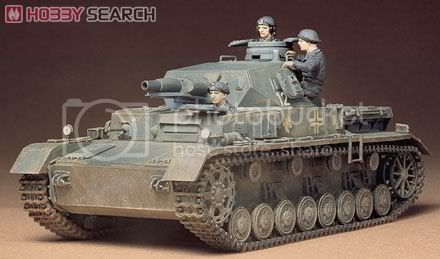
(Tamiya's inaccurate 1970's Panzerkampfwagen IV Ausf D)

into this:


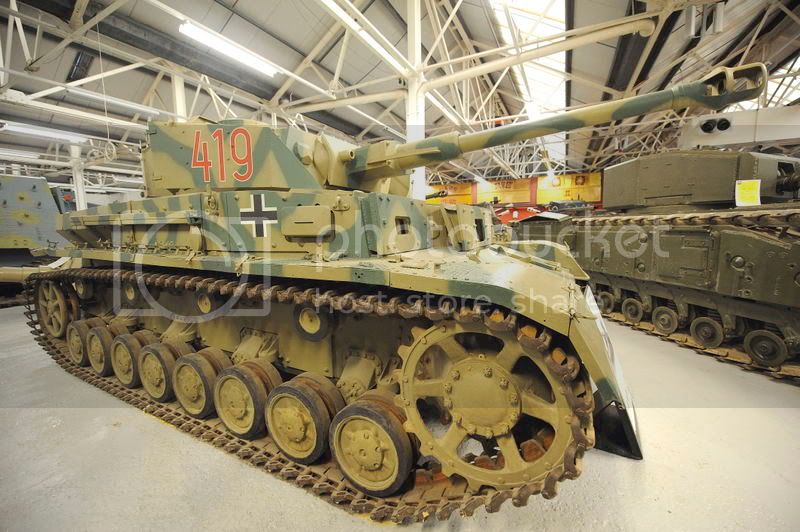
(A Panzerkampfwagen Ausf D upgunned and armoured to Ausf G standard as seen in Bovington)

more importantly, i'm trying to do it as accurately as is feasible


It all started when I was in my (not very) local hobby shop and picked up the Tamiya kit with a mind for something different as a quick and easy build. A modeller freind of mine (Paul) started saying how it wasn't too bad a kit if you ignore some of the major issues and would suit my purposes, however, my stash is big enough already and so I was looking for reasons not to buy it.
We then got chatting about DML's recent release (6330) of the upgunned version which if you know my builds appealed very much to me as I like stuff thats a bit different. Paul then swayed me into buying it by offering some old Tristar wheels and tracks to help accurise the kit.

Several e-mails started to go back and forth between us, and I started some research, when before you know it I'm now begining the build and will be using in some way or other the following:


Oh dear. My cat for one is not impressed:


This has now evolved from these humble beginings into the most serious and detailled build i've undertaken to date. Why? In short i'm having to do a lot of correctins to the Tamiya kit, kit bash it with other parts and add a bunch of aftermarket.
Oh yeah did I mention i'll be scratchbuilding and resin casting an interior?

In order to do this I have been conducting research and ammassing kits since May and am now ready to begin.

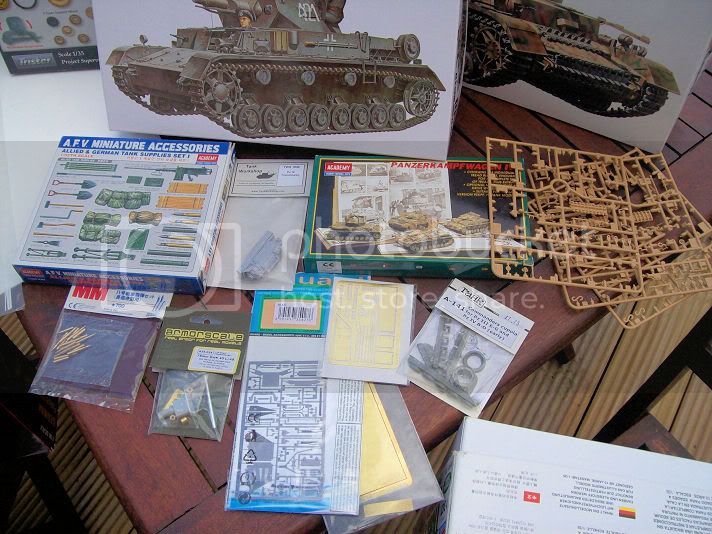
Lets have a look at what all those kits are for.......


In the centre we have the main culprit that in theory will provide the base kit, but in practice most of it will now remain in the box!
-To the right we have Tamiya's lovely Pzkpfw IV Ausf J that will be donating a few generic parts that are better detailed in this later release.
-To the left we have Tristar's excellent Pz.kpfw Iv wheel set, and this will be providing suspension bogeys, bump stops and final drive covers.
-In the far back left and front left are Tamiyas loading crew set that will just be donating some Pz IV rounds for the interior and perhaps the ammo boxes depending on the route the diorama takes (thats a whole other issue we'll get to later!).
-In front of this are some styrene sheet and evergreen rods, this is a token effort to illustrate the scratchbuilding i'll be doing.

And if we zoom in........


From the top left going clockwise we have:
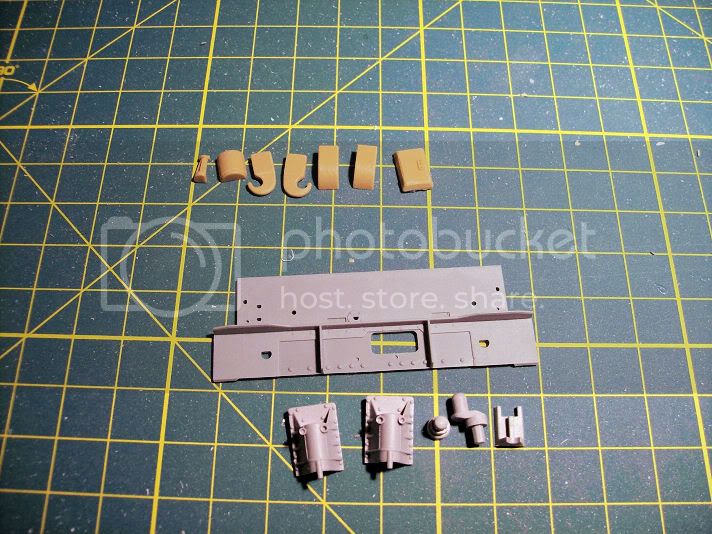
-Academy's tank supplies kit, again some shells and other odd bits will be used.
-Tank Workshops panzer IV transmission, i'm not going to try and scratch one of these!
- Academy's Panzer IV indy link set, not the best available but very cheap and ok to look at, apparently a little wider than the scale 40cm though.
- Tamiya's invaluable Pzkpfw IV OVM sets x3 (I have another 2 elsewhere!) between them they will provide tools and bosch headlights etc.
- Tank resin early cupola for Pzkpfw III and IV, a drastic improvement over the Tamiya cupola.
- Trumpeter Brass turret Schurzen taken from the panzerjagerwagen kit.
- Lionroar PE anti-skid plate
- Eduard PE set for the Tamiya Ausf D.
- Armorscale Pz.kpfw IV Ausf G barrel (L/48 not L/43 - we can discuss this later!)
- Tamiya Pzkpfw IV brass projectiles
- NOT PHOTOGRAPHED Aber PE base plates for German amunition
- NOT PHOTOGRAPHED Tiger Model Designs Early Pzkpfw IV hatches with signal ports.


Next up:


- Eduard's Jagdpanzer Hetzer mid production, this will be donating radio parts.
- Trumpeter's Panzerjagerwagen vol. 1 will be lending it's turret interior
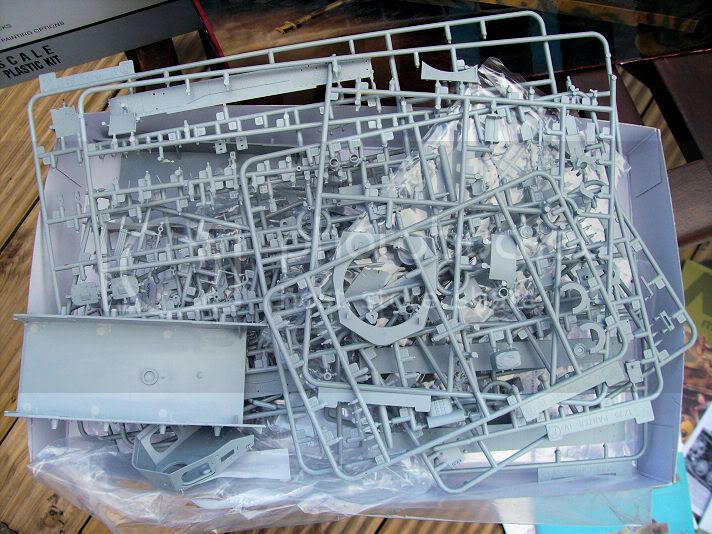
- At the front is a large amount of DML panzer IV early parts donated by freinds, there is a lot of stuff in here and i'm very greatful for it:


On the right:


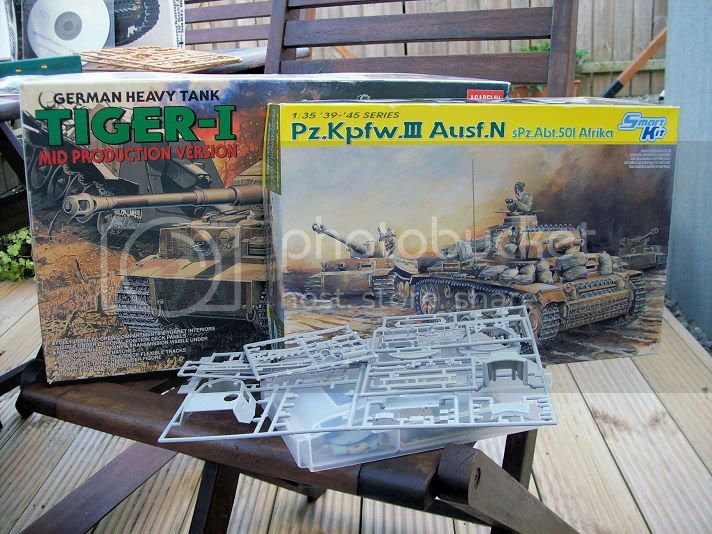
- Academy's Tiger 1 Mid-Production with interior will be giving up some generic German interior parts
- Cyber Hobby's Pzkpfw III Ausf N will give me the bow machine gun and interior parts for vision hatches.
- Various spruces from the spares bin

and other various bits and bobs.....


I won't go into detail on references but this represents the tip of the iceberg:


All of Ospreys relevant books on the Panzer IV, some 1:35 scale plans (though i'm dubious of these) various articles from AFV modeller, both from magazines and downloaded from their online archive and the CD is of a walkaround from the upgunned Panzer IV at Bovington photographed by Paul.
The CD can also represent the information I have ammassed on the PC. At last count this was 1421 files in 125 folders coming in at well over 300MB, and this is growing daily.

I have already had a lot of help from freinds new and old in this preperation and so would like to thank the following people:

Paul Cassidy: For making me buy the kit in the first place (although maybe I should blame you instead?), donating as many parts as he could from his extensive stash of kits, providing some reference material and giving me his opinion and advice on many aspects of the build from day 1.

James (lespauljames): for donating a lot of spares from his DML Ausf E kit and providing me with some very good interior reference material.

Torben Neilsen: For providing me with an excellent set of reference pics and scanning in an old article of a similar conversion, despite not knowing who I was!

Will Phelps: For scanning in Panzer IV interior layout diagrams and running the excellent Panzer IV universe site that i'm sure many are greatful for.

Frank Glackin (plastic battle): who sent me tips and photos from his old blog here where he injected some love into this old kit:
A tale of two Pzkpfw IV Ausf D's

Guillem Martí (GMARTI): For directing me to some Pz IV interior pics.

Anyone else who has helped or provided information along the way. Thankyou guys, I really appreciate it!

James
Jamesite
Visit this Community
United Kingdom
Joined: December 05, 2006
KitMaker: 2,208 posts
Armorama: 2,152 posts
Posted: Tuesday, August 18, 2009 - 03:04 AM UTC
I have just realised that I didn't tick the build log box when posting this, could a nice kind moderator change it so that it comes up with the yellow box in the forum list?

Cheers,

James
Afroman
Visit this Community
Wales, United Kingdom
Joined: April 04, 2007
KitMaker: 152 posts
Armorama: 137 posts
Posted: Tuesday, August 18, 2009 - 03:13 AM UTC
well i though you were sane, seems i was wrong

only kidding my friend, this seems like quite an ambitious build, and i read about the scratch interior that really interested me, could you show us from where you are getting the references for the interior that'd be awesome.

thanks Ollie
spitfire303
Visit this Community
Vendee, France
Joined: December 22, 2006
KitMaker: 1,437 posts
Armorama: 1,406 posts
Posted: Tuesday, August 18, 2009 - 04:05 AM UTC


Quoted Text

I told you to better buy him the up gunned dragon's Pz IV D than giving him money so he can waste them didn't I?


Well mate, you well deserve the Kamikaze ribbon on your profile LOL Good luck to you! I will stay close to this one

spit
John_O
Visit this Community
Oost-Vlaanderen, Belgium
Joined: November 23, 2007
KitMaker: 569 posts
Armorama: 322 posts
Posted: Tuesday, August 18, 2009 - 06:09 AM UTC
Thanks James, you make guys like me feel 'normal' again!

What in godsname are you going to do with all the leftovers of all those kits? Why not consider an outrageous 'What if'-model!

John
wbill76
Visit this Community
Texas, United States
Joined: May 02, 2006
KitMaker: 5,425 posts
Armorama: 4,659 posts
Posted: Tuesday, August 18, 2009 - 07:06 AM UTC
Ought to be entertaining to watch if nothing else James! Lots of stuff to keep track of there, will be interested to see how it all comes together for sure.
Plasticbattle
#003
Visit this Community
Donegal, Ireland
Joined: May 14, 2002
KitMaker: 9,763 posts
Armorama: 7,444 posts
Posted: Tuesday, August 18, 2009 - 07:35 AM UTC
Hi James. Im really looking forward to this build. I had great fun with mines, and am hoping to repeat the experience very soon with another golden oldie from Tamiya. IŽll have to have a look though my "stuff". Im sure IŽll have something to add to your list of reference images. Ive also saved a lot of stuff over the last few years.

Im hoping you could do me a favour (and Im sure a few other would appreciate it as well). Could you please take some close up images of the Tank early cupola? I need one myself and would like to see it. Where did you get this from? Cheers.


bizzychicken
Visit this Community
Wales, United Kingdom
Joined: September 06, 2008
KitMaker: 967 posts
Armorama: 842 posts
Posted: Tuesday, August 18, 2009 - 07:55 AM UTC
James, looking forward to this one. Really enjoyed Franks " A Tale of 2 Pz IV" build. Going to enjoy watching you upgun this old workhorse. Hatches all open Geraint.
Jamesite
Visit this Community
United Kingdom
Joined: December 05, 2006
KitMaker: 2,208 posts
Armorama: 2,152 posts
Posted: Tuesday, August 18, 2009 - 11:57 PM UTC

Quoted Text

well i though you were sane, seems i was wrong

only kidding my friend, this seems like quite an ambitious build, and i read about the scratch interior that really interested me, could you show us from where you are getting the references for the interior that'd be awesome.

thanks Ollie


Thanks Ollie, I am sane when I buy kits, I then go completely mad when I start thinking of what to do with them! Take my Renault UE for example, which also got a scratch interior, however, this is on a much bigger scale!
My references for the interior are from a vast set of sources, some found online and some from the kind people listed above. It would take me too long to list them i'm afraid, however, if there is something in particular you need then give me a shout and i'll be happy to help you out.


Quoted Text


Quoted Text
--------------------------------------------------------------------------------

I told you to better buy him the up gunned dragon's Pz IV D than giving him money so he can waste them didn't I?

--------------------------------------------------------------------------------

Well mate, you well deserve the Kamikaze ribbon on your profile LOL Good luck to you! I will stay close to this one

spit


lol Pawel! You are of course right, but where is the fun in building OOTB? Great to have you along and I know I can rely on you to see this one through to the end my freind!


Quoted Text

Thanks James, you make guys like me feel 'normal' again!

What in godsname are you going to do with all the leftovers of all those kits? Why not consider an outrageous 'What if'-model!

John


Thanks John, what to do with the leftovers is a very good question. I'm thinking a standard Ausf D (or upgrade to Ausf E) for another old Tamiya kit, i'll definatey be turning the Tamiya Ausf J into a final model. I think i'll work my way through the old 1970's Tamiya panzer IV kits and upgrade them until I finally run out of parts, I do have a theory for a what if vehicle, perhaps a destroyed vehicle too? Thats a way of yet though, have enough to think about!


Quoted Text

Ought to be entertaining to watch if nothing else James! Lots of stuff to keep track of there, will be interested to see how it all comes together for sure.


Thanks Bill, hopefully should keep you all entertained, and hopefully have a nice kit at the end of it!


Quoted Text

Hi James. Im really looking forward to this build. I had great fun with mines, and am hoping to repeat the experience very soon with another golden oldie from Tamiya. IŽll have to have a look though my "stuff". Im sure IŽll have something to add to your list of reference images. Ive also saved a lot of stuff over the last few years.

Im hoping you could do me a favour (and Im sure a few other would appreciate it as well). Could you please take some close up images of the Tank early cupola? I need one myself and would like to see it. Where did you get this from? Cheers.


Great to have you along Frank, your build you've posted served as a great influence and I appreciate you helping me out with the pictures. Anything else that may be useful is of course greatly appreciated.

I'll happily get you some detailled pics of the cupola, it is a nice bit of casting and is available from the AFV modeller magazine's online shop. (you needed one of these for your build I bet!) Tamiya's cupola is awful and so this is a must if using this kit.


Quoted Text

James, looking forward to this one. Really enjoyed Franks " A Tale of 2 Pz IV" build. Going to enjoy watching you upgun this old workhorse. Hatches all open Geraint.


Good to have you along Geraint mate, Franks blog was great, just one pzkpfw IV here but hopefully be just as interesting! At this stage i'm not planning on opening the drivers hatch to save me some work, but we shall see!


Thanks to all who have commented so far, will have some progress for you soon!

James
BigJon
Visit this Community
England - West Midlands, United Kingdom
Joined: July 12, 2005
KitMaker: 757 posts
Armorama: 609 posts
Posted: Wednesday, August 19, 2009 - 12:09 AM UTC
I have sat in the turret of that Panzer IV ! It would be great to see someone model that specific tank, I am looking forward to seeing what you do with this.

By the way, she's an uncomfortable old hag a few cushions wouldnt have gone amiss.
Jamesite
Visit this Community
United Kingdom
Joined: December 05, 2006
KitMaker: 2,208 posts
Armorama: 2,152 posts
Posted: Wednesday, August 19, 2009 - 12:53 AM UTC

Quoted Text

I have sat in the turret of that Panzer IV ! It would be great to see someone model that specific tank, I am looking forward to seeing what you do with this.

By the way, she's an uncomfortable old hag a few cushions wouldnt have gone amiss.


lol Jon,
I imagine any cushions are long gone!

I should make it clear i'm not intending to model the Bovington tank exactly, however, it is the best available reference for me and so my build will of course be heavily dependant on it. Mine will differ in that i'll be fitting the longer L/48 cannon as a pose to the L/43 fitted to the Bovington tank, and I wan't to model a front line vehicle rather than a training (NSKK) tank and so my markings will differ too. However, this aside it will be pretty much exactly the same.

Cheers,

James
Jamesite
Visit this Community
United Kingdom
Joined: December 05, 2006
KitMaker: 2,208 posts
Armorama: 2,152 posts
Posted: Wednesday, August 19, 2009 - 01:34 AM UTC
OK lets get started!

First up lets have a look at the Tamiya upper hull:


Not too bad for it's age, the basice details and shape are there, but i'll be removing the front glacis and fenders and replacing them with DML versions. The main hull is fairly simple and is a good impression of the Ausf D:


However, there is one glaring error..... the width. As with almost all of Tamiya's early kits, accuracy was sacrificed in return for the ability to motorize the kits, with their Panzer IV this meant that the lower hull is too wide, has holes in it where it shouln't, an incorrect shape on the lower rear end, not to mention the poor rendition of the bump stops and final drive housings that acompany it.
Fortunately I was donated not one but two lower hull tubs from DML's Ausf E kit! one standard and one with the applique armour panels added as on the version i'm modelling (Thank you to James and Paul respectively).
This means I have an accurate lower hull tub and can discard the Tamiya one. However, while the length is pretty much spot on:


The extra width of The Tamiya upper hull means that the two will not mate together cleanly. As illustarted here:


This is apparent when comparing the two lower hull tubs together:


So some serious surgery is on the cards, and will involve cutting the Tamiya hull right down the centre and re-joining it.

I'm not looking forward to that.

I also found out at a late stage of my planning that the Bovington vehicle has the later type engine deck hatches (Ausf G-J) fitted and so the Tamiya kit options of the solid and tropical hatches can't be used. Bummer, no worries, i'll use the Tamiya Ausf J one's. Nope they are a different shape as Tamiya have corrected the inaccuracies.
Fortunately I dug out the very first 1/35 scale kit I ever built, Tamiya's old Ausf H, which my dad found in his old room at my Grandpa's house and let me destroy with copious amounts of glue.
As the engine deck was moulded as one peice it fotunately had survived the worst of the glue onslaught and so I removed it from the rest of the tank to find it matches up perfectly with the rear deck of the Ausf D:


I need to remove the central panel on the Ausf D hull but this should slot straight in, though will need to be modified to the revised hull width when I get around to this.
I'll also be re-detailling the panel to bring it up to date.

As with any build I do involving an interior (which seems to be most of them these days!) I start here, as the construction and painting takes a while and can slow up the build later on otherwise.
As you can see here, DML have moulded some supports into the lower hull which I have removed, I have also filled the area that is recessed in the central part by fitting a shim of plastic card, though this needs to be made flush at the edges. This gives me a blank canvas with which to start on the interior.


There are however, some holes left at the front in which the DML bogeys and bump stops would be located and I need to fill these. In which case I need to fit the bogeys and bump stops to the exterior first.
Luckily the Tristar bogey housings fit the DML positions fairly well by cutting off the two tabs you are supposed to leave on for the 'D company' and using the tab designed for the 'T company', perhaps they've got this the wrong way around?

Before I get carried away though I wanted to add something missing on almost all renditions of these parts - casting numbers. Almost all pics I have of Pz IV bogey housings display casting numbers on them, so I shaved of numbers from spruces (Tamiya's universal carrier to be exact) and applied them to the housings. They are over scale I know, but they won't be too visible, and in my opinion are better than no details at all. These were then finished up with a light coat of thin liquid cement to add some mild casting texture.


and dry fitted to the hull to see how they look:


Hope that keeps you entertained for the meantime!

All comments welcome,

James
Splinty2001
Visit this Community
Michigan, United States
Joined: October 01, 2004
KitMaker: 283 posts
Armorama: 181 posts
Posted: Wednesday, August 19, 2009 - 02:20 AM UTC
It looks to me like you cleaned out the whole stash getting ready for this one! I'm looking forward to seeing how it goes.
jjumbo
Visit this Community
British Columbia, Canada
Joined: August 27, 2006
KitMaker: 2,012 posts
Armorama: 1,949 posts
Posted: Wednesday, August 19, 2009 - 02:41 AM UTC
Hey James,
Looks like a serious kit-bashing effort on your part !!!
Had a similar if less complicated or extravagant build in mind myself.
Along with the the old Tamiya Panzer IV, I have the old Panzer IV H sitting in my stash too.
I was just going to do a simple cross kitting of the two to produce a vehicle like the Bovington vehicle and then the new Dragon kit showed up.
Best laid plans went out the window !!!
Will watch your build with interest !!!
Cheers

jjumbo
Plasticbattle
#003
Visit this Community
Donegal, Ireland
Joined: May 14, 2002
KitMaker: 9,763 posts
Armorama: 7,444 posts
Posted: Wednesday, August 19, 2009 - 08:40 AM UTC
Great start James. DonŽt worry about cutting the hull .. jump right in. Things like this are more intimidating thinking about it rather than doing it. Do you have the extr Dragon fenders as well? These are pieces of beauty!
spitfire303
Visit this Community
Vendee, France
Joined: December 22, 2006
KitMaker: 1,437 posts
Armorama: 1,406 posts
Posted: Wednesday, August 19, 2009 - 10:11 AM UTC
looking pretty complicated my friend I must admit....good job though. Keep it coming.

spit
lespauljames
Visit this Community
England - South West, United Kingdom
Joined: January 06, 2007
KitMaker: 3,661 posts
Armorama: 2,764 posts
Posted: Wednesday, August 19, 2009 - 10:14 AM UTC
good luck!! looks like you'll need it Frankenpanzer IV
Jamesite
Visit this Community
United Kingdom
Joined: December 05, 2006
KitMaker: 2,208 posts
Armorama: 2,152 posts
Posted: Thursday, August 20, 2009 - 12:50 AM UTC

Quoted Text

It looks to me like you cleaned out the whole stash getting ready for this one! I'm looking forward to seeing how it goes.


lol! It certainly made a dent, but it would take one big diorama (spanning 1939-1945) to use up the entire stash!


Quoted Text

Hey James,
Looks like a serious kit-bashing effort on your part !!!
Had a similar if less complicated or extravagant build in mind myself.
Along with the the old Tamiya Panzer IV, I have the old Panzer IV H sitting in my stash too.
I was just going to do a simple cross kitting of the two to produce a vehicle like the Bovington vehicle and then the new Dragon kit showed up.
Best laid plans went out the window !!!
Will watch your build with interest !!!
Cheers

jjumbo


You should give it a go! The great thing about the old Tamiya kits (unless you get completely carried away like myself) is that you can have a bit of fun and try things out without too much to worry about as they are fairly cheap. Great to have you along anyway!


Quoted Text

Great start James. DonŽt worry about cutting the hull .. jump right in. Things like this are more intimidating thinking about it rather than doing it. Do you have the extr Dragon fenders as well? These are pieces of beauty!


You are right Frank, I just need to bite the bullet with them. Yes I have been kindly donated some DML slide moulded fenders, and they are indeed wonders of injection moulded plastic.


Quoted Text

looking pretty complicated my friend I must admit....good job though. Keep it coming.

spit


Complicated? me? never!
Thanks mate.


Quoted Text

good luck!! looks like you'll need it Frankenpanzer IV


Thanks mate, I owe you one!
Frakenpanzer?

Thanks to all,

James
Jamesite
Visit this Community
United Kingdom
Joined: December 05, 2006
KitMaker: 2,208 posts
Armorama: 2,152 posts
Posted: Thursday, August 20, 2009 - 01:40 AM UTC
As you know, the subconcious modelling devil inside me has attempted to make this build as difficult as possible, and so i'm going to attempt to cast a lot of the interior and other select parts in resin so that I can use them on future pzkpfw IV builds.

First up is the gun breech.
I have the Tamiya Ausf J breech, and the trumpeter turret interior, along with a DML ausf E turret interior spruce that will be providing most of the parts.
By checking references I have selected from what I have available the most accurate bits of each kit to combine together and produce the basics for my own master to cast.
So far I have come up with the following:


Most of this is the Trumpeter breech and parts with a large proportion of DML bits too, the only Tamiya part is the gun cradle bag. Other additions include a MG-34 from the Cyber hobby Pz III kit, ammo bag from the Academy Tiger, spare rounds from teh Academy accesories set (I thought it would be nice to mould the rounds in the bag) and a MG-34 turret support thing from the spares bin.
The turret front plate is from the DML Ausf E kit and has had shims added to allow it to mate up to the Tamiya Ausf D turret shell. I don't however have the external parts that fit under the gun mantlet, and so by way of careful sanding have removed the Tamiya part from the front plate (in blue) that will be adapted to fit between the DML part and the lovely armourscale mantlet seen in the pic.

You'll see I have done some detailling work to these parts already, but this is mostly to understand the fit between the different kits. I'll be using my reference treasure trove to add some fine details before I prepare them for casting.


A similar philosophy will be used for the parts in the pic below with the exception of the rear glacis plate from the DML Ausf E kit.


Idler mounts will be cast along with the generic panzer IV parts from the Tamiya Ausf J kit, these will all come in very handy for future builds.

Thats all folks!

James
Jamesite
Visit this Community
United Kingdom
Joined: December 05, 2006
KitMaker: 2,208 posts
Armorama: 2,152 posts
Posted: Friday, August 21, 2009 - 03:52 AM UTC
Just to announce there has been an addition to the reference list:

Panzer IV PzKpfw Ausf A-J (Tanks in Detail), Jonathan Forty

An initial flick through shows that it is going to be very useful, though I have already spotted a couple of incorrect captions

There are some scale plans in here, though the most useful set to me are of the interior but are not 1/35 and are on the centre page which made scanning them in and re-scaling them a real pain, still have a version i'm happy with and will see how I fare with them later.

Some good bedtime reading anyway!

James
Plasticbattle
#003
Visit this Community
Donegal, Ireland
Joined: May 14, 2002
KitMaker: 9,763 posts
Armorama: 7,444 posts
Posted: Friday, August 21, 2009 - 04:26 AM UTC

Quoted Text

though I have already spotted a couple of incorrect captions


The Ausf. D turret with the late cupola is one I will never forget. This is why I purchased the late cupola for mines. Its actually an "E". The exact same photo is in Spielbergers Panzer IV book, and properlly labelled "E".
lespauljames
Visit this Community
England - South West, United Kingdom
Joined: January 06, 2007
KitMaker: 3,661 posts
Armorama: 2,764 posts
Posted: Friday, August 21, 2009 - 06:09 AM UTC
Frankenpanzer IV ! panzer IV made from bits and bobs of other panzer IV's
i was gonna drop you a pm to see if you wanted to borrow that book! but your way ahead of me, as you probably guessed most of the ref i uploaded was from there. its not a bad book though. good one on the casting numbers, were they added ramdomy or were each taken from a certain tank?
BigJon
Visit this Community
England - West Midlands, United Kingdom
Joined: July 12, 2005
KitMaker: 757 posts
Armorama: 609 posts
Posted: Saturday, August 22, 2009 - 12:16 AM UTC
This really is the kind of article I love to watch. The potential to learn about old kits and the vehicles they represent means you can build some great models out of bargain offerings and pick up some tips along the way.

Great start, will be watching with interest !
Jamesite
Visit this Community
United Kingdom
Joined: December 05, 2006
KitMaker: 2,208 posts
Armorama: 2,152 posts
Posted: Saturday, August 22, 2009 - 07:57 AM UTC

Quoted Text


Quoted Text

though I have already spotted a couple of incorrect captions


The Ausf. D turret with the late cupola is one I will never forget. This is why I purchased the late cupola for mines. Its actually an "E". The exact same photo is in Spielbergers Panzer IV book, and properlly labelled "E".


Yes thats one of the more glaring one's! Another great one is the Ausf C, that is blatantly an F or G and even draws attention to the later style ball mount hull MG. Oh and of course, that all Ausf J's had 3 return rollers

Never mind, the bulk of the text seems on the ball and there are some very useful photos in there.


Quoted Text

Frankenpanzer IV ! panzer IV made from bits and bobs of other panzer IV's
i was gonna drop you a pm to see if you wanted to borrow that book! but your way ahead of me, as you probably guessed most of the ref i uploaded was from there. its not a bad book though. good one on the casting numbers, were they added ramdomy or were each taken from a certain tank?


lol, hopefully that will soon become official terminology!
Actually, that may soon become a reality........... I have a plan up my sleve i'll elaborate on later.
Yes I did clock that a lot of the pics you kindly provided were from here (kind of you to offer to lend it), Will Phelps suggested I buy it and as he knows a lot about the Pzkpfw IV, I thought it a good idea!
The casting numbers are not based on an individual tank, However, to apply numbers in scale would have been impossible for me, and so I found the smallest spruce numbers I had (that also had a suitable 'font') and just added 3 per bogey due to space restrictions,
In reality they should look more like this:


Quoted Text

This really is the kind of article I love to watch. The potential to learn about old kits and the vehicles they represent means you can build some great models out of bargain offerings and pick up some tips along the way.

Great start, will be watching with interest !


Jon, thanks a lot, glad this is up your street, and I hope you find the progress entertaining, It's great if others can learn from my work, so I encourage all questions etc.

Thanks gentlemen!

James
f1matt
Visit this Community
Manitoba, Canada
Joined: August 13, 2006
KitMaker: 1,021 posts
Armorama: 805 posts
Posted: Saturday, August 22, 2009 - 09:27 AM UTC
And at the other end of the model spectrum I've started a modern Tamiya kit. The Leopard 2A5. And that's almost all I'll be using.

I'm gonna enjoy following this Panzer on her road to completion. Because I don't have nearly enough courage to try something as crazy as this.

Good luck James. I'm cheering for ya!

Matt
 _GOTOTOP