Bronco's 1/35 AA Staghound
United States
Joined: July 04, 2009
KitMaker: 241 posts
Armorama: 199 posts
Posted: Friday, October 09, 2009 - 05:04 AM UTC
United States
Joined: July 04, 2009
KitMaker: 241 posts
Armorama: 199 posts
Posted: Friday, October 09, 2009 - 05:53 AM UTC
Illinois, United States
Joined: March 24, 2006
KitMaker: 1,816 posts
Armorama: 1,402 posts
Posted: Friday, October 09, 2009 - 08:34 AM UTC
Once again, simply stunning Randy... INCREDIBLE.

Patrick Keenan
Editor - WarWheels.net
IPMS/USA Armored Car/Wheeled Fighting Vehicle SIG Leader

#023
Zurich, Switzerland
Joined: March 13, 2009
KitMaker: 2,058 posts
Armorama: 1,656 posts
Posted: Saturday, October 10, 2009 - 12:23 AM UTC
The Staghound detail madness continues... Absolutely stunning work! The tools are a great touch! Please continue!
Cheerio!
Stef
Too many models - too little time...
United States
Joined: July 04, 2009
KitMaker: 241 posts
Armorama: 199 posts
Posted: Saturday, October 10, 2009 - 03:24 AM UTC
Thank you Patrick....
Stef , Thanks for the comments......
Randy
England - East Anglia, United Kingdom
Joined: August 12, 2005
KitMaker: 14,499 posts
Armorama: 11,675 posts
Posted: Saturday, October 10, 2009 - 04:58 AM UTC
Hi Randy,
More brillient stuff. Might get a stopage with that slightly twisted round lol, lol.
Amazing detail, this should be some vehicle when it's done.
Al
'Action this Day'
Winston Spencer Churchill
United States
Joined: July 04, 2009
KitMaker: 241 posts
Armorama: 199 posts
Posted: Saturday, October 10, 2009 - 06:20 AM UTC
Hi Al , Thank you for the comments. The ammo clips are a pain in the a**

. I think I will glue them in position when I'm all done. Randy
England - West Midlands, United Kingdom
Joined: August 29, 2005
KitMaker: 191 posts
Armorama: 176 posts
Posted: Saturday, October 10, 2009 - 06:48 AM UTC
Hi Randy,
Glad to see all that info came in useful.
Amazing work as usual. Keep it up.
Cheers
Kevin
United States
Joined: July 04, 2009
KitMaker: 241 posts
Armorama: 199 posts
Posted: Sunday, October 11, 2009 - 02:57 AM UTC
Hi Kevin, Could not have finished this without you. Glad you like it
Randy
New York, United States
Joined: January 21, 2008
KitMaker: 2,531 posts
Armorama: 859 posts
Posted: Monday, October 12, 2009 - 04:41 AM UTC
Hello Randy, Incredible work, I don't know how you work with such microscopic parts. The scratch-building is very impressive. Your interior looks so realistic, like you could climb in and drive away.

Al
United States
Joined: July 04, 2009
KitMaker: 241 posts
Armorama: 199 posts
Posted: Monday, October 12, 2009 - 05:56 AM UTC
Hi Al, Thank you for the kind words, willpost more soon. Randy
British Columbia, Canada
Joined: August 27, 2006
KitMaker: 2,012 posts
Armorama: 1,949 posts
Posted: Monday, October 12, 2009 - 11:42 AM UTC
Hey Randy,
I've been watching your build from the beginning.
I personally can't find the words to describe what you're doing other than "That's F***ing Amazing" or OMG !!
Looking forward to the finished build.
Cheers
jjumbo
Arthur Hamilton Jukes
July 6th, 1922 - June 20th, 2009
Dad, it's been a year now but your love will always be with us.
The Canadian Scottish (Princess Mary's)
Motto - "DEAS GU CATH" - Ready for the Fray
March - Blue Bonnets Over The Border
United States
Joined: July 04, 2009
KitMaker: 241 posts
Armorama: 199 posts
Posted: Tuesday, October 13, 2009 - 03:16 AM UTC
Hi John, Thank you for the comments, kinda anxious to see this one completed myself. Randy
British Columbia, Canada
Joined: August 27, 2006
KitMaker: 2,012 posts
Armorama: 1,949 posts
Posted: Thursday, October 15, 2009 - 09:14 PM UTC
Hey Randy,
I just picked up this kit yesterday at my LHS.
Think I'll take the lazy route and maybe keep all the hatches closed up.
Looking forward to the next installment !!
Cheers
jjumbo
Arthur Hamilton Jukes
July 6th, 1922 - June 20th, 2009
Dad, it's been a year now but your love will always be with us.
The Canadian Scottish (Princess Mary's)
Motto - "DEAS GU CATH" - Ready for the Fray
March - Blue Bonnets Over The Border
United States
Joined: July 04, 2009
KitMaker: 241 posts
Armorama: 199 posts
Posted: Wednesday, October 21, 2009 - 03:06 AM UTC
Hi John, I think you will enjoy the kit....... Randy
United States
Joined: July 04, 2009
KitMaker: 241 posts
Armorama: 199 posts
Posted: Wednesday, October 21, 2009 - 03:36 AM UTC
United States
Joined: July 04, 2009
KitMaker: 241 posts
Armorama: 199 posts
Posted: Wednesday, October 21, 2009 - 03:51 AM UTC
Illinois, United States
Joined: March 24, 2006
KitMaker: 1,816 posts
Armorama: 1,402 posts
Posted: Wednesday, October 21, 2009 - 03:53 AM UTC
Once again... stunning. I'd love to see this in person... Any chance you'll be going to AMPS 2010 in Auburn, Indiana (April 22nd-24th)? I'd think you'd do really well with this model... to say the least.
Patrick Keenan
Editor - WarWheels.net
IPMS/USA Armored Car/Wheeled Fighting Vehicle SIG Leader
United States
Joined: July 04, 2009
KitMaker: 241 posts
Armorama: 199 posts
Posted: Wednesday, October 21, 2009 - 06:32 AM UTC
Thanks Patrick , As slow as I build I don't know if I'll be done by then

Randy
Illinois, United States
Joined: February 10, 2004
KitMaker: 2,058 posts
Armorama: 791 posts
Posted: Sunday, November 01, 2009 - 05:45 PM UTC
Randy, you are an amazing scratchbuilder! Wow. Simply stunned and inspired.
Giggity, giggity
Giggity goo.
Alright.
Cuhail

Campaigns:
Stop, Look and Listen -ENDS 1-31-10
ACUTR Again-STARTS 08-18-09
What if? -STARTS 06-01-09
On the bench:
1/35 Scratchbuilt Rail Tank
United States
Joined: July 04, 2009
KitMaker: 241 posts
Armorama: 199 posts
Posted: Tuesday, November 03, 2009 - 02:02 AM UTC
Thanks Cuhail, you're no slouch yourself

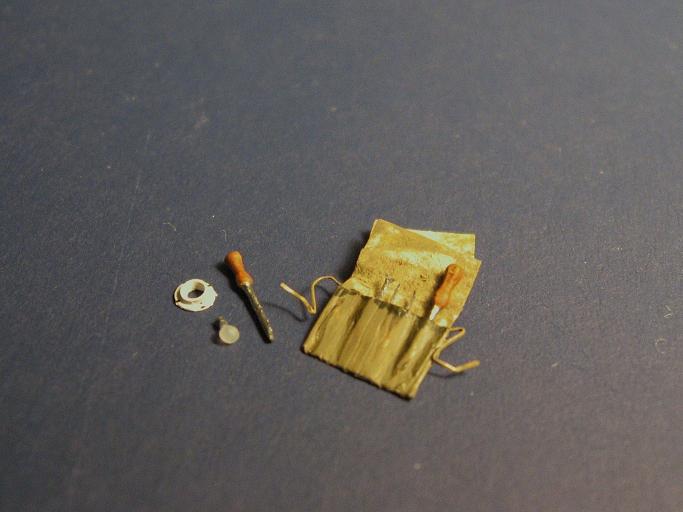
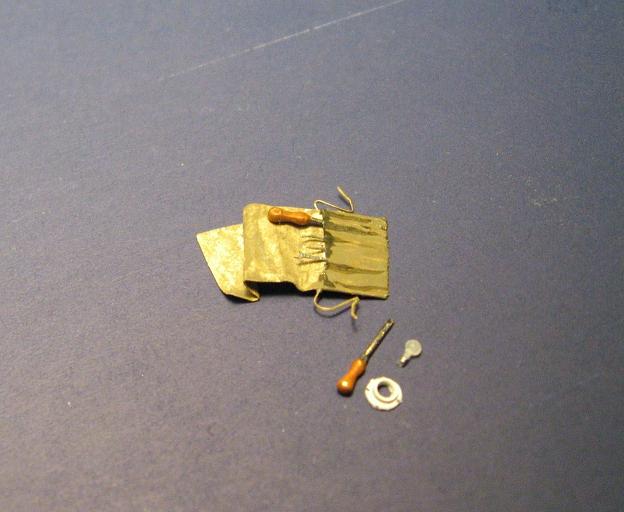
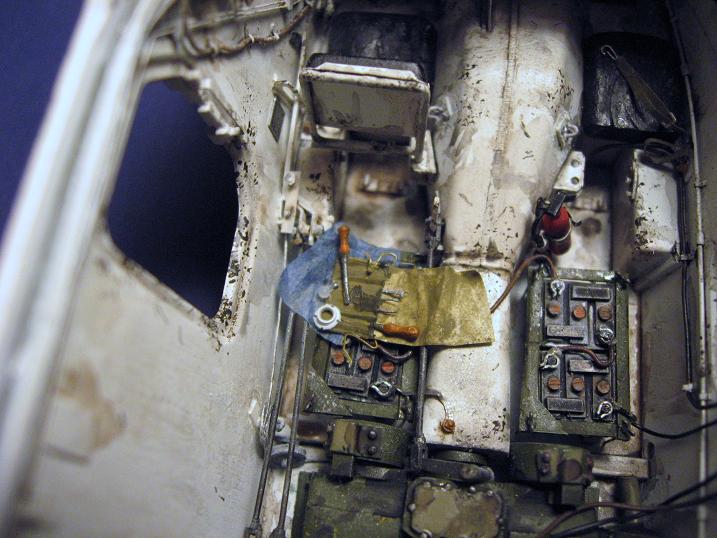
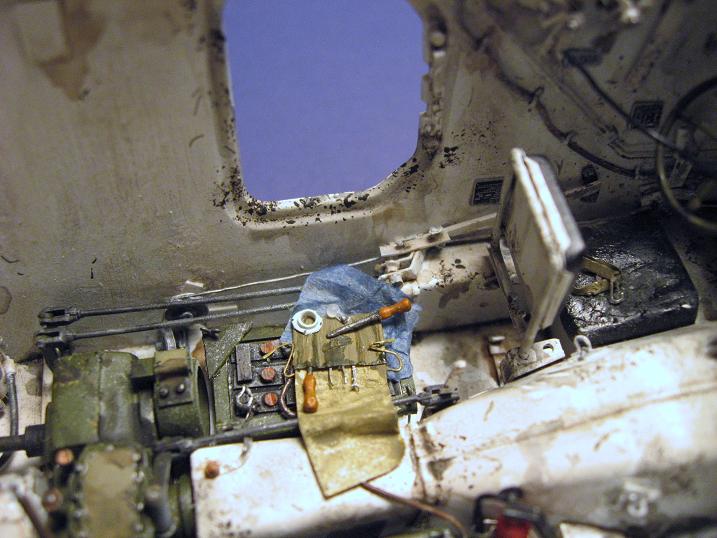
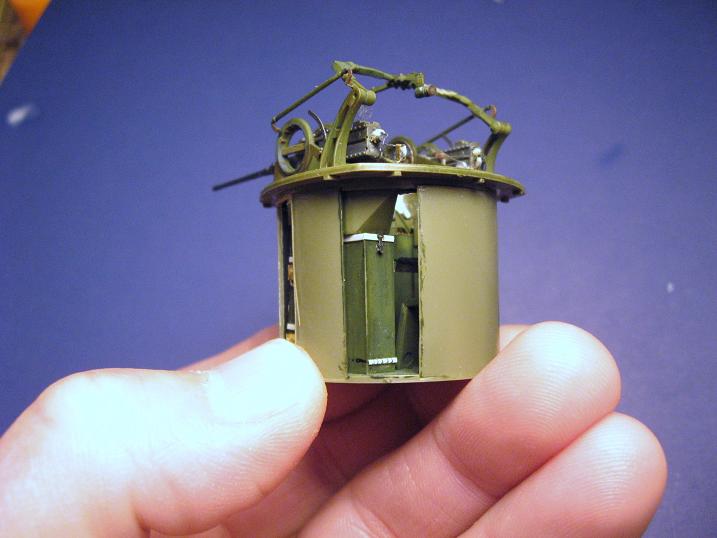
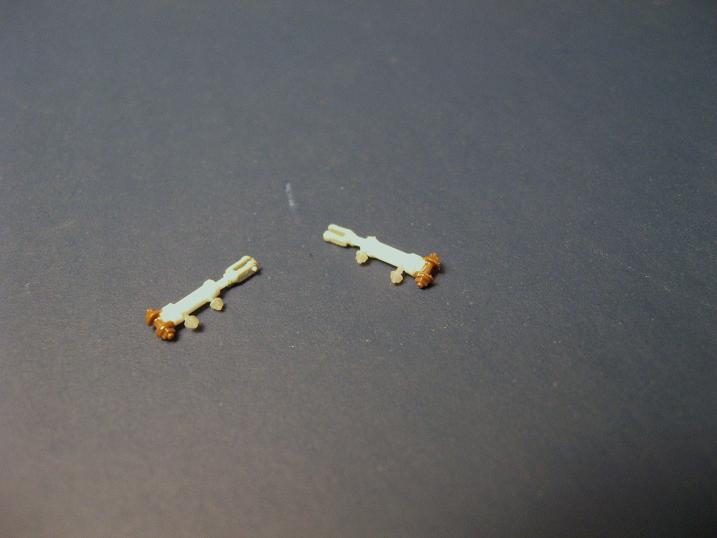
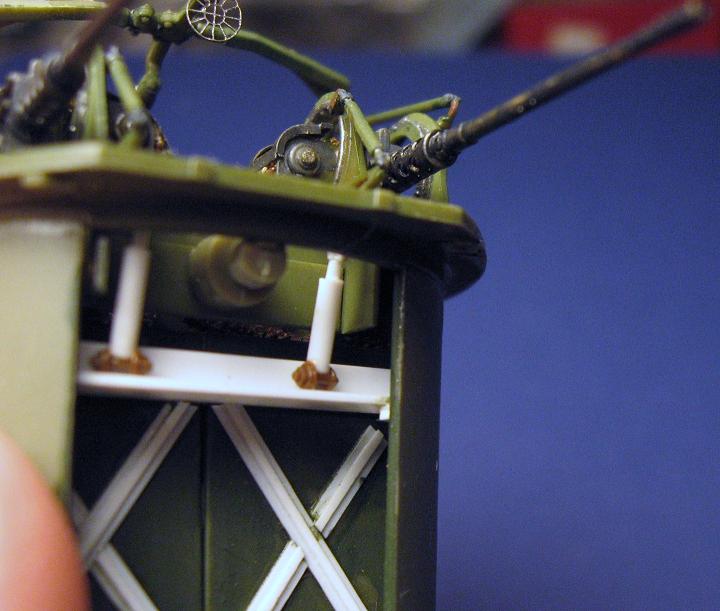
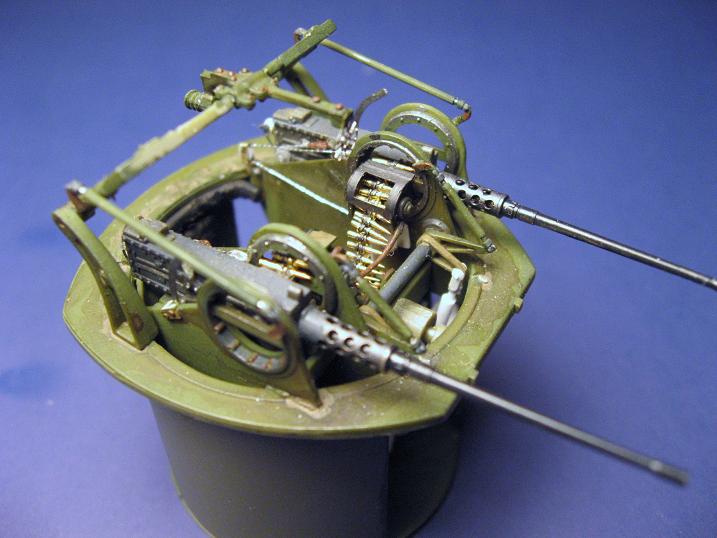
An update...............
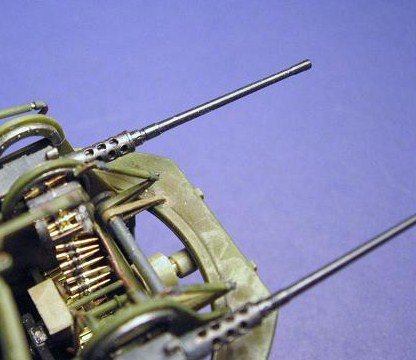
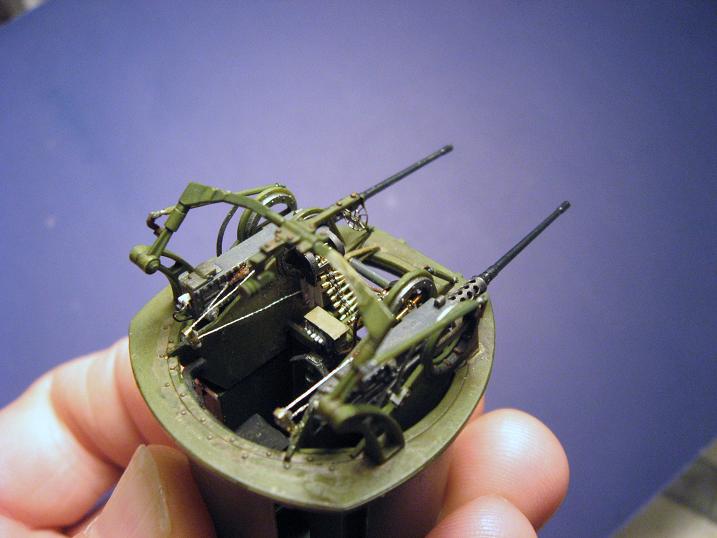
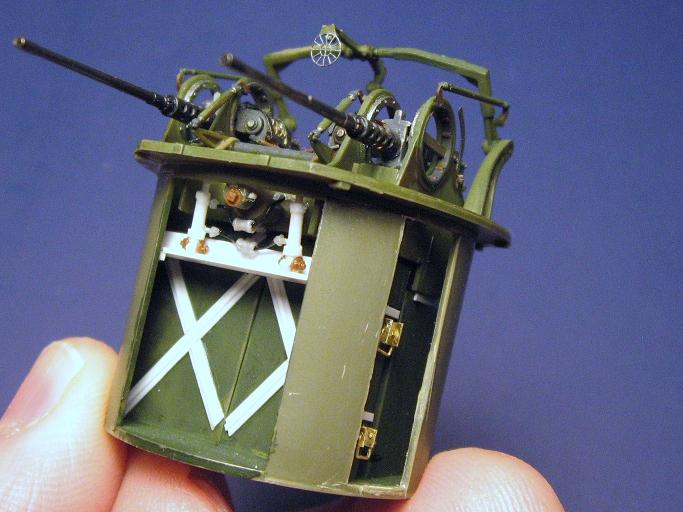
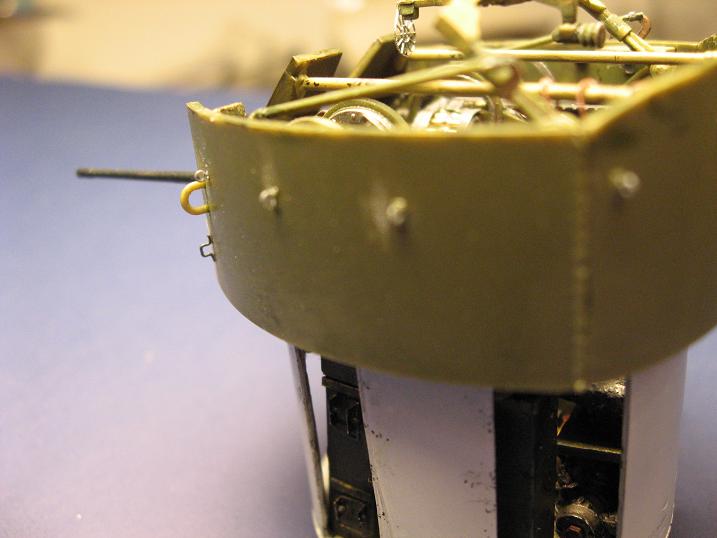
Still working on the upper turret, about the only stuff the kit omits are the components for the phone system, the dome light and the piping and wiring coming from the slip ring in the turret floor....
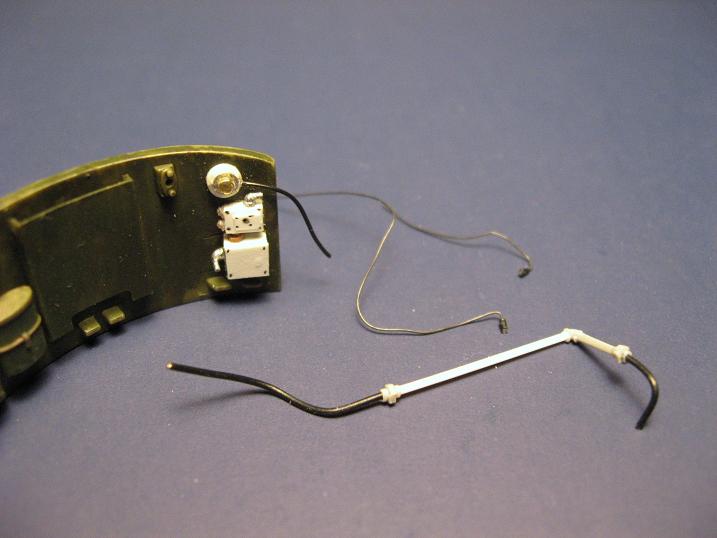
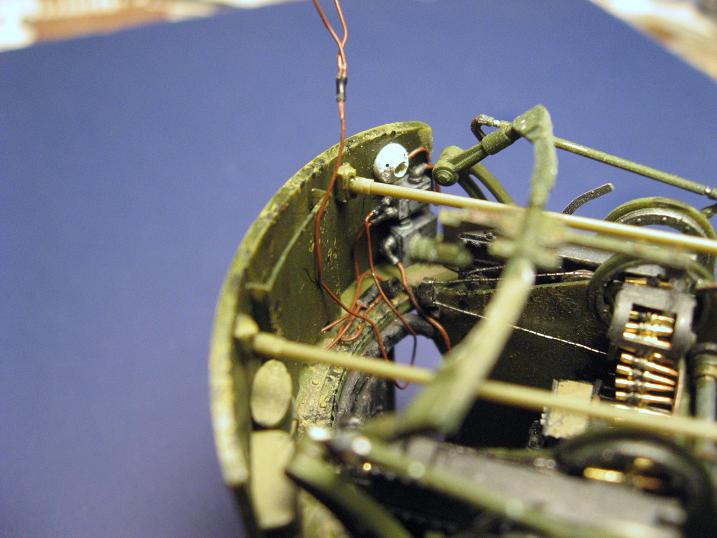
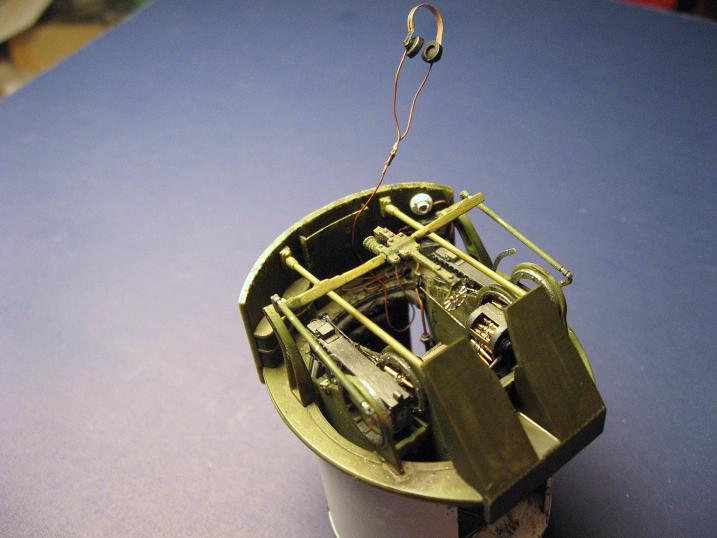
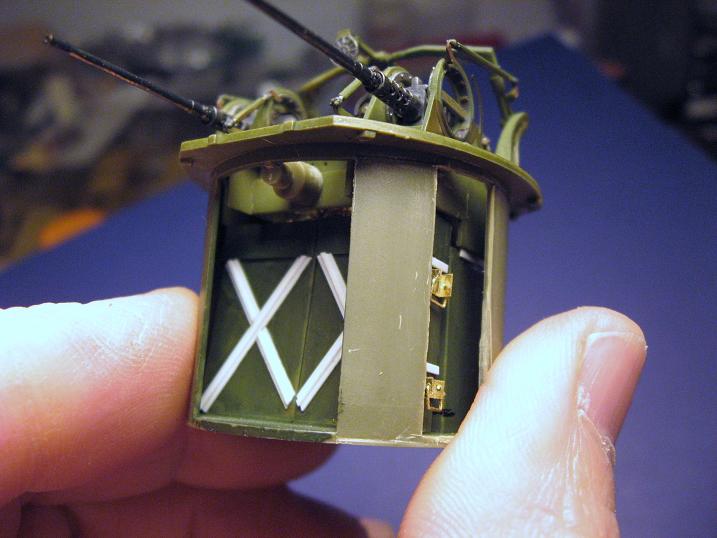
This is paint and weather as you go time, it gets tight as the side walls are added.
The outside of the turret has some cast on detail for hooks and things that could be better...
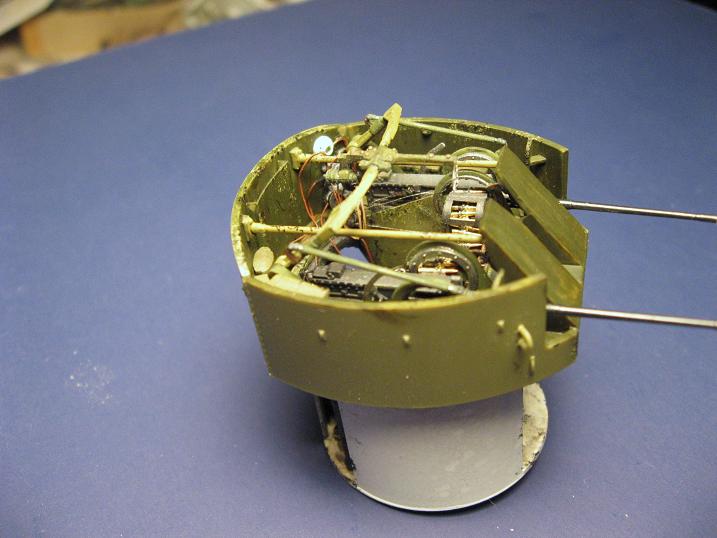
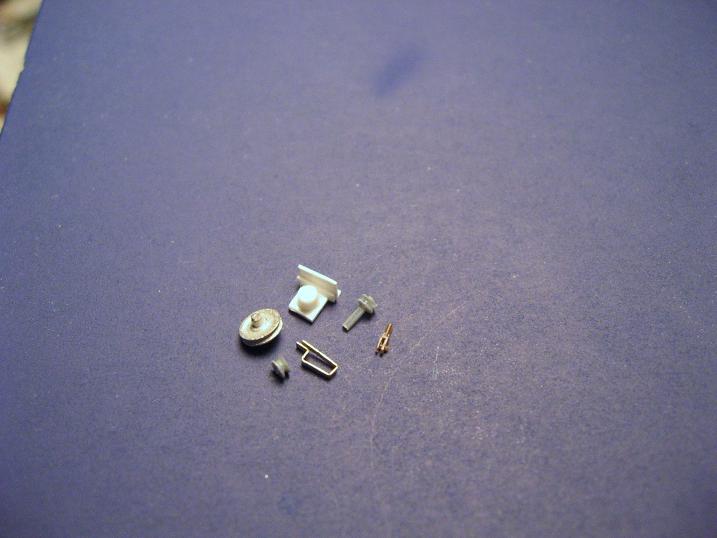
Removed this and added some eyebolts from Grantline and some brackets from wire. The eyebolts will be trimmed down to hook shape after painting the outside.
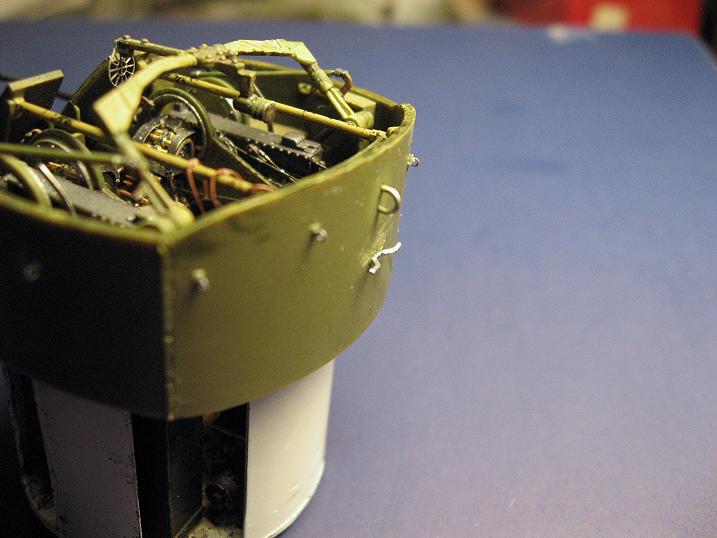
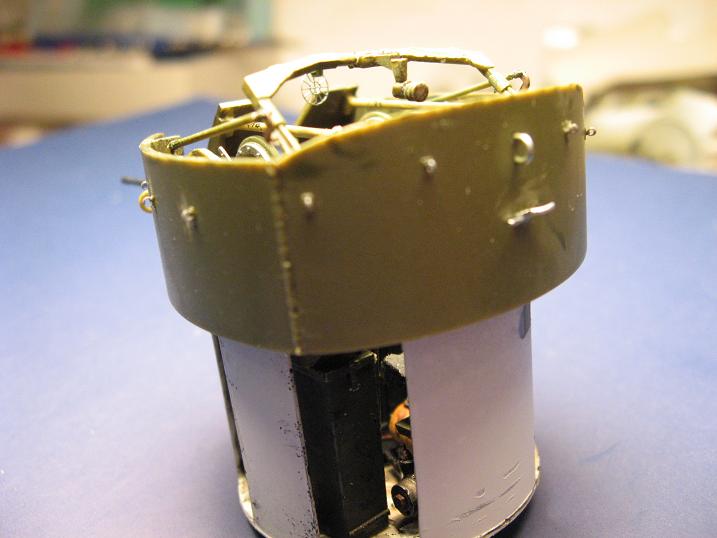
Will post some more later, as always your comments are welcome. Randy
New Jersey, United States
Joined: September 26, 2006
KitMaker: 857 posts
Armorama: 811 posts
Posted: Tuesday, November 03, 2009 - 04:32 AM UTC
#023
Zurich, Switzerland
Joined: March 13, 2009
KitMaker: 2,058 posts
Armorama: 1,656 posts
Posted: Tuesday, November 03, 2009 - 09:12 AM UTC
Even if I repeat myself: Absolutely stunning and inspiring! I wouldn't have the patience for all that...
Cheerio!
Too many models - too little time...
United States
Joined: July 04, 2009
KitMaker: 241 posts
Armorama: 199 posts
Posted: Tuesday, November 03, 2009 - 10:12 AM UTC
Thanks James....
Stefan, Thank you for the kind words.....
Randy
New York, United States
Joined: January 21, 2008
KitMaker: 2,531 posts
Armorama: 859 posts
Posted: Tuesday, November 03, 2009 - 11:22 AM UTC
Wow! I say again, Wow! Randy do you have your own personal electron microscope? I've been around the hobby for years and have judged at quite a few shows. I am very impressed with your work and can't wait to see more. I hope you will have in-progress photos with your model wherever you display it. So people can really appreciate your craftsmanship.
Al