Amazing work !!!!
Keep going !!!
Hosted by Darren Baker
Dieppe Churchill Mk 1 Build

panzerserra

Joined: March 29, 2002
KitMaker: 730 posts
Armorama: 688 posts

Posted: Saturday, November 21, 2009 - 07:13 PM UTC
Posted: Saturday, November 21, 2009 - 08:30 PM UTC
Hi Carmen,
Excellent work and a really useful build article. Great stuff.
Al
Excellent work and a really useful build article. Great stuff.
Al


csmanning

Joined: March 23, 2008
KitMaker: 333 posts
Armorama: 321 posts

Posted: Tuesday, December 08, 2009 - 01:46 PM UTC
Hey Everyone
I apologize for the quality of my pictures, I have to take them at night so my only source of lighting is my CFLs which are very strong. I'm still playing around with lighting arrangements to get the proper amount of lighting.
A quick update:
1. Finished off the front including the headlights, inside stel plate with bolts and rivets. I replaced the larger bolts on the bow glacis armour by the 3" howister.


2. Set the gun manlet complete with 2 pdr jordi rubio barrel, and RB models Besa machine gun barrel.

These besa machine gun barrels are highly recommended! They are listed fro 0.99 Euros each plus shipping from Poland from www.martola.com. Some may think that's expensive but considering I have to pay $8-10 USD (plus shipping) for two I think the conversion works out in my favor. Below is a photo of the besa MG barrel, it comes in two parts so you can put it together to replace a coaxial MG barrel or use just the end to replace it on a MG on a figure or whatever. Highly recommended!!


The fit between the two pieces is snug and IMHO you don't need to glue, hence why I haven't shown then together (I don't think I could get them apart after the fact).
3. Added the grills from the original Churchill Mk VII Eduard PE set, and mounting bracket for the DWG out of styrene.

4. On the engine deck I've replace the engine access panel handles with the Eduard offerings.
Still have to do the tool clasps, rear air intake mount for the DWG, the muffler extensions (which I'm going to paint and mount separately), and the water proofing. The rear guards are ready to put on, I just haven't done it yet... its on this week's schedule. I received my Echelon Dieppe Churchill Decal sets in the mail so I'm almost ready for paint. Perfect timing! Cheers and comments are always welcome!
I apologize for the quality of my pictures, I have to take them at night so my only source of lighting is my CFLs which are very strong. I'm still playing around with lighting arrangements to get the proper amount of lighting.
A quick update:
1. Finished off the front including the headlights, inside stel plate with bolts and rivets. I replaced the larger bolts on the bow glacis armour by the 3" howister.


2. Set the gun manlet complete with 2 pdr jordi rubio barrel, and RB models Besa machine gun barrel.

These besa machine gun barrels are highly recommended! They are listed fro 0.99 Euros each plus shipping from Poland from www.martola.com. Some may think that's expensive but considering I have to pay $8-10 USD (plus shipping) for two I think the conversion works out in my favor. Below is a photo of the besa MG barrel, it comes in two parts so you can put it together to replace a coaxial MG barrel or use just the end to replace it on a MG on a figure or whatever. Highly recommended!!


The fit between the two pieces is snug and IMHO you don't need to glue, hence why I haven't shown then together (I don't think I could get them apart after the fact).
3. Added the grills from the original Churchill Mk VII Eduard PE set, and mounting bracket for the DWG out of styrene.

4. On the engine deck I've replace the engine access panel handles with the Eduard offerings.
Still have to do the tool clasps, rear air intake mount for the DWG, the muffler extensions (which I'm going to paint and mount separately), and the water proofing. The rear guards are ready to put on, I just haven't done it yet... its on this week's schedule. I received my Echelon Dieppe Churchill Decal sets in the mail so I'm almost ready for paint. Perfect timing! Cheers and comments are always welcome!
Posted: Tuesday, December 08, 2009 - 08:55 PM UTC
Carmen,
A great build you have there! You really seem to make a lot of use of that rivet tool. I might have to look into that after all. Kep up the good work!
Cheerio!
A great build you have there! You really seem to make a lot of use of that rivet tool. I might have to look into that after all. Kep up the good work!
Cheerio!

jimbrae

Joined: April 23, 2003
KitMaker: 12,927 posts
Armorama: 9,486 posts

Posted: Tuesday, December 08, 2009 - 09:09 PM UTC
Hopefully you'll find these of use. It's a Mk. 1 Turret I photographed and measured up during the summer. If you need more, drop me a line... 
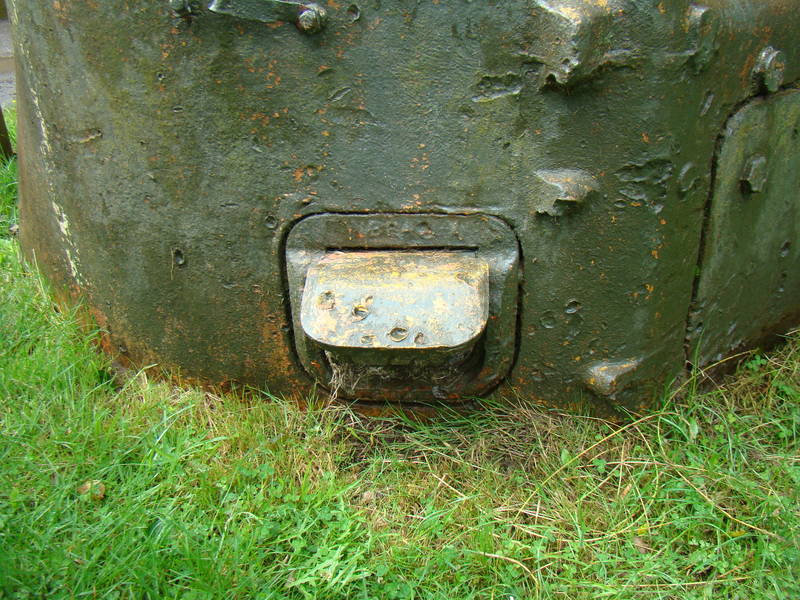
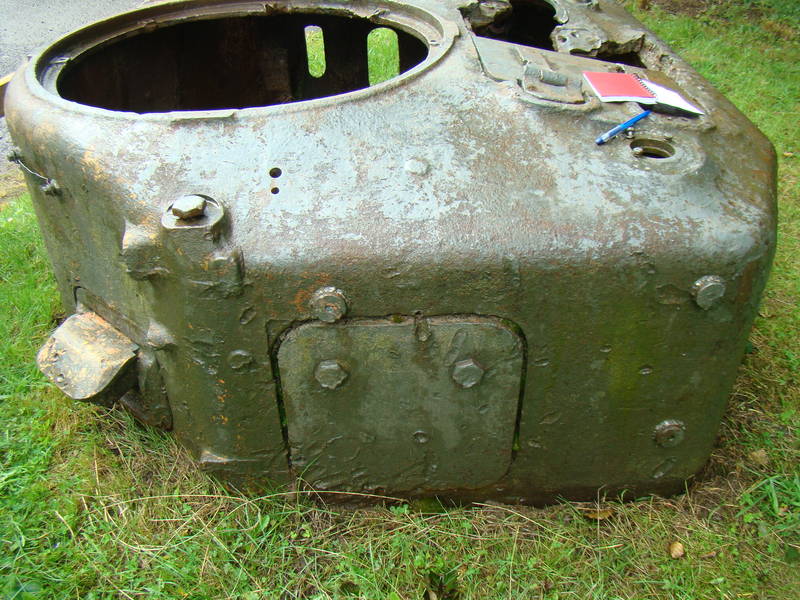
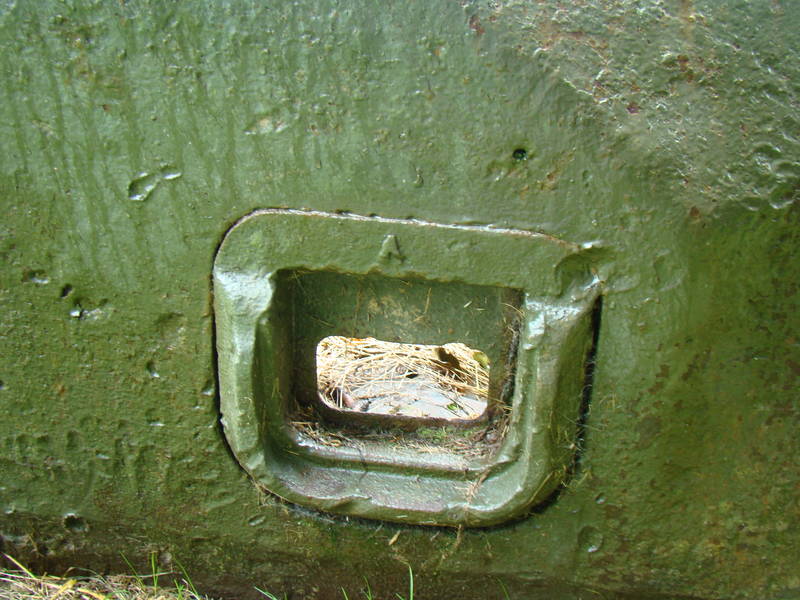
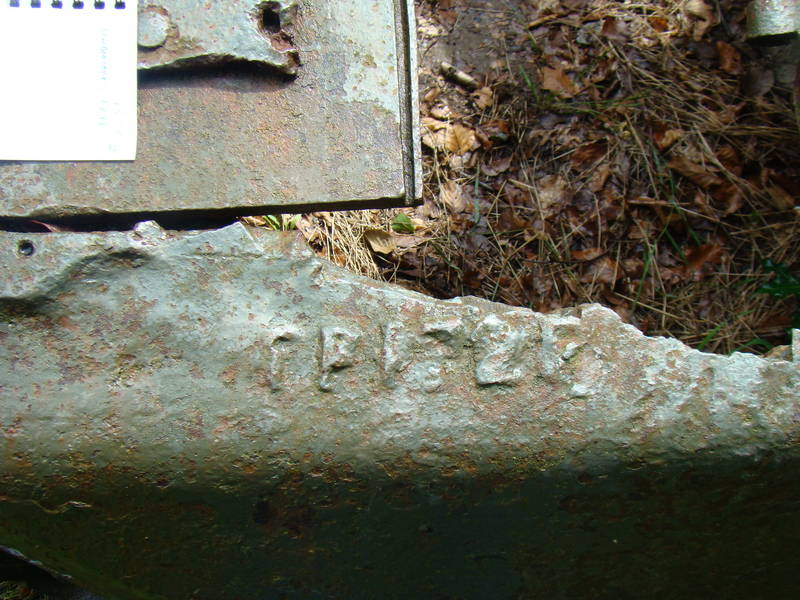


jmoldon

Joined: September 13, 2009
KitMaker: 5 posts
Armorama: 4 posts

Posted: Wednesday, December 09, 2009 - 06:59 PM UTC
Wow Carmen i am impressed with the detail and the build. i am enjoying watching your progress and the info you provide is excellent.
Thanks
Jeff
Thanks
Jeff

csmanning

Joined: March 23, 2008
KitMaker: 333 posts
Armorama: 321 posts

Posted: Friday, January 15, 2010 - 09:36 AM UTC
Hello Everyone!
Thanks to all for the comments!
Stefen - I'm telling you man... you'll get so much use out of that beading tool. Highly recommended!
Jim - Thanks for the pictures they're awesome!
I haven't made much progress since before Christmas but I'm planning on finishing off the build. I have the tool clasps on the rear engine deck left to do.
My scratch built rear air intake grill has started to curve due to either the humidity or something, so I'm going to have to redo it. I'll show pictures soon.
And I have to do the lock down clamps on all the air intakes, then I'm off to prime to check for blemishes.
Over the Xmas holidays I stumbled upon this article online which may interest some of you.
http://www.findonvillage.com/0566_the_last_tank.htm
The one interesting thing I got out of this (besides the story and the link to the Calgary Regiment) was the track rails you can clearly see in the images posted on her website.
I was also doing some research for a friend and stumbled upon a better shot of the rear air intake of BURNS from Marteinson & McNorgan's The Royal Canadian Armoured Corps. book. These images are from the Hugh Henry Collection. Page 137.


I'll post more pictures soon. Echelon has announced their Dieppe Dingo decal set, that'll help finish of my Dingo Scout Car. Now just need AFV CLub to release their Churchill BTS Track set... grrrrrr.... Happy Modelling!!
Thanks to all for the comments!
Stefen - I'm telling you man... you'll get so much use out of that beading tool. Highly recommended!
Jim - Thanks for the pictures they're awesome!
I haven't made much progress since before Christmas but I'm planning on finishing off the build. I have the tool clasps on the rear engine deck left to do.
My scratch built rear air intake grill has started to curve due to either the humidity or something, so I'm going to have to redo it. I'll show pictures soon.
And I have to do the lock down clamps on all the air intakes, then I'm off to prime to check for blemishes.
Over the Xmas holidays I stumbled upon this article online which may interest some of you.
http://www.findonvillage.com/0566_the_last_tank.htm
The one interesting thing I got out of this (besides the story and the link to the Calgary Regiment) was the track rails you can clearly see in the images posted on her website.
I was also doing some research for a friend and stumbled upon a better shot of the rear air intake of BURNS from Marteinson & McNorgan's The Royal Canadian Armoured Corps. book. These images are from the Hugh Henry Collection. Page 137.


I'll post more pictures soon. Echelon has announced their Dieppe Dingo decal set, that'll help finish of my Dingo Scout Car. Now just need AFV CLub to release their Churchill BTS Track set... grrrrrr.... Happy Modelling!!

DaveCox

Joined: January 11, 2003
KitMaker: 4,307 posts
Armorama: 2,130 posts

Posted: Friday, January 15, 2010 - 10:51 AM UTC
Hi Carmen,
I hope you don't mind me adding this to your thread (excellent model of one of my favourite tanks btw), but I have an interest in the Dieppe Raid, and only live about 20 minutes from Findon. I didn't even know that tank was there! If it's still there when the weather improves I may try and visit it and take some detail photographs. If I do I'll post them on Armorama for anyone to use as references. Certainly the details of the spockets that you've incorporated are evident!
My interest? The Dieppe Raid was planned at Wisborough Green in Sussex, and the Sea Cadet unit that I served with as a drill instructor stood guard and saluted the veterans of Dieppe when they held their memorial service there each year. I met 'Pat' Porteous VC on several occasions before his death in 2000 and was always struck by his quiet dignity and readiness to talk to the cadets. On his last visit I commanded the Guard and ordered the salute that as a VC winner he was entitled to even when not in uniform.

csmanning

Joined: March 23, 2008
KitMaker: 333 posts
Armorama: 321 posts

Posted: Friday, January 15, 2010 - 11:21 AM UTC
Dave
Thanks for the comments! That would be something if the tank is still there. I see on Valerie's website that she has posted the coordinates and a map to the location. If you make it out there please post some pictures to this thread, it would make a great addition.
I've often wondered if there was a rubber ring on the front sprocket... only because black and white pictures, and these tanks were painting in dark colors made it hard to tell from pictures. .... no questions about it now. I'll incorporate that into my paint job.
Comments always welcome!
Cheers!!
Carmen
NebLWeffah

Joined: October 13, 2004
KitMaker: 1,683 posts
Armorama: 1,248 posts

Posted: Friday, January 15, 2010 - 01:23 PM UTC
Hey Carmen
Great to see you back at it, very nice job so far and nice update.
I took a look at Valerie's website and the maps etc and came up with these:

The hulk of the Churchill II is in the centre of the three blue rings. The blue grid is a 1x1 kilometer square.
According to Google Earth, it's still there (centre of red ring):


@Dave - I hope when you drive out there someday you can find it!!
cheers

Bob
Great to see you back at it, very nice job so far and nice update.
I took a look at Valerie's website and the maps etc and came up with these:

The hulk of the Churchill II is in the centre of the three blue rings. The blue grid is a 1x1 kilometer square.
According to Google Earth, it's still there (centre of red ring):


@Dave - I hope when you drive out there someday you can find it!!
cheers

Bob

csmanning

Joined: March 23, 2008
KitMaker: 333 posts
Armorama: 321 posts

Posted: Friday, January 15, 2010 - 02:21 PM UTC
Bob
That is freakin awesome! Enough said....
That is freakin awesome! Enough said....

shopkin4

Joined: March 29, 2009
KitMaker: 1,135 posts
Armorama: 1,030 posts

Posted: Friday, January 15, 2010 - 02:31 PM UTC
Carmen,
Cant wait for you to get back to this build...I always thought Churchills were ugly things until now
Cant wait for you to get back to this build...I always thought Churchills were ugly things until now


csmanning

Joined: March 23, 2008
KitMaker: 333 posts
Armorama: 321 posts

Posted: Friday, February 05, 2010 - 08:02 AM UTC
Hey Everyone
Well it's been a while since I posted on this build. Mostly because I've been a bit demotivated. My scratch built rear air intake has warped for some reason, so I've removed it and I'm going to re-make it out of brass sheet. Something with a little less give, unlike my very thin styrene.

I have been able to add the mufflers and I've prep'd and cleaned up the resin muffler extensions. Those will go on soon once I finish the tool clasps.
I've sat several nights trying to get the PE tool clasps done but they always fall apart so I'm contemplating just adding the kit ones molded onto the tools. I'll give it another go before I do though... hopefully third times the charm.
I've also added the early style rear fenders. They definately give the look of an early MK Churchill. Almost there.... I can smell the primer and paint fumes coming.... Cheers!!
Well it's been a while since I posted on this build. Mostly because I've been a bit demotivated. My scratch built rear air intake has warped for some reason, so I've removed it and I'm going to re-make it out of brass sheet. Something with a little less give, unlike my very thin styrene.

I have been able to add the mufflers and I've prep'd and cleaned up the resin muffler extensions. Those will go on soon once I finish the tool clasps.
I've sat several nights trying to get the PE tool clasps done but they always fall apart so I'm contemplating just adding the kit ones molded onto the tools. I'll give it another go before I do though... hopefully third times the charm.
I've also added the early style rear fenders. They definately give the look of an early MK Churchill. Almost there.... I can smell the primer and paint fumes coming.... Cheers!!

csmanning

Joined: March 23, 2008
KitMaker: 333 posts
Armorama: 321 posts

Posted: Monday, February 15, 2010 - 07:09 AM UTC
Here is the replacement grill made out of sheet brass. Sorry, it's a little fuzzy.

Attached

Rear air intake extension mount. The frame is made out of styrene and the clasps are from the eduard PE set.

And mounted... Just the tool clasps left.


Attached

Rear air intake extension mount. The frame is made out of styrene and the clasps are from the eduard PE set.

And mounted... Just the tool clasps left.

Posted: Monday, February 15, 2010 - 07:36 PM UTC
Wow, missed out on a few installments of this. Amazing work!
Cheers
Stefan
Cheers
Stefan
modelpanzer

Joined: October 20, 2008
KitMaker: 109 posts
Armorama: 106 posts

Posted: Tuesday, February 16, 2010 - 06:50 AM UTC
Amazing work !!!!
Keep it going !!!
Cheers,
José César
Keep it going !!!
Cheers,
José César


csmanning

Joined: March 23, 2008
KitMaker: 333 posts
Armorama: 321 posts

Posted: Tuesday, February 16, 2010 - 01:30 PM UTC
Thanks guys! Comments are always welcome! Hopefully I'll be off to paint soon!
Does anyone have any close up pictures of the deep wading gear tie down point in the center of the engine deck??
Does anyone have any close up pictures of the deep wading gear tie down point in the center of the engine deck??

LeoCmdr

Joined: January 19, 2005
KitMaker: 4,085 posts
Armorama: 3,917 posts

Posted: Tuesday, February 16, 2010 - 05:08 PM UTC
Looking good Carmen....does this link help you out for the tie down points?
http://www.primeportal.net/tanks/scott_tremblay/churchill_mki/
http://www.primeportal.net/tanks/scott_tremblay/churchill_mki/

csmanning

Joined: March 23, 2008
KitMaker: 333 posts
Armorama: 321 posts

Posted: Thursday, March 11, 2010 - 08:05 AM UTC
Hey Everyone!
For most people following thi build log, I'm getting married in 4 months and that has proven to be a very tough distraction. I'm sorry I don't update this as often as I'd like, but slow and steady progress still wins the race. Here's my latest progress shots:
The Turret is done... I'll be experiementing with some different things to represent the waterproofing so stay tuned for that.


There are a few things I've reproduced on the turret which I honestly have no idea what they are. If someone out there know what they are or for, please feel free to post.
1. The little tiny square piece just on front right (as if you were sitting in the hatch looking forward) of the turret.
2. The rod or tube coming out of the commander's hatch.
I also have the finished hull but I'll post them shortly. Cheers! Comments always welcome!
For most people following thi build log, I'm getting married in 4 months and that has proven to be a very tough distraction. I'm sorry I don't update this as often as I'd like, but slow and steady progress still wins the race. Here's my latest progress shots:
The Turret is done... I'll be experiementing with some different things to represent the waterproofing so stay tuned for that.


There are a few things I've reproduced on the turret which I honestly have no idea what they are. If someone out there know what they are or for, please feel free to post.
1. The little tiny square piece just on front right (as if you were sitting in the hatch looking forward) of the turret.
2. The rod or tube coming out of the commander's hatch.
I also have the finished hull but I'll post them shortly. Cheers! Comments always welcome!

csmanning

Joined: March 23, 2008
KitMaker: 333 posts
Armorama: 321 posts

Posted: Thursday, March 11, 2010 - 09:56 AM UTC
PE Has always been my nemesis... this bugger was no exception. I've been trying to do this since December.... After several failed attempts, I made a jig of a flat piece of brass and soldered on two small brass rods spaced appropriately to do the double bends for the tool clasps. The clasps on the reat engine deck are the best I could do. Not too shabby...
I've also mounted the Cromwell muffler extensions. The diameter of the muffler extensions are smaller then that of the kit parts... Unfortunately I had already glue the kit part on before realizing that Cromwell included the small extension that goes into the muffler body. I had to trim that part off and glue them onto the kit part and make some adjustments.
The support iron that runs between the two extensions is simply a piece of styrene cut to the right size. Then following Mark Bannerman's guide for the bent mid section. Came out alright.... Sorry for the focus...
Tomorrow I'm off to priming and hopefully there won't be many blemishes to fix... I want to post some info on Canadian Armour colors in WW2... with the help of Steve Guthrie's article in MMI from a while back. Thanks for looking. Comments always welcome!


csmanning

Joined: March 23, 2008
KitMaker: 333 posts
Armorama: 321 posts

Posted: Thursday, March 11, 2010 - 10:05 AM UTC
How does it look in comparison to the original photos from the start of the Blog?


Posted: Thursday, March 11, 2010 - 11:40 AM UTC
This is looking fantastic Carmen, wish I'd noticed this blog before!
I built RINGER last year, the MkII that shed a track near the waterline. My article will be in next month's Military Modelling
I see you've missed somthing that I too missed so I'll point it out while you have the chance to change it! The MkIs and IIs at Dieppe did not have the two bolts on the bow plate
keep up the excellent work
Chris
I built RINGER last year, the MkII that shed a track near the waterline. My article will be in next month's Military Modelling
I see you've missed somthing that I too missed so I'll point it out while you have the chance to change it! The MkIs and IIs at Dieppe did not have the two bolts on the bow plate
keep up the excellent work

Chris

csmanning

Joined: March 23, 2008
KitMaker: 333 posts
Armorama: 321 posts

Posted: Thursday, March 11, 2010 - 11:49 AM UTC
Hey Chris
Thanks for the post! I have seen your RINGER build on Missing Lynx and the Military Modelling Magazine website. I'll pick up your build article for sure when it comes out.
Can you specify which bolts weren't on the Mk I & IIs? Are they the giant bolts either side of the tow shacle? or the bolts around the 3pdr/Besa Machine gun on the MK I & II respectively? I see one bolt above the 3pdr, but can't definitively say the other two bolts to the right were there. I have already removed the bolts/giant rivets either side of the tow shackle.
Perfect timing as I'm off to prime tomorrow. Let me know and I'll make the corrections. Cheers!
Carmen
Posted: Thursday, March 11, 2010 - 12:08 PM UTC
Sorry Carmen, I meant the two massive ones either side of the towing shackle. Getting rid of them will make the decals easier too!
Not sure if you answered your earlier question, but yes, the idlers and sprockets have rubber 'tyres' around them according to the MLRS MkI/II handbook reprint.
Good spot on the holes in the idler, another one I sadly missed (I plan to build all the dieppe churchills though , so I'll catch these things next time ) The MkI and II idler had a slightly different profile to the teeth though with a slightly flattened end (rather than the pointy AFV Club one). A light sand will sort it out. Let me know if you'd like a reference pic
One final thing, the MkI and II stored the jack blocks where the track supports are on the MksIII and onwards (under the track behind the idler wheel) I don't have my 'through the lens' to hand but it might be worth a close examiniation of your photos (if possible!) to see if they're there on your MkI
Really am loving this build, can't wait to see the paint on
Not sure if you answered your earlier question, but yes, the idlers and sprockets have rubber 'tyres' around them according to the MLRS MkI/II handbook reprint.
Good spot on the holes in the idler, another one I sadly missed (I plan to build all the dieppe churchills though , so I'll catch these things next time
 ) The MkI and II idler had a slightly different profile to the teeth though with a slightly flattened end (rather than the pointy AFV Club one). A light sand will sort it out. Let me know if you'd like a reference pic
One final thing, the MkI and II stored the jack blocks where the track supports are on the MksIII and onwards (under the track behind the idler wheel) I don't have my 'through the lens' to hand but it might be worth a close examiniation of your photos (if possible!) to see if they're there on your MkI
Really am loving this build, can't wait to see the paint on

csmanning

Joined: March 23, 2008
KitMaker: 333 posts
Armorama: 321 posts

Posted: Thursday, March 11, 2010 - 12:24 PM UTC
Thanks Chris!
Yeah I caught those massive ones myself half way through my build. I've posted pictures earlier in the build log.
As for the blocks I can't tell in the photos I have. I'm going to be building BOLSTER. The tracks sag enough to convince me they weren't stored there... one less thing to do. Thanks for pointing out the idler teeth... I saw that a while ago and wasn't sure what I was going to do. I have the early style BTS tracks from the Cromwell conversion but I've been holding off to compare against the AFV Club tracks (as they've announced back in the Fall they were releasing a separate track set).... still waiting....
I'm glad you're aboard because I've also seen your Dieppe Dingo... I have one in the works as well... HELEN which was still attached to BOLSTER... I'm going to make a large Vignette/diorama with both of them and some German naval officers and army soldiers milling around them... just as seen in the photos.
I also have CONFIDENT a MK III half built, sitting idle on my work bench so I can clear this guy off. Dieppe is a very interesting subject which I've studied over the past few years.
Thanks again!
Carmen
 |


