

Hello! I've just bought my Merk 4 from academy and I've noticed that the towing cables attachement are kind of wrong ; this is the piece from the kit: ( This picture was taken from the Curry's Sutton Merkava Mk.IV, wich you can found there https://armorama.kitmaker.net/forums/133971&page=1 )
http://img193.imageshack.us/i/p7200302r.jpg/
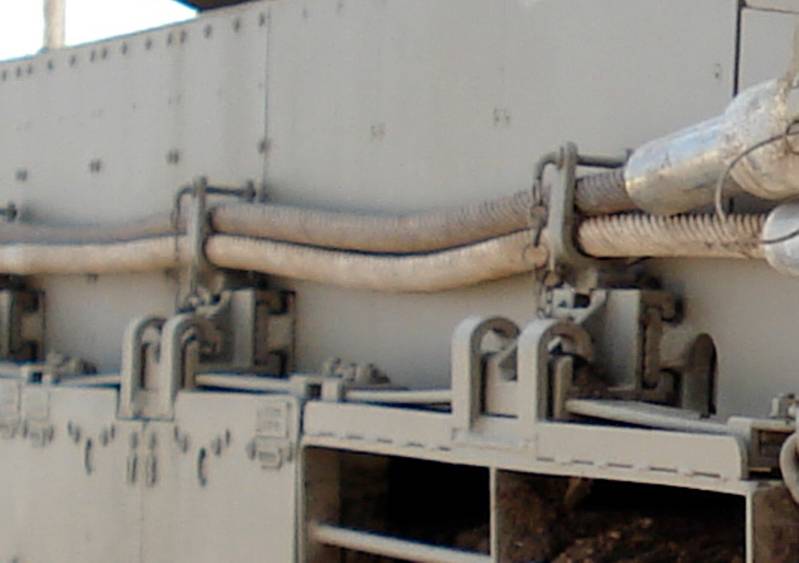
And these are the real ones : http://img194.imageshack.us/i/merkavamkivawalkaround1.jpg/
Any idea on how to fix this problem? I've think that maybe if I glued those pieces, but vertically....
On the second part of my topic. I wanted to know if any of you have some references photos of the Merk 4 anti slipping coating, espacially in the rear part of the hull.
Thanks for your Help!
Hosted by Darren Baker
Academy towing cables attachement + anti slip

blacksad


Joined: September 07, 2009
KitMaker: 198 posts
Armorama: 192 posts

Posted: Saturday, October 17, 2009 - 10:57 AM UTC

junglejim
Joined: February 18, 2003
KitMaker: 1,728 posts
Armorama: 1,629 posts

Posted: Saturday, October 17, 2009 - 03:14 PM UTC
Not sure what you're referring to - the placement of the swiveling ovals that lock the cable in? Or the placement of the cables themselves? The one thing that the Academy kit misses here is the recessed panel (external fire suppression handle?) to the left of the tail light in that photo.
Jim
Jim
blacksad
Joined: September 07, 2009
KitMaker: 198 posts
Armorama: 192 posts
Posted: Sunday, October 18, 2009 - 03:13 AM UTC
Hello! Sorry for not explaining enough, english is not my primary language hehe 
I'm talking about the oval rings that locks the cables on the tank. On the academy model, they look like a "D" ring that locks in, but in reality they look more like a "U".
I'm talking about the oval rings that locks the cables on the tank. On the academy model, they look like a "D" ring that locks in, but in reality they look more like a "U".
junglejim
Joined: February 18, 2003
KitMaker: 1,728 posts
Armorama: 1,629 posts
Posted: Sunday, October 18, 2009 - 06:39 AM UTC
Here is a couple of hi-res pic cropped down. The retaining oval shaped plate slips over a post and is held in place with a pin. You could replace the post and pin on the model with a bit of styrene rod and strip filed to shape, and use the tow cable end part #26, or open up and clean out part #25's.
HTH,
Jim


HTH,
Jim
blacksad
Joined: September 07, 2009
KitMaker: 198 posts
Armorama: 192 posts
Posted: Sunday, October 18, 2009 - 07:50 AM UTC
Hello again 
I was actually talking about the plate that holds the cable itself, not the end of it.

I was actually talking about the plate that holds the cable itself, not the end of it.
junglejim
Joined: February 18, 2003
KitMaker: 1,728 posts
Armorama: 1,629 posts
Posted: Sunday, October 18, 2009 - 11:15 AM UTC
Ahh, Ok, yes the Academy parts for the hooks are pretty thick. If you can find the new Voyager detail set it has nice replacements, or maybe try bending thin brass strip into a 'U' shape. Heat forming plastic strip might work too. I'm working on a couple of Merkava 4's right now.

Jim
Jim

Tankrider

Joined: October 07, 2002
KitMaker: 1,280 posts
Armorama: 1,208 posts
Posted: Sunday, October 18, 2009 - 12:59 PM UTC
Quoted Text
I'm working on a couple of Merkava 4's right now.
Jim
Hey Jim,
Lets see your work. It might inspire me to resume working on my Merkava IV.
John

Grumpyoldman
Joined: October 17, 2003
KitMaker: 15,338 posts
Armorama: 7,297 posts

Posted: Sunday, October 18, 2009 - 02:41 PM UTC
Closer looks.....
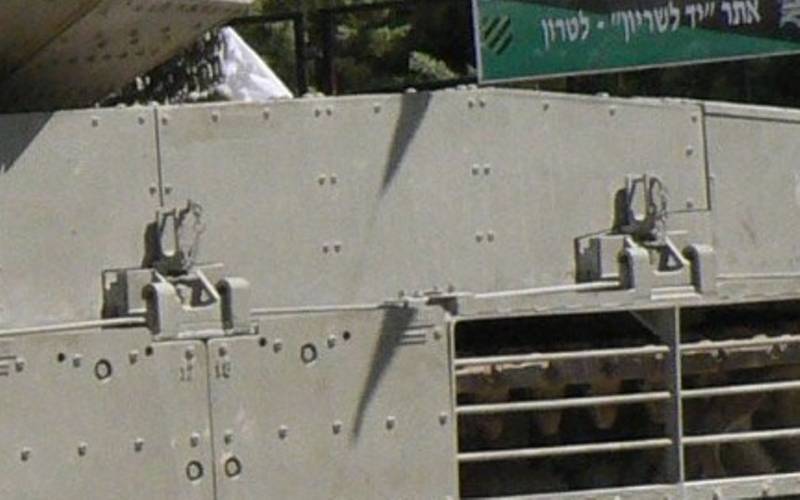
Look like a simple enough shape to scratch-build from some plastic stock or left over PE fret.
The U part appears to be mounted on a piece sticking out from the hull side, with a small gap between the inner side of the U and the hull.
It's always been a fascinating looking vehicle to me.
Look like a simple enough shape to scratch-build from some plastic stock or left over PE fret.
The U part appears to be mounted on a piece sticking out from the hull side, with a small gap between the inner side of the U and the hull.
It's always been a fascinating looking vehicle to me.

junglejim
Joined: February 18, 2003
KitMaker: 1,728 posts
Armorama: 1,629 posts
Posted: Sunday, October 18, 2009 - 03:13 PM UTC
Quoted Text
Hey Jim,
Lets see your work. It might inspire me to resume working on my Merkava IV. John
Hiya John, well I would love to, but you'll have to wait for the article in MMIR first
 . I'll see if I can put some 'tasters' up on-line. Waiting for the Friul tracks to get in.
Cheers,
Jim
blacksad
Joined: September 07, 2009
KitMaker: 198 posts
Armorama: 192 posts
Posted: Sunday, October 18, 2009 - 03:38 PM UTC
Thanks for your help, wich kit from legend provides replacement for those pieces?? I've already ordered the chain ball armour kit... well, scratchbuilt seems to be a verygood and much more costless alternative, thanks to the pieces simple design..... Where can I find some thin brass/copper/whatever sheet? 
junglejim
Joined: February 18, 2003
KitMaker: 1,728 posts
Armorama: 1,629 posts
Posted: Sunday, October 18, 2009 - 06:12 PM UTC
Hey 'John', I just checked the Academy instruction sheet (it was under a bunch of other stuff as I hadn't used it for a while, and before I was just looking at the parts on the sprue) and you're right, I think if you attach the part #24's so that they are attached to the hull like this ]U it will be close. Just file off the 'lip' and thin them down a bit.
Jim
Jim
Tankrider
Joined: October 07, 2002
KitMaker: 1,280 posts
Armorama: 1,208 posts
Posted: Monday, October 19, 2009 - 02:51 AM UTC
Quoted Text
Quoted TextHey Jim,
Lets see your work. It might inspire me to resume working on my Merkava IV. John
Hiya John, well I would love to, but you'll have to wait for the article in MMIR first
Cheers,
Jim
Oh well... Honor your commitments first as it would be in poor taste to have you getting in trouble with Spud. A look at the Friul track would be welcomed as I am not sure whether to go with Friuls or
WWII Productions Merkava IV track.
John

ivanhoe6
Joined: April 05, 2007
KitMaker: 2,023 posts
Armorama: 1,234 posts
Posted: Monday, October 19, 2009 - 03:58 AM UTC
Good morning folks, I too just picked up this kit. My question is, how are you going to do the anti-slip surfaces. I saw the Rustoleum Terra Cotta piece on the Abrahms story, do you think that's the way to go? I'd hate to loose all the bolt details. Thanks, Tom
blacksad
Joined: September 07, 2009
KitMaker: 198 posts
Armorama: 192 posts
Posted: Tuesday, October 20, 2009 - 02:57 PM UTC
From what I know, IDF vehicles have a less uniform anti slip coating, compared to the americans or the french army vehicles for exemple; the particles are also a little bit more big too... What you can do is use some masking liquid to protect the areas that are not treated ( Like the little handles,the bolts etc.) and apply a thin layer of varnish; then you can put some thin sand, like the one you can find in pet shop's... This is one technique among many others... Just browse through the forum and find the one that suits you best.... Now I have a question, does anyone here ever tried to spread the sand using a - I'm not sure what's the word for this in english- salt box??
And btw, does anybody have some reference pictures of the back portions of the hull where anti slip is applied?? Thank you in advance
And btw, does anybody have some reference pictures of the back portions of the hull where anti slip is applied?? Thank you in advance
ivanhoe6
Joined: April 05, 2007
KitMaker: 2,023 posts
Armorama: 1,234 posts
Posted: Saturday, October 24, 2009 - 06:18 AM UTC
Thanks John for the tip. The biggest tip was your question, I think you mean salt shaker. I think that would be the best way to sprinkle the sand on to the surface. thanks again. Tom
 |

WEB HOSTING BY


Copyright ©2021 Armorama and Kitmaker Network, a subsidiary of Silver Star Enterprises
All Rights Reserved. Please read our Conditions of Use and Privacy Policy.
All Rights Reserved. Please read our Conditions of Use and Privacy Policy.