_GOTOBOTTOM
Constructive Feedback
For in-progress or completed build photos. Give and get contructive feedback!
Magach 6B Gal
rfbaer
Visit this Community
Texas, United States
Joined: June 12, 2007
KitMaker: 1,866 posts
Armorama: 1,696 posts
Posted: Monday, December 14, 2009 - 12:11 PM UTC
I've always wanted to do this variant, but the price of the Legends conversion has been a brick wall, so I took the plunge and started it without it......
I'm using a Revell (Italeri) hull, Acad turret from the 6B (sort of) kit and scratching the rest. I have Michael Mass' 6B Gal book and a couple of Concord books for reference. So far I've done the turret basket, gunner's sight and the basic hull. Tracks are Friul. As I get closer to finishing the Tiran I'm heavy into now it's moving along a little more quickly.
I need to take pics with a cleaner background, but thanks for looking.


Edit: There's more of those "coffee shakes" on the last pic, sorry.....
newfish
Visit this Community
England - West Midlands, United Kingdom
Joined: June 23, 2008
KitMaker: 2,329 posts
Armorama: 2,110 posts
Posted: Thursday, December 17, 2009 - 07:47 AM UTC
Russell nice topic I have one on my bench. Well its on hold until the rest of the bits arrive for it. You said about scratch building the modifications due to the Legend conversion being too expensive. Are you aware that Legend do a cheaper set for the plastic turret which includes the gunners sight, air cleaners, smoke dischargers, drive sprockets etc… the product code is LF1056 IDF Magach6B Conversion set. Apparently the set is OOP but it’s unconfirmed. I must congratulate you on your scratch building skills on the turret basket. I have used the legend resin version . I’m looking forward to seeing how this turns out.

Edit: is that Mr Surfacer on the hull?

Jaymes.

rfbaer
Visit this Community
Texas, United States
Joined: June 12, 2007
KitMaker: 1,866 posts
Armorama: 1,696 posts
Posted: Thursday, December 17, 2009 - 01:00 PM UTC
Jaymes:
Yes, it's MrSurfacer 500 on the hull. I got a look at one in September, at Bovington, and saw the roughness of the hull castings, so I tried to duplicate it, and cover up the seam along the side bulge that all the M60 kits have.
"Thanks" on the scratch-building. This is the most extensive project I've tackled yet, and I'm kind of excited by it myself. The basket was the major hurdle....
Had I known about the "inexpensive" Legends set, I may have gone that way, but with the Acad. Magach I picked up at a show for $8 US, I'm going ahead as is.
rfbaer
Visit this Community
Texas, United States
Joined: June 12, 2007
KitMaker: 1,866 posts
Armorama: 1,696 posts
Posted: Tuesday, January 12, 2010 - 05:17 AM UTC
Basket weaving 101......for those of you like me that went to high school in California....

This took it out of me for a while. Once the reactive armor is on the turret, it'll look more like it's properly sized, but for now, it's pretty huge.
rfbaer
Visit this Community
Texas, United States
Joined: June 12, 2007
KitMaker: 1,866 posts
Armorama: 1,696 posts
Posted: Tuesday, January 26, 2010 - 01:02 PM UTC
A bit more done. I've got a couple of other projects far enough along now that this one gets some time. The turret ERA is done, and a few other details. Still not sure what exact materials to use for the turret side-rails, but coming along......I'll probably finish the turret before I move on to the hull.


NICK-NAUPLIO
Visit this Community
Argolis, Greece / Ελλάδα
Joined: March 14, 2008
KitMaker: 67 posts
Armorama: 57 posts
Posted: Tuesday, January 26, 2010 - 01:19 PM UTC
I am no expert put it looks ok to me,great work mate
rfbaer
Visit this Community
Texas, United States
Joined: June 12, 2007
KitMaker: 1,866 posts
Armorama: 1,696 posts
Posted: Wednesday, January 27, 2010 - 04:48 AM UTC
Thank you, sir! I have to admit, this is one of my favorite subjects, lots of fun for me.
HeavyArty
Visit this Community
Florida, United States
Joined: May 16, 2002
KitMaker: 17,694 posts
Armorama: 13,742 posts
Posted: Wednesday, January 27, 2010 - 10:25 AM UTC
Looking good so far. Nice sratch work. Keep it up.
rfbaer
Visit this Community
Texas, United States
Joined: June 12, 2007
KitMaker: 1,866 posts
Armorama: 1,696 posts
Posted: Wednesday, January 27, 2010 - 12:40 PM UTC
paul51
Visit this Community
Hamilton, New Zealand
Joined: January 03, 2010
KitMaker: 159 posts
Armorama: 158 posts
Posted: Thursday, January 28, 2010 - 06:16 PM UTC
your scratch basket looks pretty good, whole project is interesting so far
rfbaer
Visit this Community
Texas, United States
Joined: June 12, 2007
KitMaker: 1,866 posts
Armorama: 1,696 posts
Posted: Friday, January 29, 2010 - 05:53 AM UTC
Thanks you, Paul. It was a hurdle for me, most involved I've tried to scratch so far. I will probably cover it with the issued canvas, not sure. I keep looking at it and zero-ing in on it's faults.
rfbaer
Visit this Community
Texas, United States
Joined: June 12, 2007
KitMaker: 1,866 posts
Armorama: 1,696 posts
Posted: Tuesday, February 23, 2010 - 04:05 AM UTC
A little done this past week, mostly the stowage attached to the back of the turret. I also added the smoke grenade boxes, and a little detailing on the mantlet (ERA and MG mount). I think I'll have to break down and work with brass now, for the MG can racks and commander's stowage box rack on the turret roof. Argh....I don't like brass.

rfbaer
Visit this Community
Texas, United States
Joined: June 12, 2007
KitMaker: 1,866 posts
Armorama: 1,696 posts
Posted: Monday, March 01, 2010 - 08:13 AM UTC
A little more on the top of the turret this past weekend........


Still no brass, maybe for a couple of the little bits.
rfbaer
Visit this Community
Texas, United States
Joined: June 12, 2007
KitMaker: 1,866 posts
Armorama: 1,696 posts
Posted: Friday, March 05, 2010 - 05:19 AM UTC
Last night was karaoke night for my wife, so guess who was in the man cave......
I roughed in the commander's stowage box, and the box on t he rt rr fender, the holders for the turret crew's personal weapons, and a couple of small fittings. I'm enjoying this one a lot, even if the add-ons I'm doing are a bit out of scale, but this is about as small as these sausages I use for fingers can work.


And my motivational pic, snapped from a moving bus about 12 years ago.

A pic of a pic, sorry, but it was a great trip.
redcap
Visit this Community
England - East Midlands, United Kingdom
Joined: November 06, 2005
KitMaker: 753 posts
Armorama: 378 posts
Posted: Friday, March 05, 2010 - 05:48 AM UTC
Hi Russell

Your 6B GAL looks tremendous so far and the details you have added look every bit as good (to my eyes) as the details on the Legends resin conversion set which I used for mine.

Can't wait to see it with some paint applied.

Keep up the good work!

Gary
rfbaer
Visit this Community
Texas, United States
Joined: June 12, 2007
KitMaker: 1,866 posts
Armorama: 1,696 posts
Posted: Friday, March 05, 2010 - 07:55 AM UTC
Thanks very much, Gary. I greatly admired the 6-B Gal you recently had featured, even more motivation for me.
What did you think of the Legends parts?
rfbaer
Visit this Community
Texas, United States
Joined: June 12, 2007
KitMaker: 1,866 posts
Armorama: 1,696 posts
Posted: Monday, March 08, 2010 - 04:01 AM UTC
Rain on Sunday, bench time for me again! A little more in the way of turret detail, and some on the hull. The searchlight stowage mount on the bustle rack was a pain, first time soldering brass....not entirely happy, but it cleaned up OK.
Still having fun, though!


The most amazing thing, when I built the rack for the ammo cans on the turret roof, I didn't have any cans handy to size the thing, and I went by eye, base on pics only. Yesterday I found some cans, knocked them together, and they slid right into their places, like I'd planned it that way. Too cool.
junglejim
Visit this Community
Alberta, Canada
Joined: February 18, 2003
KitMaker: 1,728 posts
Armorama: 1,629 posts
Posted: Monday, March 08, 2010 - 06:54 AM UTC
Looking good. One thing you might want to change considering the work you've put in to it - I noticed you've put on both the horizontal lift lugs and the smaller vertical lifting rings on the sides of the lower hull. Not your fault, that's what the instructions say to do. Remove the smaller lift rings and it'll be fine. There are at least a couple types of locations for the lift lugs - check the Desert Eagle book for other pics.


Cheers,
Jim

rfbaer
Visit this Community
Texas, United States
Joined: June 12, 2007
KitMaker: 1,866 posts
Armorama: 1,696 posts
Posted: Monday, March 08, 2010 - 08:12 AM UTC
Jim, thanks for the tip. I can do that. The pic showing the starboard side looks to have two extra hooks added. Am I seeing that correctly?
junglejim
Visit this Community
Alberta, Canada
Joined: February 18, 2003
KitMaker: 1,728 posts
Armorama: 1,629 posts
Posted: Monday, March 08, 2010 - 11:42 AM UTC
Yep, they're two different tanks (the one with the extra lugs has a mine roller adapter plate on the front end). I believe some call it a 'third generation' hull type.

Jim
rfbaer
Visit this Community
Texas, United States
Joined: June 12, 2007
KitMaker: 1,866 posts
Armorama: 1,696 posts
Posted: Tuesday, March 09, 2010 - 04:48 AM UTC
Sweet. Any idea on when they got the extra lugs? I'm wanting to do mine as used about 1996 or '97. That's when I got the pic of the unit on the trailer, through the front window of a moving bus.....
Also, guessing here, but since they both have the US track, both from a training/reserve unit?
And, are the added lugs on both sides? I have the Desert Eagle book, I'll look when I'm home, but I've missed it so far.
Thanks for the info, very helpful!
rfbaer
Visit this Community
Texas, United States
Joined: June 12, 2007
KitMaker: 1,866 posts
Armorama: 1,696 posts
Posted: Monday, March 15, 2010 - 03:43 AM UTC
OK....I found pics of the added hull lifting lugs in a couple of pics, but none of the pics are dated. However, I like the look of them, so I removed the small eyes and added the big 'uns. Also added is a bit of detail on the mantlet MG mount, some more ERA on the glacis, and the commander's mortar. To come will the the remote firing apparatus for the mantlet MG, other turret MG's and whatever other little bits I find in pics.....then maybe stowage and paint, I dunno.


I'm already getting antsy to start the next one, an early Magach6, as used in the opening phases of Peace for Galilee, with a relatively clean mantlet area and maybe a searchlight instead of the MG. I actually started knocking together the basic hull, and will plow along with it as I wait for things to dry and set up on this one.
rfbaer
Visit this Community
Texas, United States
Joined: June 12, 2007
KitMaker: 1,866 posts
Armorama: 1,696 posts
Posted: Friday, March 26, 2010 - 07:15 AM UTC
I got a little done last night, not mush but some of the teenier pieces on the mantlet MG. I used the Acad .50, not the best I had but the only one that did not have the US-style mounting cradle molded onto it. The barrel is the dispensing tube from a bottle of Testor's liquid cement, handy.
Slow but sure, sort of....

Still needed here is the firing solenoid mount and cables. The Desert Eagle book has a nice drawing of the solenoid, but I can't find a single pic of it in use. I guess it's maybe not terribly reliable.
rfbaer
Visit this Community
Texas, United States
Joined: June 12, 2007
KitMaker: 1,866 posts
Armorama: 1,696 posts
Posted: Tuesday, April 06, 2010 - 07:03 AM UTC
I actually got some modeling time this weekend, seriously needed for my mental well-being.
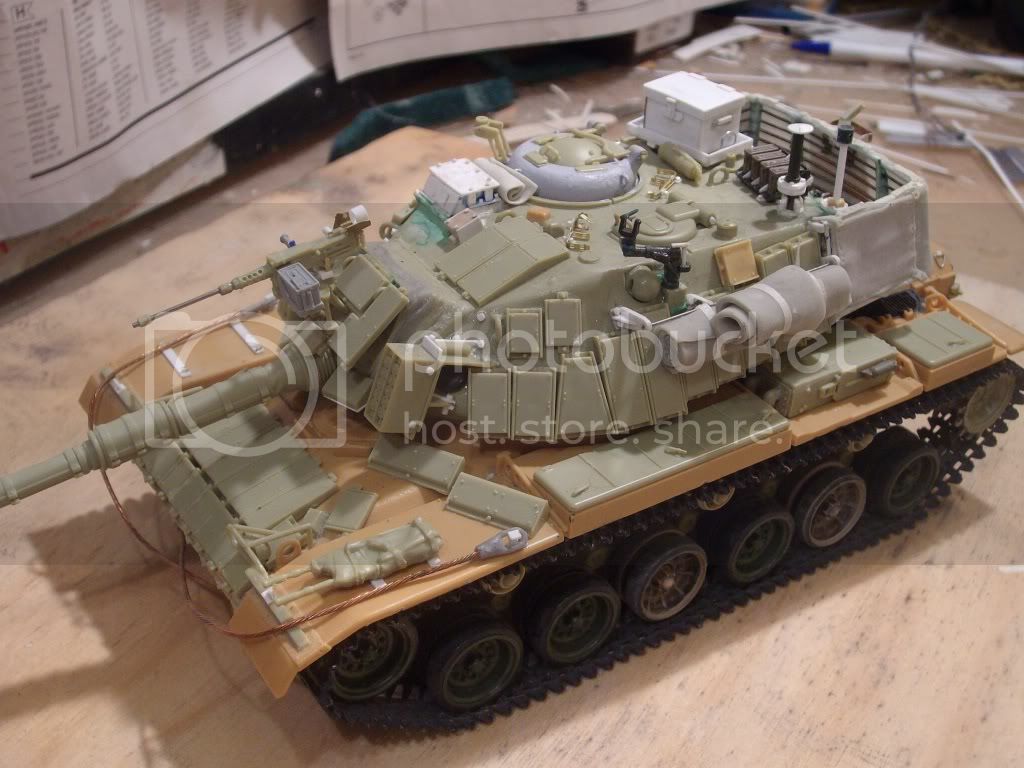
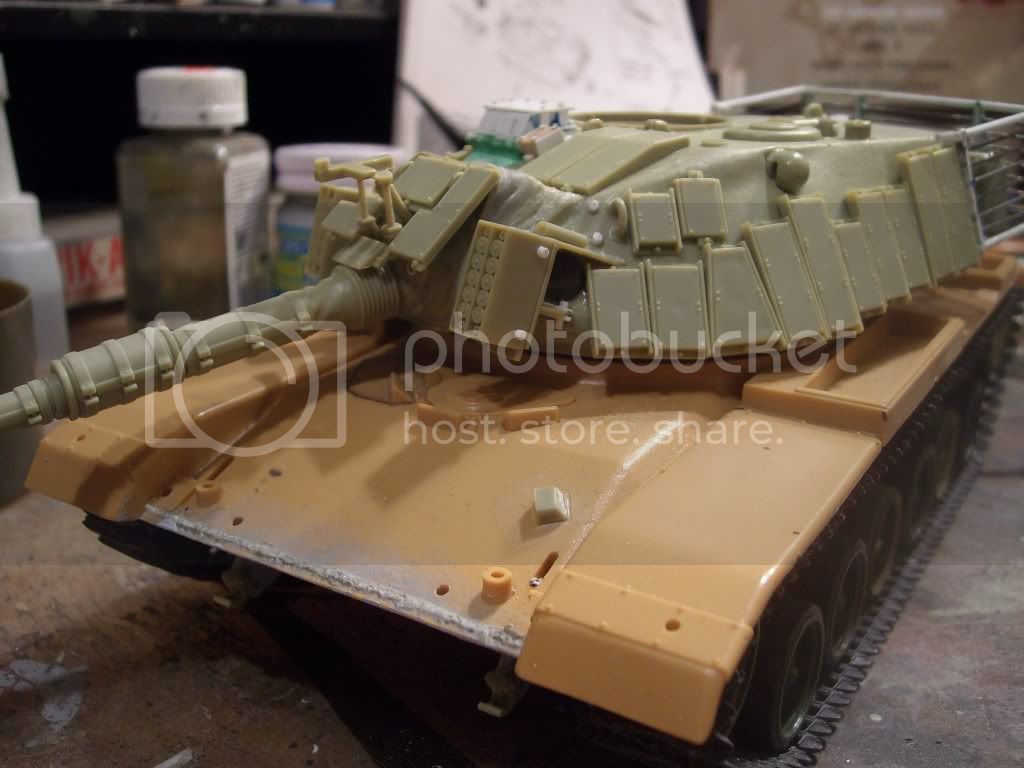
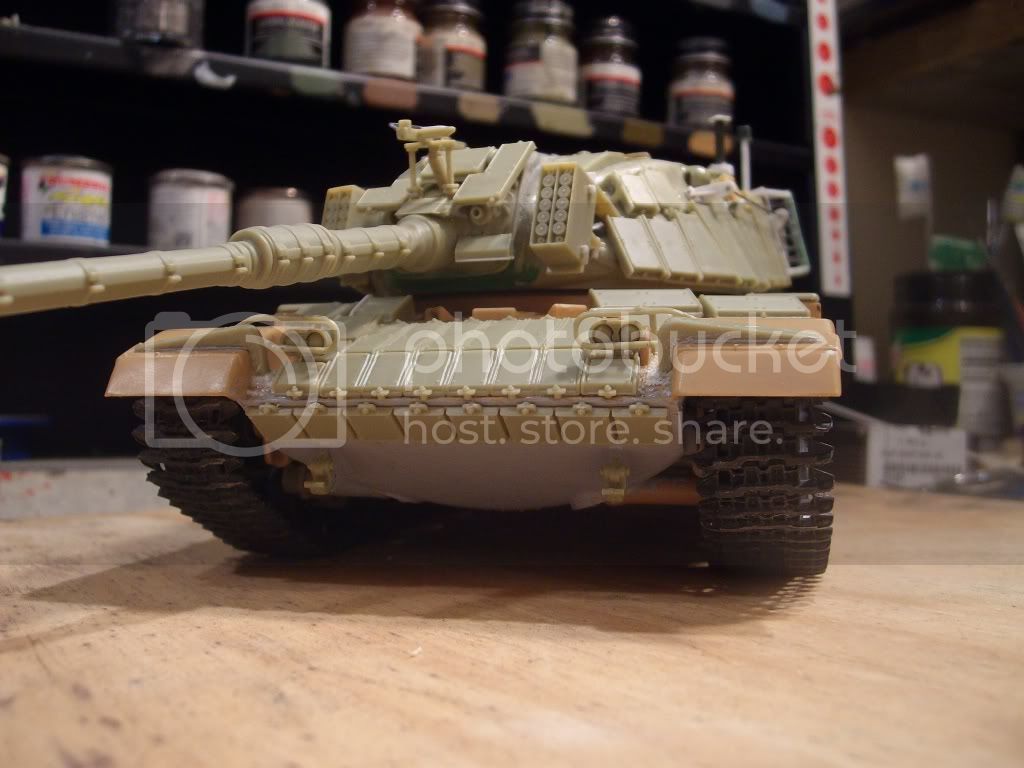
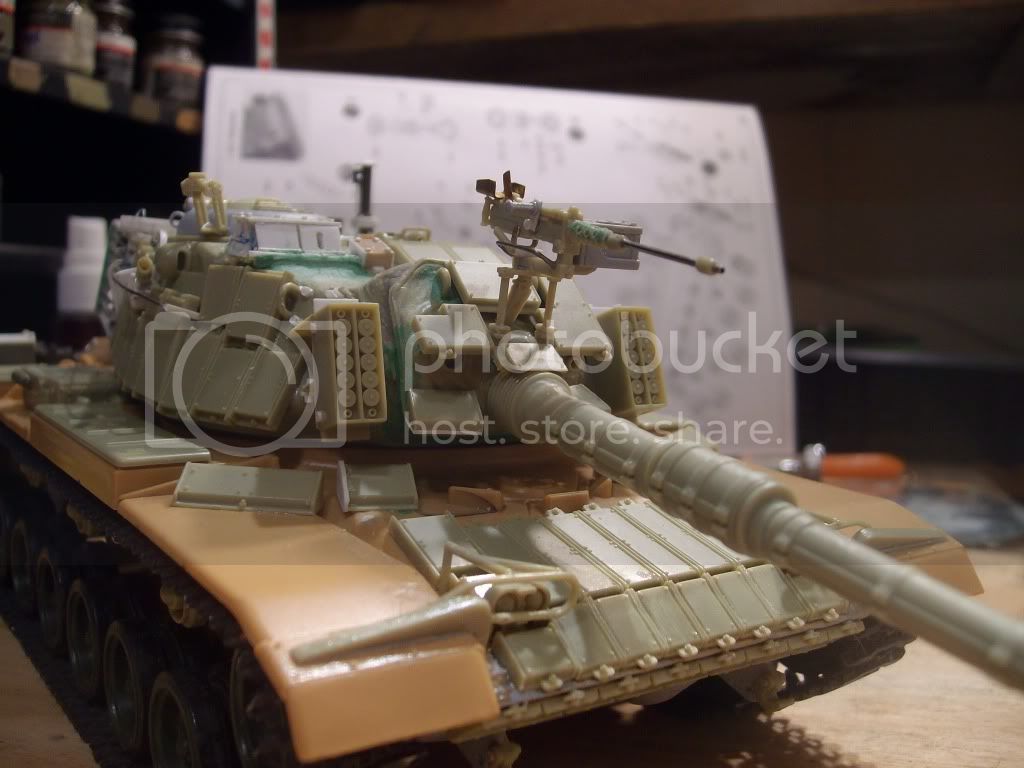
I decided to go ahead and do the canvas cover for the stowage basket, since some of my structure was less than parallel, so the Aves putty came out. I rolled it out like pizza dough, cut it to a paper pattern of the basket, and went from there. I think I like it better than the naked structure. There's a few little bits and pieces here and there added, but when I went to add the loader's MG mount, I looked all over the place for the sprue. Convinced I had lost it, with the mount and the FN
Mags, I spent about 30 minutes scratching my head before I remembered I had robbed them for a -6C I did last year. Rats. So, I knocked together a loader's mount from bits and moved on. I'll have to scare up the Mags from a Merk2 kit I have on the shelf (and it goes on....)
Sleeping mats on the rails are Aves putty, and I need to fill up the basket s well, but I don't want to cover it, I like the stuff on the turret rear and want it to be visible. Straps on the sleeping mats are a little wide, not sure what I'm going to do with those yet as they're just hanging, but I'm leaning towards using them.
I've painted things black that will need a deep wash later, but I'm kind of to the point where I'm wondering if I'm close to paint.
What have I missed? Anyway, pics:


It really is time to make up a dedicated photo area......
redcap
Visit this Community
England - East Midlands, United Kingdom
Joined: November 06, 2005
KitMaker: 753 posts
Armorama: 378 posts
Posted: Tuesday, April 06, 2010 - 07:10 AM UTC
Brilliant work so far Russell.

Look forward to seeing some paint on this beast!

Cheers.
Gary
 _GOTOTOP