Grumpy's MiniArt Campaign Building.
Grumpyoldman
 Consigliere
Florida, United States
Joined: October 17, 2003
KitMaker: 15,338 posts
Armorama: 7,297 posts
Posted: Sunday, January 10, 2010 - 06:11 AM UTC
I guess you could say I'm off to a roaring start:

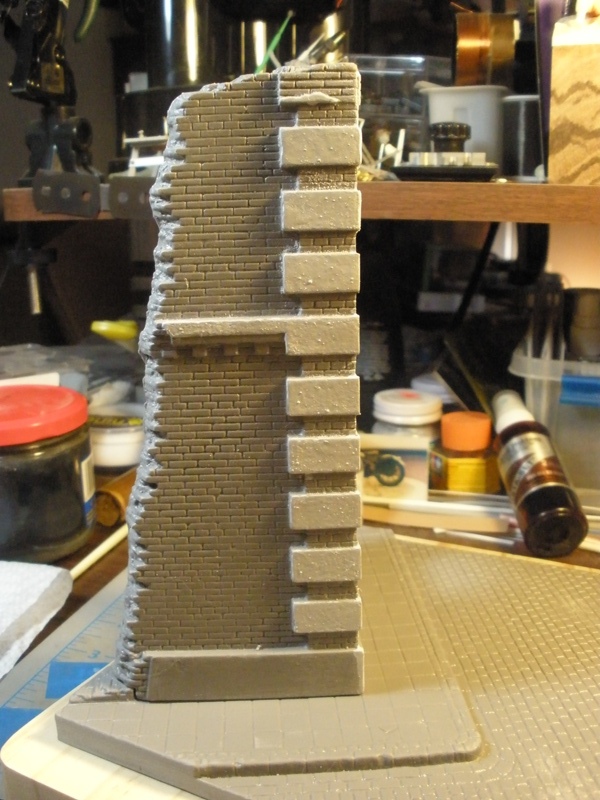
So far, so good, no major problems yet, just like cutting out an old vacformed aircraft kit, and basically assemble the same way. I was surprised with how easily and nicely the inner walls fit together following the instructions on the
MiniArt Web site under assembly Guide.
I think I'll reinforce the base underneath a little as it seems to be a little too flexible especially in the center.
Character is what you do when no one is looking.
Few things are harder to put up with than a good example.- Mark Twain
Make yourself an honest man, and then you may be sure that there is one less scoundrel in the world.--Thomas Carlyle
Florida, United States
Joined: May 04, 2008
KitMaker: 757 posts
Armorama: 518 posts
Posted: Sunday, January 10, 2010 - 09:11 AM UTC
Great job so far Grumpy. I tried out the MiniArt Austrian City Building and totaly screwed it up for not having the instructions or knowing what in the H##L I was doing. Ended up making a rubber mold of it and cast my own out of lightweigt hydrocal and it came out great. Next time I will use the scribe like I was supposed to. I always enjoy your builds and am looking forward to seeing this one finished.......Your fellow snipe.....Al
Dublin, Ireland
Joined: November 27, 2004
KitMaker: 6,048 posts
Armorama: 4,619 posts
Posted: Sunday, January 10, 2010 - 10:02 AM UTC
Great work Dave and nice wooden base you've chosen too.
Pat
work to become not to acquire
Canelones, Uruguay
Joined: December 27, 2006
KitMaker: 773 posts
Armorama: 765 posts
Posted: Monday, January 11, 2010 - 03:01 AM UTC
Thanks for the link also!. I use my Miniart street corner as a mould as I can't assembly it before.
Grumpyoldman
Consigliere Florida, United States
Joined: October 17, 2003
KitMaker: 15,338 posts
Armorama: 7,297 posts
Posted: Sunday, January 17, 2010 - 07:14 PM UTC
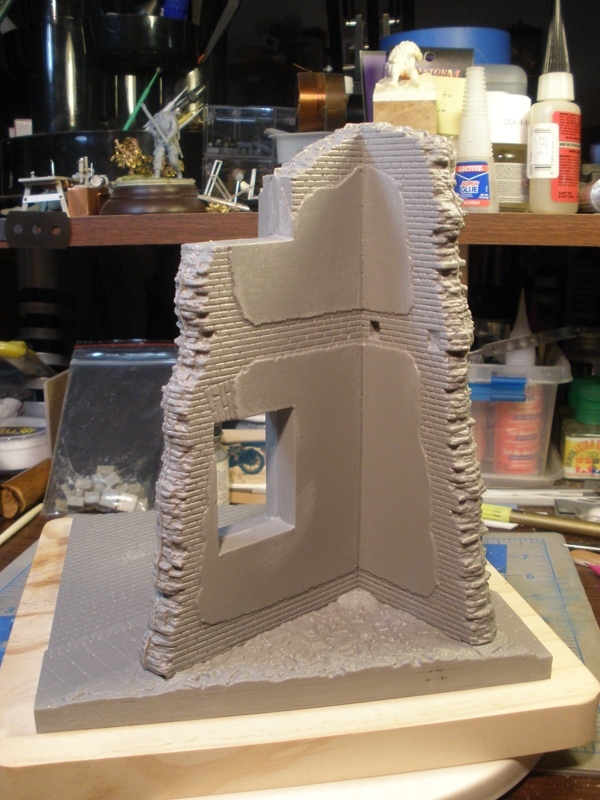
Did a little more work on this project:
Interior corner, still going to need some work and details added.
Window frames set in place, top one still needs battle damage etc. The actual windows are just push fitted at this time.
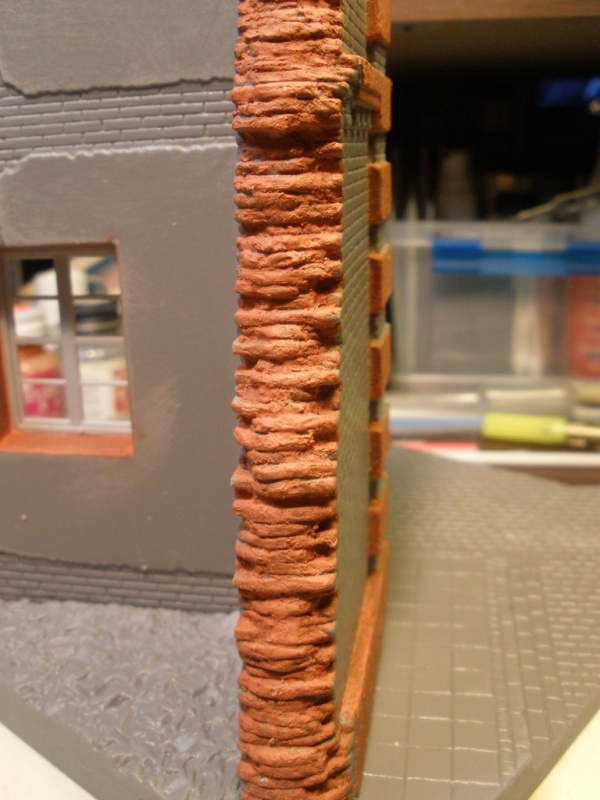
Seams were glued, then cleaned up, then textured using my home made mixture of putty and Testors liquid cement. It takes several layers to build up, letting each layer dry over night. I also used this mixture to texture the other areas of concrete work on the cornerstones, and window frames.

an over view so far.
Character is what you do when no one is looking.
Few things are harder to put up with than a good example.- Mark Twain
Make yourself an honest man, and then you may be sure that there is one less scoundrel in the world.--Thomas Carlyle
Aarhus, Denmark
Joined: July 18, 2003
KitMaker: 3,377 posts
Armorama: 1,088 posts
Posted: Sunday, January 17, 2010 - 07:48 PM UTC
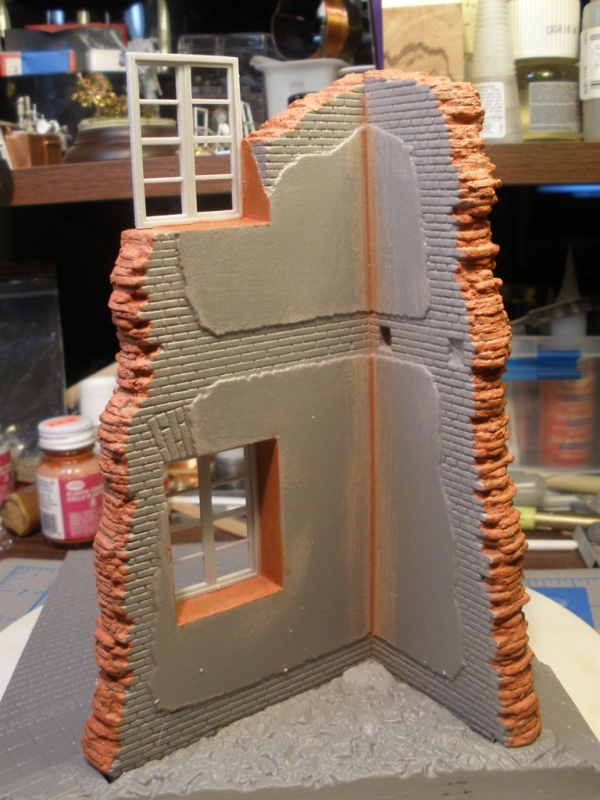
Nice work so far Dave, but I don´t think the top window would have survived the blast/demolition of the building at all - often there would have been a fire consuming the woodwork.
Cheers/Jan
It´s happy days for modellers...
Grumpyoldman
Consigliere Florida, United States
Joined: October 17, 2003
KitMaker: 15,338 posts
Armorama: 7,297 posts
Posted: Sunday, January 17, 2010 - 08:07 PM UTC
Quoted Text
Nice work so far Dave, but I don´t think the top window would have survived the blast/demolition of the building at all - often there would have been a fire consuming the woodwork.
Cheers/Jan
Thanks Jan, I'm not too familiar with European building construction, (when I was there in my OLD Navy days, building architecture was not a top priority- "wine - women and song" were!

) so I assumed they were built along the lines of our old fashion casement windows that came made of metal frames. I was planning on a little destruction to the top window frames though.
I like this one so much, I'm going to copy it for my little corner.
Character is what you do when no one is looking.
Few things are harder to put up with than a good example.- Mark Twain
Make yourself an honest man, and then you may be sure that there is one less scoundrel in the world.--Thomas Carlyle
Aarhus, Denmark
Joined: July 18, 2003
KitMaker: 3,377 posts
Armorama: 1,088 posts
Posted: Sunday, January 17, 2010 - 10:36 PM UTC
My guess is that most windows from that time would be woodframing - metal and other materials are relatively new in residential housing, whereas shopwindows are propably older.
Quoted Text
I like this one so much, I'm going to copy it for my little corner.
Thanks!, steal all you want my friend.
Cheers/Jan
It´s happy days for modellers...
North Carolina, United States
Joined: February 22, 2002
KitMaker: 11,718 posts
Armorama: 7,138 posts
Posted: Sunday, January 17, 2010 - 11:28 PM UTC
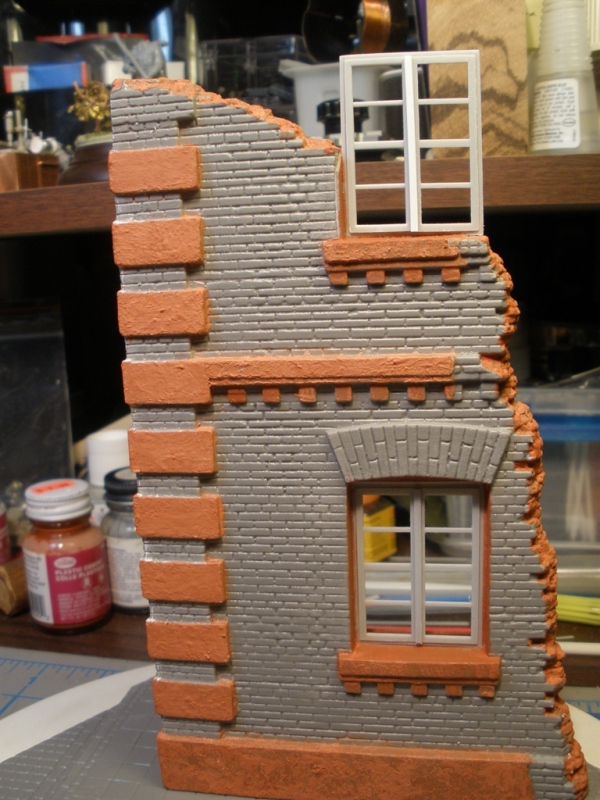
That is one of the best MiniArt brick seamlines I've seen. Well done Dave.
Florida, United States
Joined: May 04, 2008
KitMaker: 757 posts
Armorama: 518 posts
Posted: Monday, January 18, 2010 - 05:00 AM UTC
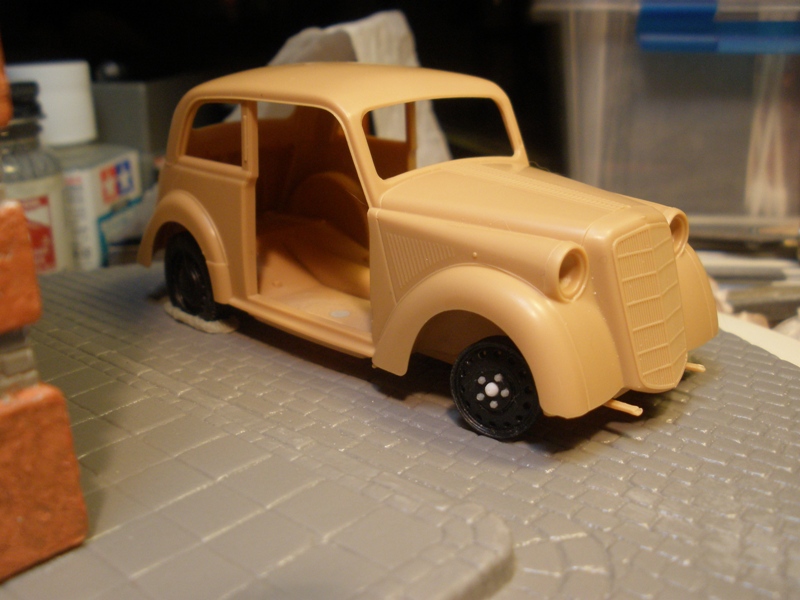
Wine, women and song, kida reminds me of my old Navy days. Dave I really like the Citroen, I think that I want to do mine similar to yours. To immitate being the greatest form of flatery and compliments. Great job ,Grumpy............Al

#130
Noord-Holland, Netherlands
Joined: June 07, 2002
KitMaker: 8,797 posts
Armorama: 4,190 posts
Posted: Monday, January 18, 2010 - 09:52 PM UTC
Wicked work mate
I have built this exact same building from miniart for a friend who likes them a lot but can't built them himself. Was a lot of fun to do in between all the other projects.
You have done a great job. Very wel done with the seams of the wall parts. Can't wait to see how this progresses on.
And that Opel from Jan looks really cool... Looking forward to your rendition. I also have that kit in the stash. Looking forward to do something with that as well.
For the same guy I curently have another Miniart building on the table.
Greetz Robert "FAUST" Blokker
"Wees niet onverstandig, haastig of voortvarend; alles sal regkom, as ons almal ons plig doen".
FUTBOL KAVGADIR!!!!!!!
England - South East, United Kingdom
Joined: January 10, 2009
KitMaker: 375 posts
Armorama: 362 posts
Posted: Saturday, January 23, 2010 - 02:23 AM UTC
what sort of putty do you mix with the testors cement? I'm making one of these and that looks just like what i need to get the ends of the walls looking nice.
Current builds;
Tamiya 1/35 Sdkfz 251/1 Diorama (name pending)
Dragon 1/35 T 34/85 Bedspring Diorama "Blood and Iron"
Grumpyoldman
Consigliere Florida, United States
Joined: October 17, 2003
KitMaker: 15,338 posts
Armorama: 7,297 posts
Posted: Monday, January 25, 2010 - 03:29 AM UTC
Luke, the putty I used here was Model Masters red putty, but any putty that thins with Testors cement will give the same results. I just applied it in thin layers, and stippled with a short bristle brush.
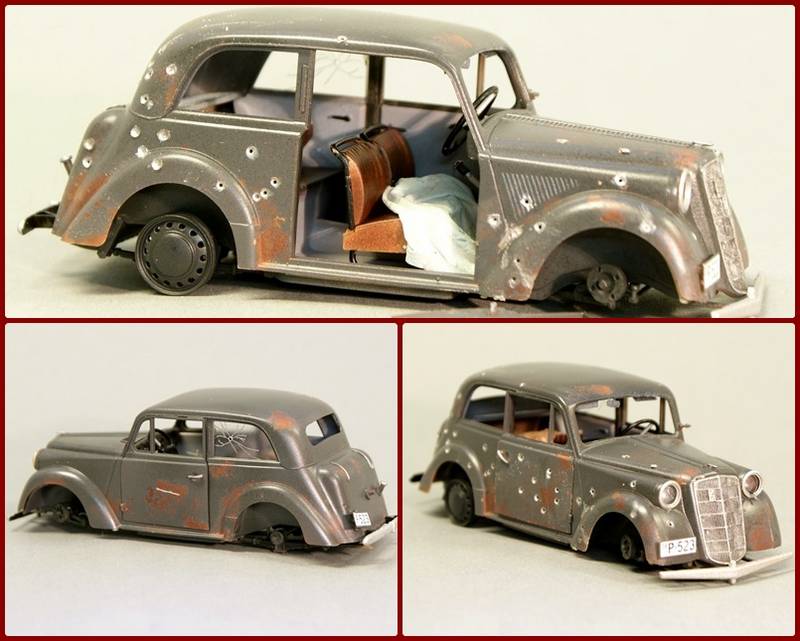
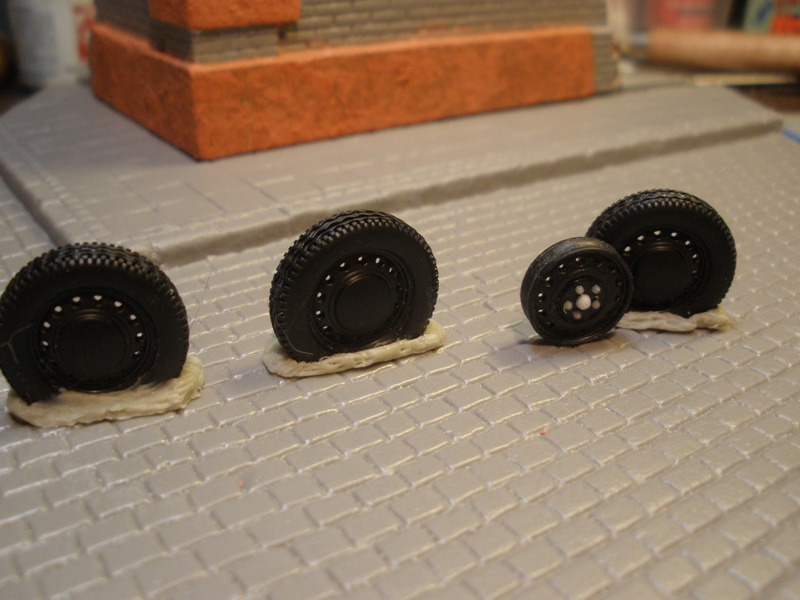
A little work on the Opel.
Tissue paper, and cotton ball shot up seats
Some flat tires, and bare wheel.
Character is what you do when no one is looking.
Few things are harder to put up with than a good example.- Mark Twain
Make yourself an honest man, and then you may be sure that there is one less scoundrel in the world.--Thomas Carlyle
Aarhus, Denmark
Joined: July 18, 2003
KitMaker: 3,377 posts
Armorama: 1,088 posts
Posted: Monday, January 25, 2010 - 04:48 AM UTC
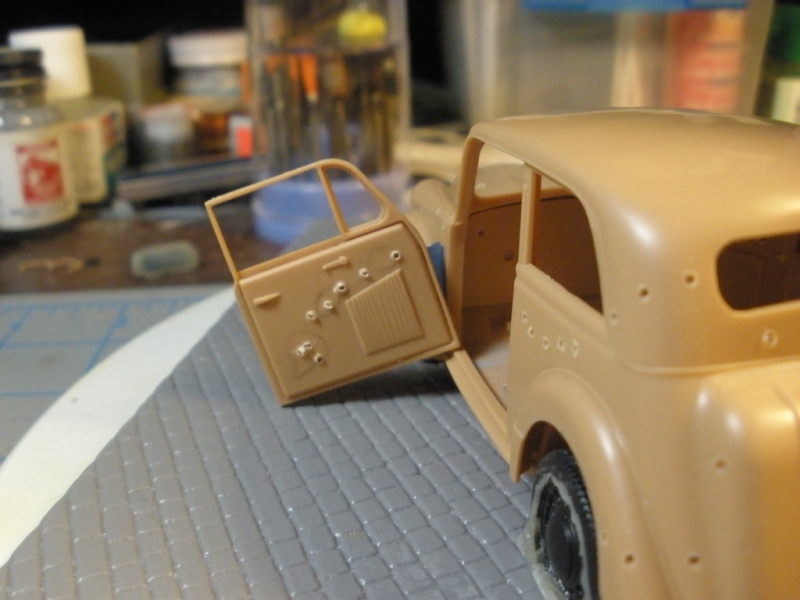
You seem to be on the run - good work.
I like the seats, it will be nice seeing them with some paint on. - I hope you can still take the car apart otherwise you will have a lot of fun painting the interior ...

Cheers/Jan
It´s happy days for modellers...
Grumpyoldman
Consigliere Florida, United States
Joined: October 17, 2003
KitMaker: 15,338 posts
Armorama: 7,297 posts
Posted: Monday, January 25, 2010 - 09:33 AM UTC
Yep, top not cemented yet, or any of the interior except the firewall. I also sacrificed the extremely fragile steering, glued nice and tight.
Character is what you do when no one is looking.
Few things are harder to put up with than a good example.- Mark Twain
Make yourself an honest man, and then you may be sure that there is one less scoundrel in the world.--Thomas Carlyle
Ireland
Joined: February 25, 2009
KitMaker: 51 posts
Armorama: 48 posts
Posted: Monday, January 25, 2010 - 10:17 AM UTC
Can't wait to see the finished article
cars seats look class

#003
Donegal, Ireland
Joined: May 14, 2002
KitMaker: 9,763 posts
Armorama: 7,444 posts
Posted: Monday, January 25, 2010 - 10:39 AM UTC
Good progress so far Dave. Have that MiniArt building in the stash ... glad to see it went together well. Love what you done with the Citroen.

IPMS Stockholm
"The problem with common sense, is that it is not that common"
Grumpyoldman
Consigliere Florida, United States
Joined: October 17, 2003
KitMaker: 15,338 posts
Armorama: 7,297 posts
Posted: Sunday, February 07, 2010 - 10:44 AM UTC
Thanks Frank.
OK another installment.
Did a little more work on the
OPEL 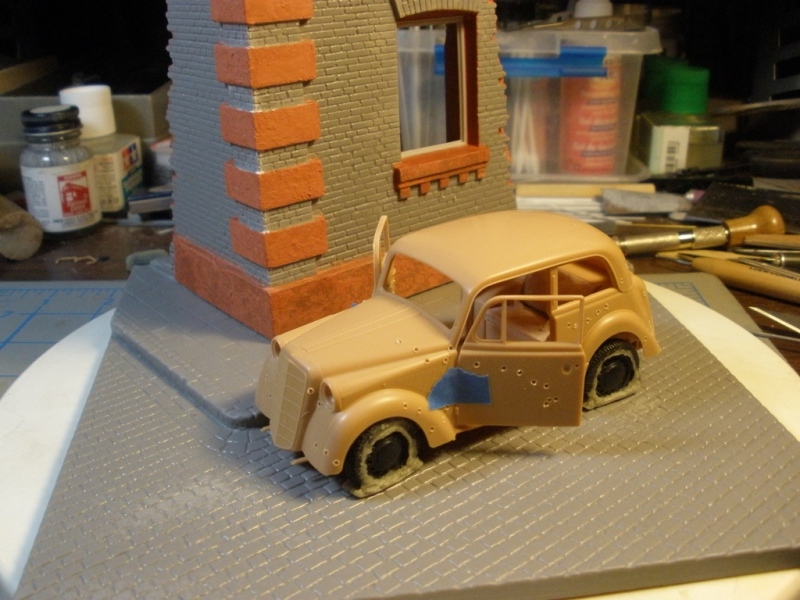
Got all confused and also made the spare tire a flat tire, so probably will just leave it off. The other flats may not be perfect, but may improve a little more with some light sanding and files. (I'll live with it in either case!)
Character is what you do when no one is looking.
Few things are harder to put up with than a good example.- Mark Twain
Make yourself an honest man, and then you may be sure that there is one less scoundrel in the world.--Thomas Carlyle
Florida, United States
Joined: May 04, 2008
KitMaker: 757 posts
Armorama: 518 posts
Posted: Sunday, February 07, 2010 - 11:24 AM UTC
Hey Grumpy ....I thought that was a Citroen too. Had to take a good look at the one that I have and sure enough they are different....duhhh. So who has the Opel ? I would like to get one of those too. Your build is coming along really nice. Looking forward to seeing it finished.Take care..........Al
Grumpyoldman
Consigliere Florida, United States
Joined: October 17, 2003
KitMaker: 15,338 posts
Armorama: 7,297 posts
Posted: Sunday, February 07, 2010 - 11:40 AM UTC
The OPEL is a kit by Bronco.
Character is what you do when no one is looking.
Few things are harder to put up with than a good example.- Mark Twain
Make yourself an honest man, and then you may be sure that there is one less scoundrel in the world.--Thomas Carlyle
Aarhus, Denmark
Joined: July 18, 2003
KitMaker: 3,377 posts
Armorama: 1,088 posts
Posted: Sunday, February 07, 2010 - 07:20 PM UTC
Hi Dave, nice work on the OPEL - a little thing to be aware of, when a bullet hit sheetmetal, it tends to strech the metal on til it burst - meaning that you will see a flat crater with a hole in the middle, be carefull that there is no rim on the crater.
Heres a sample:

Otherwise - good work, looking forward seeing some paint on it.
Cheers/Jan
It´s happy days for modellers...
North Carolina, United States
Joined: June 06, 2006
KitMaker: 4,691 posts
Armorama: 3,509 posts
Posted: Monday, February 08, 2010 - 04:27 AM UTC
It's going to look great Dave,keep the updates coming
Oregon, United States
Joined: December 08, 2005
KitMaker: 556 posts
Armorama: 433 posts
Posted: Monday, February 08, 2010 - 07:48 PM UTC
Looking good Dave. I gotta give ya credit, it looks better than mine.
I built one of these things last year and I swore I'd never buy another. None of the parts fit correctly because the "castings" or whatever you call them, didn't match. I did manage to make the thing look decent with a lot of putty and sanding and putty and filing....
I thought I'd give mini-art another chance with their Normandy House. Same garbage. Part halves don't line up. Last mini-art kit for me.
Good luck and I'll keep watching your build.
Steve
A veteran - whether active duty, retired, or national guard or reserve -- is someone who, at one point in their life, wrote a blank check made payable to "The United States of America," for an amount of "up to and including my life."
Grumpyoldman
Consigliere Florida, United States
Joined: October 17, 2003
KitMaker: 15,338 posts
Armorama: 7,297 posts
Posted: Monday, February 08, 2010 - 10:54 PM UTC
Thanks Steve, perhaps the time I spent playing with vacformed aircraft kits years ago helps with these buildings. (Plus actually reading/watching their tutorial on their site solved the interior wall fit with a decent seam.)
Character is what you do when no one is looking.
Few things are harder to put up with than a good example.- Mark Twain
Make yourself an honest man, and then you may be sure that there is one less scoundrel in the world.--Thomas Carlyle
Ireland
Joined: February 25, 2009
KitMaker: 51 posts
Armorama: 48 posts
Posted: Monday, February 08, 2010 - 11:21 PM UTC
excellent work


