_GOTOBOTTOM
Armor/AFV: Axis - WWII
Armor and ground forces of the Axis forces during World War II.
Hosted by Darren Baker
Enheitsdiesel Pritschenwagen, IBG Models 1:35
Bratushka
Visit this Community
Indiana, United States
Joined: May 09, 2008
KitMaker: 1,019 posts
Armorama: 657 posts
Posted: Thursday, April 15, 2010 - 10:14 PM UTC

Quoted Text

Hi

I always think the issue of wood grain and its depiction on vehicles is questionable, so I wouldn't deduct points from my personal estimation of a kit for its lack of depiction.

Most times pretty hard to see on new vehicles covered in a good coat of paint in the real world, reduce that to 1:35 scale and you are unlikely to be able to see it at all.

I'd rather it be left off as it looks a bit toy like in most examples I've seen, and leave it up to the modeller if he wants to add it. The coarse sandpaper method as shown here for example I think is an ideal technique if you wish to depict woodgrain, all be it overscale

Alan


I bought a wire brush type tool ages ago from MicroMark that was for creating woodgrain in styrene and other soft materials. The bristles extend and retract from the handle which has the effect of of adding or reducing depth in the pattern. I believe its intended use was in model railroading for buildings and the cars that had wooden components. I've used it with 1/48th scale aircraft components, 1/24 -1/25th scale automotive stuff, and some 1/35 military. It looks good if used with a light touch.


On the tire patterns, couldn't that be attributed to a civillian type tire and a military version? And then add to that a "use what is available" mindset to get replacements sent to the field?
FAUST
#130
Visit this Community
Noord-Holland, Netherlands
Joined: June 07, 2002
KitMaker: 8,797 posts
Armorama: 4,190 posts
Posted: Thursday, April 15, 2010 - 10:58 PM UTC

Quoted Text

On the tire patterns, couldn't that be attributed to a civillian type tire and a military version? And then add to that a "use what is available" mindset to get replacements sent to the field?


I think it has more to do with the fact that several manufacturers made the EInheitsdiesels and that all parts were interchangeable. So when a vehicle broke down it didn't matter which manufaturer it was... It could always be fixed. There were one or two parts that were different and of which 2 types were available... I have to check the bit of reference I have which items those were.
But Probably the number of manufacturers also meant that there were several tire manufacturers delivering the tires which could be an explanation to the different threadpatterns you see in the pictures. For the fitting of the wheel the tirepattern isn't that important.

Here another picture showing 2 types of threadpattern. The Sparewheel is different from the one on the frontwheel
Frenchy
Visit this Community
Rhone, France
Joined: December 02, 2002
KitMaker: 12,719 posts
Armorama: 12,507 posts
Posted: Thursday, April 15, 2010 - 11:13 PM UTC

Quoted Text

Frenchy, I saw those pictures you posted, pitty they're not sharper for smaller details modeler needs to see.


Did you see these ?
http://www.reddevilsthiene.it/pagine/Pag_EINHEITS%20LKW/pag_einheits_lkw_2.html

HTH

Frenchy
Pedro
Visit this Community
Wojewodztwo Pomorskie, Poland
Joined: May 26, 2003
KitMaker: 1,208 posts
Armorama: 1,023 posts
Posted: Thursday, April 15, 2010 - 11:39 PM UTC
Wow, thanks Frenchy, those are really helpful!

Robert, you metioned your references, are there any titles dedicated solely to the ED ?

Greg
FAUST
#130
Visit this Community
Noord-Holland, Netherlands
Joined: June 07, 2002
KitMaker: 8,797 posts
Armorama: 4,190 posts
Posted: Friday, April 16, 2010 - 12:08 AM UTC
Handle reference in the loosest way possible.

So far the only ED dedicated publication I could find is the Waffenarsenal Sonderband 72 which deals with the 2,5 ton EinheitsLKW's of the wehrmacht.
The rest of my ref is what I managed to find online and with contacts I once had with people who restored an Einheitsdiesel.
All gathered while I was doing my research for once building the Schmidt Vacu form kit
FAUST
#130
Visit this Community
Noord-Holland, Netherlands
Joined: June 07, 2002
KitMaker: 8,797 posts
Armorama: 4,190 posts
Posted: Friday, April 16, 2010 - 12:28 AM UTC
Little update... Mailman just delivered the box from Poland with the 2 Einheitsdiesels in it. And last night I found in my photocollection a nice conversion of the Pritsche that I probably will built. I'm a happy man
Heilsberg
Visit this Community
Wojewodztwo Warminsko-Mazurskie, Poland
Joined: April 14, 2010
KitMaker: 11 posts
Armorama: 9 posts
Posted: Monday, April 19, 2010 - 02:08 AM UTC
New for Pritschenwagen:


Free Image Hosting at <a href=www.ImageShack.us" border="0"/>


Free Image Hosting at <a href=www.ImageShack.us" border="0"/>


Free Image Hosting at <a href=www.ImageShack.us" border="0"/>


Free Image Hosting at <a href=www.ImageShack.us" border="0"/>


Free Image Hosting at <a href=www.ImageShack.us" border="0"/>
FAUST
#130
Visit this Community
Noord-Holland, Netherlands
Joined: June 07, 2002
KitMaker: 8,797 posts
Armorama: 4,190 posts
Posted: Monday, April 19, 2010 - 03:05 AM UTC
Hmmm got a very heavy sense of "Ineedoneofthosetoo"

Nice set... Very good details inside the driverscab... pretty usefull for my own conversion.
Pekka
Visit this Community
Uusimaa, Finland
Joined: May 29, 2006
KitMaker: 15 posts
Armorama: 7 posts
Posted: Monday, April 19, 2010 - 05:58 AM UTC
I was looking at the photo more carefully and realised that it´s not made by IBG but for the IBG kit. Anyway, the details shoul have been there in the first place
Anyway, the floor anti slip texture looks still like 1/16 scale...
While today dismantling my library( the room needs paint etc) I found Wheels & Tracks issue 57 from1996. It has a super article of Einheits. Many great conversions. Among others is 8x8 variant but also amphibious body.
Pekka N.
Heilsberg
Visit this Community
Wojewodztwo Warminsko-Mazurskie, Poland
Joined: April 14, 2010
KitMaker: 11 posts
Armorama: 9 posts
Posted: Monday, April 19, 2010 - 06:49 AM UTC
Free Image Hosting at <a href=www.ImageShack.us" border="0"/>

As Niko Model crew told me pattern of floor is good. It's 1/35 not 1/16. The same numbers of row and the same numbers of "dots" in a row like on photo. Don't forget - floor in Einheitsdiesel from Koblenz is different. If You have different photo it not always mean it's bad. Kit is made by Niko Model exclusively for IBG distribution.
mzaborsk
Visit this Community
Rhode Island, United States
Joined: June 21, 2008
KitMaker: 116 posts
Armorama: 78 posts
Posted: Sunday, April 25, 2010 - 12:16 AM UTC
wow...lot'sof good info on the vehicle...it's been on my wish list since it's anouncement ... I like to purchase it can't wait till it's available in the US...

Michael
Pedro
Visit this Community
Wojewodztwo Pomorskie, Poland
Joined: May 26, 2003
KitMaker: 1,208 posts
Armorama: 1,023 posts
Posted: Tuesday, July 26, 2011 - 09:33 AM UTC
Hi all,

It's been a while, but I managed to do some improvements on the tires and put most of the truck + IBG's upgrade set together.

Starting from the tires, I've made myself a nice tool out of three broken blades with proper distances, which enabled me to scribe two lines on each side of the tire face, using the centre line of the tire as a guide.

From right to left: scribed tire, tire with scribing exploited further to give the desired steps and prototype tire under a coat of primer:


chassis with wheels blu-tacked in place for photos:


Some details on the front: I exchanged the notek from IBG detail set for a Tamiya one, seems better detailed, and angle on the mounting of IBG part made it placed much lower than on the photos of original trucks. PE radiator mesh looks very nice, but because there is no actual radiator in the kit, I will have to block the see-through effect witch some evergreen.


Interior details do look the part and there is also inner frame for the windshields with riveting. My only concern are the turn signals which look a bit too thin, together with their flat mountings.


And some general photos, the truck seems to be a handsome one. I still have to figure out the canvas cab roof construction as I wanted to make it in the opened or half opened state (top part folded, back part still vertical).


Pedro
Visit this Community
Wojewodztwo Pomorskie, Poland
Joined: May 26, 2003
KitMaker: 1,208 posts
Armorama: 1,023 posts
Posted: Sunday, July 31, 2011 - 07:34 AM UTC
After I shot the above photos, one thing became evident: as I dug through the available photos of ED trucks in search of good view of folded down roof and its construction, I found out that the cab's rear bulkhead should be some 4 mm higher than the cab's sides. It's quite evident here:
http://www.reddevilsthiene.it/pagine/Pag_EINHEITS%20LKW/pag_einheits_lkw_7.html
and here:
http://antikvariat.ru/auto/3402/39919/

Considering the above photos, I had to make some quick alterations to the rear bulkhead, bench but also make new backrest.

Here's what I came up with:
(on top of this picture is the original backrest)


Best regards,
G.Z.
Pedro
Visit this Community
Wojewodztwo Pomorskie, Poland
Joined: May 26, 2003
KitMaker: 1,208 posts
Armorama: 1,023 posts
Posted: Wednesday, October 12, 2011 - 12:32 PM UTC
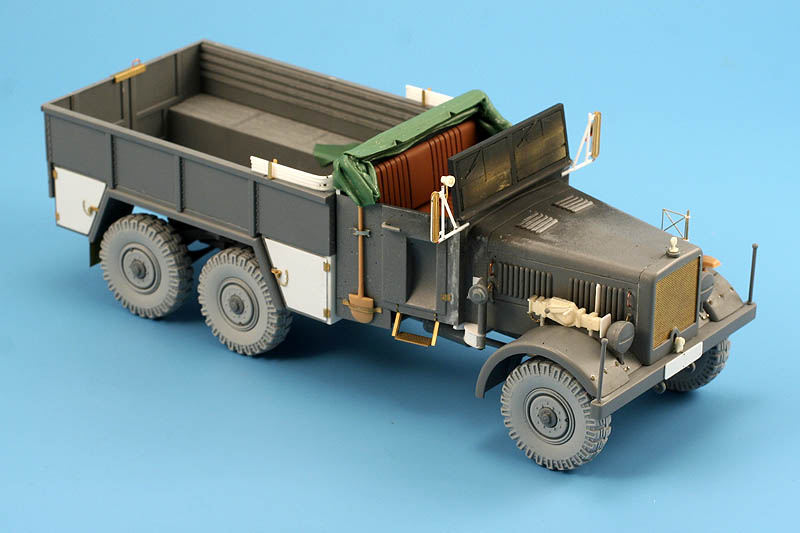
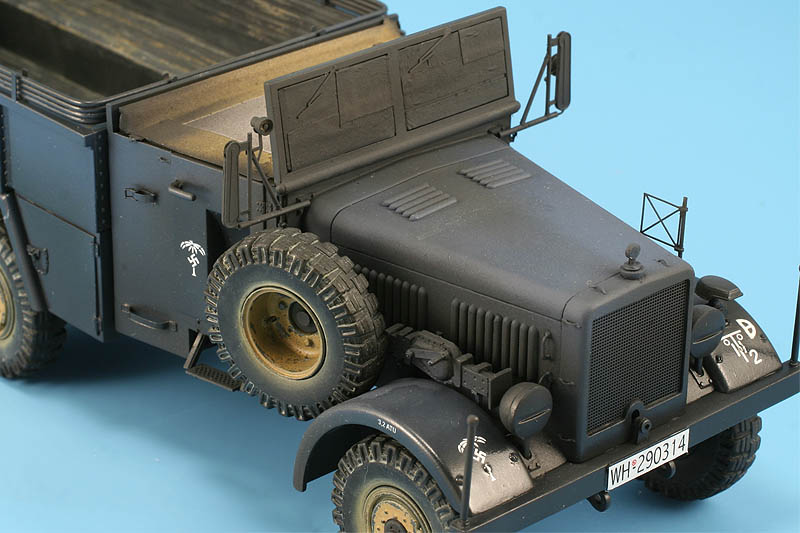
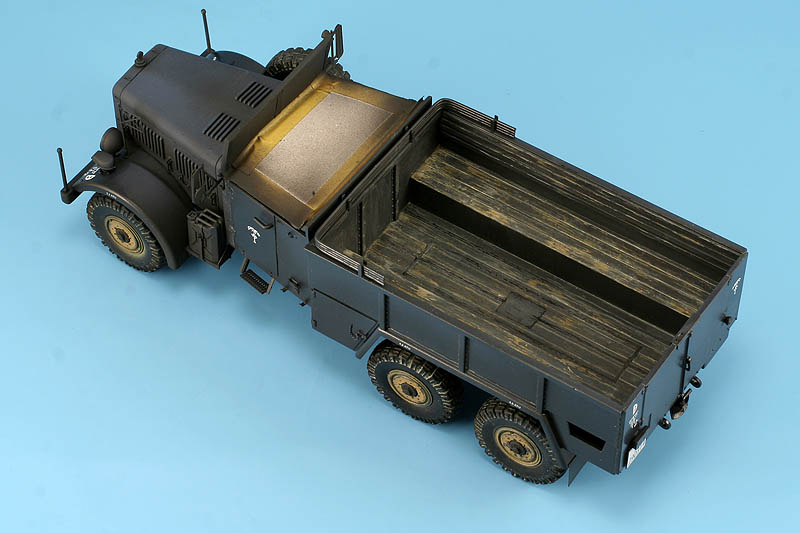
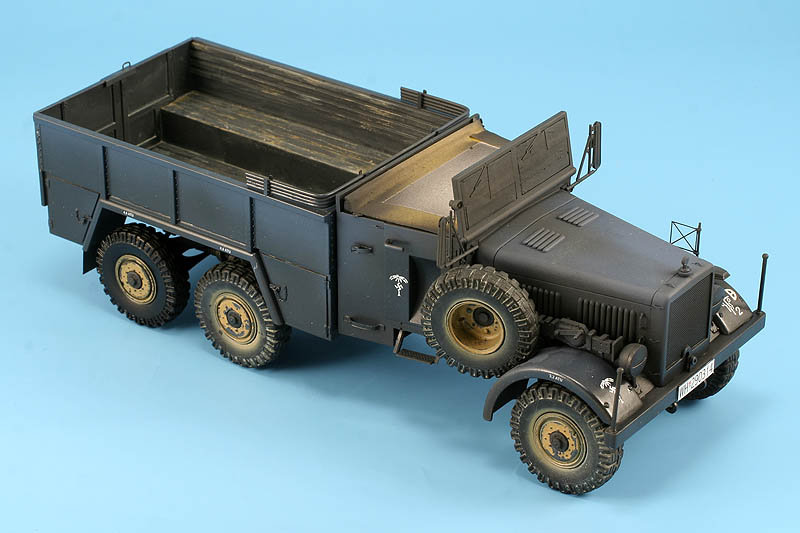
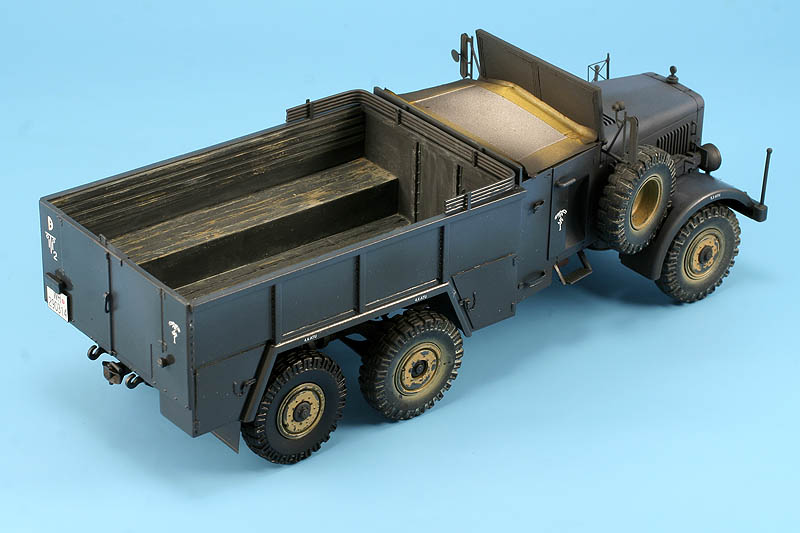
I'm still playing with this build, though I think I am finally getting there...

From photos I figured quite a few other details I had to redo.
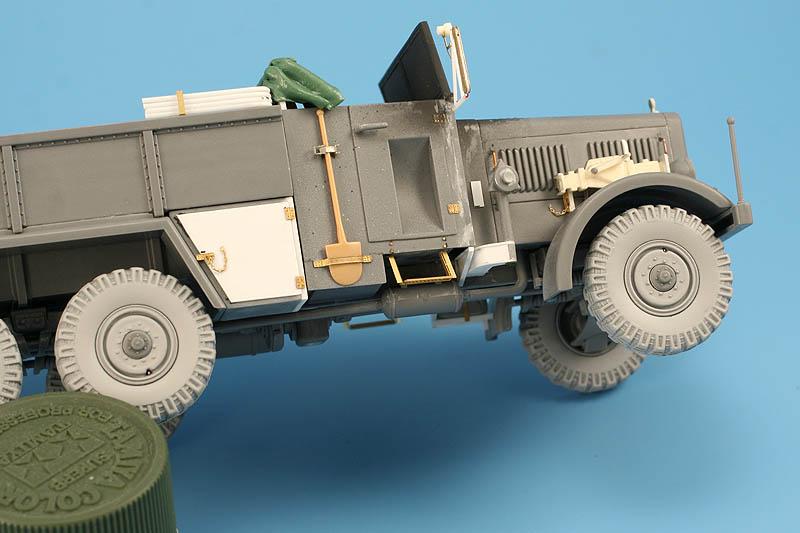
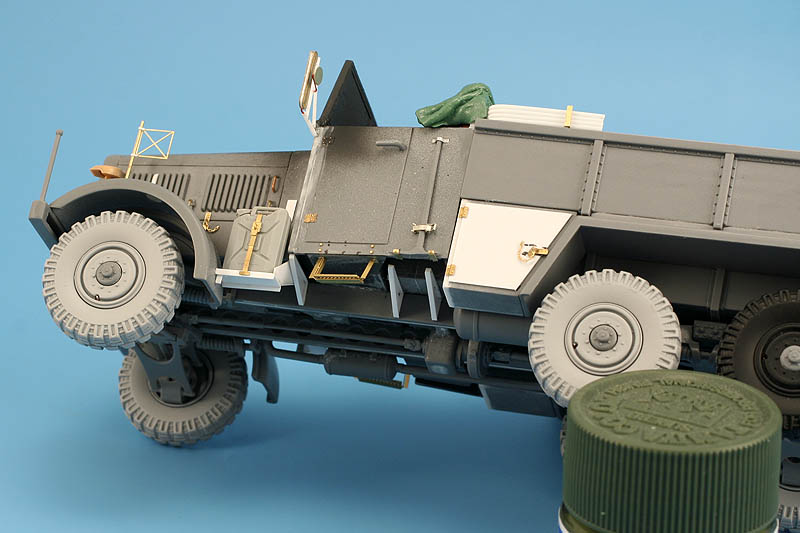
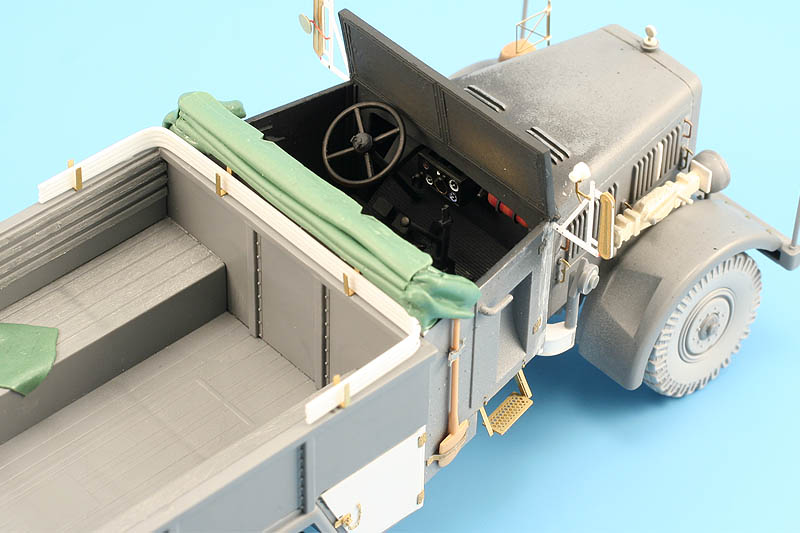
I have added cab interior vent flap, cab support rib, made new spare wheel support and lenghtened the front toolboxes by 1mm. One of the vent louvers on the hood sides is strangely missing from the kit on both sides so I scratched that too. I also made new turn signal supports and rear canvas cover supports from round evergreen. Tilted cab roof was sculpted using the good ol' Greenstuff.


Just before painting the whole thing in panzer gray I figured another three details to bother myself with: windshield lowering mechanism in the recesses on the cabs bulkhead edges, turn signals mounts should be welded to a triangular plate riveted or screwed to the cabs front bulkhead, and not sinked into it like in the kit and lastly a slew of radiator cover loops placed around the radiator.


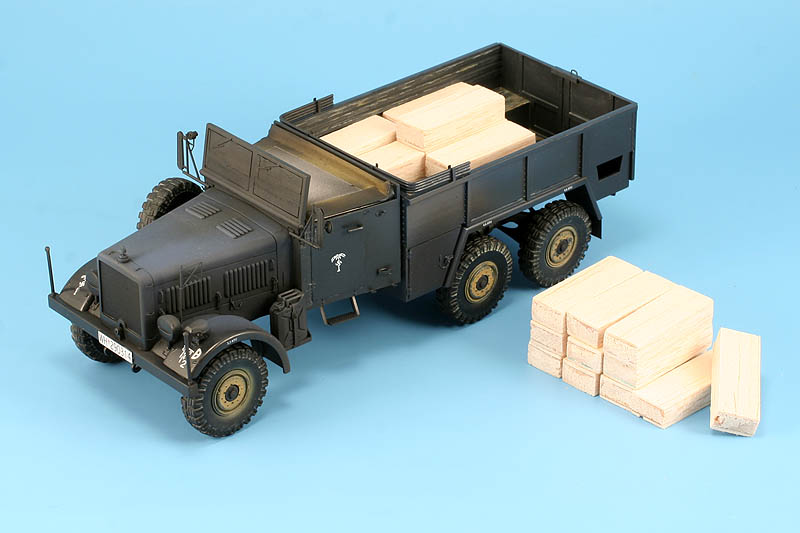
I painted and weathered cargo bays interior, but I am not entirely happy with the results....


...which fortunately will be mostly covered with cargo: some twenty 15cm K18 cannon cartridge boxes (still to be detailed and painted) I borrowed the details for the cargo from this interesting website: http://wehrmachts.kisten.free.fr/15cmk18.htm


Markings are a combined bunch: DAK palmtrees are from Archers set, tactical and tyre pressure markings are the kits own decals, 21st pz. div. sign is an old decal from one of the 1:76 matchbox sets, fits 1:35 scale nicely thoug its thickness fits rather the 1:1 scale. License plates are some italeri kit leftover.

Eventually the kit will be painted in a scheme like this, using the hairspray technique, leaving cab and cargo bay interior still in panzer gray:


Cheers,
G.Z.
 _GOTOTOP