


Constructive Feedback
For in-progress or completed build photos. Give and get contructive feedback!
For in-progress or completed build photos. Give and get contructive feedback!
Hosted by Darren Baker, Dave O'Meara
feed back on paint chipping please

bellers

Joined: September 30, 2008
KitMaker: 253 posts
Armorama: 218 posts

Posted: Wednesday, May 05, 2010 - 09:54 AM UTC
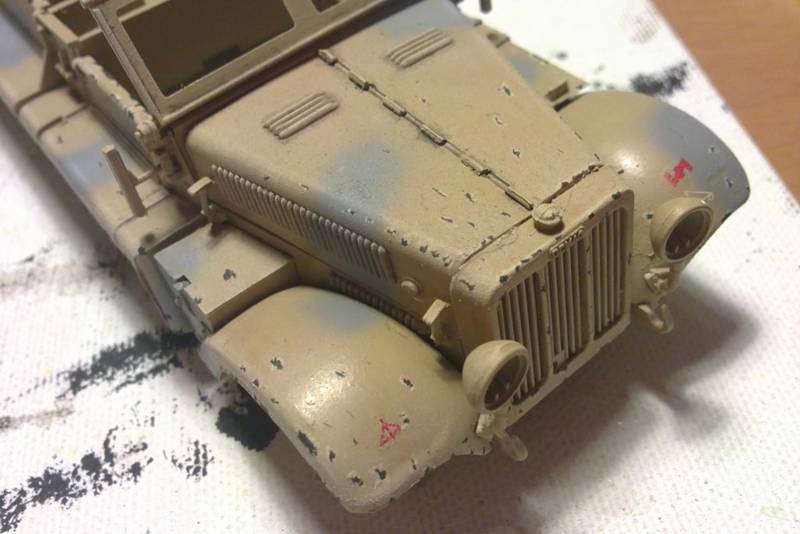
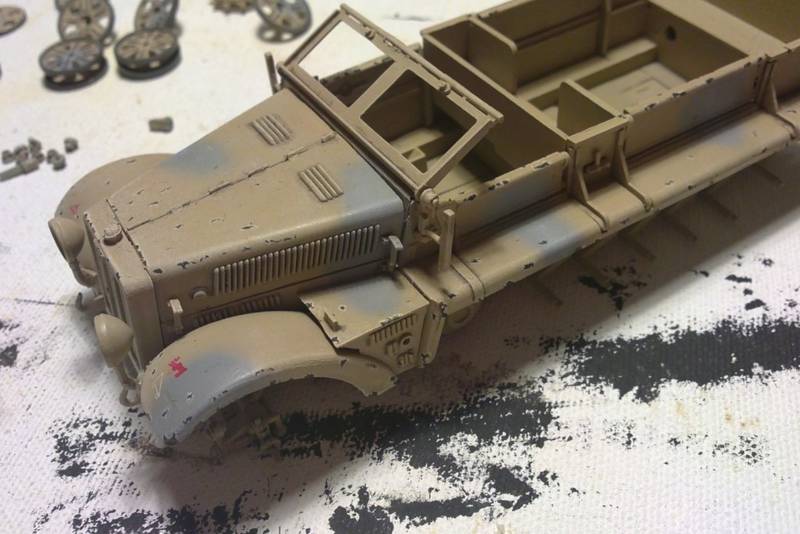
hi guys would like your input on my paint chipping.just had a go on a sd kfz 10 iv been building dident cost alot of cash so its a pefect test subject'your comment are welcome
bellers
Joined: September 30, 2008
KitMaker: 253 posts
Armorama: 218 posts
Posted: Wednesday, May 05, 2010 - 09:55 AM UTC
bellers
Joined: September 30, 2008
KitMaker: 253 posts
Armorama: 218 posts
Posted: Wednesday, May 05, 2010 - 10:03 AM UTC
just used a small brush to try and get a good chipping effect
bellers
Joined: September 30, 2008
KitMaker: 253 posts
Armorama: 218 posts
Posted: Wednesday, May 05, 2010 - 10:04 AM UTC

panzerbob01

Joined: March 06, 2010
KitMaker: 3,128 posts
Armorama: 2,959 posts
Posted: Wednesday, May 05, 2010 - 10:14 AM UTC
Wayne:
I like it! Your chips look pretty nice, from what I can see.
As a suggestion, though... seeing as you have several good-sized chips, you are suggesting some significant wear n tear. From this, I offer you probably should ding-up more along most or all edges of the 'track. Look at all of those edges and corners which guys stand on and which get rubbed against plants and stuff. Get some tiny stuff in!
The other thing which I have fiddled with in this sort of case is trying to add in scratches- maybe more finish is lost to scratching from plants and wire and stuff then from the rather discrete blows a solid chip suggests. I use coloured pencils to scratch in lines where I don't want to "cut thru the paint but only mar it some".
A technique I recently tried on a DAK Horch project was to use a knife to actually scratch lines and small gouges in a top-coat, exposing the darker base coat beneath.
Looks like you have a god start, there, Pard!

lukiftian

Joined: March 12, 2010
KitMaker: 791 posts
Armorama: 592 posts

Posted: Monday, May 10, 2010 - 07:47 AM UTC
That's pretty good. You've shown more restraint than I've seen some modelers use with this technique (lol including me).
bellers
Joined: September 30, 2008
KitMaker: 253 posts
Armorama: 218 posts
Posted: Monday, May 10, 2010 - 08:16 AM UTC
thanks kevin and yes it is hard to stop (just one more chip carnt stop myself noooooooo) 

DT61
Joined: September 18, 2005
KitMaker: 1,226 posts
Armorama: 819 posts

Posted: Friday, May 14, 2010 - 08:52 AM UTC
Wayne,
I like what you have done so far, but Bob's suggestion would help bring it all together. I have never tried the "knife" scratches, but have used an old stiff brush to "scratch" the paint. I also use prisma coloured pencils to add scratches and variations to the paint.
Darryl
I like what you have done so far, but Bob's suggestion would help bring it all together. I have never tried the "knife" scratches, but have used an old stiff brush to "scratch" the paint. I also use prisma coloured pencils to add scratches and variations to the paint.
Darryl

JoeKer
Joined: April 24, 2010
KitMaker: 21 posts
Armorama: 18 posts
Posted: Friday, May 14, 2010 - 05:27 PM UTC
Great job! Maybe I am missing this, but is the wear on the inside paint? The chips you have are suggestive of significant use and this should probably be reflected on the interior surfaces? In any case, really nice so far!
bellers
Joined: September 30, 2008
KitMaker: 253 posts
Armorama: 218 posts
Posted: Friday, May 14, 2010 - 07:49 PM UTC
work on the inside will be done next hopefully ill be able to brig it together with the weathering iv done on the out side as in the back i plan to put some stowage and the seat accros the center thanks for ya comments.
thanks for ya comments.
Karl187

#284

Joined: October 04, 2006
KitMaker: 3,094 posts
Armorama: 2,942 posts

Posted: Monday, May 24, 2010 - 01:24 AM UTC
I've heard of someone using a dental scraper (a sharp ended hook shaped metal thing) or a needle (safety pin?) to add various scratches. Adam Wilder did a simple one for ana article where he put two pieces of kabuki tape down, with about a 1mm gap between them and then painted a small scratch in with the vehicle undercoat color before whipping the tape off to reveal a perfect line scratch. He then blended it a wee bit to look more natural. Might want to give those a try if your still going at it.


MUNROS
Joined: September 24, 2010
KitMaker: 75 posts
Armorama: 43 posts

Posted: Sunday, November 28, 2010 - 12:39 AM UTC
Wayne, HI! I think it looks real good. The comment about your showing restraint with the chipping, is right on. It is had to decide when enough is enough. Have you tried using a sponge? The stuff that would be in a cheap seat cousion ,spell check is telling me i can't spell, hope you know what i mean. Anyway... I've only used acrylic paints for this but, DO thin it, right from the bottle is too thick, and you end up with paint bumps, instead of scratches. Dab most of the paint off and go. Good to practice on something first, which i seem unable to do. I learn new things by screwing up projects. It does look good though. RONNY.

muchachos
Joined: May 21, 2008
KitMaker: 537 posts
Armorama: 439 posts

Posted: Sunday, November 28, 2010 - 07:53 AM UTC
It looks quite good. The only thing I would advise is to put more, smaller chips, and cluster them together. You can get a good result from using a little scrap of fine sponge to do this.

collin26
Joined: March 24, 2007
KitMaker: 317 posts
Armorama: 259 posts

Posted: Sunday, November 28, 2010 - 09:01 AM UTC
Wayne,
So waht paint are you using? This is not supper critical but some work better than others as far as brushability goes. I would suggest "Lifecolr" or "Vallejo". chocolate browns.
As for the chipping so far I think it is a nice start. I would practice keeping the individual chips a little bit smaller and a bit more random. It is important that they not be in any sort of patern or be predictable at all. Keep them in the edges of panels and leading edges of the vehicle. I think you are of to an excelent start here, just try not to over do the size or quantity.

bellers
Joined: September 30, 2008
KitMaker: 253 posts
Armorama: 218 posts
Posted: Monday, November 29, 2010 - 07:55 AM UTC
thanks for the comments guys.she is still a work in progress and packed away for the mo as i have campaigns starting so will post progress as and when thanks for looking.
thanks for looking. |

WEB HOSTING BY


Copyright ©2021 Armorama and Kitmaker Network, a subsidiary of Silver Star Enterprises
All Rights Reserved. Please read our Conditions of Use and Privacy Policy.
All Rights Reserved. Please read our Conditions of Use and Privacy Policy.