

Hello all. This is my first posting ever. So don't count on good pics or followed protocoll.
That said, on i go to my project.
Its the beautiful new tasca offspring and well...WOW!! Ease of build, a fit I've never encountered before, lots and lots of detail and really awesome etch.
I usually build wings but I allways have a tank on the bench for recreation and less challenging builds. Don't get me wrong, tanks are not an easy subject, it's just that I don't allow myself to be armour anything else than real FUN! Not really a lot of resource, scratching or aftermarket goodies.
But I'm deviating. Let me get things fixed here and I'll put on some pics (thanks steffan for the help!!).
Hosted by Darren Baker
Tasca British Sherman

Rebilda

#057

Joined: May 11, 2010
KitMaker: 248 posts
Armorama: 119 posts

Posted: Wednesday, May 12, 2010 - 03:23 AM UTC

Rebilda
#057
Joined: May 11, 2010
KitMaker: 248 posts
Armorama: 119 posts
Posted: Wednesday, May 12, 2010 - 04:06 AM UTC
Well...guys I'm really sorry, I just don't get it. How do I post the pics? I mean, I managed to upload them in the kitmakers-gallery-thingy but where do I go from there?

exer

Joined: November 27, 2004
KitMaker: 6,048 posts
Armorama: 4,619 posts

Posted: Wednesday, May 12, 2010 - 04:41 AM UTC
Okay it's quite easy Leo  Click on the thumbnail in your gallery. Underneath the enlarged pic you'll see a line of script marked Linked Thumbnail: Click on the icon to the right of this and another line of script marked HTML code: will appear. copy and paste this into your post and your pic will appear as if by magic
Nice build by the way
Click on the thumbnail in your gallery. Underneath the enlarged pic you'll see a line of script marked Linked Thumbnail: Click on the icon to the right of this and another line of script marked HTML code: will appear. copy and paste this into your post and your pic will appear as if by magic Nice build by the way

Removed by original poster on 05/12/10 - 15:58:45 (GMT).
barkingdigger
#013

Joined: June 20, 2008
KitMaker: 3,981 posts
Armorama: 3,403 posts
Posted: Wednesday, May 12, 2010 - 05:00 AM UTC
Sorry - I wrote a long description of the process, but Pat's is succinct and to the point!
Tom
Tom
Rebilda
#057
Joined: May 11, 2010
KitMaker: 248 posts
Armorama: 119 posts
Posted: Wednesday, May 12, 2010 - 05:29 AM UTC
Okay, then, first try:
thats it so far; she's wearin a nice grey coat from surfacer-fashions since two minutes ago.
D'ya think? Well, I'm humbled, but it really is a matter of sticking things where the instructions tell you with these kits. They even give you a 1:1-scale drawing of where to place the armour-plates
thats it so far; she's wearin a nice grey coat from surfacer-fashions since two minutes ago.
Quoted Text
Nice build by the way
D'ya think? Well, I'm humbled, but it really is a matter of sticking things where the instructions tell you with these kits. They even give you a 1:1-scale drawing of where to place the armour-plates
Rebilda
#057
Joined: May 11, 2010
KitMaker: 248 posts
Armorama: 119 posts
Posted: Wednesday, May 12, 2010 - 05:34 AM UTC
Whoa, now thank you so much. THAT worked.... I'll try not to forget. As i've warned you, it won't be easy with this-a-here-rookie.
I'm wondering: this is what you do when you put together build logs? I mean, some of those pics are added after long painful hours of creating marvels with evergreen!?!! This must cost you really a lot of time...
Hope I'll get as fluent with this, or this will be really boring for all a' youse...
I'm wondering: this is what you do when you put together build logs? I mean, some of those pics are added after long painful hours of creating marvels with evergreen!?!! This must cost you really a lot of time...
Hope I'll get as fluent with this, or this will be really boring for all a' youse...

ericadeane

Joined: October 28, 2002
KitMaker: 4,021 posts
Armorama: 3,947 posts
Posted: Wednesday, May 12, 2010 - 05:56 AM UTC
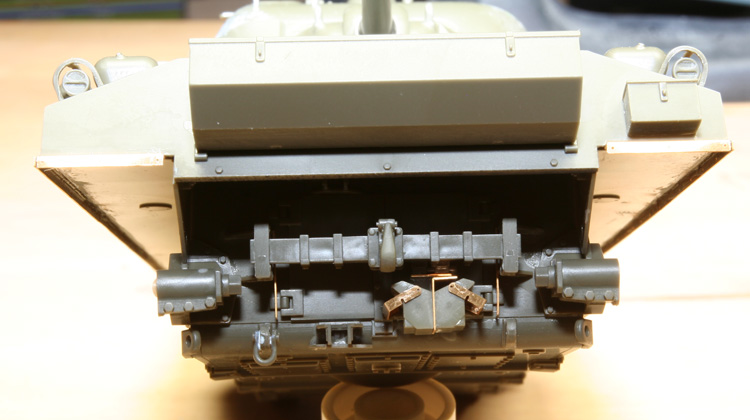
Nice clean work. SOmething that you should do (that probably was omitted in the instructions) is to apply putty to the seams where parts C52 and C53 join to C50.
Here's what it really looked like:

Here's what it really looked like:
Rebilda
#057
Joined: May 11, 2010
KitMaker: 248 posts
Armorama: 119 posts
Posted: Wednesday, May 12, 2010 - 06:16 AM UTC
Oh no!!!!! Should have checked my zaloga...Thank you so much for the nice pic. I now how much trouble it is..
Well, although this is a fun build I think I really HAVE to correct this. Dagn it. See something else, anyone?
And this is not an acuratesse-piece-of-art,mind you, just needs to be clean.
Thanks for the compliments, btw, this is what I love about tanks: not much work and the pros tell ya its nice. Yippeee! Wanna now something: got an f-15 on my table (yeah, the one with no tracks on them). been sandin it for three months now. Now THATS hard work.
Heres the backside of the beauty:
Rebilda
#057
Joined: May 11, 2010
KitMaker: 248 posts
Armorama: 119 posts
Posted: Thursday, May 13, 2010 - 12:03 AM UTC
Now, I hope this is more to your liking:
Much better, thanks for the tip and pic aqain.
Don't you hate surgery on an allready primed or even painted kit, too?
Much better, thanks for the tip and pic aqain.
Don't you hate surgery on an allready primed or even painted kit, too?
Rebilda
#057
Joined: May 11, 2010
KitMaker: 248 posts
Armorama: 119 posts
Posted: Thursday, May 13, 2010 - 12:09 AM UTC
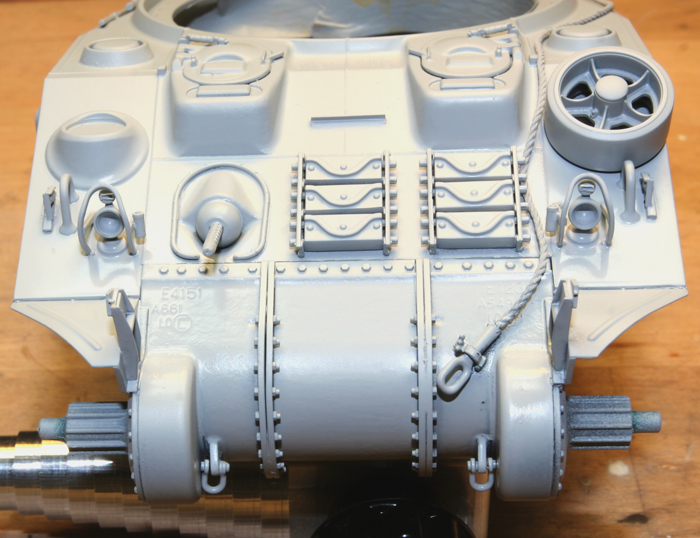
Ahh, forgot, closeup of the turret-roof:
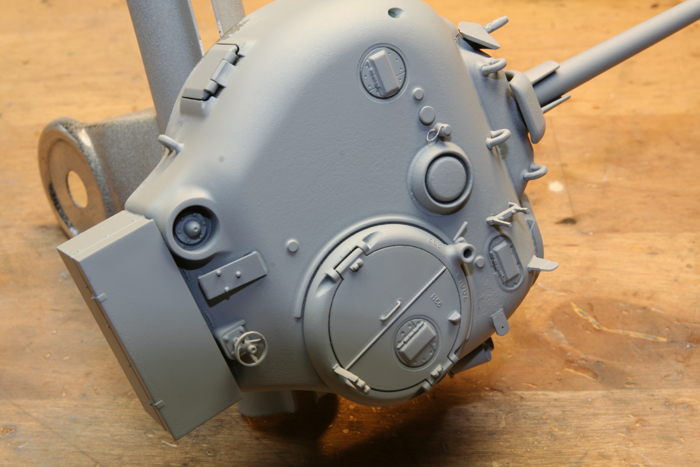
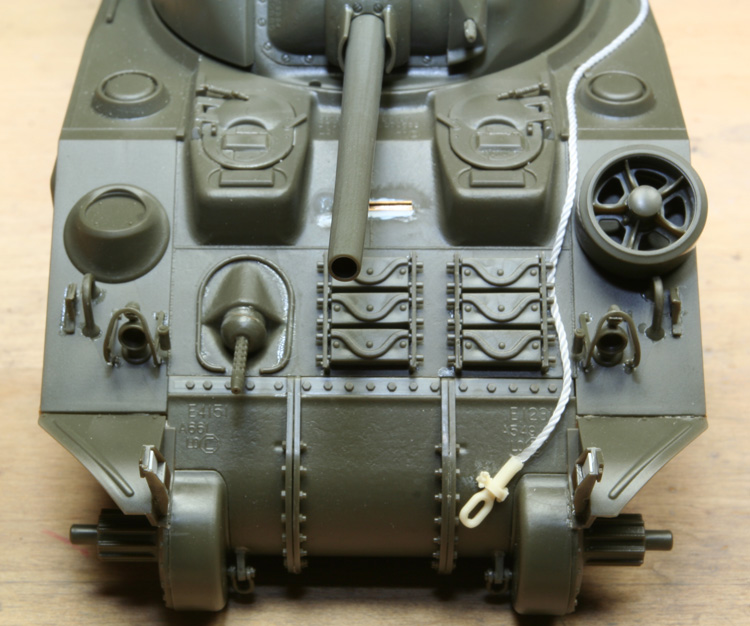
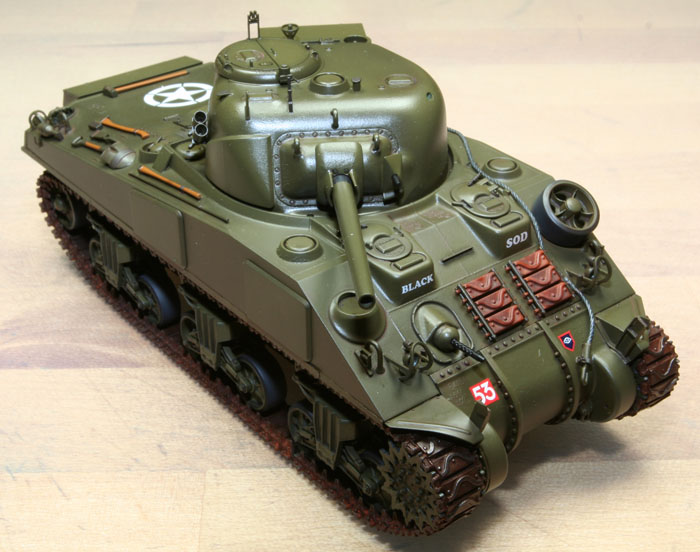
I wanted to depict the tank shortly after debarking or, say, after a rainy night. So no gun and searchlight and baggage. You'll notice, I closed the searchlight post with a plug. That was conecetd with a twisted steelwire instead of a chain. They didnt' do that, right? But I liked that better than a photoetched chain.
Where did they store the cal. 50 anyhow? There's no cradle on d the back of the bustle, just that box. In there??
Thanks for watching and helping...

HONEYCUT

Joined: May 07, 2003
KitMaker: 4,002 posts
Armorama: 2,947 posts

Posted: Thursday, May 13, 2010 - 01:22 AM UTC
Hey Leo
I like your enthusiasm mate!
This appears to be a great clean build. You've done well on the transmission cover but I notice the seam between the bolted flanges (vertical) has come adrift a little...
Refer to Roy's photo again for a visual.
I'm not too sure on this Tasca turret, but referring to where the spotlight mount is located, it is possible the larger 'disc' is actually the removed lid which was fitted onto a knob a la the smaller one next to it; therefore it is shown removed from the mount and a small chain can run from near the base of the mount to the side of this 'disc'
Does this make sense?

Brad
I like your enthusiasm mate!
This appears to be a great clean build. You've done well on the transmission cover but I notice the seam between the bolted flanges (vertical) has come adrift a little...
Refer to Roy's photo again for a visual.
I'm not too sure on this Tasca turret, but referring to where the spotlight mount is located, it is possible the larger 'disc' is actually the removed lid which was fitted onto a knob a la the smaller one next to it; therefore it is shown removed from the mount and a small chain can run from near the base of the mount to the side of this 'disc'
Does this make sense?
Brad
Rebilda
#057
Joined: May 11, 2010
KitMaker: 248 posts
Armorama: 119 posts
Posted: Thursday, May 13, 2010 - 01:47 AM UTC
Quoted Text
Hey Leo
I like your enthusiasm mate!
This appears to be a great clean build.
Thanks, man! Makes me a happier modeller!
I seen that gap meself while painting. Maybe slap some milliput in there to at least optically hide it.
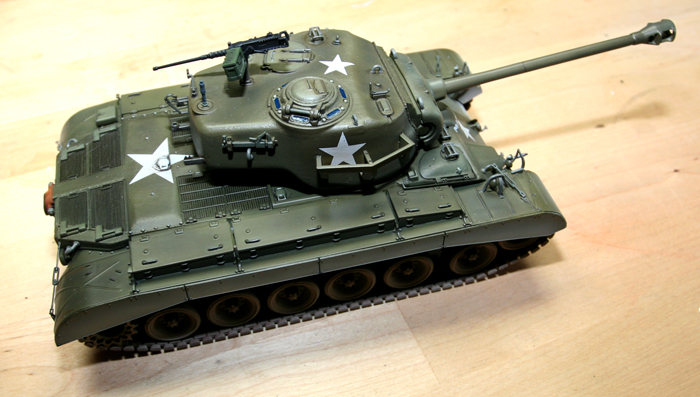
Now, commonwealth shermans were painted same as u.s., right? I'd like to look it something like this Trumpeter-Pershing I did as a speed-build coupla months ago:
It's Gunze H78, find it to be the best match to some lightened Tamya 62. What do you say?

ericadeane
Joined: October 28, 2002
KitMaker: 4,021 posts
Armorama: 3,947 posts
Posted: Thursday, May 13, 2010 - 02:01 AM UTC
Yes, the M4A4 would have been painted US olive drab at the Detroit Tank Arsenal. Many UK units did not want the .50cal so they left it off. Check period photos for your particular unit.
Rebilda
#057
Joined: May 11, 2010
KitMaker: 248 posts
Armorama: 119 posts
Posted: Thursday, May 13, 2010 - 02:51 AM UTC
Well, thanks Roy. I don't want to put the cal. 50 on the comanders-cupola anyways (I'll save that for a Dragon-patient of mine). It's just leave it off, if it isn't in the cradle,then?
The Olivedrab ok, anyone?
Thing is, just has to look the part and be not too dark. The Pershing became too sinister for my taste, even though I tried to lighten it up with several transparent airbrushed coats...
The Olivedrab ok, anyone?
Thing is, just has to look the part and be not too dark. The Pershing became too sinister for my taste, even though I tried to lighten it up with several transparent airbrushed coats...
barkingdigger
#013
Joined: June 20, 2008
KitMaker: 3,981 posts
Armorama: 3,403 posts
Posted: Thursday, May 13, 2010 - 08:02 AM UTC
Leo,
Hi - while all the UK-bound Shermans left the factory un US OD, the British did tend to repaint anything they modified. In fact they developed paint colour SCC 15 specifically to be a British "OD equivalent" so they could just repaint parts rather than whole vehicles. SCC 15 is a bit greener than OD, and is somewhere close to Tamiya's Khaki Drab.
I find Tamiya's OD (and Khaki Drab) to be too dark in scale, so I mix it 3:1 with Buff or Dark Yellow to lighten it up a bit. That way when I wash on darker shadows the result is still light enough to be acceptable. Since real vehicles varied between batches, and bleached in the sun, you can mix up variations in 3:1, 4:1, or even 5:1 ratios and get away with it depending on the history of the particular vehicle you are modelling. And don't forget that some field mods might lead to patches repainted in new dark paint that stands out against older faded paint. In other words, there is no "correct" answer except whatever looks goood to you!
Tom
PS: Don't be fooled by photos, as lighting can change the appearance of colour!
Rebilda
#057
Joined: May 11, 2010
KitMaker: 248 posts
Armorama: 119 posts
Posted: Thursday, June 03, 2010 - 09:23 AM UTC
Hi, guys.
Here some updates before I go on vacation.
First of all: don't try this at home! I'm most possibly the only one who fell into that trap and maybe you get a good laugh out of this:
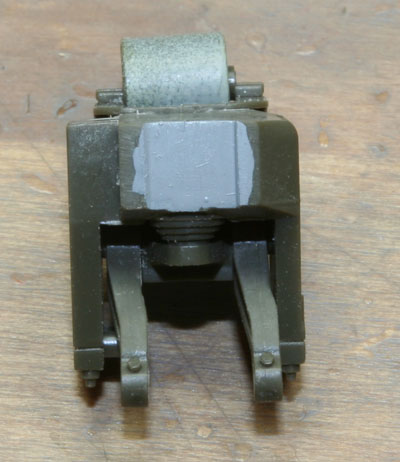
Notice something? I accidentaly switched the sides of one of the swing arms so the wheel cradle or whatever it is called in english won't fit in.
So off to a little surgery (hate doin' this off work!!):
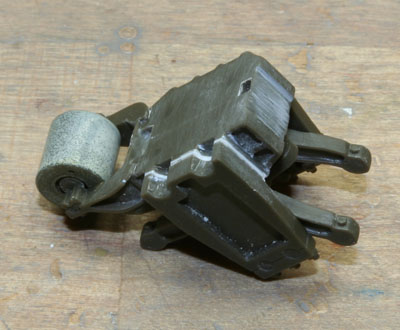
See? Well, seriously, be careful not to be as numbminded as me. It broke again when i pressed in the wheel assembly. Sheeesh....
So, now, after some spraying and shading and lots of washing:
..there you go.
I'll dust it some when I get home, then some rust-runs, a good dunk in Xtracylics finest matte and whoalahhh!
Well, anywho...still got to pack some stuff (I will take four tank-kits with me, three of which are Shermans - YEEEEEEEEEHHHHHHHAAAAAAAAAAAAHHHHHHHHHHH!!!!!!!!!!).
Hmmm. Not so easy sayin goodbye for a week.
Been so much fun with all a' youse.
Ah, well, I'll drink a few beers on you when I'm there. And I'll try to have something ready for BobCards pacific adventure (cheers to you, too, if you stray to this section at all!!)
So here comes:
See ya all in two weeks.
Bavaria out.
Here some updates before I go on vacation.
First of all: don't try this at home! I'm most possibly the only one who fell into that trap and maybe you get a good laugh out of this:
Notice something? I accidentaly switched the sides of one of the swing arms so the wheel cradle or whatever it is called in english won't fit in.
So off to a little surgery (hate doin' this off work!!):
See? Well, seriously, be careful not to be as numbminded as me. It broke again when i pressed in the wheel assembly. Sheeesh....
So, now, after some spraying and shading and lots of washing:
..there you go.
I'll dust it some when I get home, then some rust-runs, a good dunk in Xtracylics finest matte and whoalahhh!
Well, anywho...still got to pack some stuff (I will take four tank-kits with me, three of which are Shermans - YEEEEEEEEEHHHHHHHAAAAAAAAAAAAHHHHHHHHHHH!!!!!!!!!!).
Hmmm. Not so easy sayin goodbye for a week.
Been so much fun with all a' youse.
Ah, well, I'll drink a few beers on you when I'm there. And I'll try to have something ready for BobCards pacific adventure (cheers to you, too, if you stray to this section at all!!)
So here comes:
See ya all in two weeks.
Bavaria out.

KEVINT

Joined: August 29, 2005
KitMaker: 191 posts
Armorama: 176 posts
Posted: Thursday, June 03, 2010 - 10:04 AM UTC
Nice Build.
But just to stop you in your TRACKS!
Cheers
Kevin
But just to stop you in your TRACKS!
Cheers
Kevin

bydand

Joined: April 19, 2004
KitMaker: 278 posts
Armorama: 167 posts
Posted: Friday, June 04, 2010 - 10:52 PM UTC
Kevin, I was going to as well, but IWM B 8276 shows a V with the tracks this way round. Never say never with a Shermie.
Leo. I think Black dog did have the .50 mounted. If you look at the second tank in the above picture It looks to have one on the turret.
Craig
Leo. I think Black dog did have the .50 mounted. If you look at the second tank in the above picture It looks to have one on the turret.
Craig

Dutchy3RTR

Joined: June 28, 2009
KitMaker: 340 posts
Armorama: 337 posts

Posted: Friday, June 04, 2010 - 11:06 PM UTC
Quoted Text
Nice Build.
But just to stop you in your TRACKS!
Cheers
Kevin
Oops.
KEVINT
Joined: August 29, 2005
KitMaker: 191 posts
Armorama: 176 posts
Posted: Saturday, June 05, 2010 - 12:54 AM UTC
Hi Craig
I had seen the odd link reversed but not a full set.
I bet you could just picture the tank crew having just connected the last links together, standing back to admire their work and thinking "oh! "
"
Cheers
Kevin
I had seen the odd link reversed but not a full set.
I bet you could just picture the tank crew having just connected the last links together, standing back to admire their work and thinking "oh!
"Cheers
Kevin

AlanL
Joined: August 12, 2005
KitMaker: 14,499 posts
Armorama: 11,675 posts
Posted: Saturday, June 05, 2010 - 01:31 AM UTC
Hi Leo,
Coming along well. There is a good picture of Black Sod in British Tanks in Normandy page 39.
The 'Micks' tended not to mount the .50 cal as it obstructed getting out of the tank quickly if it was hit. Where they did mount MGs it seems they prefered the .30 cal.
Al
Coming along well. There is a good picture of Black Sod in British Tanks in Normandy page 39.
The 'Micks' tended not to mount the .50 cal as it obstructed getting out of the tank quickly if it was hit. Where they did mount MGs it seems they prefered the .30 cal.
Al
bydand
Joined: April 19, 2004
KitMaker: 278 posts
Armorama: 167 posts
Posted: Saturday, June 05, 2010 - 06:39 AM UTC
Hi kevin,
I've seen them both on 'backwards' but that was the first time I've seen one one way and one the other, perhaps it made turns faster
Craig
I've seen them both on 'backwards' but that was the first time I've seen one one way and one the other, perhaps it made turns faster
Craig

thebear

Joined: November 15, 2002
KitMaker: 3,960 posts
Armorama: 3,579 posts
Posted: Saturday, June 05, 2010 - 09:11 AM UTC
I can't say I've seen a whole track on backwards but ...

could happen OR EVEN THIS>>>>>

Rick
could happen OR EVEN THIS>>>>>
Rick

bydand
Joined: April 19, 2004
KitMaker: 278 posts
Armorama: 167 posts
Posted: Sunday, June 06, 2010 - 09:36 AM UTC
I think you'd have to take a photo to a competion to prove it though.
Craig
Craig
 |

WEB HOSTING BY


Copyright ©2021 Armorama and Kitmaker Network, a subsidiary of Silver Star Enterprises
All Rights Reserved. Please read our Conditions of Use and Privacy Policy.
All Rights Reserved. Please read our Conditions of Use and Privacy Policy.