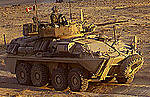
It's been almost two weeks since my last up-date on this project, so it's about time, I guess...

Since my last posts, I've done the detail painting, to include some scuffs and chipping down to bare metal in limited, high-wear areas. All of the detail painting was done using various acrylics, mostly Games Workshop's Citadel and Vallejo. I used a silver pencil for the wear around the rims of the road wheels.
I followed up the detail painting with "oil paint dot modulation". This was followed by pin washes and heavy washes mixed with mineral sprits, oil pints, and luquin drying medium.
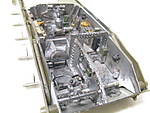
Finally, I added the tools and other stowage. Here're a couple of pictures of how I added the straps and buckles for the stowage:
The "leather strap" was cut from a piece of wine bottle foil to about .9 mm wide. The tip was trimmed and it was painted with Citadel Beastial Brown. The PE buckles were attached to a piece of tape, and the reverses were painted black.

After drying, the buckles were turned over and the fronts were painted black followed by Citadel Brazen Brass. The strap was cut into 17 mm long sections. Before each section was cut, the tip was trimmed and the buckle holes were added using a pin. Each section was then folded into a "V", the buckle was slipped on, and then the strap was flattened out.

These strap sections were slipped into the footman loops (see my earlier post on how I made these):

The tools were then added, and the length of each strap and buckle combination was adjusted so that the buckles would be on top of the tool handle when they were glued down. (No sense in going to all the trouble to add the straps and buckles if they can't be seen!). The excess strap was then cut from the "running" ends with fine sissors.

The strap ends were then glued with a supper glue drop placed on top of the running end (over the tool handle) and the standing / buckle ends were held down with a cocktail stick (tooth pick) while the glue set. Finally, the straps were touched up using Citadel Snakebite Leather.


 (Maybe by next month, I'll have all the wheels on it!)