_GOTOBOTTOM
Armor/AFV: Braille Scale
1/72 and 1/76 Scale Armor and AFVs.
Hosted by Darren Baker
Panzer IVJ, Holland 1944
spacewolfdad
Visit this Community
England - West Midlands, United Kingdom
Joined: May 23, 2010
KitMaker: 642 posts
Armorama: 593 posts
Posted: Saturday, July 31, 2010 - 12:54 AM UTC
Hi Folks,

I have finished a session with the dreaded photo-etch and thought I had better post the results. I didn't think that it would take this much time and effort, but I was wrong, my next project will be oob for my wargames army.

Anyway here are a few photos of what I have been up to:

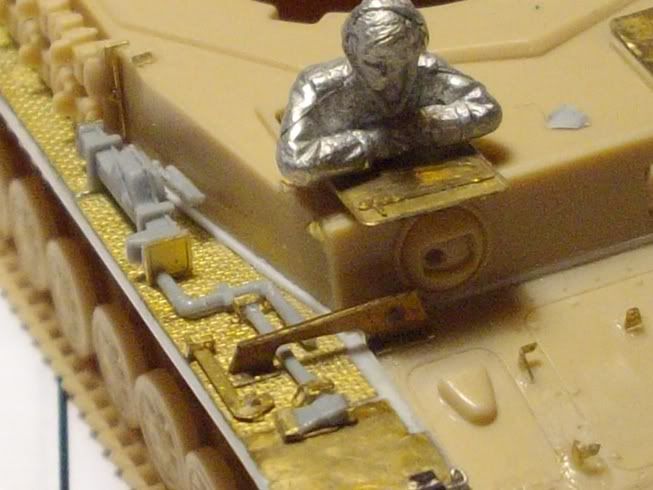
Here is the radio operators hatch, complete with securing bolt.


A view of the front plate with the spare track brackets. I lost two of these tiny pieces to the dreaded 'Carpet Monster' , who kindly regurgitated them two days later!


A closer view of the brackets.


Next the front towing brackets got their bolts with chains attatched (more fiddly than I expected).


The fenders were given a retaining pin made from thin fuse wire, bending it was a matter of practice until I got the correct shape.


I then made hinges from lead foil (wine bottle top - not me that drinks it, I only have the occasional beer, honest!)


The spare wheel carrier is a nice piece to do and looks better than the plastic kit one.


With the wheels added.


The jack block holder consists of 6 parts! There are two strengthening bands for the block itself (I had to replace them with lead foil - Carpet Monster again!), the tray the block sits in (it is even detailed on the underside, so if you leave the block off there are the charactaristic three holes in the bottom), the retaining strap and two fillets for underneath the tray.


Well that's it for now, I am doing some more this weekend and will post futher updates when there is enough work to show you all.

Hope you like it, all the best,

Paul
randyd
Visit this Community
United States
Joined: July 04, 2009
KitMaker: 241 posts
Armorama: 199 posts
Posted: Saturday, July 31, 2010 - 03:16 AM UTC

Hi Paul, Good to see your post here. The pe details are looking wonderful

Can't wait to see more!

Randy


vonHengest
Visit this Community
Texas, United States
Joined: June 29, 2010
KitMaker: 5,854 posts
Armorama: 4,817 posts
Posted: Saturday, July 31, 2010 - 03:39 AM UTC
This is looking great Paul, I didn't fully realize this was Braille Scale until a few moments ago. I would like to know where you got your PE from.
spacewolfdad
Visit this Community
England - West Midlands, United Kingdom
Joined: May 23, 2010
KitMaker: 642 posts
Armorama: 593 posts
Posted: Saturday, July 31, 2010 - 04:22 AM UTC

Quoted Text


Hi Paul, Good to see your post here. The pe details are looking wonderful

Can't wait to see more!

Randy


Hi Randy,

Good to hear from you, thanks for the comment. How are all your projects progressing? Look forward to seeing some of your fantastic stuff soon.

All the best,

Paul
spacewolfdad
Visit this Community
England - West Midlands, United Kingdom
Joined: May 23, 2010
KitMaker: 642 posts
Armorama: 593 posts
Posted: Saturday, July 31, 2010 - 04:27 AM UTC

Quoted Text

This is looking great Paul, I didn't fully realize this was Braille Scale until a few moments ago. I would like to know where you got your PE from.


Hi Jeremy,

Thanks for the comments, the photo-etch is by Part and I got it from this company:

http://www.lonewulfmodels.co.uk/view_product.php?c_id=25&sc_id=57&p_id=693

I think they ship to the US, they are very reliable.

Hope this helps, all the best,

Paul
tread_geek
Visit this Community
Ontario, Canada
Joined: March 23, 2008
KitMaker: 2,847 posts
Armorama: 2,667 posts
Posted: Monday, August 02, 2010 - 05:16 AM UTC
Paul, this build is positively fascinating. I can't believe that you have maintained your sanity with all that miniscule PE. I have the Dragon Panzer IV F2 and the ET Model Panzer IV PE set. Just looking at, and having reviewed the latter, intimidates the heck out of me. My hat is off to you.

Cheers,
Jan
spacewolfdad
Visit this Community
England - West Midlands, United Kingdom
Joined: May 23, 2010
KitMaker: 642 posts
Armorama: 593 posts
Posted: Monday, August 02, 2010 - 09:09 AM UTC

Quoted Text

Paul, this build is positively fascinating. I can't believe that you have maintained your sanity with all that miniscule PE. I have the Dragon Panzer IV F2 and the ET Model Panzer IV PE set. Just looking at, and having reviewed the latter, intimidates the heck out of me. My hat is off to you.

Cheers,
Jan


Hi Jan.

I have had more than my fair share of tussles with the 'Carpet Monster', the score stands at 5-2 to me! I don't know if I should do this again, but I have just bought PE sets for the Elephant (Part) and Tiger I (Voyager) so I reckon I must be mad .

All the best,

Paul
weathering_one
Visit this Community
Ontario, Canada
Joined: April 04, 2009
KitMaker: 458 posts
Armorama: 456 posts
Posted: Tuesday, August 03, 2010 - 08:32 AM UTC
Paul, I couldn't begin to imagine even going half as far as you have on this kit. It must take ages to get those fiddly PE pieces in place. What type of glue do you use for them?

Regards,
AJ
spacewolfdad
Visit this Community
England - West Midlands, United Kingdom
Joined: May 23, 2010
KitMaker: 642 posts
Armorama: 593 posts
Posted: Tuesday, August 03, 2010 - 01:58 PM UTC

Quoted Text

Paul, I couldn't begin to imagine even going half as far as you have on this kit. It must take ages to get those fiddly PE pieces in place. What type of glue do you use for them?

Regards,
AJ


Hi AJ,

It is a bit bonkers isn't it, but in a nice way. I use good old spit (bet you wish you hadn't asked now!), or more technically, a saliva laden paintbrush to position the smallest pieces. Once in place the saliva acts as a temporary 'glue' to hold the piece there and then I use ZAP CA -Thin CA on the end of a pin to run into the join by capillary action. This seems to work well and I haven't had anything fall off yet. Now I've said that I'll come back to the model tommorrow and find a pile of brass on the work-mat!

Thanks for the comment, all the best,

Paul
Braille
#135
Visit this Community
California, United States
Joined: August 05, 2007
KitMaker: 1,501 posts
Armorama: 1,485 posts
Posted: Saturday, August 07, 2010 - 02:32 PM UTC
Paul,

Been following your progress with interest. Outstanding job on the build thus far and excellent work and recovery with the photo etch parts. I'm currently building a 35th scale panzer IV complete with photo etch fenders for the Workhorse Campaign and am amazed at the work that you have already put in on your 72nd scale build!

72 scale is my preferred scale but I just had to try one of the larger scale builds. Looking forward to some more of your work on this build.

-Eddy
spacewolfdad
Visit this Community
England - West Midlands, United Kingdom
Joined: May 23, 2010
KitMaker: 642 posts
Armorama: 593 posts
Posted: Sunday, August 08, 2010 - 04:55 AM UTC

Quoted Text

Paul,

Been following your progress with interest. Outstanding job on the build thus far and excellent work and recovery with the photo etch parts. I'm currently building a 35th scale panzer IV complete with photo etch fenders for the Workhorse Campaign and am amazed at the work that you have already put in on your 72nd scale build!

72 scale is my preferred scale but I just had to try one of the larger scale builds. Looking forward to some more of your work on this build.

-Eddy


Hi Eddy,

Thanks for the kind comments, I am just finishing the tools off and about to photo them for insertion here. The next step is the schurzen supports, which I think will be a bit of a challenge, then I am putting it aside for a few days to have a rest (I have a lot of wargaming vehicles to airbrush!).

I am tempted by one of the new 1/35 models, either a Dragon Stug III, or a Panzer IVJ. They are superb models and very tempting.

All the best,

Paul
spacewolfdad
Visit this Community
England - West Midlands, United Kingdom
Joined: May 23, 2010
KitMaker: 642 posts
Armorama: 593 posts
Posted: Wednesday, August 11, 2010 - 12:43 PM UTC
Hi Folks,

I have just finished putting the last tiny bit of PE on the tools and have nearly gone 'Doolally tap' with the effort, I am glad the end is in sight. Just the schurzen supports and then a break for painting other projects, whoopee.

Here we go, progress so far:

General view of right side.


General view of left side.


View of the rear of tank.


Close up of front right side.


Close up of front left side.


Close up of rear right side.


Close up of rear left side.


Close up of spare track PE.


That's it for now, hope you enjoy it all.

All the best,

Paul
hedorah59
Visit this Community
California, United States
Joined: May 04, 2009
KitMaker: 123 posts
Armorama: 121 posts
Posted: Thursday, August 12, 2010 - 05:42 AM UTC
I don't know how you do it - I am intimidated enough by the PE in my 1/35th kits, let alone something this small!

Its really looking nice, Paul!
Rob_Haelterman
Visit this Community
Oost-Vlaanderen, Belgium
Joined: October 01, 2008
KitMaker: 145 posts
Armorama: 139 posts
Posted: Thursday, August 12, 2010 - 06:42 AM UTC
Apart from a very faint feeling that you are out of your mind, I can only feel admiration for what you are doing to this kit !
:-)

Keep it up !
Rob
spacewolfdad
Visit this Community
England - West Midlands, United Kingdom
Joined: May 23, 2010
KitMaker: 642 posts
Armorama: 593 posts
Posted: Thursday, August 12, 2010 - 08:48 AM UTC

Quoted Text

I don't know how you do it - I am intimidated enough by the PE in my 1/35th kits, let alone something this small!

Its really looking nice, Paul!


Hi Kirk,

I'm beginning to wonder myself, it is something that I will need to have a rest from when it is finished. The modelling does need a lot of concentration, but I hope the finished item will be well worth it. There will be lots of OOB builds after this one!

All the best,

Paul
spacewolfdad
Visit this Community
England - West Midlands, United Kingdom
Joined: May 23, 2010
KitMaker: 642 posts
Armorama: 593 posts
Posted: Thursday, August 12, 2010 - 09:03 AM UTC

Quoted Text

Apart from a very faint feeling that you are out of your mind, I can only feel admiration for what you are doing to this kit !
:-)

Keep it up !
Rob


Hi Rob,

Thanks for the kind words, I am beginning to wonder myself if there is a sort of madness here. The frightening thing is that I have now finished with the Part general PzIVJ fret and there is still a stack of photoetch on it!


I have to be careful that I don't get too carried away.

All the best,

Paul
spacewolfdad
Visit this Community
England - West Midlands, United Kingdom
Joined: May 23, 2010
KitMaker: 642 posts
Armorama: 593 posts
Posted: Monday, August 23, 2010 - 12:41 PM UTC
Hi Folks,

Just a short update, I have managed to get the schurzen rails on, it wasn't easy as the supports were not that easy to fit. Anyway I'm putting it to one side for a short while to refresh my modelling kama, it has been a bit intense all this PE.

Here is the current state of play:


All the best,

Paul
tread_geek
Visit this Community
Ontario, Canada
Joined: March 23, 2008
KitMaker: 2,847 posts
Armorama: 2,667 posts
Posted: Tuesday, August 24, 2010 - 05:46 AM UTC
Your build is truly amazing. I still can't believe that the men in the white coats and a padded truck haven't captured you yet!

Cheers,
Jan
spacewolfdad
Visit this Community
England - West Midlands, United Kingdom
Joined: May 23, 2010
KitMaker: 642 posts
Armorama: 593 posts
Posted: Tuesday, August 24, 2010 - 12:35 PM UTC
Hi Jan,

I have had to put it down for a bit, it was getting a bit too intense. I have done some wargames pieces that I had waiting for a coat of paint and I will begin on my PzIV D for the campaign. I have sorted out a few things to do for the braille scale campaign, so I will be quite occupied. I have to get the figures for the scene sorted soon, so that I can work out how to pose this tank. Thanks for the comments.

All the best

Paul
 _GOTOTOP