_GOTOBOTTOM
Armor/AFV: Axis - WWII
Armor and ground forces of the Axis forces during World War II.
Hosted by Darren Baker
Tiger I Initial - s.Pz.Abt. 502 no '100'
GewoonWouter
Visit this Community
Antwerpen, Belgium
Joined: March 31, 2010
KitMaker: 227 posts
Armorama: 123 posts
Posted: Saturday, August 07, 2010 - 06:30 AM UTC
Hi guys
My first topic here

I bought Dragon kit 6600 (Tiger I Initial) some time ago. It's my third modelling kit since I recently restarted with modelling. And the first one with an extensive amount of PE and other aftermarket stuff...

I'm going to build tactical no'100' of the s.Pz.Abt. 502. This Tiger I had some disctinctive features like sidebins on the turret and a lucky horseshoe...

Hope you all like it a bit.


the MIG parts I'm not going to use since they don't really fit onto the model. The Friuls I keep for a next project since I need the mirrored ones instead of the early tracks


it's the first time I'm using so much PE but I'm starting to like working with it
And I must say, the kit really falls together, except for some minor errors...

to be continued...
cheers
barkmann424
Visit this Community
England - North West, United Kingdom
Joined: November 23, 2008
KitMaker: 357 posts
Armorama: 353 posts
Posted: Saturday, August 07, 2010 - 06:42 AM UTC
Hi Wouter!
Wow that was quick! You are certainly right about this kit falling together... You will be assembling the next one blindfolded!
Awesome job on the etch, and a sumptuous clean build, even with all the additions you have bestowed on this fortunate feline, really looking forwards to the painting trips!

Cheers for sharing Phil!
Byrden
Visit this Community
Wien, Austria
Joined: July 12, 2005
KitMaker: 2,233 posts
Armorama: 2,221 posts
Posted: Saturday, August 07, 2010 - 07:18 AM UTC
Wouter ;

Would you please tell us what the "minor errors" are? I edited those instructions and if there's a problem I should fix it.

Also; could you tell me where you got the idea to run a wire out of the back of the headlight? I thought the electrical connection was through the stem.

I have some comments on your build, if you want them.

David
vonHengest
Visit this Community
Texas, United States
Joined: June 29, 2010
KitMaker: 5,854 posts
Armorama: 4,817 posts
Posted: Saturday, August 07, 2010 - 07:20 AM UTC
This looks great, I've been thinking about putting one of these together but I haven't seen anybody else's take on this build. Thanks for sharing!
GewoonWouter
Visit this Community
Antwerpen, Belgium
Joined: March 31, 2010
KitMaker: 227 posts
Armorama: 123 posts
Posted: Saturday, August 07, 2010 - 09:37 AM UTC
Phill: thx for the comment matey, yeah, next one will be blindfolded ^^

Jeremy: sure is a recommended kit mate

David: some minor errors are parts which have the wrong name in the instructions...not much but I though there were a couple of them. Also, apparantly the locating pins for the sledgehammer are conflicting with the locations of the wire for the Bosch headlight...this is not out of my experience since I'm not using the locating pins, but a fellow builder told me about this problem...
And one thing I really thought to be a pitty is that the turret consist out of two halfs...but again, that's al just minor...the kit it in my opinion a great one and for sure recommendable

oh, btw, about that cabling on the back of the headlights...I think you know a lot more about Tigers so you are probably right there. But I didn't know and just followed the Aber instructions...

And your comments about my build are welcome of course ^^

cheers
Byrden
Visit this Community
Wien, Austria
Joined: July 12, 2005
KitMaker: 2,233 posts
Armorama: 2,221 posts
Posted: Saturday, August 07, 2010 - 12:07 PM UTC
OK, brace yourself...

I think the turret MG sticks out a little too far, maybe 30%.

You've sealed the ventilation hole in the engine hatch, by placing the flat panel on it. This hole was sealed only for underwater travel.

The vision port on the left side of your turret is upside down.

You placed the spade and axe as instructed by Aber, I suppose? The kit positions are correct for '3' and probably '100'.

The hammer was squeezed in between the wire and the hatch, sorry if the kit hole is wrong.

David
GewoonWouter
Visit this Community
Antwerpen, Belgium
Joined: March 31, 2010
KitMaker: 227 posts
Armorama: 123 posts
Posted: Saturday, August 07, 2010 - 07:16 PM UTC
David, thx for your reply and honesty...

I know I made some mistakes...next time I'll have to take more time in consideration before I add parts

btw: I got a question about the ventilation hatch in the engine bay...I got me some book here which mentioned that that hatch came in later when the Feifel aircleaners were introduced. And that the initials didn't have that hatch...now I guess you did loads of reasearch so what do you think about it?

cheers
Byrden
Visit this Community
Wien, Austria
Joined: July 12, 2005
KitMaker: 2,233 posts
Armorama: 2,221 posts
Posted: Saturday, August 07, 2010 - 07:33 PM UTC
This is "100".


ivanhoe6
Visit this Community
Wisconsin, United States
Joined: April 05, 2007
KitMaker: 2,023 posts
Armorama: 1,234 posts
Posted: Sunday, August 08, 2010 - 05:43 AM UTC
Hi Wouter,
You are off to a great start so far. I just got this kit a couple of days ago in the mail (thanks Rob!) and will be following along with great interest . So, thanks for "taking me to school" on this.
David, any idea what the casting numbers on the mantlet would be? And the little historical info I have says that Tactical 100 was the first Tiger captured by the Russians, pulled out of some bog after being abandoned. Any idea of the date ?
Anyway Wouter, thanks thanks for sharing with all us people at Armorama !
Tom
Byrden
Visit this Community
Wien, Austria
Joined: July 12, 2005
KitMaker: 2,233 posts
Armorama: 2,221 posts
Posted: Sunday, August 08, 2010 - 06:19 AM UTC
Tom:

On 18 January 1943, as the German forces were attempting to break out from the Schlüsselberg pocket, Tiger 100 got stalled in a bog and captured by the Soviets. Five Tigers were lost in the battle. Tiger 121 was also captured intact. The battalion was left with only one Tiger in working order, probably number 111.

During this time the battalion was based within a few kilometers of Mga, which is why that town is quoted on Dragon's instruction sheet. The two captured tanks were in camouflaged, though the Russians washed this off before displaying them.

I can't say what the casting numbers were.

David
ivanhoe6
Visit this Community
Wisconsin, United States
Joined: April 05, 2007
KitMaker: 2,023 posts
Armorama: 1,234 posts
Posted: Sunday, August 08, 2010 - 07:35 AM UTC
Thanks David for the history lesson ! I think I'm going for 009 then the last 3 numbers of the Fgst. number.
Tom
Byrden
Visit this Community
Wien, Austria
Joined: July 12, 2005
KitMaker: 2,233 posts
Armorama: 2,221 posts
Posted: Sunday, August 08, 2010 - 08:09 AM UTC
Well, one thing I can say for sure, is that the weld number was not correlated with the Fgst. number. The weld number was meaningful only to the foundry where the item was made.
The Bovington Tiger has a 2-digit number (see below). The APG Tiger, an even earlier one, has "22".


David
ivanhoe6
Visit this Community
Wisconsin, United States
Joined: April 05, 2007
KitMaker: 2,023 posts
Armorama: 1,234 posts
Posted: Monday, August 09, 2010 - 02:57 AM UTC
Thanks again David !
GewoonWouter
Visit this Community
Antwerpen, Belgium
Joined: March 31, 2010
KitMaker: 227 posts
Armorama: 123 posts
Posted: Tuesday, August 10, 2010 - 12:52 AM UTC
Always nice to learn a thing or two

Ivanhoe: you're gonna have fun with this kit mate ;-)

ok then, I finished the Tiger today...

allthough, be aware...Dragon suggests in the instructions that you put the wheels on like this:

as you can see the inner part of the wheel doesn't touch the suspension arm...
I think it has to be like this (correct me if I'm wrong...)

on with the rest than...
I added the casting number on the mantlet...took me some liberty to take my birthday :-D

I also removed the Aber hatch on the engine bay and changed it for the (open) kit part


Now I'll just have to wait for my new AB and Initial tracks to arrive...

cheers
Byrden
Visit this Community
Wien, Austria
Joined: July 12, 2005
KitMaker: 2,233 posts
Armorama: 2,221 posts
Posted: Tuesday, August 10, 2010 - 01:15 AM UTC
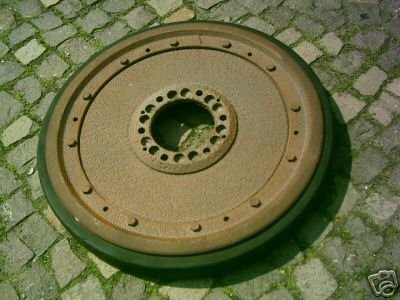
So, you want spare wheels on the deck?

This is a spare wheel. Notice the open hub:


Yours would have only 6 bolts around the edge.

David
GewoonWouter
Visit this Community
Antwerpen, Belgium
Joined: March 31, 2010
KitMaker: 227 posts
Armorama: 123 posts
Posted: Tuesday, August 17, 2010 - 05:52 AM UTC
thx David, dunno yet if I'm going for the spare wheels on the back, but it's nice to know for sure

Anyway, not much new on the Tigerfront...except that I had an idea for a little dio/vignette (whatever ). The crew of number '100' encountered a panzer crewmember of a shot panzer and he's warning that the Russions aren't far...or something like that...

tell me what you guys think of the setting...


the driver...I repladed the moulded on buckle by an Aber one, I also added the German eagle on the cap...

The commander...also with some Aber replacement parts...I messed up with the collar...I broke it so I'll have to try to fix it, maybe with some Milliput or so...my first time...we'll see what that brings . I have to fill the seems and add the wiring for the headphones...
The Tank figures aren't very bad, but they are still way behind the Alpine ones...


Still waiting for the tracks and my paints...hope to get started soon...

The Tiger will be on a snowy landscape with maybe a piece of tree or so on the ground

Anyway, let me know what you think and suggestions are very welcome

cheers!
Byrden
Visit this Community
Wien, Austria
Joined: July 12, 2005
KitMaker: 2,233 posts
Armorama: 2,221 posts
Posted: Tuesday, August 17, 2010 - 07:55 AM UTC
I think that if I had something to tell a tank, I'd tell the commander, not the driver... and with the noise of the engine, I'd have to stand near him.

If going into combat, the headlights would be removed. The kit provides the empty socket parts.

David
GewoonWouter
Visit this Community
Antwerpen, Belgium
Joined: March 31, 2010
KitMaker: 227 posts
Armorama: 123 posts
Posted: Wednesday, August 18, 2010 - 12:09 AM UTC
I noticed that the empty sockets are supplied, I even used one...and err, I believe you that they took off their headlights, didn't know that, but the box art on the Dragon kit is also incorrect then...

Anyway, my intention is not to make a 100% historical correct Tiger nor dio, I just want to have fun building it

How the figures are put on the dio is btw WIP, still not final...So thanks for pointing some thing out to me ^^

Anyway...
jimz66
Visit this Community
Connecticut, United States
Joined: December 15, 2006
KitMaker: 1,165 posts
Armorama: 1,105 posts
Posted: Wednesday, August 18, 2010 - 03:03 AM UTC
Great work Wouter. This one is shaping up nicely. I can't wait to see it painted.
GewoonWouter
Visit this Community
Antwerpen, Belgium
Joined: March 31, 2010
KitMaker: 227 posts
Armorama: 123 posts
Posted: Saturday, August 21, 2010 - 12:01 AM UTC
thx mate...

I couldn't wait too, so this morning I put her in German Grey with a touch of medium blue

no, I know it's not quite like the real (darker) panzer grey, but I do like the look of it


cheers
Plasticbattle
#003
Visit this Community
Donegal, Ireland
Joined: May 14, 2002
KitMaker: 9,763 posts
Armorama: 7,444 posts
Posted: Saturday, August 21, 2010 - 02:05 AM UTC
Hi Wouter. Ive been following this build for a while. I´ve enjoyed it so far .... I have plans to build 100 as well. Very neat building and great job with the etch! Looking forward to more.
GewoonWouter
Visit this Community
Antwerpen, Belgium
Joined: March 31, 2010
KitMaker: 227 posts
Armorama: 123 posts
Posted: Sunday, August 22, 2010 - 01:05 AM UTC
thx for the compliments mate . I'll hope I can make a nice final model out of it...

cheers
GewoonWouter
Visit this Community
Antwerpen, Belgium
Joined: March 31, 2010
KitMaker: 227 posts
Armorama: 123 posts
Posted: Saturday, September 04, 2010 - 09:24 AM UTC
ok, update

The grey was a bit too boring I guess so I decided to try some color modulation style ish thing...hopefully you guys like it a bit...


het kan altijd beter waarschijnlijk maar ik vind het best nog wel geslaagd voor mijn doen

For the wheels I used the QuickWheels template and it works really good...I need some extra detailing on the rubber since some paint came off


next step: the varnish and decals

cheers
Cronic
Visit this Community
Belgium
Joined: August 19, 2010
KitMaker: 22 posts
Armorama: 22 posts
Posted: Sunday, September 05, 2010 - 12:04 AM UTC
looking real good.. makes me wanna buy one for myself
keep it up
GewoonWouter
Visit this Community
Antwerpen, Belgium
Joined: March 31, 2010
KitMaker: 227 posts
Armorama: 123 posts
Posted: Sunday, September 05, 2010 - 01:18 AM UTC
thx mate

it's for sure a kit I can recommend

btw...how come you have a higher army ranking than me with fewer posts?

anyway...I'm eager to start on the whitewash camo...in a couple of weeks

cheers
 _GOTOTOP