_GOTOBOTTOM
Armor/AFV: Allied - WWII
Armor and ground forces of the Allied forces during World War II.
Hosted by Darren Baker
My Dragon M7 build
barkingdigger
Staff MemberAssociate Editor
ARMORAMA
#013
Visit this Community
England - East Anglia, United Kingdom
Joined: June 20, 2008
KitMaker: 3,981 posts
Armorama: 3,403 posts
Posted: Sunday, August 22, 2010 - 06:06 AM UTC
Dear all,

Welcome to my first ever solo build log! I'll be building Dragon's new 1:35 scale M7 Priest (item 6637) mainly to explore all of the issues associated with assembling this complex kit. This is really a supplement to the in-box review that I will be submitting shortly, because I realised that if I waited to build and photograph all the sub-assemblies for the review it'd be old news by the time I sent it in! So, while a few of the images here will be repeated in the review, I hope this blog adds some much-needed advice for those who have this kit in their own stash...


So, where to start? My review highlights several major areas that need more clarification than the kit instructions provide, but to avoid spoiling the surprise I will only mention the first - the transmission. The model has a three-piece tranny as per the early Sherman tank, and Dragon chose to mould it as a rounded front with add-on lobes for the final-drive gears. That's fine, but it means there is a joint at the crease where the lobe meets the front, which isn't prototypical. So I assembled the whole lot just to see how it fits.


I was surprised at how well it all went together! However, the fit of the lobes is less than positive, and I found it very useful to add the two side pieces so I could get it all squared up before the glue dried. The sides can be fitted at different angles, so I pressed the unit onto the front of the hull to make sure it was all aligned properly. Also, it is best to add the tow shackles and their mounts before adding the lobes, as space is rather limited.


The joins that worried me are not very big if all is aligned well, so a coat of Mr Surfacer on the affected areas should easily hide them. Just be careful not to cover any of the lovely details like the drain plugs or the subtle casting marks!

That's it for the first post - I'll get back to finishing off the review now so it can get submitted...

Tom
jimz66
Visit this Community
Connecticut, United States
Joined: December 15, 2006
KitMaker: 1,165 posts
Armorama: 1,105 posts
Posted: Sunday, August 22, 2010 - 06:36 AM UTC
Nice work Tom. You did remember to photo the sprues before you removed anything right? Keep us posted!
Tojo72
Visit this Community
North Carolina, United States
Joined: June 06, 2006
KitMaker: 4,691 posts
Armorama: 3,509 posts
Posted: Sunday, August 22, 2010 - 07:54 AM UTC
I just got mine last week.I will be following your build with great interest.
mar107784
Visit this Community
Zuid-Holland, Netherlands
Joined: March 22, 2010
KitMaker: 118 posts
Armorama: 3 posts
Posted: Sunday, August 22, 2010 - 09:35 AM UTC
Nice detailing, I am will follow it.
vonHengest
Visit this Community
Texas, United States
Joined: June 29, 2010
KitMaker: 5,854 posts
Armorama: 4,817 posts
Posted: Sunday, August 22, 2010 - 09:40 AM UTC
I too will be watching this build with great interest.
thebear
Visit this Community
Quebec, Canada
Joined: November 15, 2002
KitMaker: 3,960 posts
Armorama: 3,579 posts
Posted: Sunday, August 22, 2010 - 09:59 AM UTC
Just got mine too ,so I'll be following this build as well ...Got this crazy idea of building the Italeri ,Academy ,and Dragon kits all side by side ...Nahhhhhh!
russamotto
Visit this Community
Utah, United States
Joined: December 14, 2007
KitMaker: 3,389 posts
Armorama: 2,054 posts
Posted: Sunday, August 22, 2010 - 11:49 AM UTC
Watching as well, as this is on my list.
barkingdigger
Staff MemberAssociate Editor
ARMORAMA
#013
Visit this Community
England - East Anglia, United Kingdom
Joined: June 20, 2008
KitMaker: 3,981 posts
Armorama: 3,403 posts
Posted: Sunday, August 22, 2010 - 12:12 PM UTC
Guys,

Glad you're all interested! I'll do my best to point out any ills and cures I find in this kit. The review has just been submitted (along with a full set of sprue shots) so that'll set out all my first impressions that are behind this blog.

Richard, why not build them all? I have the Italeri kit on my shelf waiting its turn too...

I suppose I could add this to the Shermans campaign, since I don't have enough Shermans under way at the moment!

Tom
PvtMutt
Visit this Community
Missouri, United States
Joined: July 01, 2006
KitMaker: 614 posts
Armorama: 601 posts
Posted: Friday, August 27, 2010 - 04:41 AM UTC
Hey Tom I started on my copy June 29th and not being able to wait for someone to start a build blog jumped right in with both feet. With this being my first American armor it's been a slow go because the instructions add to the head scratching sometimes.

You're right about lots of dry fitting being the order of the day too so you folks that are about to build one,take your time,don't get in any hurry.

I already had the Eduard interior and exterior PE sets to use on the Academy M7 and i've been using some of it to kind of dress up the DML M7 a bit. PE is not really needed but what the heck since I had the PE and not the Academy kit.

I've about reached the point of needing to do some painting before I can continue to assemble the sub-units and move forward with the build.
Part #B43,the bolted plate that covers the joint between the upper hull and the drive unit has me perplexed at the moment so I may wait and see how you do it before I glue those sections together.

It's a great kit for sure
Tony the Mutt
barkingdigger
Staff MemberAssociate Editor
ARMORAMA
#013
Visit this Community
England - East Anglia, United Kingdom
Joined: June 20, 2008
KitMaker: 3,981 posts
Armorama: 3,403 posts
Posted: Friday, August 27, 2010 - 05:02 AM UTC
Hey Tony,

Glad I'm not the only one having trouble with the instructions! I'll be posting the next instalment (on the gun) this weekend once I get some pictures snapped, and will then move on to the hull. I've looked at that bolt strip (Italeri moulded it in place...) and I think it's going to be fun to fit exactly without any alignment marks. I intend to paint the kit as sub-assemblies of tranny, lower hull, upper hull, interior with gun - then I'll slap them all together at the end.

By the way, the kit review has just appeared! Review

Tom
stufer
Visit this Community
England - East Anglia, United Kingdom
Joined: May 25, 2003
KitMaker: 416 posts
Armorama: 342 posts
Posted: Friday, August 27, 2010 - 06:54 AM UTC
Hey Tom
picked me up one of these last weekend,but was disappointed with the lack of sprues in the box.Having purchased a couple of Pzkpfw IVs i was impressed with the amount of extra stuff that will no doubt end up in the spares box.
I know that these sprues are the result of multiple parts making up multiple variants of German armour but i thought Dragon missed a trick with the M7,maybe providing parts to make up an early or late M7 ,like a 3-in-1 kit in the box (OK,I want to model an early Alamein M7!)
This is going to sound like I'm ladying but far from it,this M7 is light years ahead of the Academy offering and i'm (hopefully) going to be buying more,but,hey!some of us are never happy!!!

barkingdigger
Staff MemberAssociate Editor
ARMORAMA
#013
Visit this Community
England - East Anglia, United Kingdom
Joined: June 20, 2008
KitMaker: 3,981 posts
Armorama: 3,403 posts
Posted: Friday, August 27, 2010 - 08:49 AM UTC
Steve,

I hear ya on the lack of options! I was surprised by the empty space too, and disappointed with the way some stowage was moulded in so I had no choices. This is definitely a new marketing direction for Dragon - their other Sherman-based kits come with a whole warehouse of spares...

On the plus side, one of the few spares is a set of final-drive covers that will replace the undersized ones in my Dragon M4A2 PTO.

Tom
stufer
Visit this Community
England - East Anglia, United Kingdom
Joined: May 25, 2003
KitMaker: 416 posts
Armorama: 342 posts
Posted: Friday, August 27, 2010 - 09:53 AM UTC
hey!
i've re-read my previous post,and for those who are wondering why i was 'ladying' wonder no more! think female dog,and go from there....

hush my potty mouth!!

I'm hoping the aftermarket boys start work on alternative M7 configurations (Rob at Formations I'm looking at you!)

Or as a form of penance Dragon could do us a brand new tooling of the Sexton?!

See?i said some of us are never happy!!
barkingdigger
Staff MemberAssociate Editor
ARMORAMA
#013
Visit this Community
England - East Anglia, United Kingdom
Joined: June 20, 2008
KitMaker: 3,981 posts
Armorama: 3,403 posts
Posted: Sunday, August 29, 2010 - 07:46 AM UTC
Right, the second instalment!

The review went off, and I can now reveal the three main areas of concern that prompted this blog were the tranny, the gun mount, and the upper hull assembly. We’ve looked at the tranny, so on to the gun mount!

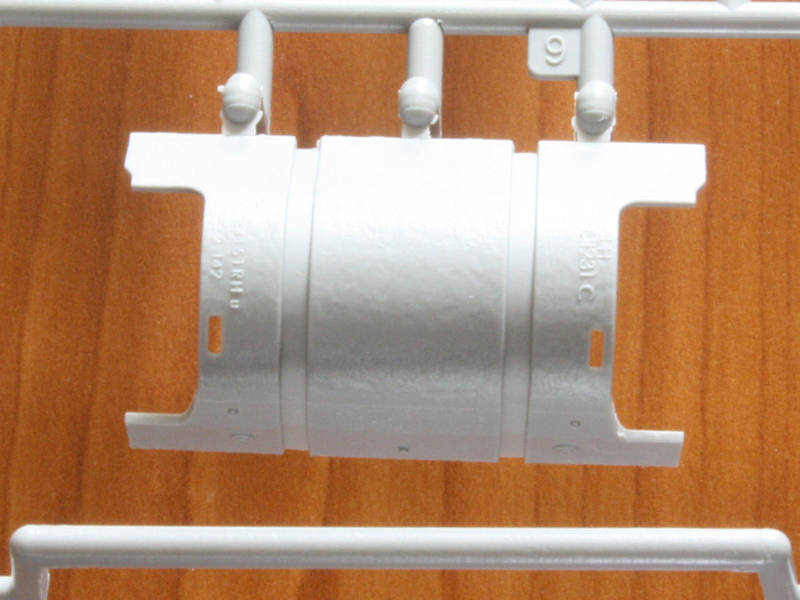
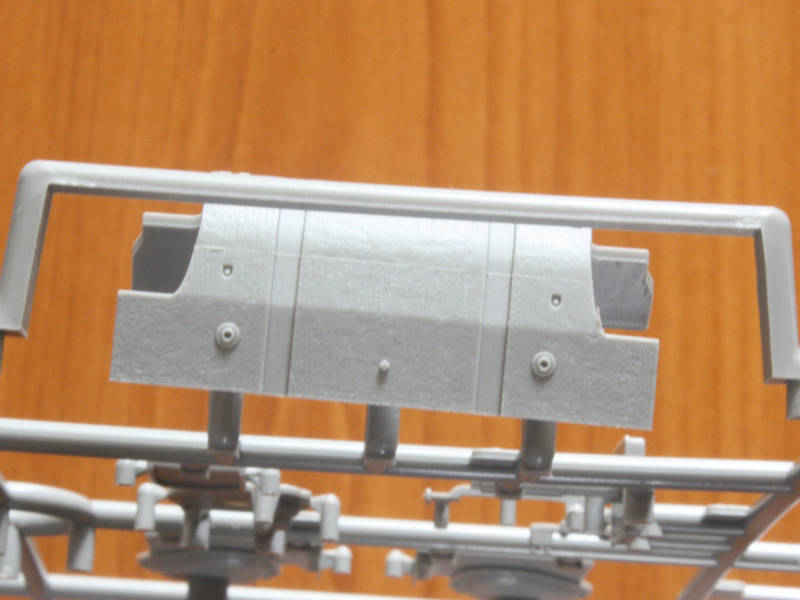
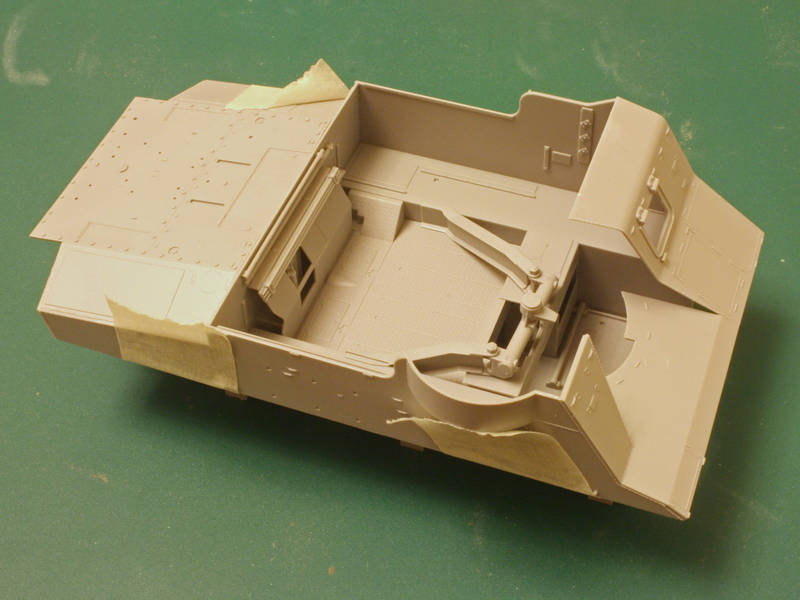
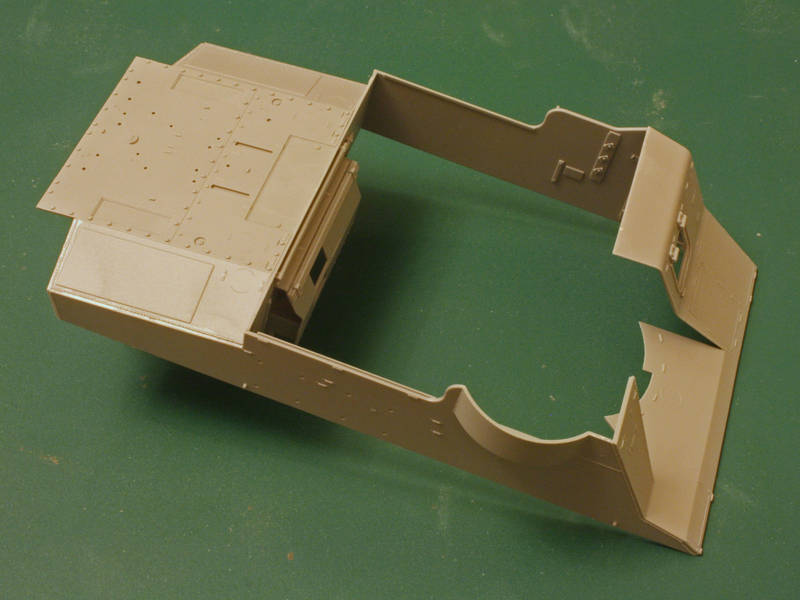
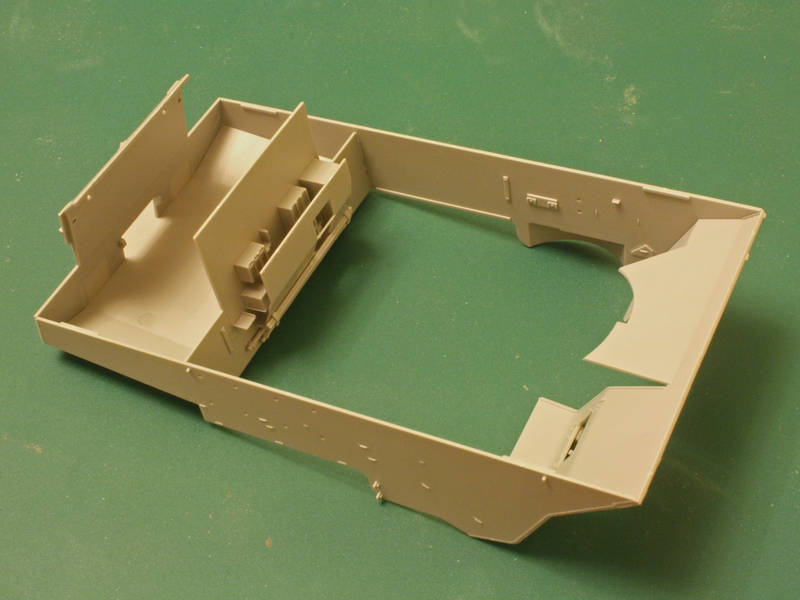
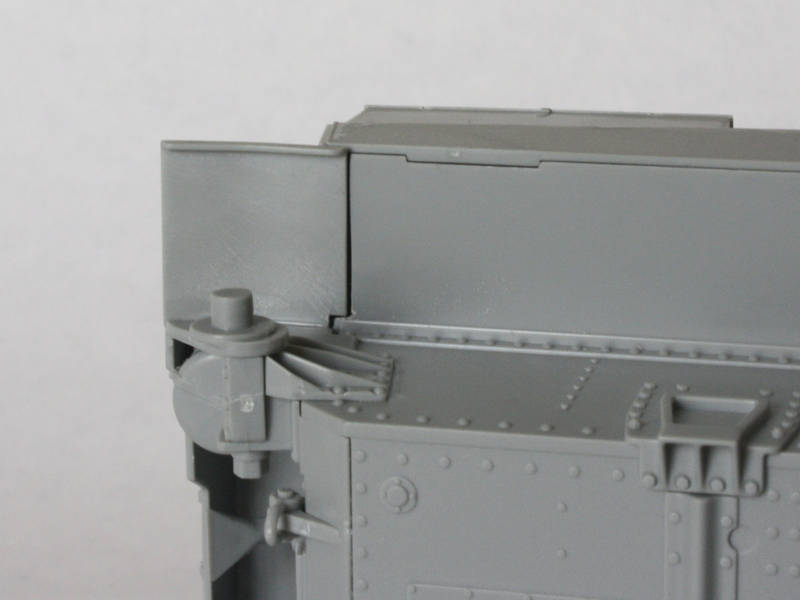
The first thing to point out is that the instructions are rather vague about parts location and assembly stages. They also show the parts built up in a sequence that would certainly lead to damage later on – I found it best to throw the sequence away and start from first principles.

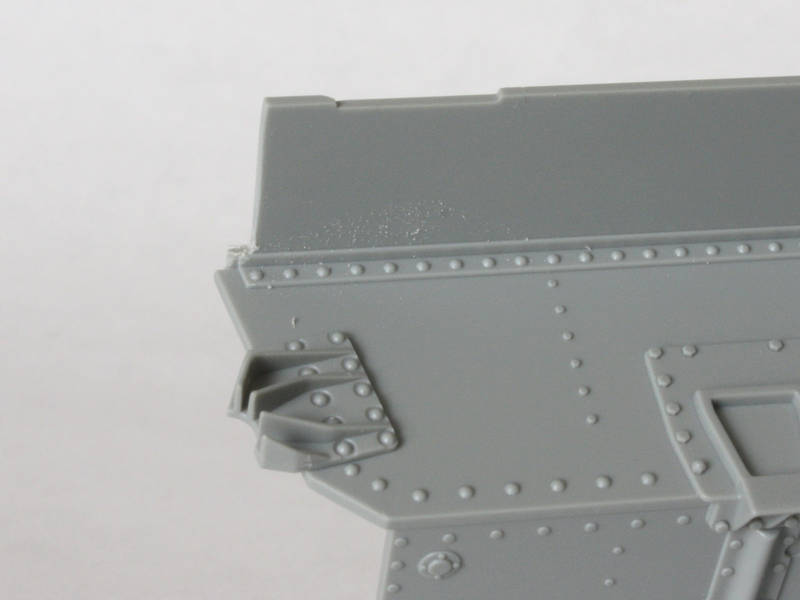
The second thing to point out is the frailty of many of the parts as well as the lack of positive locators on many of them.

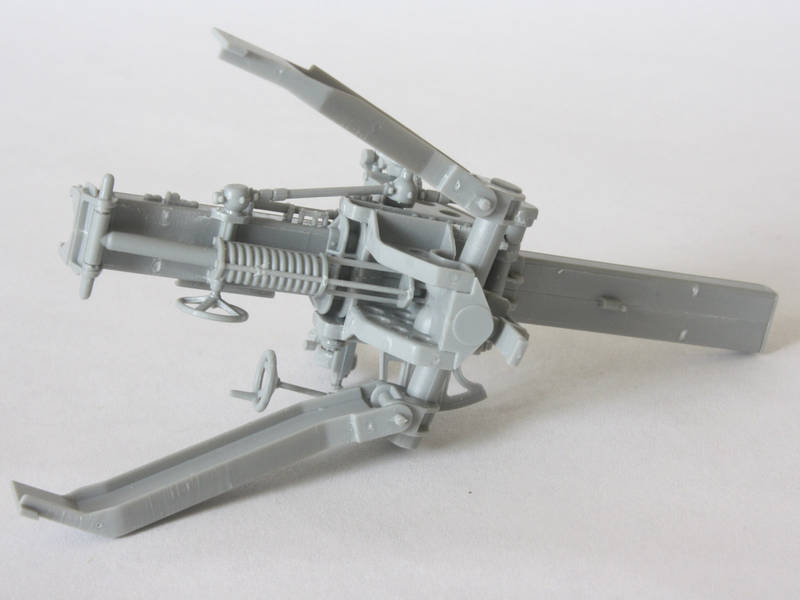
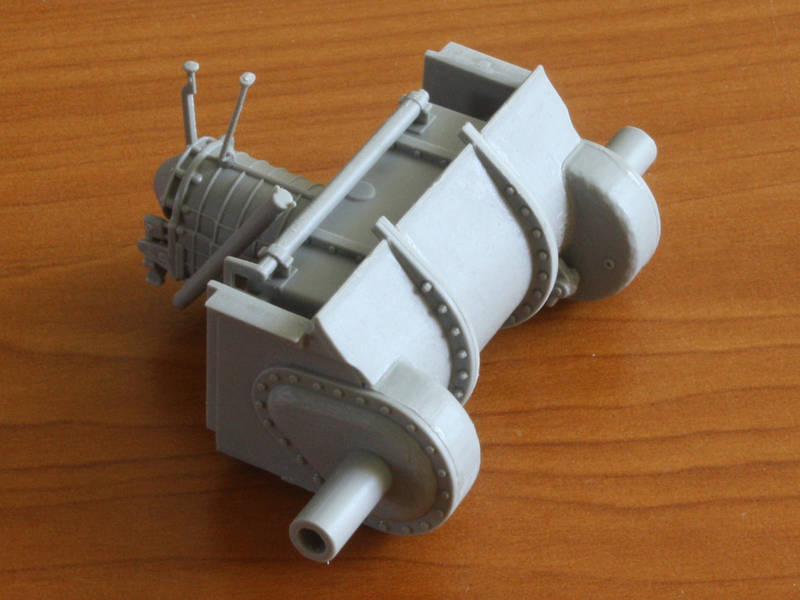
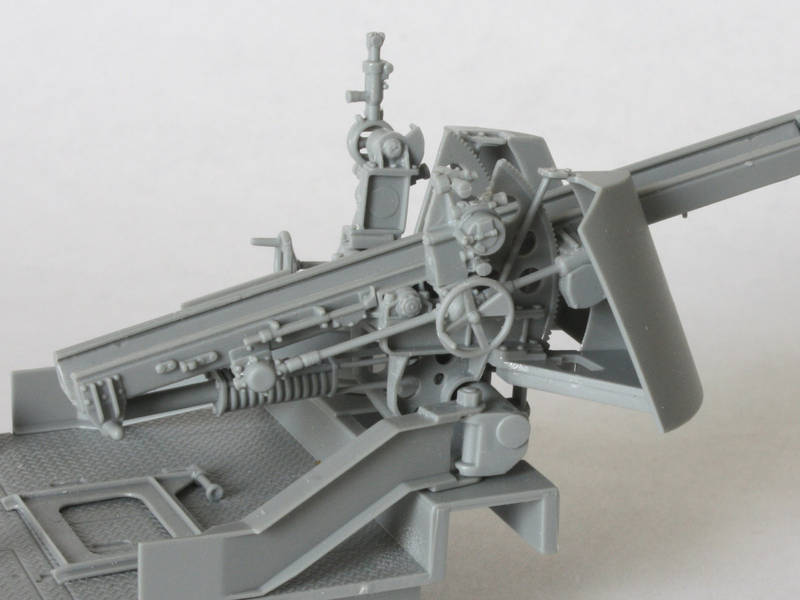
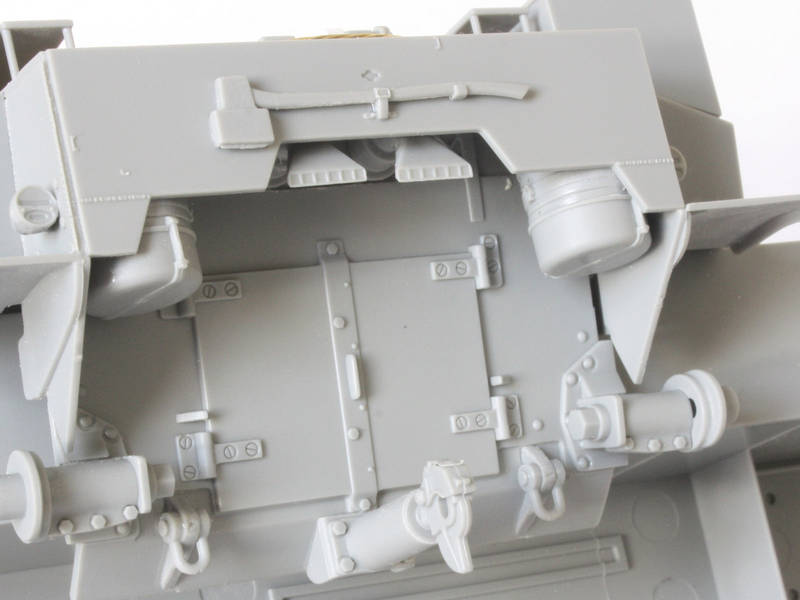
I decided it was best to start by gluing up the gun assembly (step 5), but got seduced by the detailed breech block. I posed it open, but forgot that the operating handle is moulded into the breech in the closed position. So, I’ll be carving and making a new one from plastic strip…


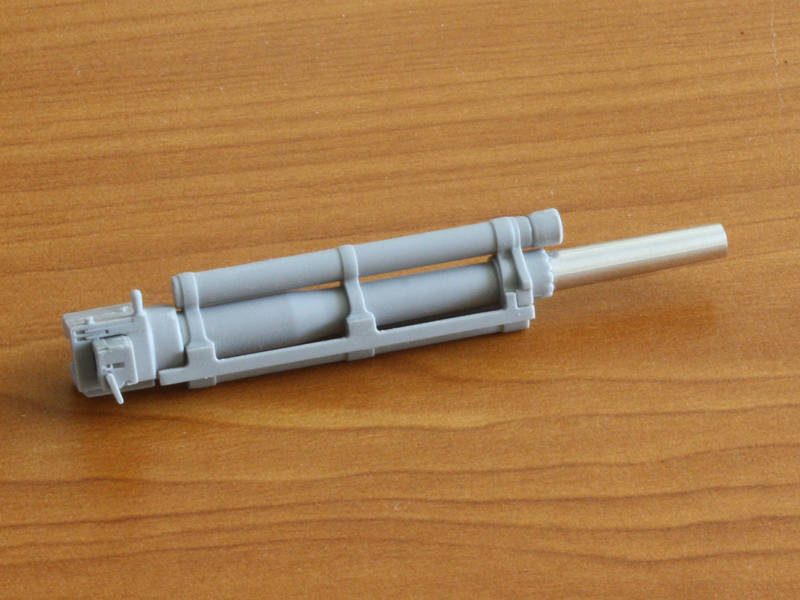
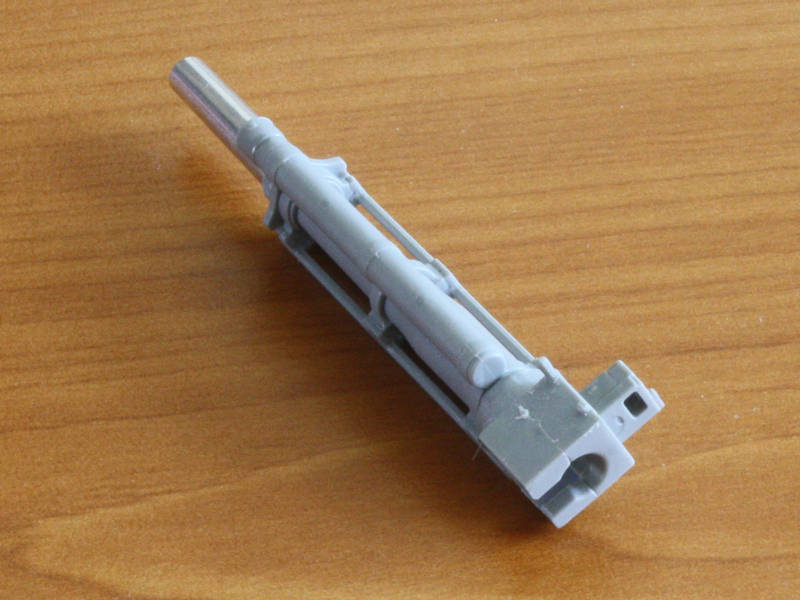
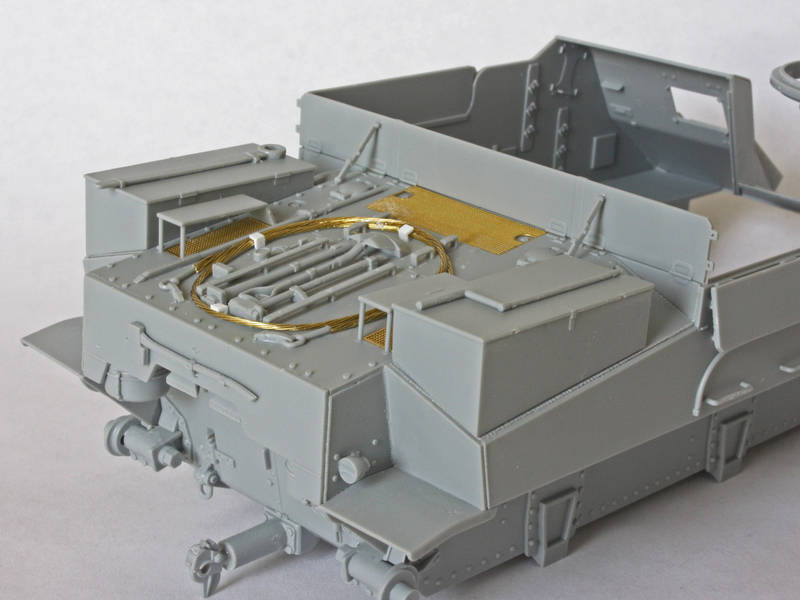
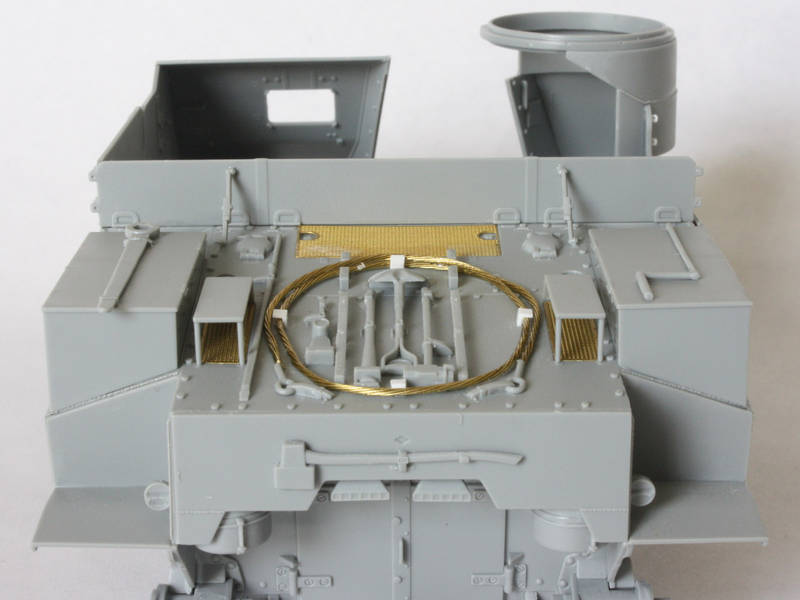
Next up I glued the gun cradle sides together, being careful to preserve the two pins at the rear (for the travel lock) even though the instructions say to cut them off. True, they aren’t really well detailed, but are better than nothing! The instructions would have had me add side details onto each cradle half before they were joined, but that would have ensured breakages as I held the two sides together and would have affected my ability to deal with the seam down the middle. In fact, I left these off until after adding the two sides of the elevation gear in which the cradle sits.


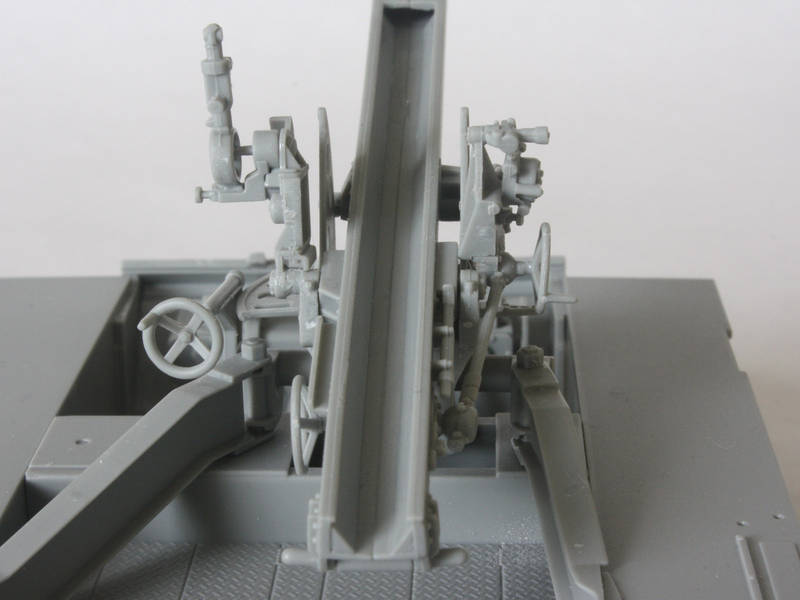
I wanted the gun to elevate, so I did not glue the cradle pivots where they are trapped by the elevation gear. (The instructions don’t suggest this…
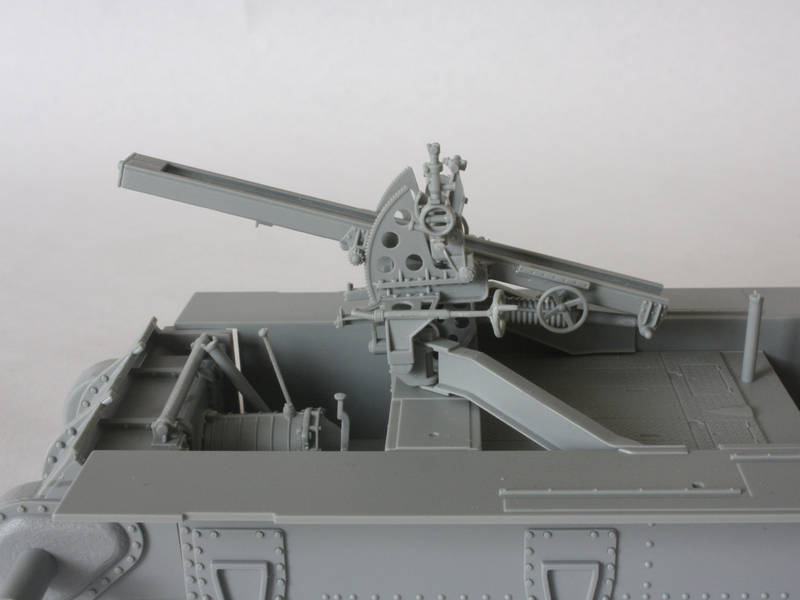
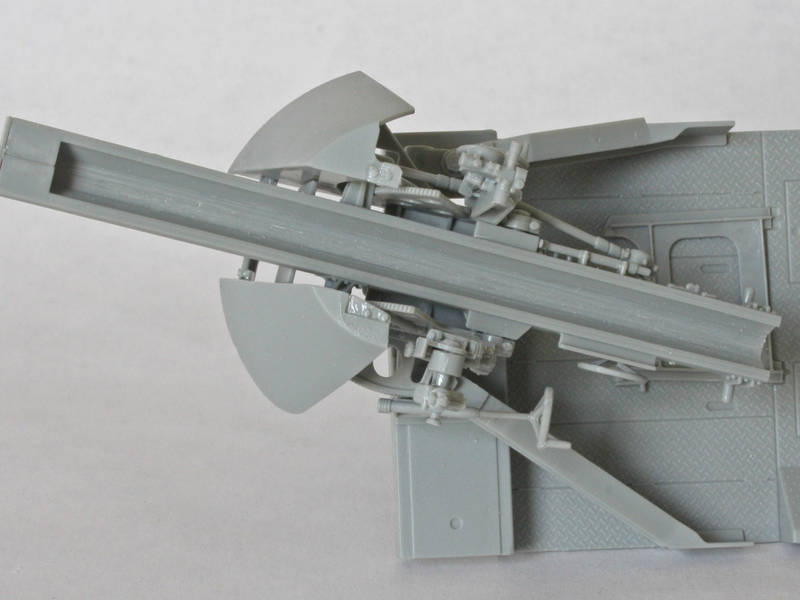
) Once the elevation gear halves were secure I then set about building the mount with its trails because I wanted to get all the architecture done before adding any fragile detail. I glued the yoke to the two trails and set the assembly on the fighting compartment floor to dry overnight. Later I took it off the floor and trapped it under the elevation gear with the bottom plate C3 – I was careful not to glue the yoke, so it can pivot side to side.

Underneath the cradle there is a cylinder that attaches the cradle to the elevation gear. The front mount under the elevation gear is an impossibly tiny part that locates into a hole in the front face of the gear, and the cylinder snaps in between the two sides of this mount with incredibly tiny pins. I left the piston loose in the cylinder and snapped its T-shaped end between the lugs at the rear of the cradle. If you glue this assembly it would lock up the cradle preventing it from elevating.


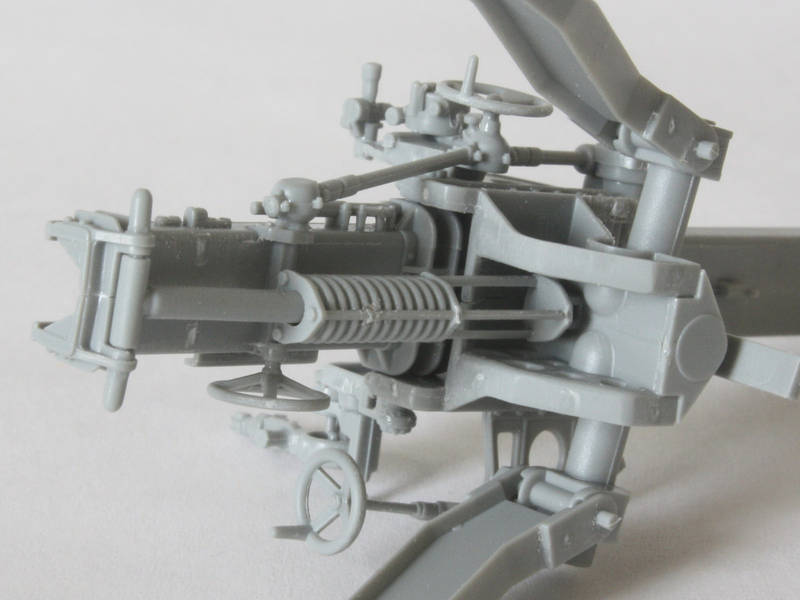
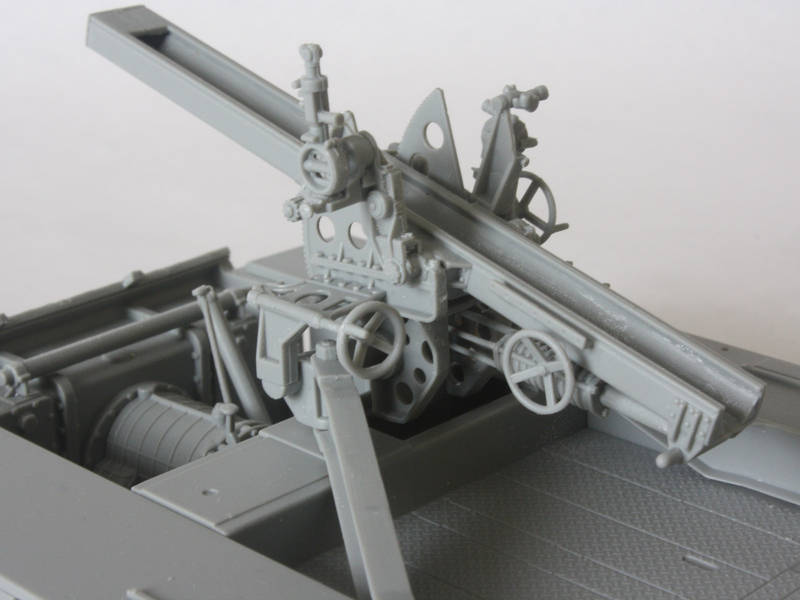
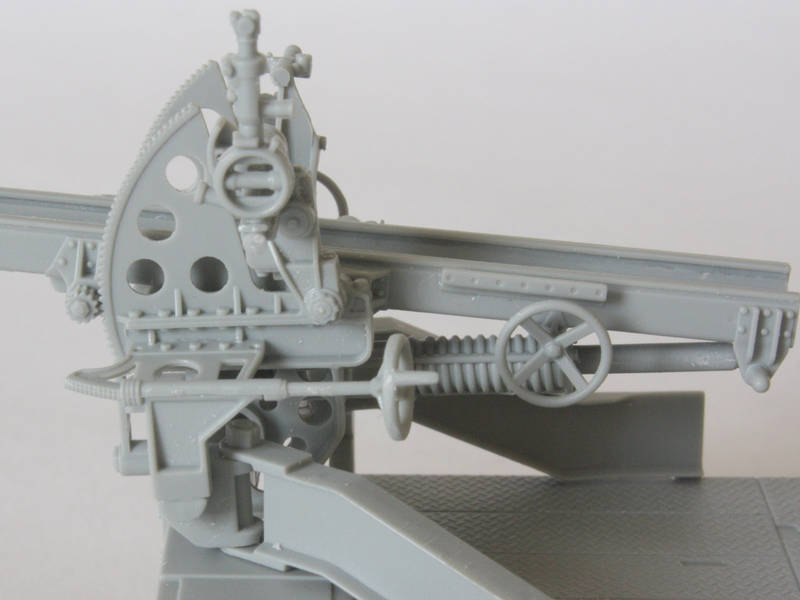
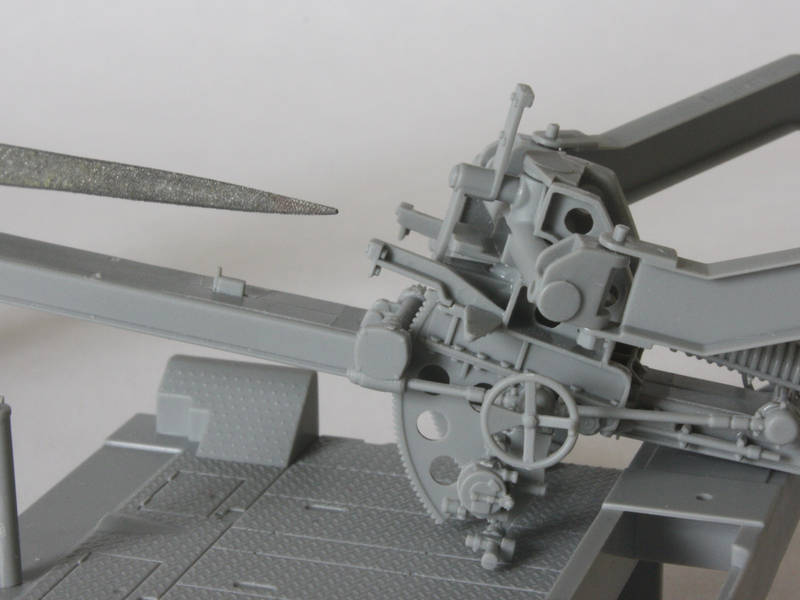
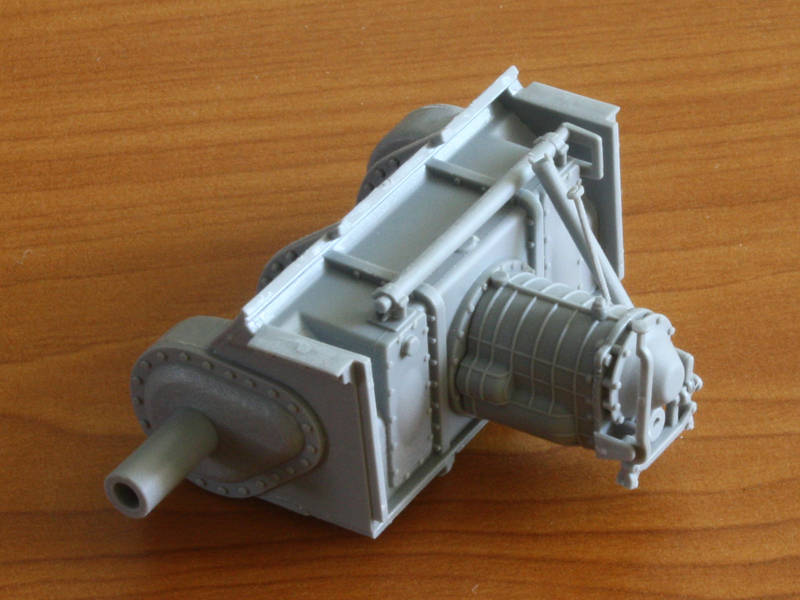
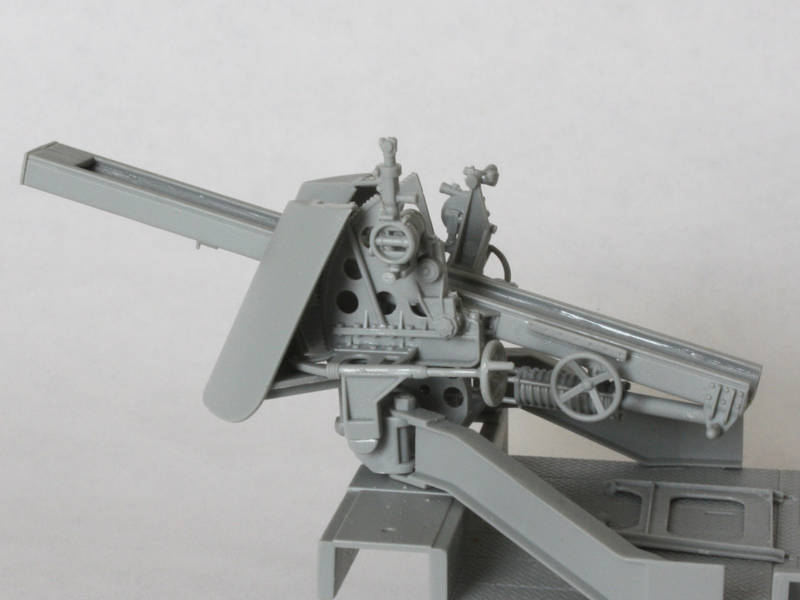
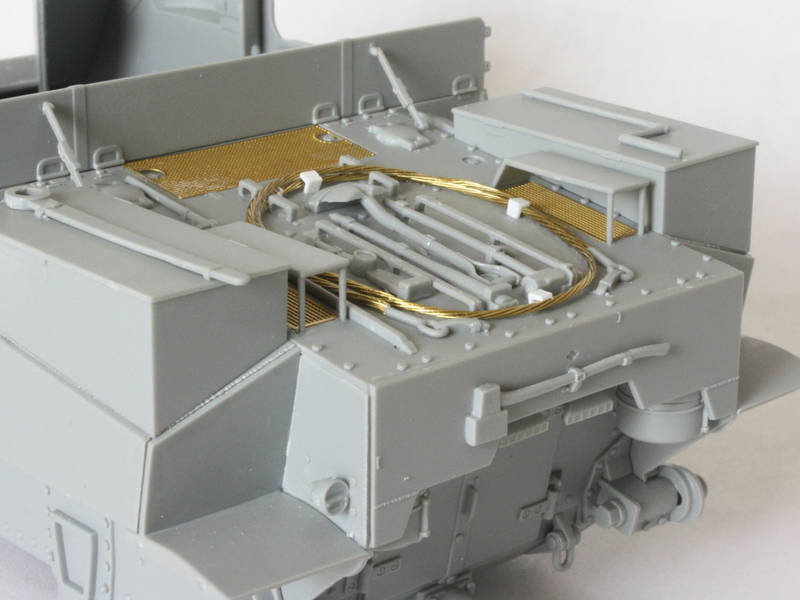
After all the structure was done I turned to the details that I’d skipped. Most are fairly straight-forward, but the sights on either side are nightmares! I found the parts to be a very vague fit, and the illustrations were unhelpful. I think I made a decent job in the end, and offer my photos as a guide to proper assembly. On the left side the sight sits on the elevation gear, but fouls the cradle, so I added a small spacer to shift it over enough to be out of the way. (I cut a thin slice from one of the many ejector nubs that I cut off the parts…) Oh, and I left the handwheels off til last.


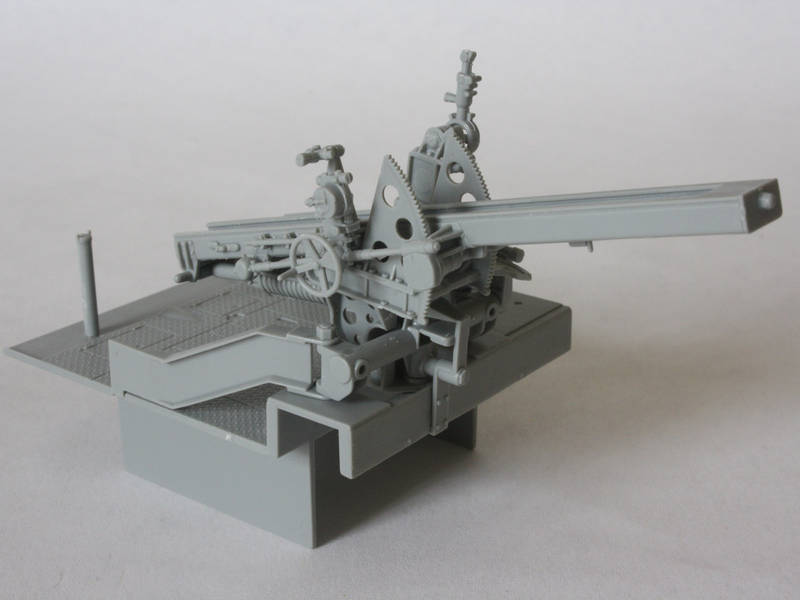
When I finished adding details I noticed that the yoke is effectively clipped in place on the floor by part C1, so I think I may glue it to the floor, and paint the floor as a separate assembly from the lower hull. If I do, then the whole floor assembly can be left loose until the upper body is fitted to the hull so I can wiggle it all into place.

The gun sits in the cradle and is supposed to be glued, but I’ll leave it off until after painting. Pity it doesn’t snap-fit…

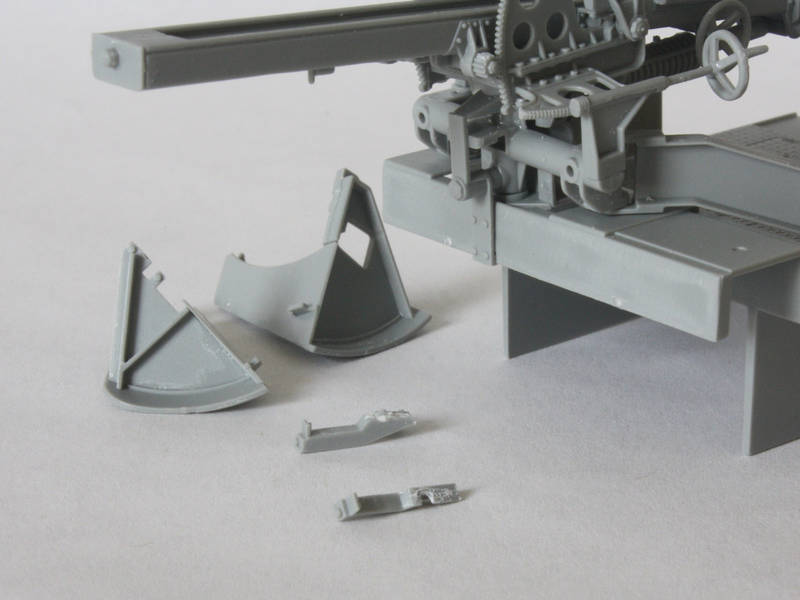
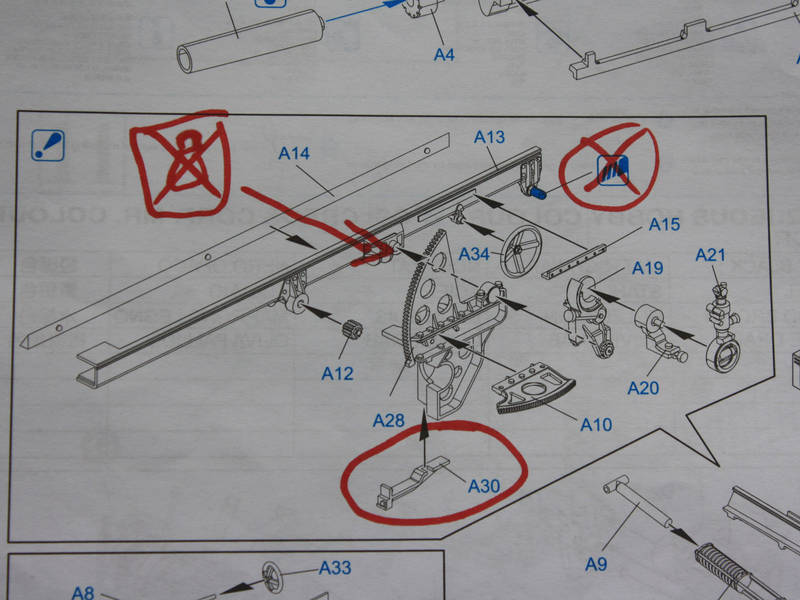
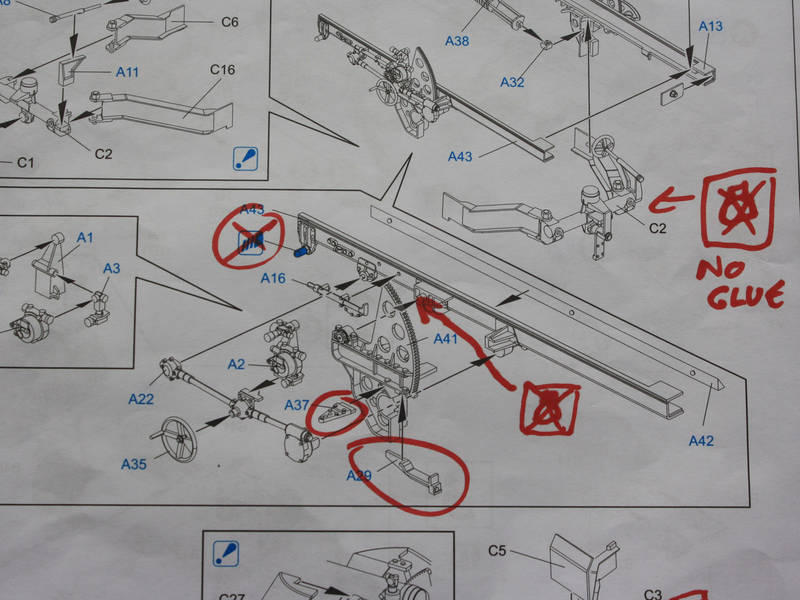
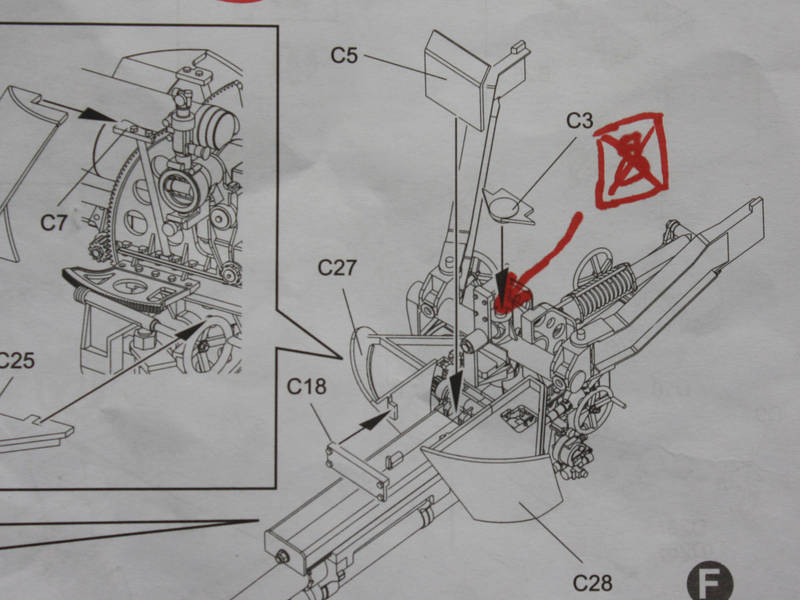
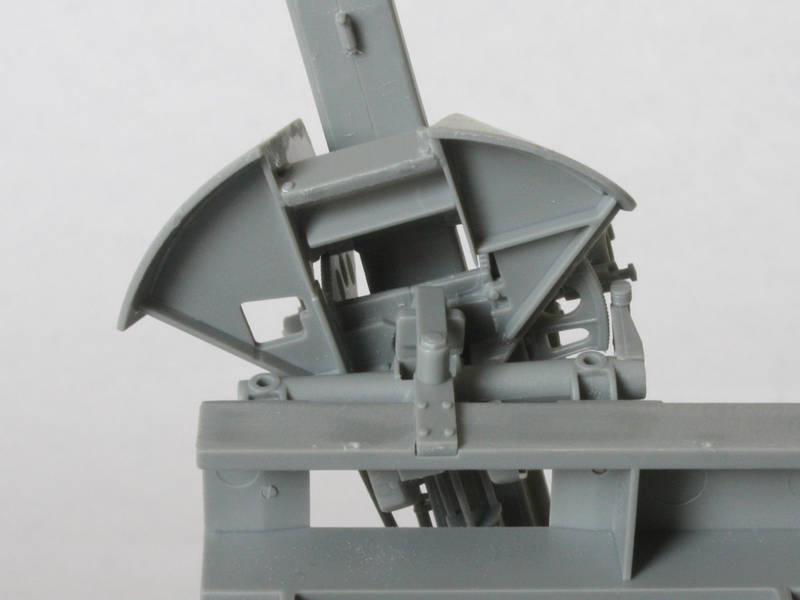
The only thing left is the shield. I built up the two halves, but struggled with location, so I put it aside for the night! I then saw Tony (callsign PvtMutt) posting his M7 build in the Shermans campaign, and he was kind enough to PM me with the solution. It seems that parts A29 and A30, which fit under the elevation gear halves, are left-overs from the earlier kit of the towed 105mm field piece, and are effectively replaced on the M7 by the floors of the gun shields C25 & C26.


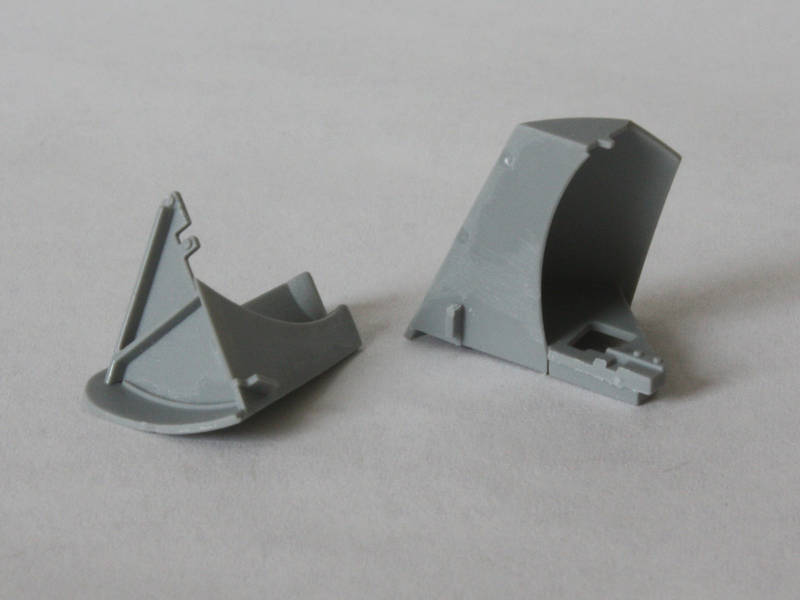
These fit up from underneath, and are then held together with part C18. Of course by this point I had already fitted A29 & A30, so I now had to carefully pry them off! Much swearing and replacement of dislodged details followed. So, lesson for the day? Don’t attach parts A29 & A30!


To round off, here are the kit instructions, duly marked up to show parts that shouldn’t be glued, as well as the offending parts (circled) and the nubs that must be retained.


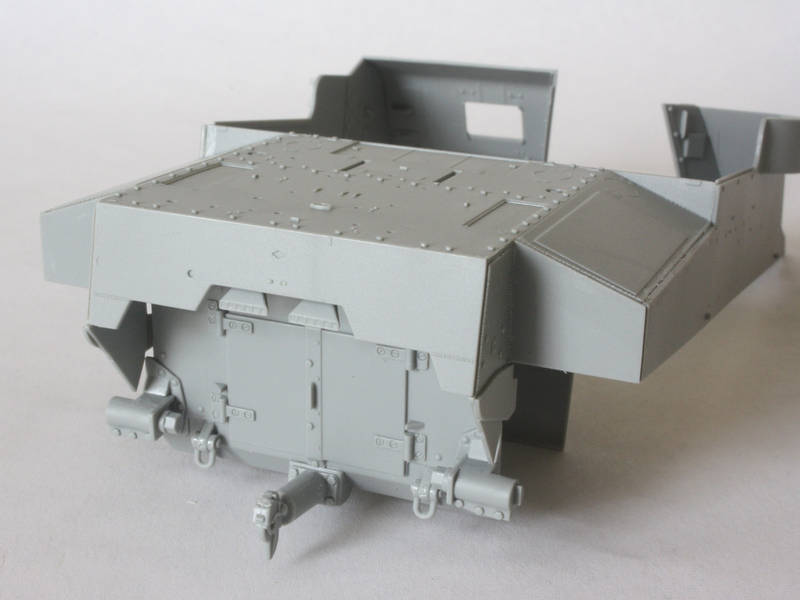
Next time: the upper hull!

Tom
PvtMutt
Visit this Community
Missouri, United States
Joined: July 01, 2006
KitMaker: 614 posts
Armorama: 601 posts
Posted: Sunday, August 29, 2010 - 08:58 AM UTC
Great update Tom
Even though this Dragon kit has a lot less parts than most of them it's not a push over i'll tell you. Clearer instructions would be a big help.
I didn't use a filler to cover the seam between the two halves of the bed or trail, what ever you call it. I save my PE frames so I cut a strip and laid it over the seam this time,it looks a lot cleaner and not near as much work.

Watchin for the next installment.
Tony the Mutt
barkingdigger
Staff MemberAssociate Editor
ARMORAMA
#013
Visit this Community
England - East Anglia, United Kingdom
Joined: June 20, 2008
KitMaker: 3,981 posts
Armorama: 3,403 posts
Posted: Sunday, August 29, 2010 - 11:17 AM UTC
Tony,

Yeah, I have to say the photos highlighted just how much filling and flash-removing I still need to do! (Now I know why movie stars are all running scared of the new high-definition filming!) The gun cradle is strange - I'd have designed it as a one-piece channel instead of two halves.

I should have another instalment ready to post in a few days...

Tom
vonHengest
Visit this Community
Texas, United States
Joined: June 29, 2010
KitMaker: 5,854 posts
Armorama: 4,817 posts
Posted: Sunday, August 29, 2010 - 01:30 PM UTC
Tom: Despite the minor issues you've pointed out, I'm really liking what I see. Looks like I'm going to be picking my kit up soon. Keep up the good work!
PvtMutt
Visit this Community
Missouri, United States
Joined: July 01, 2006
KitMaker: 614 posts
Armorama: 601 posts
Posted: Thursday, September 16, 2010 - 02:25 PM UTC
This build fell plum off the radar?????


Get the lead out my boy
Tony the Mutt
vonHengest
Visit this Community
Texas, United States
Joined: June 29, 2010
KitMaker: 5,854 posts
Armorama: 4,817 posts
Posted: Thursday, September 16, 2010 - 04:07 PM UTC
I'm sure Tom will be back soon.

The radar for the Armor/AFV forums has a very broad range and is very encompassing, so it's easy for threads to fall off the radar so to speak.
Dangeroo
#023
Visit this Community
Zurich, Switzerland
Joined: March 13, 2009
KitMaker: 2,058 posts
Armorama: 1,656 posts
Posted: Thursday, September 16, 2010 - 07:41 PM UTC
Hi Tom

I must have missed this one so far... My kit finally arrived in the mail 2 weeks ago. Looks like a decent kit and your buildlog will certainly be of help.

Cheers!
Stefan
barkingdigger
Staff MemberAssociate Editor
ARMORAMA
#013
Visit this Community
England - East Anglia, United Kingdom
Joined: June 20, 2008
KitMaker: 3,981 posts
Armorama: 3,403 posts
Posted: Thursday, September 16, 2010 - 11:42 PM UTC
Hi guys,

Sorry for the silence, but real life (and a parallel Tasca build) ate up my time and I've still got some work to do before the next instalment is ready to post. As a teaser, I've been fitting out the back deck, and got stumped by the wire "tow cable" that just won't stay coiled long enough for the superglue to set! I'll try annealing over a flame, but I think a replacement might be on the cards...

Tom
chefchris
Visit this Community
North Carolina, United States
Joined: February 06, 2006
KitMaker: 1,544 posts
Armorama: 1,464 posts
Posted: Friday, September 17, 2010 - 01:36 AM UTC
I hate those Dragon tow cables - I would almost rather rather have the nylon cord.......

How's the breach block on the gun? I know TigerModels is working on an AM one.....
Tanks for Sharing
Chris
barkingdigger
Staff MemberAssociate Editor
ARMORAMA
#013
Visit this Community
England - East Anglia, United Kingdom
Joined: June 20, 2008
KitMaker: 3,981 posts
Armorama: 3,403 posts
Posted: Friday, September 17, 2010 - 02:08 AM UTC
Chris,

The sliding block is nice and accurate, but the breech itself has a nasty dividing line down the middle because it is in two halves. This takes some fixing if you want to preserve the details on top. And, since they saw fit to mould the operating handle in the "closed" position it takes surgery to pose the breech open...

Tom
Paul-H
Visit this Community
United Kingdom
Joined: April 02, 2010
KitMaker: 234 posts
Armorama: 207 posts
Posted: Friday, September 17, 2010 - 05:02 AM UTC
Hi

Thanks for all the build tips

I have just bought one of these so will be following your build with interest.

Keep the tips coming.

Paul
barkingdigger
Staff MemberAssociate Editor
ARMORAMA
#013
Visit this Community
England - East Anglia, United Kingdom
Joined: June 20, 2008
KitMaker: 3,981 posts
Armorama: 3,403 posts
Posted: Monday, September 20, 2010 - 09:45 AM UTC
It’s been too long since the last instalment!

When last I blogged, we were building gun shields. These shots show the gun shields in position. Note that the instructions are really vague about the location of these parts…


The next big issue was the hull. Open-topped models are a real pig to paint, because lots of detail is visible but almost inaccessible. Given the slope of the front plate I figured it would be best if I could build the superstructure as a box to be joined to the lower hull after painting. I built up the bulkhead with its details, and then attached all the basic panels. Sure enough, the assembly is much sturdier than its constituents, but I found a slight problem in the form of a filler pipe on the floor – it gets caught under the guard on the bulkhead. Due to the angle of the rear hull plate the top needs to slip on from the rear, and that filler gets in the way. However, I found that if I left the floor loose I could tilt it up to ease the pipe into place while positioning the upper hull.


As I added details to the hull I discovered that there are a number of “mirrored” or “handed” parts, where the illustration labels only one and adds its opposite part’s number in brackets. However, in several cases these seem to be reversed, such as with all four corner fenders, or with the gusset plates either side by the rear idler axle. The mix-up is easy to straighten out just by test-fitting, but it gets rather more tricky with the tail lights and the idler mounts (parts B33 & B34) – as they fit either way round are they correct or reversed? I took the gamble that they too were reversed, but I may be wrong…

I started adding details from the back, with all the tools. I worked out from the centre so I could get access, which was fine until I hit the tow cable. The wire provided is far too springy, and after failing to glue it I resorted to annealing it over a flame, but wasn’t happy. So out came some light-duty brass picture wire instead. I added some brackets from plastic angle stock, but I admit in the close-up photos it looks a little clunky.


The two toolboxes on the rear sides are a disappointment, being moulded as single chunks in the best of 1970s style. They are a slight improvement on the old Tamiya M3 Lee parts (I checked…) but only just. If I wasn’t trying to review the kit contents I’d be tempted to rebuild them from sheet plastic.

The other thing to add this time is that I had to slightly trim the sponson floors at the rear so they fit past the overlap of the fenders. It’s only a few millimetres, but makes it possible to slip the hull together.


The last thing to say is Dragon moulded the handle on the rear engine door as a lump, in a nod to their 1970s Italeri roots. Pity, since the screw-head detail on the hinges is breathtaking. I may yet replace it with wire if the AMS bug bites.


That’s all for now. Hull sides & front yet to come!

Tom
 _GOTOTOP