Armor/AFV: Modern Armor
Modern armor in general.
Hosted by Darren Baker
PZH 2000 Afghanistan
Paulinsibculo
Visit this Community
Overijssel, Netherlands
Joined: July 01, 2010
KitMaker: 1,322 posts
Armorama: 1,239 posts
Posted: Monday, October 25, 2010 - 04:52 AM UTC
Remi,
Quite some pages have been spend on that.
Have a look in one of the old Master Verlinden's books, the new "Let's build diorama" by Laszlo Adoba (discussed at this site) or in periodicals like Military Modelling. You will be burried by info. But also in the stories of Mr. Steve Zaloga you will find a lot of useful stuff.
Spend some minutes on the web for these names and you can go for months!
Buck_Compton
Visit this Community
Limburg, Netherlands
Joined: October 04, 2009
KitMaker: 155 posts
Armorama: 102 posts
Posted: Monday, October 25, 2010 - 05:04 AM UTC
Maybe i wasn't clear enough Paul,

I've been looking around in construction markets like Hornbach, Gamma and praxis. But they all dont sell the right stuff. The guy who made the the Clervaux castle told me that i had to look for blueish styrofoam. Because it has a very fine structure to work with...

Cheers Remi
Paulinsibculo
Visit this Community
Overijssel, Netherlands
Joined: July 01, 2010
KitMaker: 1,322 posts
Armorama: 1,239 posts
Posted: Monday, October 25, 2010 - 05:34 AM UTC
In Holland they call it "Roofmate SL-A". A piece of 1250 x 600 x50 mm costs about € 20,- at Raab Karcher Bouwmarkt. Take care: if you glue them together they sell the right glue as well.
Roofmate is normally used for roof isolation. Maybe a construction company may have some rests from one of their sites.
Good luck.
Buck_Compton
Visit this Community
Limburg, Netherlands
Joined: October 04, 2009
KitMaker: 155 posts
Armorama: 102 posts
Posted: Monday, October 25, 2010 - 07:11 AM UTC
Hey Paul,

I'll go out hunting for that stuff. Might I be so free to ask what unit you are serving in?

Cheers
Paulinsibculo
Visit this Community
Overijssel, Netherlands
Joined: July 01, 2010
KitMaker: 1,322 posts
Armorama: 1,239 posts
Posted: Monday, October 25, 2010 - 07:44 AM UTC
Hi Remy,

Maybe you already found them yourself but I found the decals for "our" PZH200 at www.blackliondecals.nl, item 35026 - Modern Dutch Army: ISAF vehicles.
To your question: As you may understand I can not inform the whole world about my present position. But I started as a young lieutenant in Seedorf in 1976 with the famous M109. So I am almost at the end of my carreer! Looking forward to plenty of time to do modelling.
Buck_Compton
Visit this Community
Limburg, Netherlands
Joined: October 04, 2009
KitMaker: 155 posts
Armorama: 102 posts
Posted: Monday, October 25, 2010 - 08:03 AM UTC
Aha ok running at the end. I bought these decals allready at the smc.

Cheers
Teaker11
Visit this Community
California, United States
Joined: July 02, 2009
KitMaker: 962 posts
Armorama: 786 posts
Posted: Monday, October 25, 2010 - 09:19 AM UTC
I missed it some wher in the post what Bronco tracks are used?
thanks JIm

Buck_Compton
Visit this Community
Limburg, Netherlands
Joined: October 04, 2009
KitMaker: 155 posts
Armorama: 102 posts
Posted: Monday, October 25, 2010 - 09:36 AM UTC

Quoted Text

I missed it some wher in the post what Bronco tracks are used?
thanks JIm


Bronco PZH tracks

Cheers Buck
Buck_Compton
Visit this Community
Limburg, Netherlands
Joined: October 04, 2009
KitMaker: 155 posts
Armorama: 102 posts
Posted: Wednesday, November 03, 2010 - 10:21 AM UTC
Ok a bit of an update:

Photo etched set: I noticed indeed that the antenna mounts arent the same as those on the Dutch Pzh. They look quite detailed tough.

Bronco tracks: Understood that they arrived at my home place the other day so I giess i've got something to do the upcomming week.

Rack: Still looking for a good mesh and somthing to make the 'skeleton'

Some other questions:

How should I make a decent muzzle cover? I also noticed that the hatch on the left rear part of the chassis is quite diffrent from the dutch version. Its a door wich opens to the side instead of dropping down. Any suggestions?

CHeers Remi


Leopard-2
Visit this Community
Bayern, Germany
Joined: November 10, 2009
KitMaker: 229 posts
Armorama: 220 posts
Posted: Wednesday, November 03, 2010 - 09:25 PM UTC
Hallo Remi,

don't worry, i will not discuss about rubber pads anymore ;-) .

First to the muzzle cover: i think that expoxy putty should do the job. Milliput for example. Very good stuff is Magic Sculp because it can be rolled out very good which is important to mold a cover. All you need is some baby powder (to make the putty less sticky) and a rolling pin from your mama's kitchen or a comparable tool.

As for the Broncos, let me give you a hint: don't be too shy with glueing. The contact surfaces of the track parts should continouous and thin (i mean thin!) be brushed with thin cement. Therefor cements that include brushes like Revell Contacta Liquid or Mr. Cement are well-suited. When i started with my first tracks i also only added thin "drops" to some places on the surfaces. The result was that a lot of splices were too weak and the parts came apart again when moving built segments just a little bit.
Logically care has to be taken that no cement comes in contact with the track connector parts but even if it happens it's not really a problem. Just move the parts at times while the cement sets. The tracks may be less smooth running then but that will have no effect on the model. And it doesn't matter because you finally don't want to have a toy, do you?

If you want to have correct antenna mounts and the hatch on the rear the keywords are: SCRATCH and BUILDING
Take your time and some 0,2mm plastic sheet and you should come to a good result. Don't forget to reposition indicator, rear light and reflector of the left side of the rear under the hatch, by the way.
I didn't perceive all details of the antenna mounts because i didn't find photos of them in a trice. Just a thought but the antenna mounts could be "constructed" with streched spure (hope you know what i mean?).

Plastik sheet can also be used to make the "skeleton" of the rack. But i don't have an answer for your question about the mesh. Maybe you should keep on looking for universal mesh. It seems that the structure of the mesh seen on the racks of dutch PZH2000s is pretty wide-meshed. Maybe there are some photo etched engine grills that have a good fitting mesh? If you really can't find something you will have to do it yourself again. But how? Well, i have an idea. I'll let you know if i have tried out.
Buck_Compton
Visit this Community
Limburg, Netherlands
Joined: October 04, 2009
KitMaker: 155 posts
Armorama: 102 posts
Posted: Friday, November 12, 2010 - 04:16 AM UTC
Ok well i'm looking in to the mesh from eduard thanks for the advice.

I just now had a look at the tracks from bronco very very realistic. But looking at this i'd say there is no way to decently removing the pads. i gues chipping of bits and parts is all that is left to it making them look worn down.

Cheers Remi
Paulinsibculo
Visit this Community
Overijssel, Netherlands
Joined: July 01, 2010
KitMaker: 1,322 posts
Armorama: 1,239 posts
Posted: Friday, November 12, 2010 - 04:31 AM UTC
Remi,

Try it with a Dremel . They have quite some special tools to fit in, like for carving and grinding. Would save you quite some work and time probably.
Buck_Compton
Visit this Community
Limburg, Netherlands
Joined: October 04, 2009
KitMaker: 155 posts
Armorama: 102 posts
Posted: Saturday, January 01, 2011 - 10:33 AM UTC
Ok havn't been posting in a while but I have been busy with some preperations.

I first had to find a way to weather the vehicle as realistic as possible so i have been training on an old model using a technique someone on this forum used mixing plaster pigment and water to a soupyish mix and then applying it to the vehicle letting it dry for a night and then brush it of using a toothbrush and q-tips.

Also i have been trying to find a way to produce the rack on the rear of the turret. i found out that Evergreen has some very good plastics to make that rack so going to work on that later on.

This evening I have been working on the wheels i've been trying to damage them using a scalpel. I've add a picture of it up here. I will be painting them in black primer this evening. I do still have to remove some of the scrappings


I've also been checking out the revell 1/35 PZH2000 box i found out they updated the tracks looking awesomly realistic to what the real tracks look like.

Cheers Remi
Leopard-2
Visit this Community
Bayern, Germany
Joined: November 10, 2009
KitMaker: 229 posts
Armorama: 220 posts
Posted: Saturday, January 01, 2011 - 08:29 PM UTC
The kit contains new tracks now?! Photo please!
Buck_Compton
Visit this Community
Limburg, Netherlands
Joined: October 04, 2009
KitMaker: 155 posts
Armorama: 102 posts
Posted: Sunday, January 02, 2011 - 03:26 AM UTC


I remember the detail in the 1st pzh2000 1/35 kit i bought was far less than this one has. But I compared it just now with the ones from Bronco and those have some better details in it.

Cheers
Leopard-2
Visit this Community
Bayern, Germany
Joined: November 10, 2009
KitMaker: 229 posts
Armorama: 220 posts
Posted: Sunday, January 02, 2011 - 04:45 AM UTC
Those are the (terrible) gummybear-like tracks that so many modellers hate. I've never seen other tracks. When i bought my first Pzh2000 kit over four years ago the tracks where the same and so where the details.
Buck_Compton
Visit this Community
Limburg, Netherlands
Joined: October 04, 2009
KitMaker: 155 posts
Armorama: 102 posts
Posted: Sunday, January 02, 2011 - 04:56 AM UTC
Well my first kit had other type of tracks thats what im sure of... to bade i trew it away...

I do have to agree that those rubber blocks look like little cushions.

but those Bronco Pzh tracks seem to be just fine enough to me

https://armorama.kitmaker.net/review/4747e

Cheers
Buck_Compton
Visit this Community
Limburg, Netherlands
Joined: October 04, 2009
KitMaker: 155 posts
Armorama: 102 posts
Posted: Monday, January 03, 2011 - 01:56 AM UTC
Ok i just now finished the wheels i only have to weather them but I will that be doing later on when i´ve finished the entire model

Buck_Compton
Visit this Community
Limburg, Netherlands
Joined: October 04, 2009
KitMaker: 155 posts
Armorama: 102 posts
Posted: Monday, January 03, 2011 - 10:06 AM UTC
Ok I´ve been quite busy this evening.

As you guys know I'm trying to make my first dio using a Pzh2000. As you might know the Revell kit is a German Pzh wich has some diffrences compared to the one in use by the Dutch army. This evening I've been busy trying to change or scratch build these diffrences. Ok top to bottom left to right

1st row shows the newly made door of the generator I've made that out of putty, 0,3mm evergeen plate and part of a q-tip

2nd row: I added the grate on the door of the compressor and I also added the beacons on the right side instead of the left side as it is in the German version. I Made the aiming posts of metal wire and some thinfoil. I hang them up using PE parts from the Eduard kit for the Pzh

3rd row: The baggage rack it's a bit bend tough still have to straighten that one out. I also put in an ammo sheet as I remember that was the only thing we carried on that rack besides some 'pillows' we used to sit on while driving from the hide to the firing location and back. I also added the airintake of the charge compartiment on the rear of the turret

4th row: I added the PE racks to clean your boots before entering the turret. Also using some tinfoil I added the bellow wich covers the barrel.

Photo

Well thats it for today I'd guess still have to remove some remaining putty from the gun in order to smoothen the surface.

Cheers Remi
warreni
Visit this Community
South Australia, Australia
Joined: August 14, 2007
KitMaker: 5,926 posts
Armorama: 712 posts
Posted: Monday, January 03, 2011 - 10:52 AM UTC
I bought and built the PzH2000 about 12 months ago and I could not figure out why you thought the kit supplied tracks were so bad. I thought they were fine and had no hesitation in using them on my build. Looks like the answer is that they were updated just before I bought my kit. Lucky me!

Just a quick thought, are these tracks used on any other vehicle as they may be available without the pads for the other vehicle??

At least you don't have to worry too much about the camo scheme in your PzH2000..
Buck_Compton
Visit this Community
Limburg, Netherlands
Joined: October 04, 2009
KitMaker: 155 posts
Armorama: 102 posts
Posted: Monday, January 03, 2011 - 11:04 AM UTC
Well the PZH tracks are based on the Marder tracks but I must be honest that I do not know the diffrences between them. But i did notice that the pads from the revell are more round on the surface compared to the bronco ones.

That camo scheme still has to be done I believe

Cheers Remi
Buck_Compton
Visit this Community
Limburg, Netherlands
Joined: October 04, 2009
KitMaker: 155 posts
Armorama: 102 posts
Posted: Wednesday, January 05, 2011 - 01:35 PM UTC
Hey Guys,

I've been another day working at it. I believe I've generally changed everything that needed to be will talk you guys trough it.

1st Column: I've cut up the barrel clamp as I'm planning to have the turret in an unlocked position wich means that the clamp has to be on the deck. 2nd photo shows the Smoke dischargers. I believe it was meant to put the addon PE parts on the Smoke dischargers but the PZH I'm making has smoke pots loaded so the covers should be on top of the dischargers. To bad that there isn't enough space to make them full size. Also to be seen on 2nd and 3rd photo is the Velocity meter. The one on the German PZH is a little bit diffrent as to the Dutch the base is smaller and instead of 1 support it has actually 2 I've also added the wire connecting the meter to the gun.

2nd Column: I've added the PE grid on the engine's air intake. 2nd photo shows the clamps for the towing cable. As the German Towing cable is around the turret and the Dutch one on the left side of the hull I had to add them using some leftovers from the PE. 3rd photo shows a part of the towing cable in the new position and the protective rack for the generator air intake.

3rd column. The PE set from eduard has replacements for all the pioneering equipment. My technical abilities arent that good so I chose to replace only the saw. The 3rd photo shows the crew hatch as I'm planning to have one of the gunners to man the GPMG Mag.

And at the bottom: This is only one of the 2 sideskirts. The German ones have holes to be able to climb the vehicle on each skirt. Ofcourse the Dutch one has this only on 1 side just behind the driver so I had to fill up all the other holes using liquid plastic.

Photo

I've just now painted the entire vehicle flatblack so I will be able to see if I forgot anything.

Cheers

Remi

Buck_Compton
Visit this Community
Limburg, Netherlands
Joined: October 04, 2009
KitMaker: 155 posts
Armorama: 102 posts
Posted: Saturday, January 08, 2011 - 03:12 PM UTC
Gents,

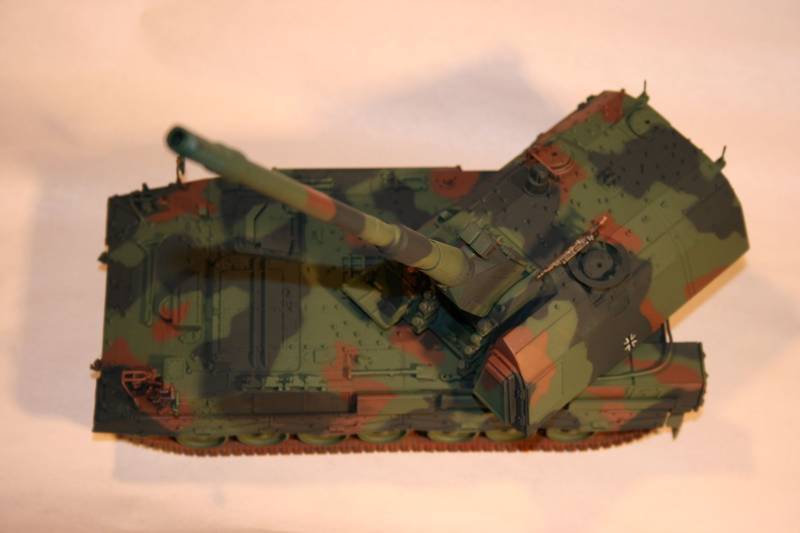
I found it a good moment this evening to work on the model seen the bad weather that has been passing by today. So today I've done the priming using Mat-Black from Tamiya. After having done that I noticed some flaws in the filling of the holes... As soon as I repeared that I sparyed it another time with Mat-Black. After that i sparyed the Nato Green XF-67 from tamiya on to it. After that had dried I'd put on the Nato-Black XF-69 from tamiya. Ofcourse after that dried I spray painted the brown on it using Leather Brown from Revell. Thats where some problems came up I must have failed to mix it right with the thinner. So it started to spatter I've mixed it again and then continued to paint. After it had dried out I repaired the black as that was still in my cups. The green will be done tomorrow morning. If that is done I will put on the decals and the IR stickers and the engineering tape used to cover the vehicle markings. Also going to drybrush it using silver chrome from tamiya. If that is done I will put on the Clear lacquer to seal it. Weathering will be something for the next weekend i'd guess. Depends on the tracks how well they come along during the week.

Here are a couple of photo's:


Oh I forgot to mention what I used as reference source's for the paint job. As the revell manual is kind of rough and unclear to how to paint it exactly I've used some of my own pictures from Afghanistan as a reference also I used some photos from an american website that shows photos of the airlift to KAF. And last but certainly not the least I used someones photos of a model shown over here. A paint job that I really like a lot.

German PZH

Cheers,

Remi
warreni
Visit this Community
South Australia, Australia
Joined: August 14, 2007
KitMaker: 5,926 posts
Armorama: 712 posts
Posted: Saturday, January 08, 2011 - 04:14 PM UTC
Not the best photo, but here is how mine came out..


Yours is coming along very nicely Remi. Hope you work out your track issues soon.
Buck_Compton
Visit this Community
Limburg, Netherlands
Joined: October 04, 2009
KitMaker: 155 posts
Armorama: 102 posts
Posted: Sunday, January 23, 2011 - 12:52 PM UTC
@Warren thats a good looking PZH2000

Ok here is an update of the work i've done in that past weeks.

The Tracks:
I've put them toghether according the guide. Painted them flat black XF-1 and Chrome silver x-11. Had it drie over night and then lightly sprayed over a layer of German green XF-63 mixed with a few drops of XF-20 Medium Grey. Than I painted the Pads black with XF-1 and weatherd the entire track with sand color from the Tamiya weathering sets. Some photos of it below:


Ok after Camouflaging the vehicle a detailed it with the Decals and painting of the equipment lamps windows etc etc. Than I painted a Blank Laquer from Revell on to it. That was where "the sh*t hit the fan" it seems that using Kruppw's weathering technique of mixing Plaster, pigment and water should be applied with out the laquer on the vehicle because of the smooth surface it creates. The mix pulls together like oil on a teflon frying pan. so I had to remove the mix and repaint the vehicle.

Then i re applied the mixture a day later. I had it drie over night and then brushed it of using a very stiff old toothbrush. When that was done I applied all the road wheels and pulled the tracks around the it. wich was quite a job as 1 track didnt fit correctly forcing me to add one more block to the track wich kind of overstretched it hehehe it some times seems impossible to get things right. Thats about it what I've done so far.

This is the course of weathering:


preliminary result:


A general idea of the dio using a white cotton sheet:


Next up will be:
- Building the rack
- Attaching the towing cable
- Building and putting on the Antenna's
- Painting on the exhaust soot.
- Washing the vehicle
- Applying the Laquer
- Repairing stuff
- Building a GPMG for loaders hatch
- correcting the weathering as i remember the camo was more visible than what we are seeing now

Now I have a question about that last one.

I've had 2 suggestions of applying it with Pigment or with Oil Paint. Is there any one who has some good techniques that would work? I have no real experience on both...