Tamiya Cromwell + AM in-progress
Rheinland-Pfalz, Germany
Joined: November 27, 2005
KitMaker: 182 posts
Armorama: 180 posts
Posted: Saturday, October 30, 2010 - 01:29 AM UTC
Hello together,
I`ve never posted some Photos to Armorama and so i decided test this with some progress-photos of Tamiya`s Cromwell with AM. Nothing tooooo spectacular, nothing finished but better than nothing.

Smoke emitters and small parts...
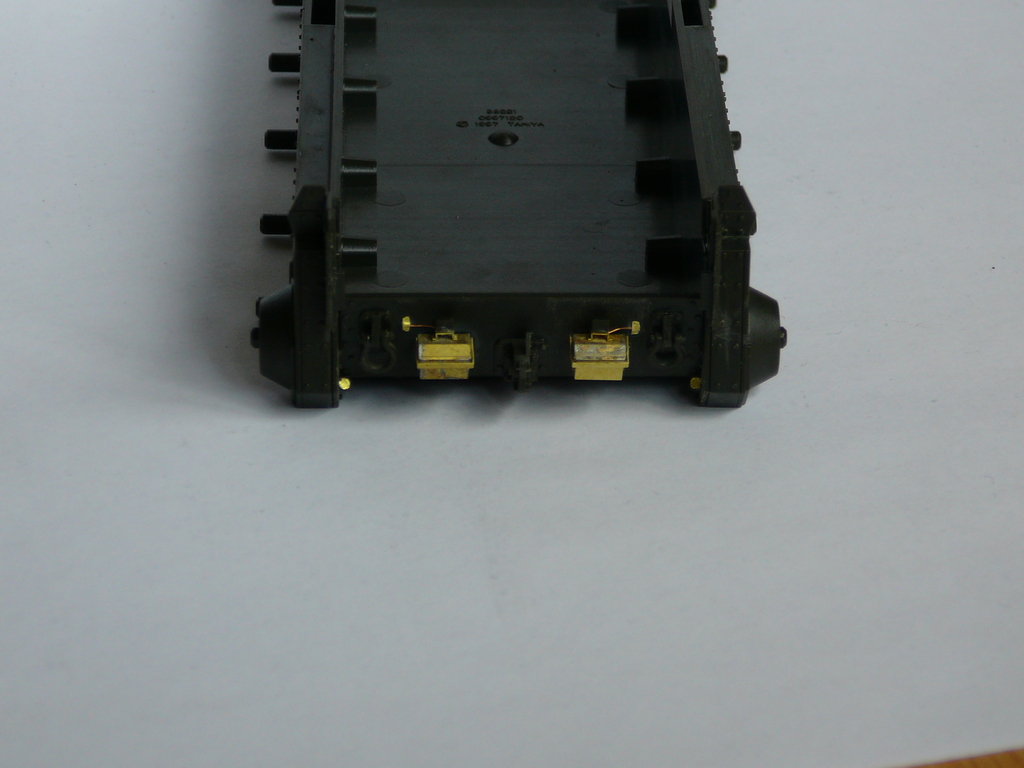
Commanders hatch. Note that the periscopes have been made from photoetch and than glued to the hatch. You can easily see, that there is some putty which still has to be smoothed a little...
The etchted brass-orgy has started. But, to be honest, no bigger problems with the ABER-parts. Very good fit, nice quality and easy to bend if you heat the parts properly.

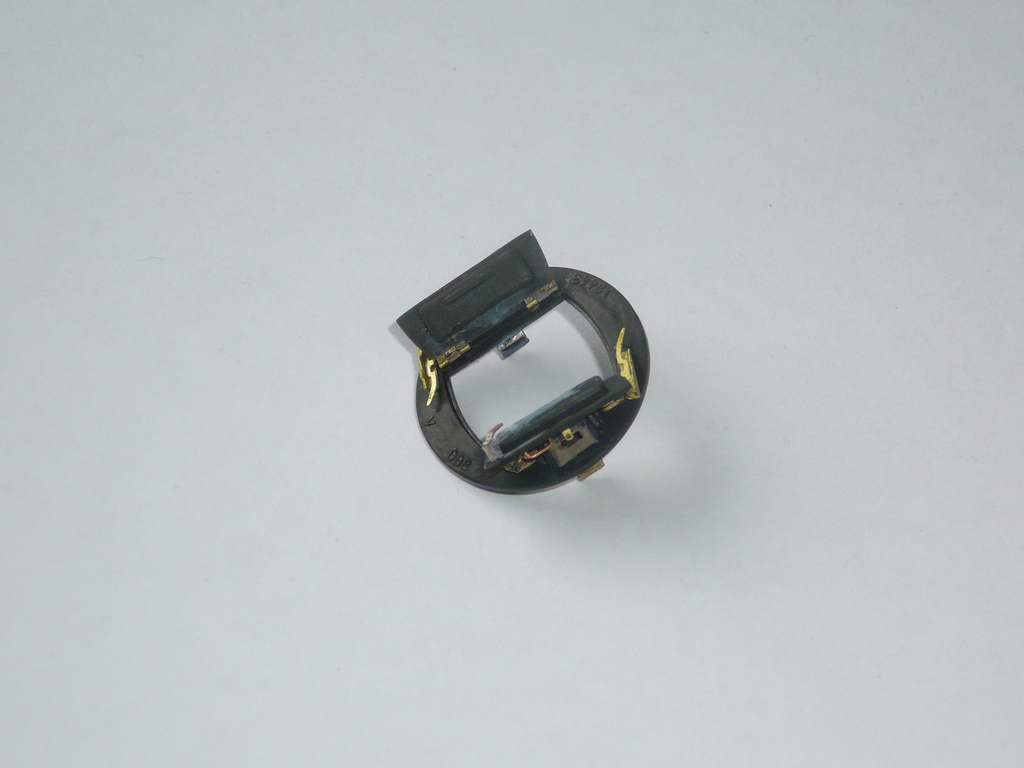
Same for this parts. Note that the Normandy cover is not glued yet.

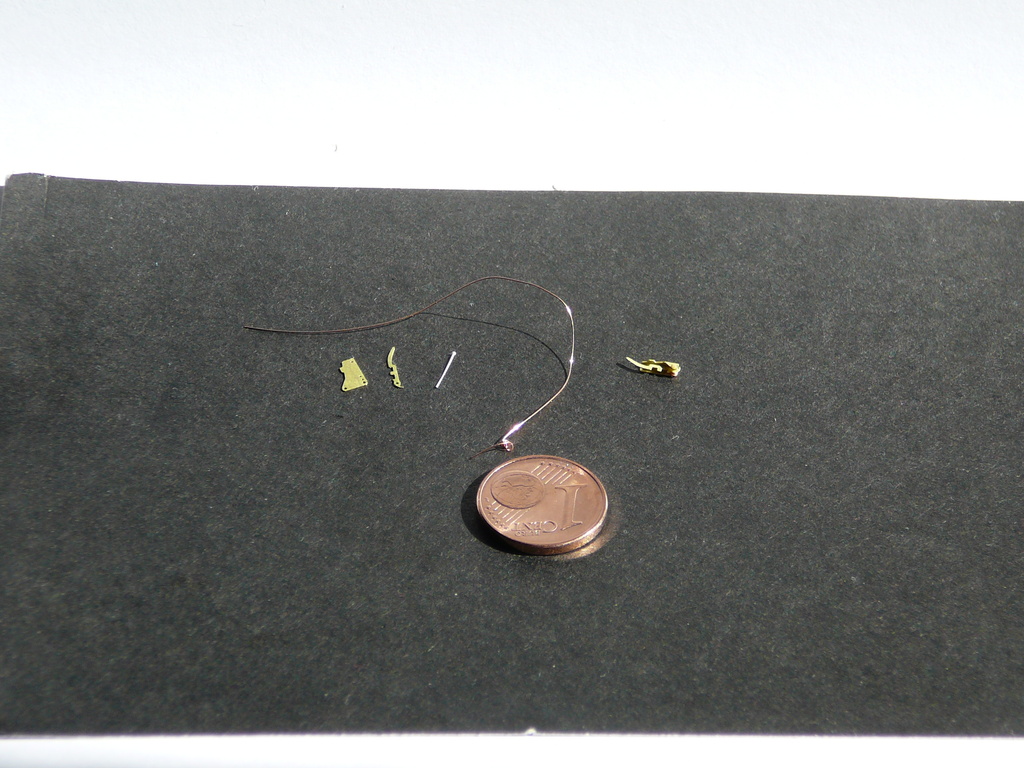
The small parts...


Hope you enjoyed some in-progress shots.
Best Regards
Dennis
Ohio, United States
Joined: March 06, 2006
KitMaker: 129 posts
Armorama: 118 posts
Posted: Saturday, October 30, 2010 - 01:49 AM UTC
Great so far, keep 'em coming

Arkansas, United States
Joined: June 29, 2009
KitMaker: 11,610 posts
Armorama: 7,843 posts
Posted: Saturday, October 30, 2010 - 08:02 AM UTC
I see some preshading going on with the deep wading snorkels. Do you plan on preshading the entire model? Clean assembly so far. Can't wait to see more.
Ideals are peaceful. History is violent.

#023
Zurich, Switzerland
Joined: March 13, 2009
KitMaker: 2,058 posts
Armorama: 1,656 posts
Posted: Sunday, October 31, 2010 - 08:03 PM UTC
Dennis, great work on the Cromwell. Lots of great details there. Many of them too fiddly for my patience I'm afraid... Looking forward to seeing more!
Stefan
Too many models - too little time...
Rheinland-Pfalz, Germany
Joined: November 27, 2005
KitMaker: 182 posts
Armorama: 180 posts
Posted: Monday, November 01, 2010 - 02:41 AM UTC
Hello,
Thank you all for the kind words. As I mentioned, i just wanted to test the photo uploader but i`m quite happy that some people like the photos.
@ Stefan: There are few things I enjoy as much as working with etched parts. I love brass. And in this case it was not to fiddly, only the clean-up took its time. The ABER-parts are really nice ones, even the workable parts went together very easily.
@ Matt:
Quoted Text
I see some preshading going on with the deep wading snorkels. Do you plan on preshading the entire model? Clean assembly so far. Can't wait to see more.
Sorry, but I didnt get it. English is not my first language so perhaps I`ve mistaken something. There is no preshading and no snorkel yet. If this was just a nice guess from you than you are partly wrong. There will be no deep-wading equipment. But i will try to use a more excessive kind of pre-shading on the sides of the turret because of the step angle of the armor.
Regards
Dennis
Rheinland-Pfalz, Germany
Joined: November 27, 2005
KitMaker: 182 posts
Armorama: 180 posts
Posted: Friday, December 17, 2010 - 04:05 AM UTC
Hello Guys,
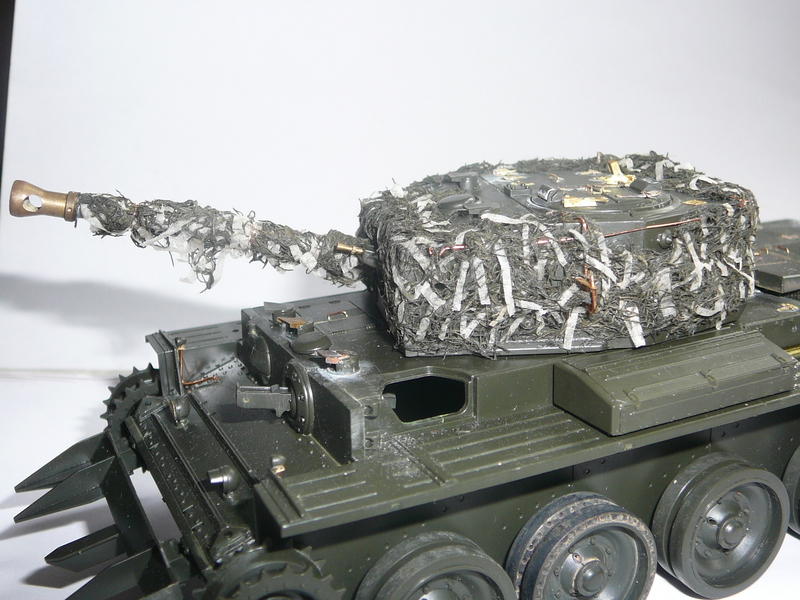
just one little update. You can see that I was still busy with the photoetched parts and the tracks. The tracks are the singlelink tracks from Hobby Boss- of course some work but well-detailed, easy to build, perfectly-fitting and the price is unbeatable. The only other thing I got was the figure which was build out of 4 different manufacturers. I`m trying to sculp the left arm by myself because I could not find anything suitable. Let`s see the photos.
Regards
Dennis


Rheinland-Pfalz, Germany
Joined: November 27, 2005
KitMaker: 182 posts
Armorama: 180 posts
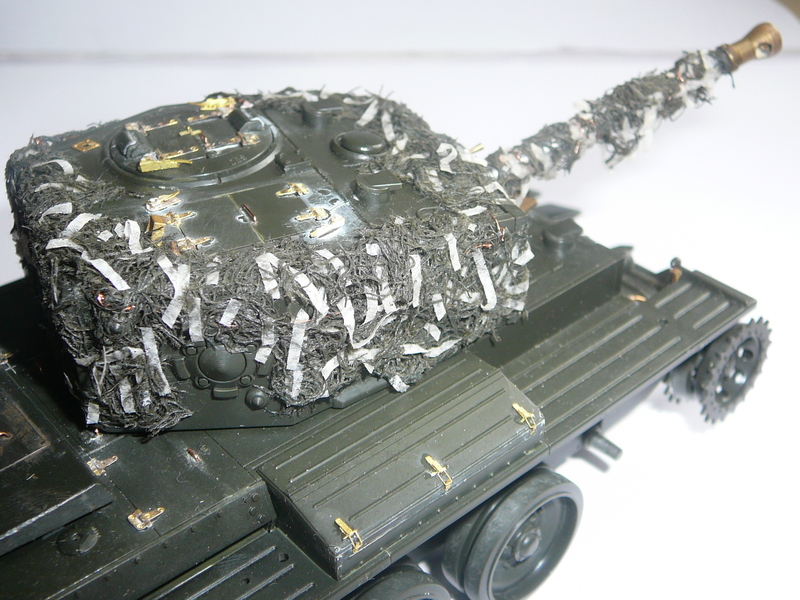
Posted: Saturday, July 14, 2012 - 07:13 AM UTC
Hello Folks,
some centurys ago I started Tamiya`s 1/35 Scale Cromwell Mk. IV as seen above.... and due to short time for modelling, it is not even now finished. But.... I managed to try a replication of the famous "Hessian Tape" camouflage netting on the turret these days. I used some Bundeswehr (German Army) wound bandage for the netting and small and thin strips of tea filters, both applied with watered white glue (PVA Glue?? Sorry, english is not my native tongue). So, here are the photos. Comments and critics are much appreciated.
Have a nice day all.
Best Regards
Dennis


Rheinland-Pfalz, Germany
Joined: November 27, 2005
KitMaker: 182 posts
Armorama: 180 posts
Posted: Saturday, July 14, 2012 - 08:08 AM UTC
Hello,
one little addition: one of the future crew members.

My first try to (partly) sculp a figure. It all looks very rough but is not all done yet. Way to go.
Best Regards
Dennis
Georgia, United States
Joined: June 19, 2007
KitMaker: 254 posts
Armorama: 76 posts
Posted: Sunday, July 15, 2012 - 12:13 AM UTC
That's looking real good, Dennis.
By the way what part of Rheinland-Pfalz are you from?
United States
Joined: February 19, 2009
KitMaker: 1,139 posts
Armorama: 1,100 posts
Posted: Sunday, July 15, 2012 - 12:25 AM UTC
[quote]Hello Folks,
some centurys ago I started Tamiya`s 1/35 Scale Cromwell Mk. IV as seen above.... and due to short time for modelling, it is not even now finished. But.... I managed to try a replication of the famous "Hessian Tape" camouflage netting on the turret these days. I used some Bundeswehr (German Army) wound bandage for the netting and small and thin strips of tea filters, both applied with watered white glue (PVA Glue?? Sorry, english is not my native tongue). So, here are the photos. Comments and critics are much appreciated.
Have a nice day all.
Best Regards
Dennis
[/quote
you do know you have the drive sproket in the wrong place?
Rheinland-Pfalz, Germany
Joined: November 27, 2005
KitMaker: 182 posts
Armorama: 180 posts
Posted: Sunday, July 15, 2012 - 01:24 AM UTC
you do know you have the drive sproket in the wrong place?[/quote]
Hello together,
@Nick: This is perhaps the most embarrasing moment throughout my whole modelling career

In fact I have not noticed it despite the fact, that I consultated a lot of references. Hell, how could this happen? At least, nothing is now glued in place, so I can change it easily. I could have told you something like "mixed it up in the hurry", but why not give honesty a try?!?
Thank you very much for your help.
@Jeff: Thank you very much. I am living in Mainz currently.
Best Regards
Dennis
England - East Anglia, United Kingdom
Joined: August 12, 2005
KitMaker: 14,499 posts
Armorama: 11,675 posts
Posted: Sunday, July 15, 2012 - 03:16 AM UTC
Hi Dennis,
Nice work.
I wouldn't bother with the Rhino though as they came along very late in the Normandy Campaign and most got dumped by the road side between Paris and Belgium!
Cheers
Al
'Action this Day'
Winston Spencer Churchill
Rheinland-Pfalz, Germany
Joined: November 27, 2005
KitMaker: 182 posts
Armorama: 180 posts
Posted: Sunday, July 15, 2012 - 03:33 AM UTC
Hi Alan,
Right you are. I just had a chat with a mate from Germany regarding this case and we came to the same conclusion. I have at least never seen a real combat photography with the hedgerow cutter mounted. As ist is not glued in place yet, I will simply leave it off. Thanks for your interest.
Best Regards
Dennis
California, United States
Joined: November 01, 2009
KitMaker: 657 posts
Armorama: 481 posts
Posted: Thursday, January 10, 2013 - 03:43 AM UTC
Dennis
Guten Morgen, Any progress on your cromwell I have 2 in the stash and 1 of them will be only my second armor build ever and first Allied tank. I am watching eagerly.
Eugene
" For those who fought for it Freedom has a flavor the protected will never know"
Italeri T-55, Syrian Army 6 Day War Taken out. 2%
AFV IDF Shot. 6 Day War 0%..
United States
Joined: June 23, 2008
KitMaker: 1,024 posts
Armorama: 753 posts
Posted: Thursday, January 10, 2013 - 08:05 AM UTC
I like the Photo etch details added, really brings up the kits details. One thing however, I think your drive sprocket are mixed up with the other wheel, the sprocket should be at the rear and the small one should be at the front!

#003
Donegal, Ireland
Joined: May 14, 2002
KitMaker: 9,763 posts
Armorama: 7,444 posts
Posted: Thursday, January 10, 2013 - 09:16 AM UTC
Very nice build Dennis. The hessian tape camo looks great. The figure also looks very promising.

IPMS Stockholm
"The problem with common sense, is that it is not that common"
Rheinland-Pfalz, Germany
Joined: November 27, 2005
KitMaker: 182 posts
Armorama: 180 posts
Posted: Saturday, January 12, 2013 - 03:03 AM UTC
Hello Gentlemen,
Thank You for your kind words.
@Eugene: Guten Tag. Unfortunately no progress on the Cromwell by today. The grandfather of my girlfriend died several days ago, so we will have to travel to attend the funeral these days. And as this would not be enough my car broke down today. So time to get my hands dirty today. No building this weekend. And, to get back to the topic, I struggle in the moment to find the right base color for the Cromwell. If you like to add some detail and if you don`t mind the extra work I can recommend the Bronco Tracks for the Cromwell. These are single link tracks which are quite lousy to clean up but come very cheap ( around 6-8 Dollars here in Germany)and have a far better definition than the kit supplied vinyl tracks. You can also use RB Models Brass barrels for the BESA machine guns and the Antenna Guards which will cost around 1 Dollar each. These will improve the slightly oversized/underdetailled kit parts. Even if you don`t feel like using some aftermarket parts the kit will build into a very nice and for its age very well detailed kit. The fit is perfect and I didn`t encounter any problems you should be aware of. The only thing I would really, really recommend are etched screens for the air outlet/intake covers. Tamiya supplied only some wavvy vinyl netting which is a real pain-in-the-a... It glues very hard but couriously is prone to melt and to stick everywhere, you have to cut it very, very precisely because the fittings are very narrow and it has no support on one side. So, if you can get your hands on the etched screens from Tamiya himself which comes for around 4-5 Dollars, you should give it a try; for appearance and for handling as well. I don`t like to talk about "one has to" or "you must" in the field of ones hobby, but in this case I am pretty close to do so. The vinyl neting really is pretty crappy. Good luck, of course, on your build.
@Calvin: Thanky for your words. The photo-etched parts on this model were some nice load of work. The hinges of the turret hatches are moveable which is very nice for the painting process. I originally intended to use etched fenders as well, but, what should I say: I screwed them up. These were my first tryout on soldering which was not the best thing I have ever done. Sometimes you find your master. By now I think I could have handled them, because my technique (slightly) improved, but in these days the result was, to be honest, only of value as a kind of modern art.
The wheels are corrected by now. I have been already made aware of this and got some red blushes on my face. I don`t know how this could have happend because I really did some research on this vehicle. Nevertheless thanks for your hint.
@Frank: Thanky you for your words. I`ve discovered that I really enjoy modifying my figures a little bit. In this case it was also unavoidable because most of the british tank crews available seem to be made to fit the sherman variants. So some putty on the arms are the minimal amount of work you have to consider. I really suck at figure painting so don`t expect a masterpiece. But we will see.
I hope, I will find some minutes to start painting when times are somewhat calmer.
Best regards
Dennis
United States
Joined: June 23, 2008
KitMaker: 1,024 posts
Armorama: 753 posts
Posted: Saturday, January 12, 2013 - 06:47 PM UTC
P.E can be such a pain at times, me coming back into the hobby after a few years, I have a hard time with it myself. But your work seems to have paid off! The hessian netting is a bit of art itself. Have your technique bookmarked for future reference

Rheinland-Pfalz, Germany
Joined: November 27, 2005
KitMaker: 182 posts
Armorama: 180 posts
Posted: Tuesday, May 07, 2013 - 04:06 AM UTC
Hello everybody,
not to much happened here for a while. But at least I managed to come off with a color which pleases me at the moment. I Have tried several tones and mixtures during the past weeks which only led to an increased consumption of paint remover. By now I have painted the turret to see how the color comes out and will paint the rest of tank these days. I`m a little afraid of the next painting stage because the color got a little dark and will need a perhaps very harsh and colorfull layer for the shadows and higlights. I hope, I will not overdo it. But we will see.

This is the color I chose for the Cromwell. Feel free to comment on the look.
Best Regards
Dennis
England - East Midlands, United Kingdom
Joined: April 29, 2004
KitMaker: 1,336 posts
Armorama: 1,137 posts
Posted: Tuesday, May 07, 2013 - 04:21 AM UTC
Dennis: "watered white glue" (PVA Glue??)"
Ya Richtig!

Schoen Gruess, & ausserdem, raffiniertes (:-?) arbeit!

Mitglied: East Mids Model Club Show: 24th March 2013
England - East Anglia, United Kingdom
Joined: August 12, 2005
KitMaker: 14,499 posts
Armorama: 11,675 posts
Posted: Tuesday, May 07, 2013 - 04:45 AM UTC
Hi Dennis,
Really great work, excellent progress, should be a real gem when you get finished.
Cheers
Al
'Action this Day'
Winston Spencer Churchill
Croatia Hrvatska
Joined: January 29, 2011
KitMaker: 977 posts
Armorama: 553 posts
Posted: Tuesday, May 07, 2013 - 04:56 AM UTC
Lovely Work so far Dennis, looking forward to see more!
Kind regards,Sven.
http://svenharjacekmodels.blogspot.com/
Rheinland-Pfalz, Germany
Joined: November 27, 2005
KitMaker: 182 posts
Armorama: 180 posts
Posted: Tuesday, May 07, 2013 - 09:20 PM UTC
Hello Gentlemen,
thanks for the kind words. I had a nice chat with a mate last night and I think I will use the perhaps a little dark colour as the shadow layer und work mostly with highlights. I`m courios which colour could be used to light the base colour drastically without changing the tone to much. I am afraid that a higlight with white or buff could shift the tone to much to the grey side. So perhaps I should give yellow a try to bring some life to the colour?? What do you think?
@Alan: I hope it will become a gem someday. At least it takes as long as a real gem would need to form in the earth...
@Jon: Thanks for your kind words and the hint on the glue. Sometimes it is indeed hard to find the right expressions in english for words, you use very often in german.
As for your german words: actually it would be: "Ja, richtig. Schönen Gruss und ausserdem: raffinierte Arbeit". As a typical german it was unavoidable to correct this..
You know: german regularity and thoroughness and rules and no humor and Angela and stuff. Just german...
Best regards
Dennis
#023
Zurich, Switzerland
Joined: March 13, 2009
KitMaker: 2,058 posts
Armorama: 1,656 posts
Posted: Tuesday, May 07, 2013 - 11:06 PM UTC
Dennis, hervorragende Arbeit! The camo net is really impressive. I've also used Swiss Army bandages for camo nets before...
Cheers!
Stefan
Too many models - too little time...


