_GOTOBOTTOM
Constructive Feedback
For in-progress or completed build photos. Give and get contructive feedback!
1/35 Russian 60t platform railcar
grave_digger
Visit this Community
Clare, Ireland
Joined: December 30, 2008
KitMaker: 952 posts
Armorama: 834 posts
Posted: Thursday, November 18, 2010 - 09:02 AM UTC
Evening gentlemen,
another wagon build, this time very quick one - also short in time and with my limited painting and finishing skills - I have not planned any masterpiece
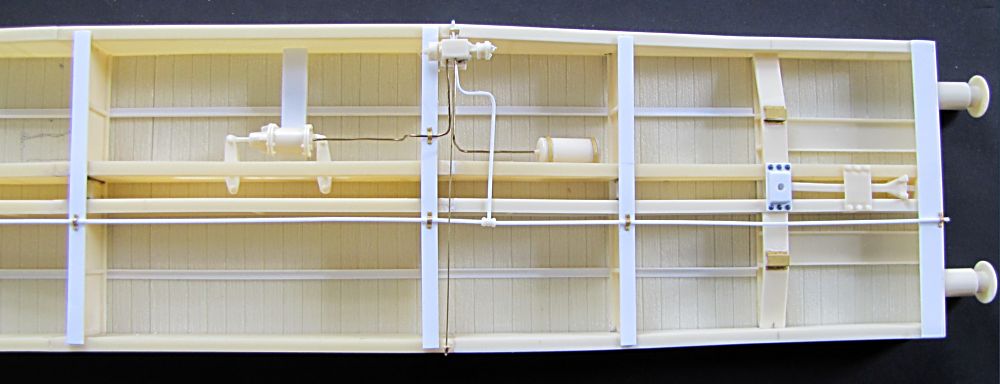
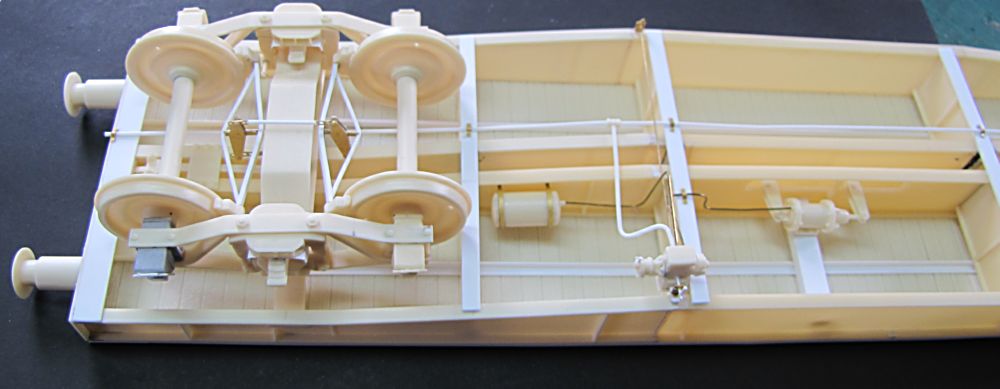
One of first type of Russian heavy flat wagon, built about 1930. It had welded side beams construction, and these beams were made from rolled sections later on. They were used often in Russian railway military service during WWII, and captured ones could be seen also in German service.
The kit:
There is 148 resin parts and 152 PE parts involved, so lets say this will be straight OOTB build


Parts:


Havent taken photo of PE sheets, so here is their design instead.


And decals


More to come
Cheers
Libor
Gorizont
Visit this Community
Sachsen, Germany
Joined: November 28, 2007
KitMaker: 1,462 posts
Armorama: 1,289 posts
Posted: Friday, November 19, 2010 - 03:01 AM UTC
Looks really interesting to me!
Also I should take a closer look at the wheel/axles-parts of the wagon during the build... they could be important for one of my other projects.
(a very big rail-car)

greetings...
Soeren
grave_digger
Visit this Community
Clare, Ireland
Joined: December 30, 2008
KitMaker: 952 posts
Armorama: 834 posts
Posted: Friday, November 19, 2010 - 11:59 AM UTC
Thank you Soeren. PM me your email address, I will send you some excelent drawings for them

Bogies assembly:
This car had bogies made on Diamond type base - licensed or just simply copied.
Both sides are very same and pretty simple, just small pins and brake hangers need an extra care, as they are really tiny parts. For first bogie I used simple plastic sheet for "spring trays", because PE ones came later.


Finished sides with springs mounted on main beam, and frame with bearing housings added then - all the same 4 times.


Finally I glued wheels on their axles (I had to clean and extend holes in wheels with 4,2mm diameter drill bit) also some care needed to keep right angle between axle and wheels.


Next step - brakes
Cheers
Libor

Gorizont
Visit this Community
Sachsen, Germany
Joined: November 28, 2007
KitMaker: 1,462 posts
Armorama: 1,289 posts
Posted: Sunday, November 21, 2010 - 06:08 AM UTC
Hi Libor, thanks for the offer with sending the images.
I´m not sure about the details of these parts with the "newer" axles/wheels of the more modern rail-cars. (I planned to build a (rocket/launch-vehicle-transporter car; scale is 1/144)
It will look a bit different to this one.

I will try to use your images and them from the company´s webpage to compare them with my images of the wheel-parts of the railcars.
Until now, there are only a few differences.

I forgot: Good start of your build! ;-)


greetings and thanks...
Soeren
grave_digger
Visit this Community
Clare, Ireland
Joined: December 30, 2008
KitMaker: 952 posts
Armorama: 834 posts
Posted: Sunday, November 21, 2010 - 08:17 AM UTC
Hi Soeren, thank you. Your idea sounds very interesting. I am not very good in this new stuff, but if there is anything I could help you with, just let me know

Continued with brakes.
There is a few PE parts involved, brake hangers, operating arms and so on. 1mm styrene rod 41mm long with the ends cut in sharp angle and 2mm channel simply bend and glued together. PE parts in between sets right proportions. Brake blocks (left and right) completed with PE hangers, glued at the ends of styrene construction and whole things hung on inner pins.


PE arms halves glued tohether (I could not find my solder to use )and completed always right+left with use of small pins, cut from 1mm styrene rod. Then again whole things assembled on the bogies.


Another piece of the same diameter rod connected both PE pieces below the bogie, and 0,3mm wire I used to make safety holders - if something breaks, the brake piece wont fall on the rails. 1,5mm angle strips 22mm long made up brake slides, and once again 1mm rod will connect brakes with a brake cylinder arms below the chassis.


Then surfacer, bit cleaning and polishing to remove glue marks, sharp edges etc., and finally some painting to give it nicer look. That is for today, thank you for your patience


Cheers
Libor

Gorizont
Visit this Community
Sachsen, Germany
Joined: November 28, 2007
KitMaker: 1,462 posts
Armorama: 1,289 posts
Posted: Monday, November 22, 2010 - 06:03 AM UTC
Hi Libor, the actual status of your build looks great!
Also it seems, that you made some scratch-made parts.
Yes, it looks good!

For my soviet rocket/ launch-vehicle-transporter-car I have no exact plans, but I also will use your images for comparison to the "more modern" (since the 1960´s) vehicles images.
(I have a lot of them - including the Proton-rocket (the launcher of some of the Venera/ Venus-landers))

greetings...
Soeren
grave_digger
Visit this Community
Clare, Ireland
Joined: December 30, 2008
KitMaker: 952 posts
Armorama: 834 posts
Posted: Tuesday, November 23, 2010 - 02:01 AM UTC
Hi Soeren,
thank you. That sounds very good - I have seen similar Russian stuff actually, missile launched from train car - but have to find the pictures
Cheers
Libor
Gorizont
Visit this Community
Sachsen, Germany
Joined: November 28, 2007
KitMaker: 1,462 posts
Armorama: 1,289 posts
Posted: Tuesday, November 23, 2010 - 06:56 AM UTC
Hi Libor, the "planned-by me" launch-vehicle and its transport-vehicle were not -rail-launched-.
I will take a look and perhaps I will "in-direcly" relink the images to here. (links only)
There are some small differences to the "modern vehicles", but as good as possible I will use your images.
You don´t need to make some "special" images for me.

greetings and thanks!
Soeren
wildsgt
Visit this Community
Kentucky, United States
Joined: May 27, 2007
KitMaker: 327 posts
Armorama: 259 posts
Posted: Tuesday, November 23, 2010 - 07:23 AM UTC
Great detail work on bracks.I will watch this build.GREAT WORK
grave_digger
Visit this Community
Clare, Ireland
Joined: December 30, 2008
KitMaker: 952 posts
Armorama: 834 posts
Posted: Wednesday, November 24, 2010 - 09:25 AM UTC
Hi Soeren, thank you, now I see. Any pictures linked would be welcome - always interested to see such stuff
Thank you for your kind words Bill

Frame
I started building the frame in sections, however I think it would be more clever to glue lenghtwise beams together first, then add ends, and then continue with cross beams and reinforcements. Anyway, in any case, flat working surface is a need, and also keeping the right angle in any corner is necessary.


As mentioned, I started in sections and added floor plates simultaneously. There are two different lenght floors, but order does not matter. Only two pieces have channels bellow, and they are supposed to be mounted at the ends.


continued section by section, styrene angles (floor girgers) and styrene strips for crossbeams from the box used to finish the most of chassis.


PE slides for boggies mounted then


Cheers
Libor
Plasticbattle
#003
Visit this Community
Donegal, Ireland
Joined: May 14, 2002
KitMaker: 9,763 posts
Armorama: 7,444 posts
Posted: Wednesday, November 24, 2010 - 09:57 AM UTC
Hi Libor. Nice start to the build. The kit looks like a winner .. some lovely details ... especially on the boogies.

Quoted Text

They were used often in Russian railway military service during WWII, and captured ones could be seen also in German service.


Was this possible? I always thought that the two countries had different gauges and not compatible.
grave_digger
Visit this Community
Clare, Ireland
Joined: December 30, 2008
KitMaker: 952 posts
Armorama: 834 posts
Posted: Wednesday, November 24, 2010 - 12:13 PM UTC
Hi Frank, thank you for your kind comments. Yes, that is right, I will add here a few words written about it earlier by my friend modeller Adam Kuller:
During WWII these cars were used widely in military service by Russian Army and captured ones later by Germans. The Wermacht, on their progress East, changed the Russian gauge 1520mm for their own
( and usual in most Europe countries) 1435mm. Captured cars got narrower bogies to be used on new rails, and later on, when Germans were withdrawing, the Russians used these changed cars.
This was the way
I could not find anything especially for this one, but I have reference for smaller Russian 20t wagon - with Russian markings crossed and new German drawn instead. Also these cars or whole trains were called "Umspurzug" - train with changed gauge. This comes also as a decal option in the other kit
Cheers
Libor
grave_digger
Visit this Community
Clare, Ireland
Joined: December 30, 2008
KitMaker: 952 posts
Armorama: 834 posts
Posted: Friday, November 26, 2010 - 09:34 AM UTC
According to my last post, this is a type of car (recent build of my American friend Adam Kuller) I have documented also in German "Umspurzug" service with their markings


Brake system assembly:
Typical wagon brake equipment contains cylinder with arms, air tank, brake power switch - to set braking power of whole system. I used PE clamps to assembly air pipe, but it was also often put through holes in cross beams.


Assembled switch mounted on cross beam, cylinder with arms set in the slot, pins in the middle of arms are actually fit into beam - then I added cylinder hanger made from piece of styrene. Air tank fitted on beam wall using PE clamps.


Pieces - connectors and clamps - used to assembly air pipes, and plate with levers to manipulate brake power switch. Levers are optional from PE sheet or styrene rod, all connected to the switch with 0,4mm wire


Air line made from 1mm styrene rod, should end on both sides on the left, then other lines added - to connect all brake parts one to other.


Both bogies will be connected to cylinder arms on their side, using once again 1mm styrene rod from the box


Cheers
Libor
grave_digger
Visit this Community
Clare, Ireland
Joined: December 30, 2008
KitMaker: 952 posts
Armorama: 834 posts
Posted: Saturday, November 27, 2010 - 11:06 AM UTC
Very quick one for tonight. I added air valves, hoses (I replaced cats ones with tiny cable isolation to keep them flexible) and connectors. Also couplers and buffers assembled - the last ones could be kinda optional, once wagons were equiped with Willison type couplers (their implementation began in 1935, until then well known common screw couplings and buffers were in use) the buffers lost their purpose - sometimes removed, sometimes kept. Ti finish this step, I put on holders for coupler manipulating rod, the rod itself made from 0,4 mm wire, and the rest of the parts.


Cheers
Libor
collin26
Visit this Community
Connecticut, United States
Joined: March 24, 2007
KitMaker: 317 posts
Armorama: 259 posts
Posted: Saturday, November 27, 2010 - 04:36 PM UTC
Libor,
Really nice build. I like the looks of the small details in brass. Looking forward to the progress pics.
grave_digger
Visit this Community
Clare, Ireland
Joined: December 30, 2008
KitMaker: 952 posts
Armorama: 834 posts
Posted: Sunday, November 28, 2010 - 07:29 AM UTC
Hi Iain, thank you for your kind words
Cheers
Libor
grave_digger
Visit this Community
Clare, Ireland
Joined: December 30, 2008
KitMaker: 952 posts
Armorama: 834 posts
Posted: Sunday, November 28, 2010 - 10:24 PM UTC
Another small update, I have added more PE parts. These are actually stanchion holders, but so far I have not seen any of those platforms with stanchions mounted on. Anyway, there are here, every completed with 3 PE parts - can be soldered or glued, everything works fine.


Easy job to place them on, using a ruler to keep right distance between them - according to the instructions. Also tiny rings assembled this way.


Cheers
Libor
retiredyank
Visit this Community
Arkansas, United States
Joined: June 29, 2009
KitMaker: 11,610 posts
Armorama: 7,843 posts
Posted: Sunday, November 28, 2010 - 11:50 PM UTC
A wonderful bit of scratch-building libor. It all seems to be coming together well. Definitely have to keep up with this build.
grave_digger
Visit this Community
Clare, Ireland
Joined: December 30, 2008
KitMaker: 952 posts
Armorama: 834 posts
Posted: Monday, November 29, 2010 - 09:19 AM UTC
Thank you Matt for your kind comment. It goes fine together, very important thing was to keep right angle in any corner of the frame, working on large, flat surface to get whole chassis straight.
Cheers
Libor
JeanCorbeau
Visit this Community
Groningen, Netherlands
Joined: July 28, 2010
KitMaker: 8 posts
Armorama: 7 posts
Posted: Monday, November 29, 2010 - 10:08 AM UTC
Yes, it's looking very good,me like!
Though I'm a bit anxious to see your BR86 finished

Greetz from Groningen!

grave_digger
Visit this Community
Clare, Ireland
Joined: December 30, 2008
KitMaker: 952 posts
Armorama: 834 posts
Posted: Monday, November 29, 2010 - 11:22 PM UTC
Hi Jan, thank you very much. No doubt, BR86 wont be missed and forgoten
BTW - the cab on your BR52 looks stunning, great work there. I did not want to use much rust on my loco, which was actually just couple years old that time - but I really like the way you did in your cab
Cheers
Libor
jojogy
Visit this Community
Netherlands
Joined: July 10, 2007
KitMaker: 695 posts
Armorama: 111 posts
Posted: Wednesday, December 01, 2010 - 10:16 PM UTC
Hi Libor,

Great work, nice details and interesting to follow. Jan's BR52 is really a nice picture to see in real live.

Is everything what I see on the pictures included in the kit? I see some evergreenparts, that's why I ask

Cheers, Johanna
grave_digger
Visit this Community
Clare, Ireland
Joined: December 30, 2008
KitMaker: 952 posts
Armorama: 834 posts
Posted: Saturday, December 04, 2010 - 09:04 AM UTC
Hi Johanna,
thank you for the kind words.
Jan´s cab came along very nicely - love the worn off effect he used.
Styrene pieces used for building, yes, they are included in the kit - its actually common practice that many resin kits come with styrene, brass and everything needed to build a model. No update yet, but its coming soon
Cheers
Libor
JeanCorbeau
Visit this Community
Groningen, Netherlands
Joined: July 28, 2010
KitMaker: 8 posts
Armorama: 7 posts
Posted: Sunday, December 05, 2010 - 05:20 AM UTC
Well then, Johanna, Libor - you're very kind, but I guess that's about enough of my BR52! For those wanting to take a look: Click.

Let's go back to topic now - Libor, your turn again!

Cheerio!
7505
Visit this Community
New Hampshire, United States
Joined: February 03, 2002
KitMaker: 176 posts
Armorama: 140 posts
Posted: Sunday, December 05, 2010 - 10:20 AM UTC
First class build Libor. Those truck frames look like Arch Bar type used in America, are they a Soviet version of the Arch Bar?
 _GOTOTOP