Hong Kong S.A.R. / 繁體
Joined: August 12, 2010
KitMaker: 92 posts
Armorama: 80 posts
Posted: Saturday, November 20, 2010 - 12:15 AM UTC
Hi all,
While still experimenting with cammo netting and loose snow on my Strv 103B, might as well started work on the Strv 122.
The kit comes with a PE part for the light guard, IMHO which is way off. The light guard of the Strv 122 are made of round bars, which I scratch built here with Plastruct 0.6 mm Styr. round rod bend to shape.

Will keep you up to date on the progress,
Best regards,
Li
On the bench:
M1151 (Academy)
NegmaShot (AEF Design)
Correze, France
Joined: June 10, 2004
KitMaker: 5,329 posts
Armorama: 5,204 posts
Posted: Saturday, November 20, 2010 - 04:03 AM UTC
Interesting to read you managed to bend your styrene rods to build the light guards. I never succeeded in doing so. Could you please share your tip ?
TIA
Olivier
Visit my site Click the banner
"La reine des batailles, j'ai nommé l'infanterie"
Napoléon
Hong Kong S.A.R. / 繁體
Joined: August 12, 2010
KitMaker: 92 posts
Armorama: 80 posts
Posted: Saturday, November 20, 2010 - 11:07 PM UTC
Quoted Text
Interesting to read you managed to bend your styrene rods to build the light guards. I never succeeded in doing so. Could you please share your tip ?
TIA
Olivier
Thanks Olivier for the positive feedback.
Bending styr. rods I usually dip it in some really hot water to soften it up before bending or else it might break in the process, a flat plier comes in handy though tweezers can also do the trick depending on the thickness of the rod.
I leave the end longer so it would go into the hull and also serves to adjust the height of the frame.

Cheers,
Li
On the bench:
M1151 (Academy)
NegmaShot (AEF Design)
Correze, France
Joined: June 10, 2004
KitMaker: 5,329 posts
Armorama: 5,204 posts
Posted: Sunday, November 21, 2010 - 01:56 AM UTC
Thanks a lot Li,
I definitely have to try this.

Visit my site Click the banner
"La reine des batailles, j'ai nommé l'infanterie"
Napoléon
Texas, United States
Joined: March 05, 2003
KitMaker: 2,092 posts
Armorama: 1,607 posts
Posted: Sunday, November 21, 2010 - 04:07 PM UTC
Good tip. I'm with Oliver. It's hard to get bent styrene to stay bent. Looks comparable to the same thing done with metal rod.
Paul
Hong Kong S.A.R. / 繁體
Joined: August 12, 2010
KitMaker: 92 posts
Armorama: 80 posts
Posted: Monday, November 22, 2010 - 01:31 AM UTC
Hi all,
The trick in heat treatment of the styrene rod is each time you bent it, you have to hold it in the desired position till it cools off to set, or else it will rebound a little if you let loose too early.
So, its heat and cool, heat and cool, try it, its fun,
and practice makes perfect.
Cheers,
Li
On the bench:
M1151 (Academy)
NegmaShot (AEF Design)
Hong Kong S.A.R. / 繁體
Joined: August 12, 2010
KitMaker: 92 posts
Armorama: 80 posts
Posted: Monday, November 22, 2010 - 01:54 AM UTC
Hi all,
Assembly is virtually complete saves the side skirts which will be assembled latter.

since this is an early HB kit, assembly takes patience and watch out for parts D21 & D3, mine end up with a big gap and have to be refitted again.

Comments and suggestions are welcome,
Cheers,
Li
On the bench:
M1151 (Academy)
NegmaShot (AEF Design)
Hong Kong S.A.R. / 繁體
Joined: August 12, 2010
KitMaker: 92 posts
Armorama: 80 posts
Posted: Monday, November 22, 2010 - 11:07 PM UTC
Hi all,
The 122 is now painted light green and masked, preparing to receive the coat of dark green or Nato green.
Hope you enjoy the built so far,

Cheers,
Li
On the bench:
M1151 (Academy)
NegmaShot (AEF Design)
Jönköping, Sweden
Joined: March 03, 2002
KitMaker: 327 posts
Armorama: 259 posts
Posted: Tuesday, November 23, 2010 - 01:16 AM UTC
Nice build but, HB has made a mistake.
The strv 122 don't have the APU in the right rear corner of the hull.
Also, the commanders cupola tarp cover is the one rolled up in front of the hatch, the one to the rear, similar to the loaders tarp, should not be there.
http://www.primeportal.net/tanks/thord_wedman/strv_122//Thord
Hong Kong S.A.R. / 繁體
Joined: August 12, 2010
KitMaker: 92 posts
Armorama: 80 posts
Posted: Tuesday, November 23, 2010 - 02:52 AM UTC
Thank you Thord for the heads-up,
Didn't know that HB has made the mistake, just thought that its a new config.
The kit comes with the other parts for the rear, so its an easy switch, removing the tarp is easy too.
Best regards,
Li
On the bench:
M1151 (Academy)
NegmaShot (AEF Design)
Kronoberg, Sweden
Joined: January 13, 2009
KitMaker: 20 posts
Armorama: 19 posts
Posted: Tuesday, November 23, 2010 - 09:27 AM UTC
As Thord said.
The commanders folded tarpaulin (part no G1) is not used, only the roll up in front (part no G25), but the APC unit you can actually leave it as it is, if you want.
Hong Kong S.A.R. / 繁體
Joined: August 12, 2010
KitMaker: 92 posts
Armorama: 80 posts
Posted: Wednesday, November 24, 2010 - 02:05 AM UTC
Hi all,
Just finished the basic cammo pattern of the Strv 122, the light green looks a bit yellowish now, but my experience is that it will lean more on the green once washing and weathering has started.

Hope you enjoy this !
Comments and suggestions are welcome.
Best regards,
Li
On the bench:
M1151 (Academy)
NegmaShot (AEF Design)
Hong Kong S.A.R. / 繁體
Joined: August 12, 2010
KitMaker: 92 posts
Armorama: 80 posts
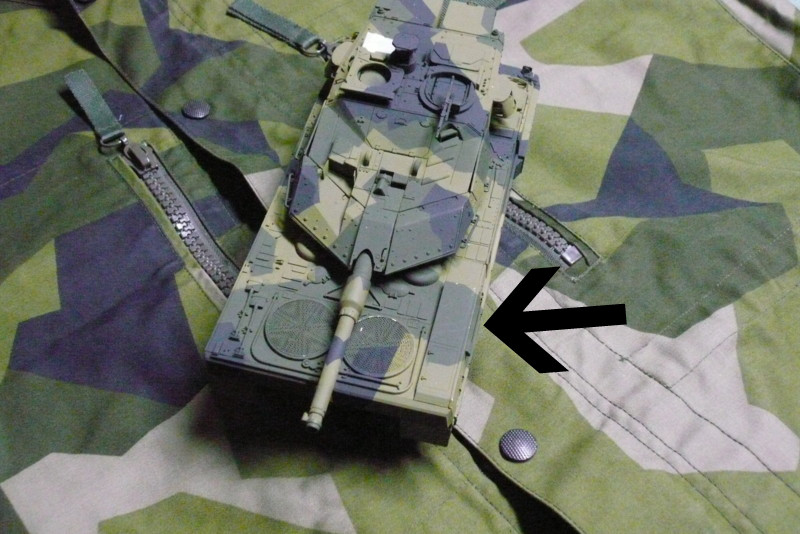
Posted: Wednesday, November 24, 2010 - 03:10 AM UTC
And here is a comparison with a Swedish M90 uniform.

the white patch is the white putty over the tarp area.
Cheers,
Li
On the bench:
M1151 (Academy)
NegmaShot (AEF Design)
Colorado, United States
Joined: February 06, 2002
KitMaker: 1,526 posts
Armorama: 1,294 posts
Posted: Wednesday, November 24, 2010 - 08:04 AM UTC
Great build and great painting job also! I'll be following your work since I plan to do one also. Keep up the good work and thanks for posting.
Happy modeling!
Warning: possible addiction may occur.
Currently on the bench: Maquette T-34/76
Hong Kong S.A.R. / 繁體
Joined: August 12, 2010
KitMaker: 92 posts
Armorama: 80 posts
Posted: Wednesday, November 24, 2010 - 09:33 PM UTC
Quoted Text
Great build and great painting job also! I'll be following your work since I plan to do one also. Keep up the good work and thanks for posting.
Thanks James for the positive feedback, except for a few minor flaws this is a reasonably good kit.
Modern tanks are huge, the Leo is nearly one and a half length of the Tiger I, so its well worth the money!
Cheers,
Li
On the bench:
M1151 (Academy)
NegmaShot (AEF Design)
Nordjylland, Denmark
Joined: January 30, 2006
KitMaker: 613 posts
Armorama: 508 posts
Posted: Wednesday, November 24, 2010 - 11:46 PM UTC
I like to commemorate you on your paint job, it looks smashing! I tried my hands on this before but did not get it as close as you have done. Please tell about the paints, which brand, which mixes and so on.
One little point though. The box at the back on the right side of the hull is an APU box only found on Danish versions. I have the same kit as you have made this from and it does tell you to apply it, however it is a mistake. To my knowledge it is not found on the Swedish version
Hong Kong S.A.R. / 繁體
Joined: August 12, 2010
KitMaker: 92 posts
Armorama: 80 posts
Posted: Thursday, November 25, 2010 - 12:41 AM UTC
Hi Keo,
Thank you for your kind words, much appreciated.
For this built, I use only Tamiya Acrylic paint as follows;
Black is Nato Black(XF-69),
Light Green I mix Olive Green(XF-58) with Yellow(XF-3) at 1:1
Dark Green I mix Olive Green(XF-58) with Dark Green(XF-61) at 8:1,
To achieve your desired tone you add the darker color little by little or the other way round.
Hope this helps,
Best regards,
Li
On the bench:
M1151 (Academy)
NegmaShot (AEF Design)
Hong Kong S.A.R. / 繁體
Joined: August 12, 2010
KitMaker: 92 posts
Armorama: 80 posts
Posted: Sunday, November 28, 2010 - 11:14 PM UTC
Hi all,
Here's an update for the Strv 122,
The road wheels are all in place and weathered, the upper hull are all done and ready for the final touches, hope you enjoy the built so far,


Comments and suggestions are welcome,
Best regards,
Li
On the bench:
M1151 (Academy)
NegmaShot (AEF Design)
Seine-et-Marne, France
Joined: February 02, 2006
KitMaker: 130 posts
Armorama: 120 posts
Posted: Monday, November 29, 2010 - 12:33 AM UTC
very nice i like this ....
Pierric
Texas, United States
Joined: March 05, 2003
KitMaker: 2,092 posts
Armorama: 1,607 posts
Posted: Monday, November 29, 2010 - 01:26 AM UTC
Nice. Good job on the shading.
Paul
Hong Kong S.A.R. / 繁體
Joined: August 12, 2010
KitMaker: 92 posts
Armorama: 80 posts
Posted: Monday, November 29, 2010 - 02:08 AM UTC
Thank you Boudehen and Paul for the positive feedbacks,
Best regards,
Li
On the bench:
M1151 (Academy)
NegmaShot (AEF Design)
Correze, France
Joined: June 10, 2004
KitMaker: 5,329 posts
Armorama: 5,204 posts
Posted: Monday, November 29, 2010 - 08:02 AM UTC
Hi Li,
nice job on the camo and the removal of the APU ! This must not have been an easy step.
Olivier
Visit my site Click the banner
"La reine des batailles, j'ai nommé l'infanterie"
Napoléon
Alberta, Canada
Joined: July 23, 2010
KitMaker: 786 posts
Armorama: 753 posts
Posted: Monday, November 29, 2010 - 08:22 AM UTC
really cool looking vehicle and the camo paint makes it an interesting piece when finished. fun to see the tank sitting on the camouflage jacket for a comparison. the bending of the styrene rods worked really well and the how-to explanation is much appreciated. cheers for sharing, bd.
the opposite of courage in our society is not cowardice, it is conformity.
Nordrhein-Westfalen, Germany
Joined: August 01, 2006
KitMaker: 129 posts
Armorama: 113 posts
Posted: Monday, November 29, 2010 - 08:49 AM UTC
Looks super after the corrections!
Especially the camo colours are impressing.
I wonder that you all can build such a vehicle so quickly.
Simply great! I'm lookinjg forward to the weathered cat.
Harald
Colorado, United States
Joined: February 06, 2002
KitMaker: 1,526 posts
Armorama: 1,294 posts
Posted: Monday, November 29, 2010 - 10:06 AM UTC
Superb job! Your finished product looks great!! You really nailed the painting job.
Happy modeling!
Warning: possible addiction may occur.
Currently on the bench: Maquette T-34/76