_GOTOBOTTOM
Armor/AFV: Modern - USA
Modern Armor, AFVs, and Support vehicles.
Hosted by Darren Baker
Build Log: DML M1A2 w/ Legends Tusk II
HeavyArty
Visit this Community
Florida, United States
Joined: May 16, 2002
KitMaker: 17,694 posts
Armorama: 13,742 posts
Posted: Tuesday, January 25, 2011 - 07:44 AM UTC

Quoted Text

in typical fashion, I couldn't leave the model alone after I had declared it finished. Am I the only one who does this on a routine basis?


Nope, I do it all the time. To me, a model is never completely done. They can always be improved upon.


Quoted Text

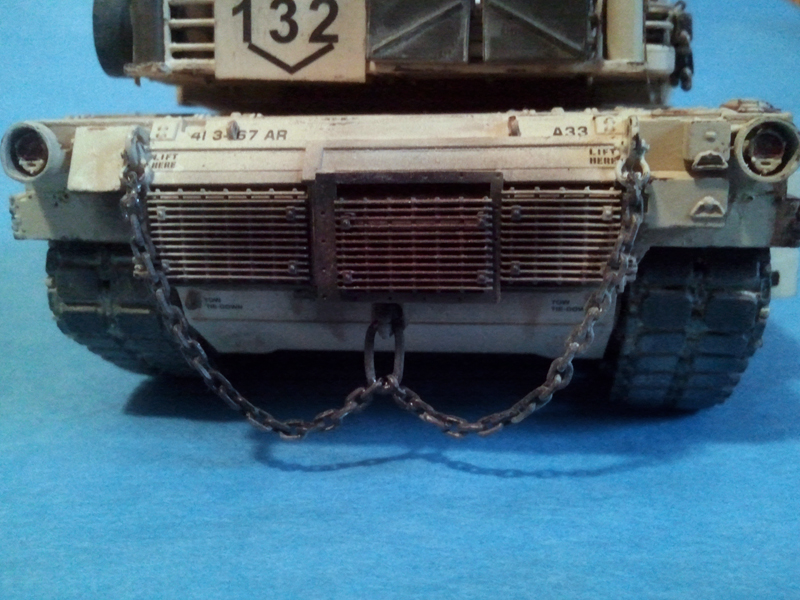
...TUSK with the home-brewed tow chain system. I had never seen that on a model before (although I'm sure somebody has done it).


I am actually adding the same thing on my current build, Bad Blessing (probably the one you saw in the Tankograd book), for a another customer.

Yours looks great. It adds some uniqueness to it. Its even better now.
Firecap4
Visit this Community
Georgia, United States
Joined: December 12, 2007
KitMaker: 309 posts
Armorama: 288 posts
Posted: Tuesday, January 25, 2011 - 02:32 PM UTC
Dustin, that looks really, really nice...love the chain. Your's and Gino's Abrams have really been great inspirations for my own TUSK II I am currently working on. The PE frame for the TC's .50 cal shield has been giving me a fit the last couple of days, but I think I've found a solution: I'm going to detach the two pieces that fold down across the front of the glass parts and attach them directly to the glass with Future, then take a page from the painting aircraft canopies and simply paint the edges of the glass Sand color. Also only putting the bottom row of tiles on the turret per the Tankograd TUSK book, so looking for appropriate sized bolts to put in place of the missing tiles on the tile frames.
charging_rhinos
Visit this Community
Utah, United States
Joined: June 16, 2010
KitMaker: 89 posts
Armorama: 76 posts
Posted: Tuesday, January 25, 2011 - 02:46 PM UTC
thanks Chuck. Yeah, that TC's shield was definitely a headache. It sounds like your plan would have made things a lot easier on me. I'm usually an aircraft modeler, so I wonder why I didn't think of your idea as well. It makes so much sense! Great idea for sure.

As for the rivets, I know that Everest makes some super thin round rods that might be an easy way to make some bolts, provided you're not too concerned with a round edge, rather than a full-on hex nut shape. Post up some pics of your build to show the progress!
HeavyArty
Visit this Community
Florida, United States
Joined: May 16, 2002
KitMaker: 17,694 posts
Armorama: 13,742 posts
Posted: Tuesday, January 25, 2011 - 02:54 PM UTC

Quoted Text

...only putting the bottom row of tiles on the turret per the Tankograd TUSK book, so looking for appropriate sized bolts to put in place of the missing tiles on the tile frames.


Chuck: Plastruct makes hex rod. All you have to do is slice it like a salami and add the bolt head to your project. You can add a washer in the same way using a slightly bigger rod before adding the bolt as well.
Firecap4
Visit this Community
Georgia, United States
Joined: December 12, 2007
KitMaker: 309 posts
Armorama: 288 posts
Posted: Tuesday, January 25, 2011 - 04:12 PM UTC

Quoted Text


Quoted Text

...only putting the bottom row of tiles on the turret per the Tankograd TUSK book, so looking for appropriate sized bolts to put in place of the missing tiles on the tile frames.


Chuck: Plastruct makes hex rod. All you have to do is slice it like a salami and add the bolt head to your project. You can add a washer in the same way using a slightly bigger rod before adding the bolt as well.


Yep, that's what I was thinking of using...gotta make the journey to the other side of Jacksonville; pretty sure Hobby World carries it.
trahe
Visit this Community
Virginia, United States
Joined: April 03, 2006
KitMaker: 1,158 posts
Armorama: 950 posts
Posted: Wednesday, January 26, 2011 - 12:34 AM UTC
Dustin, great work! Looks fantastic. Thanks for sharing!
Firecap4
Visit this Community
Georgia, United States
Joined: December 12, 2007
KitMaker: 309 posts
Armorama: 288 posts
Posted: Thursday, January 27, 2011 - 02:46 PM UTC

Quoted Text

thanks Chuck. Yeah, that TC's shield was definitely a headache. It sounds like your plan would have made things a lot easier on me. I'm usually an aircraft modeler, so I wonder why I didn't think of your idea as well. It makes so much sense! Great idea for sure.


Got my shield done tonight; definately the way to go for the TC shield.
charging_rhinos
Visit this Community
Utah, United States
Joined: June 16, 2010
KitMaker: 89 posts
Armorama: 76 posts
Posted: Thursday, January 27, 2011 - 02:53 PM UTC

Quoted Text

Got my shield done tonight; definately the way to go for the TC shield.


excellent! Glad to hear that you made it through that part without grabbing a hammer.
Firecap4
Visit this Community
Georgia, United States
Joined: December 12, 2007
KitMaker: 309 posts
Armorama: 288 posts
Posted: Thursday, January 27, 2011 - 02:56 PM UTC

Quoted Text


Quoted Text

Got my shield done tonight; definately the way to go for the TC shield.


excellent! Glad to hear that you made it through that part without grabbing a hammer.


The hammer is on standby for the Bronco tracks, LOL
majjanelson
Visit this Community
South Carolina, United States
Joined: December 14, 2006
KitMaker: 1,355 posts
Armorama: 979 posts
Posted: Friday, January 28, 2011 - 02:43 AM UTC
Dustin,

Your M1A2 SEP is very nice, but I wish I had seen this earlier.

There is a rectangular indentation on the LH engine access door just over the "4" in the "4I 3-67 AR". It should be smooth like the RH side. This is a mold error by DML that they have subsequently corrected.


It's not your fault, but I'm not sure how you can correct it now.
charging_rhinos
Visit this Community
Utah, United States
Joined: June 16, 2010
KitMaker: 89 posts
Armorama: 76 posts
Posted: Friday, January 28, 2011 - 03:03 AM UTC

Quoted Text

Dustin,

Your M1A2 SEP is very nice, but I wish I had seen this earlier.

There is a rectangular indentation on the LH engine access door just over the "4" in the "4I 3-67 AR". It should be smooth like the RH side. This is a mold error by DML that they have subsequently corrected.
It's not your fault, but I'm not sure how you can correct it now.


You know, I was wondering about that as i built the model up. i really appreciate the feedback, even if it's slightly after the fact. As Gino said earlier, a model is never truly done. Silly me for not remembering to check if that was supposed to be there or not before paint & decals. I thought of asking about that at least a dozen times during the build, but I never remembered it when at the computer, unfortunately.

I just took a closer look at it. Actually, i'm pretty sure i can get it filled and repainted without messing anything up far beyond repair. With all my newbie mistakes, I'm getting pretty handy with putty and small airbrush nozzles lately. Not sure if that's a thing to be proud of though... Anyway, thanks again for the critique. I really appreciate it. I'll post up some pics when I get it patched up.
 _GOTOTOP