_GOTOBOTTOM
Constructive Feedback
For in-progress or completed build photos. Give and get contructive feedback!
Tamiya TigerB Porsche
rfbaer
Visit this Community
Texas, United States
Joined: June 12, 2007
KitMaker: 1,866 posts
Armorama: 1,696 posts
Posted: Saturday, January 08, 2011 - 01:43 PM UTC
My first attempt at zimm, my first German subject in 30 years.......anyone see any glaring errors? I'm ready (I think) to start putting color on. Zimm is Milliput and a hot knife, tracks Friul.
In the buff:

And Krylon gray:
retiredyank
Visit this Community
Arkansas, United States
Joined: June 29, 2009
KitMaker: 11,610 posts
Armorama: 7,843 posts
Posted: Sunday, January 09, 2011 - 12:22 AM UTC
I can't see any goofs from this angle. Perhaps if you posted some photos from different angles...?
rfbaer
Visit this Community
Texas, United States
Joined: June 12, 2007
KitMaker: 1,866 posts
Armorama: 1,696 posts
Posted: Monday, January 10, 2011 - 05:13 AM UTC
Le me see what I can get out of my photobucket today.......


Best I have right now, thanks for looking!
exer
Visit this Community
Dublin, Ireland
Joined: November 27, 2004
KitMaker: 6,048 posts
Armorama: 4,619 posts
Posted: Monday, January 10, 2011 - 05:21 AM UTC
Interesting Russel I'm in the process of adding zimmerit to a Tiger one with Milliput but I'm using the Modelkasten stamps and rollers.

Tiger turret
I think I misread your post, I thought first that you used a hot knife on the milliput but I think actually you used milliput in places and the hot knife in others- yes? Very brave to use the hot knife I'd be too scared
Tojo72
Visit this Community
North Carolina, United States
Joined: June 06, 2006
KitMaker: 4,691 posts
Armorama: 3,509 posts
Posted: Tuesday, January 11, 2011 - 04:36 AM UTC
zimm looks good,tracks came out perfect also,keep posting.
rfbaer
Visit this Community
Texas, United States
Joined: June 12, 2007
KitMaker: 1,866 posts
Armorama: 1,696 posts
Posted: Tuesday, January 11, 2011 - 03:08 PM UTC
Thanks, Anthony.
Pat, your`second read is correct. I used Miliput on the large flat surfaces, and the hot knife in the places where my fingers wouldn't fit to spread the putty. The Milliput was formed with a pocket screwdriver (Snap-On, nothing but the best...).
I'll try and keep this one current, something I'm not terribly good at.
OK, back the the hardware store for some Krylon dunkelgelb.......
lukiftian
Visit this Community
British Columbia, Canada
Joined: March 12, 2010
KitMaker: 791 posts
Armorama: 592 posts
Posted: Wednesday, January 12, 2011 - 06:31 AM UTC
I don't think the primer coat was necessary. Zimmerit looks pretty good for a first try though, better than my first attempt.
rfbaer
Visit this Community
Texas, United States
Joined: June 12, 2007
KitMaker: 1,866 posts
Armorama: 1,696 posts
Posted: Sunday, January 16, 2011 - 08:33 AM UTC
Thanks Kevin. I primered because I've started using Krylon paint and am a little unsure about evenness of coverage. I also had the gray on hand and wanted to see the model in all one color. I have found that the Krylon primer gray dries as tight as Tamiya primer, and it's about 1/3 the price.
rfbaer
Visit this Community
Texas, United States
Joined: June 12, 2007
KitMaker: 1,866 posts
Armorama: 1,696 posts
Posted: Friday, January 28, 2011 - 03:49 AM UTC
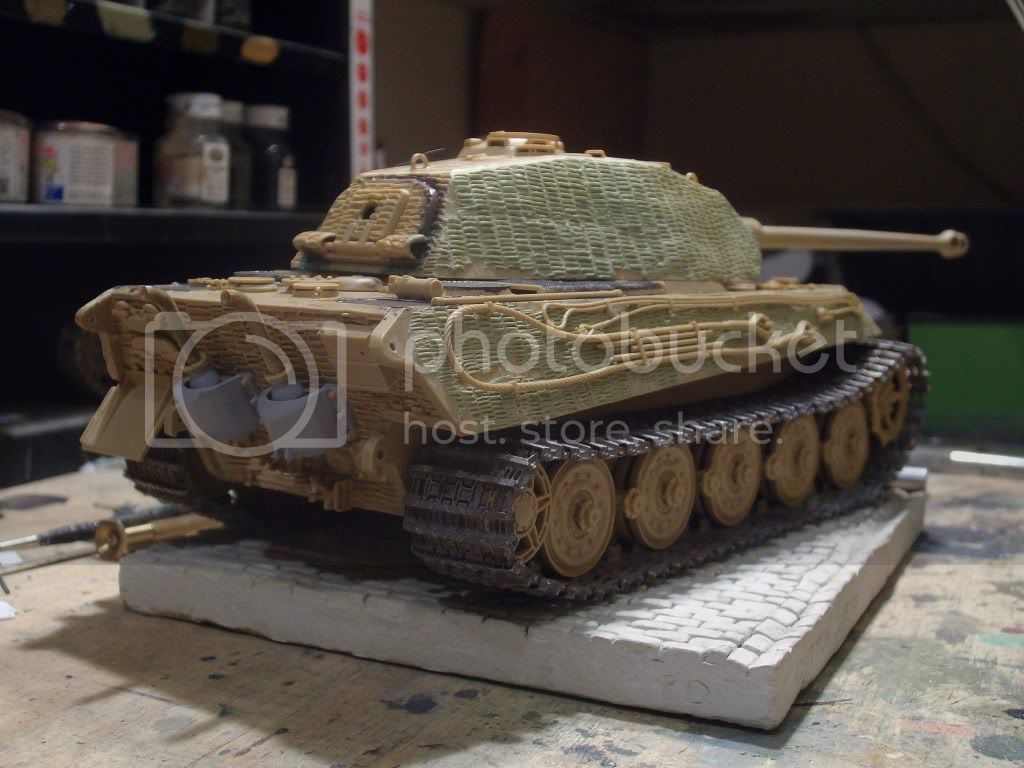
Base color and wash/filter is on. I'm seriously unsure about this, but not displeased........opinions? I like the basic color composition, but looks a little dark, maybe?
Color is Krylon acrylic spray tan (not my favorite, needs a hair dryer to get it to lay down) with a wash of Vallejo yellow and craft paint brown mix. No sealer yet, so if it's horrible, it can be remove fairly easily. Don't hold back here, please, I really need some opinions, and I've got thick skin.


Thaks for looking, as always!
meaty_hellhound
Visit this Community
Alberta, Canada
Joined: July 23, 2010
KitMaker: 786 posts
Armorama: 753 posts
Posted: Friday, January 28, 2011 - 04:57 AM UTC
hi Russel, great job on the zim... looks full pro.

hard to talk about the tan dunkelgelb from the photos as there is allows issues of how it was photographed and how our monitors interpret your pics but it looks within the right hue.

one thing i may suggest is to add a lighter tone to all the horizontal surfaces like the top of the turret and top of the hull. this will help make it less monotone for the later weathering.

cheers, bd.
pseudorealityx
Visit this Community
Georgia, United States
Joined: January 31, 2010
KitMaker: 2,191 posts
Armorama: 1,814 posts
Posted: Friday, January 28, 2011 - 05:05 AM UTC
It's possibly due to the lighting, but the wash isn't really perceivable in the photos. While I'm not one for extremely contrasting washes, maybe a little bit more intensity?

The zimmerit looks a bit thick to me. Not sure if you could sand it down a little to even it out.

I can't get myself interested enough to do my own zimmerit, so for the effort, especially your first, lots of credit is due.
rfbaer
Visit this Community
Texas, United States
Joined: June 12, 2007
KitMaker: 1,866 posts
Armorama: 1,696 posts
Posted: Friday, January 28, 2011 - 08:13 AM UTC
Thanks so much gentlemen, exactly what I am looking for. A lighter wash on the horozontal surfaces is on the schedule.
Zim is a tad thick on the turret sides in a couple of places.......I actually re-did some before priming, but I'm reluctant to sand it since I'll lose the texture if I do. I will probably hang some foliage on the turret sides instead of track links, keeping away from straight lines to key off of.
retiredyank
Visit this Community
Arkansas, United States
Joined: June 29, 2009
KitMaker: 11,610 posts
Armorama: 7,843 posts
Posted: Saturday, January 29, 2011 - 03:14 AM UTC
Looking good Russel. The lighter wash will definitely help give the paint a new dimension. I'm trying get over my zimerphobia and do a King Tiger. Remember, your paint thus far will contrast with the rest of the camo. This will affect how the paint is percieved by the eye.
lukiftian
Visit this Community
British Columbia, Canada
Joined: March 12, 2010
KitMaker: 791 posts
Armorama: 592 posts
Posted: Saturday, January 29, 2011 - 07:09 AM UTC
If the colour of the photo is true, then that's pretty close. Although Dunklegelb is a greenish shade, photos I've seen of the colour suggest a chemical change depending on what the paint composition was and what it was painted over, usually in very thin coats. It tended to look more toward the red than the green sometimes.
rfbaer
Visit this Community
Texas, United States
Joined: June 12, 2007
KitMaker: 1,866 posts
Armorama: 1,696 posts
Posted: Sunday, January 30, 2011 - 08:53 AM UTC
All good! I've got a couple of lighter washes on the horozontal surfaces, (our Euro friends might call the technique "mapping" but I'm not totally sure...) and it's starting to look "bleached" up top. Camo colors to follow.......
No pics as yet, this laptop/I-phone combo is a bit cumbersome....
lone-ronin
Visit this Community
Mississippi, United States
Joined: January 31, 2006
KitMaker: 147 posts
Armorama: 93 posts
Posted: Monday, January 31, 2011 - 06:24 PM UTC
How did you like working with the Milliput? I tried to use it on a Tiger I (P), and could not get it to act right. I am in the process of using Squadron white putty now, and it is about to whip me. The Tiger I (P) was definitely not the kit to use as a first attempt at zimmeritt...those @#%^&*$%^ conical bolts on the front plates are a royal pain to work around! LOL This and the Tamiya late Tiger I in the stash are probably going to be the end of my brief return to German armor.
rfbaer
Visit this Community
Texas, United States
Joined: June 12, 2007
KitMaker: 1,866 posts
Armorama: 1,696 posts
Posted: Sunday, February 06, 2011 - 04:37 AM UTC
The milliput was OK, just be sure and keep your tools and fingertips slightly wet. The big problem for me was getting the putty a uniform thickness- I actually failed in a couple of places on the turret and will have to cover it up with foliage or spare tracks, if I can find a pic of a P-turret with spare tracks.....
Hopefully I'll find time soon to get some more pics up, but not much done since my last progress pic.
rfbaer
Visit this Community
Texas, United States
Joined: June 12, 2007
KitMaker: 1,866 posts
Armorama: 1,696 posts
Posted: Thursday, June 09, 2011 - 05:17 AM UTC
Ready for a base, (finally!) possibly abandoned and parked next to a Sherman, just to give a size contrast.......
I think I'm done with the weathering unless I can find some fuel fillers and add some spillage.


Thanks for looking, and input welcomed!
retiredyank
Visit this Community
Arkansas, United States
Joined: June 29, 2009
KitMaker: 11,610 posts
Armorama: 7,843 posts
Posted: Thursday, June 09, 2011 - 06:32 AM UTC
Very nice. If you are going to make it abandoned, I would suggest adding some rust to it. European weather was pretty harsh.
rfbaer
Visit this Community
Texas, United States
Joined: June 12, 2007
KitMaker: 1,866 posts
Armorama: 1,696 posts
Posted: Thursday, June 09, 2011 - 07:16 AM UTC
Thanks, it's a possibility.
 _GOTOTOP