_GOTOBOTTOM
Armor/AFV: IDF [Israeli Defense Forces]
Armor and AFVs of the IDF army from 1947-today.
Hosted by Darren Baker
IDF M 60A1 Blazer ESCI 1/35 OOB
didgeboy
Visit this Community
Washington, United States
Joined: September 21, 2010
KitMaker: 1,846 posts
Armorama: 1,509 posts
Posted: Monday, February 07, 2011 - 05:10 PM UTC
This is my first ever build log, so comments are welcome but be nice. I started building when I was about 13. This is going to be my first serious build since about 1988, seriously. So here goes. This kit was purchased in Germany in 1990 when I was actually a tanker and prior to the first Gulf War. It has been sitting collecting dust since.


Although I did not know it the ESCI kit is a pretty well liked kit. The box art is pretty simple but nice, the parts trees are pretty well laid out and first glimpse of the instructions seems pretty straight forward albeit detailed.


My fist jump into this was cleaning up some minor moulding lines on the lower hull. The mould lines are very minor and clean up easily. The injector pin marks are minimal and the overall quality is better than I expected, having experienced the other ESCI kits of that era.
AussieReg
Staff MemberAssociate Editor
AUTOMODELER
#007
Visit this Community
Victoria, Australia
Joined: June 09, 2009
KitMaker: 8,156 posts
Armorama: 194 posts
Posted: Monday, February 07, 2011 - 05:40 PM UTC
Hi Damon. I think you're copy/pasting the wrong link from your gallery.
If you click on the pic you want to drop into the thread, a larger pic will appear. Beneath that larger pic is a "http" link, and to the right of that is a small square icon. Click on the icon and another link will appear beneath it. Copy/paste that link to your thread.


Hope that is easier than it sounds !!

Cheers, Damian
BLACKWATER
Visit this Community
Yunnan, China / 简体
Joined: August 05, 2010
KitMaker: 449 posts
Armorama: 441 posts
Posted: Tuesday, February 08, 2011 - 01:47 AM UTC
Although not see the pictures, but I will focus on its progress.
Cheers
Blackwater
dylans
Visit this Community
British Columbia, Canada
Joined: March 05, 2009
KitMaker: 394 posts
Armorama: 380 posts
Posted: Tuesday, February 08, 2011 - 06:44 AM UTC
nice, i will be watching this one.
I have that kit next in the to do pile, if i ever finish my merkava 3
please keep us updated
Dylan
didgeboy
Visit this Community
Washington, United States
Joined: September 21, 2010
KitMaker: 1,846 posts
Armorama: 1,509 posts
Posted: Saturday, February 12, 2011 - 06:37 AM UTC
So not much progress to report except all of the road wheels and drive sprockets are cleaned up. I will be detailing those later once they are glued together. I added the first piece of blazer this morning, to the lower hull. My only complaint there was it would have been nice to have some guide holes or something as gluing in place was tricky and not much surface to surface contact for the parts. Oh well. I have pictures to post but kitmaker says that I have exceeded my allowed space. If someone has a great idea for a free place to store photos that I can then upload here, please let me know. This is all new to me. Once I have a place to upload photos from we'll get em up and you can all tell me how things are going.


I also added the front tow hooks to the lower hull this morning too. God, I really love my new modeling area, and have added a computer to my workspace with itunes. Serious man cave stuff. Cheers.
Shanelangston
Visit this Community
Wyoming, United States
Joined: October 27, 2010
KitMaker: 85 posts
Armorama: 84 posts
Posted: Sunday, February 13, 2011 - 04:42 AM UTC
www.picasaweb.google.com

I use it myself, free, and some pretty great tools.
didgeboy
Visit this Community
Washington, United States
Joined: September 21, 2010
KitMaker: 1,846 posts
Armorama: 1,509 posts
Posted: Sunday, February 13, 2011 - 09:52 AM UTC
I had thought about picasa, but did not know if you could link to it here. Thank you for the heads up. Cheers.
didgeboy
Visit this Community
Washington, United States
Joined: September 21, 2010
KitMaker: 1,846 posts
Armorama: 1,509 posts
Posted: Sunday, February 27, 2011 - 02:41 PM UTC
Been away from the desk for a few weeks but managed to find some time this morning to get some building in. I put all of the road wheels together today and did some detail work on them too. As I mentioned earlier, weathering the road wheels is something that I find adds a bit more realism to armour models. If you have ever seen a tank out in the "field" you'll know what I am talking about.
So, the road wheels got their detail and then got added to the lower hull. The suspension arms and return rollers, drive sprockets and idler wheels were also added today. Not much accomplished but I find that much of my time is used up trimming and cleaning parts.


This is what the wheels looked like at the start of the day.


you can sort of see the detail here of the dents and "chips".


This is a good detail shot of a dent.


The wheels attached to the lower hull. You can see the "chipping" here pretty well.


and here as well.

So the lower hull is pretty much done minus the engine grille area. I have started work on the upper hull and will post photos when I get them. The best part of today as the I found out my camera has a macro zoom function so no more blurry close ups. I am still figuring out how to embed photos in these posts so please bear with me as I get the hang of it. That's all for now and my apologies for this being such a boring build log. Cheers.
didgeboy
Visit this Community
Washington, United States
Joined: September 21, 2010
KitMaker: 1,846 posts
Armorama: 1,509 posts
Posted: Saturday, March 05, 2011 - 05:59 AM UTC
Was able to get a bit more work done on Wed evening. Added a few more details to the lower hull and began work on the upper. Most of this build has been pretty straight forward with little needing to be done to make the parts fit correctly. I did need to do some minor shading/shaving to a few of the brackets on the upper hull near the "boxes".

The other item of note here is the phone(?) box (I am assuming that is what this is). The instructions show that it goes directly onto the fender, but all photos I have seen of actual vehicles show it mounted to the side of the engine deck above the fender. So I went with my instincts and the actuals.

The rest of the lower hull details were tow hooks, and the engine exhaust area, again pretty straight forward.


This is a close up of the call box/phone.

I have been enjoying this build as it is my first one in over 10yrs, and I am sure that I am rusty. The point of this blog here is just for me to be able to document what I am doing and get the experience cataloging and posting. So again, if this is boring for you, my apologies, but hey what are you going to do? Cheers.

rfbaer
Visit this Community
Texas, United States
Joined: June 12, 2007
KitMaker: 1,866 posts
Armorama: 1,696 posts
Posted: Sunday, March 06, 2011 - 05:41 AM UTC
Not boring to me........keep it up!
Anything IDF is neat, and the Magach series is probably my favorite.
didgeboy
Visit this Community
Washington, United States
Joined: September 21, 2010
KitMaker: 1,846 posts
Armorama: 1,509 posts
Posted: Sunday, March 06, 2011 - 05:17 PM UTC
Had some time today so I have added some more items to the upper hull. Today was the first day that I have encountered problems of any significance. The main issues I found today were the "extra" pieces that, from all of the pictures I can find, do NOT belong on the real deal. I have eliminated these from my build, unless someone can show me a great photo with them included on the actual beast. These are parts B64 and B?? seen here:


This is where they SHOULD go if indeed they actually belong ON this kit.


This is where the instructions tell you to put them. Keep this picture handy we'll be coming back to it in a minute. . .

So I managed to add the air cleaners and tool boxes to the upper hull. I am holding off adding the handles for these until later as I am sure they would just get broken off if I added them now. Although this does pose the problem of having to glue them from the top rather than the bottom, but we'll make it work.


The fit of the air cleaners is a bit rough and is going to require some putty to fill the holes there, as will also be needed where the missing parts will be missing. . . .So onto the glacis where we will be adding the lights and such.

Ahh, yes the lights. Fun thing that, as you can see from the previous picture of the instructions the upper hull all goes together at once, or so one would gather from the drawings. In my previous post I think I mentioned something about dry fitting (think measure twice, cut once) all parts prior to gluing. Well, needless to say I did NOT dry fit the lights or the brackets and the result is that the lights are sitting too low on their mount so the brackets look too high. Oh well. This is BEFORE the brackets are added. . .

And after . . .
right side.
and left side.

This is from the drivers hatch looking forward at the completed lights and brackets. . .


So all in all a decent day, if a short one. There were some piece today that had a bit of flash on them and seam lines that needed to be dealt with. The brackets also had some injection pin marks on them that needed to be addressed with the emory board. The little brace pieces for the brackets had some flash on it that was precarious to get off as those things are VERY flimsy. Other than those few issues today the whole thing is going swimmingly and I am pretty happy. Did I mention this is my first build in like 20+ years?? Cheers.
Wrongway_Joe
Visit this Community
Ohio, United States
Joined: March 11, 2004
KitMaker: 3 posts
Armorama: 1 posts
Posted: Monday, March 07, 2011 - 03:26 PM UTC

Quoted Text

Had some time today so I have added some more items to the upper hull. Today was the first day that I have encountered problems of any significance. The main issues I found today were the "extra" pieces that, from all of the pictures I can find, do NOT belong on the real deal. I have eliminated these from my build, unless someone can show me a great photo with them included on the actual beast. These are parts B64 and B?? seen here:


This is where they SHOULD go if indeed they actually belong ON this kit.


This is where the instructions tell you to put them. Keep this picture handy we'll be coming back to it in a minute. . .


The pipe is an exhaust that is routed from the engine through a heat exchanger in the crew compartment. See image 0034 on the M60 page at http://www.ferreamole.it/images/m60/m_60a1_02.htm.

Scalemodels.ru has a walkaround of the Blazer at the Yad La-Shiryon museum in Israel and the following picture of the area of the hull does not show the pipe. http://walkarounds.scalemodels.ru/v/walkarounds/afv/after_1950/m60_blazer/m60a1_blazer_0044.jpg.html

Not sure if they removed the pipe to install the reactive armor blocks or because they did not need the heater.

The build is looking good.

Wrongway_Joe
didgeboy
Visit this Community
Washington, United States
Joined: September 21, 2010
KitMaker: 1,846 posts
Armorama: 1,509 posts
Posted: Monday, March 07, 2011 - 06:01 PM UTC
Yea, that is what I found. I have a bunch of reference from the Lebanon war, yea I'm that old, that shows no pipe and thingy. I don't have any idea what it is for as I was never a DINO rider. So I am feeling pretty comfortable on this. I am hoping to get more done on thursday, so stay tuned for more updates. Not that this is particularly exciting but. . . .
rfbaer
Visit this Community
Texas, United States
Joined: June 12, 2007
KitMaker: 1,866 posts
Armorama: 1,696 posts
Posted: Tuesday, March 08, 2011 - 03:56 AM UTC
Re: the light guards, the Israeli crews use them as hand-holds when mounting, and they're frequently pulled down and forward from such use. That would enable you to "center them" and still maintain accuracy.
didgeboy
Visit this Community
Washington, United States
Joined: September 21, 2010
KitMaker: 1,846 posts
Armorama: 1,509 posts
Posted: Tuesday, March 08, 2011 - 10:11 AM UTC
Rus, can you what you mean by "center them". I understand about the pulling and such but I think I am missing the idea about HOW I would do that. Cheers.
didgeboy
Visit this Community
Washington, United States
Joined: September 21, 2010
KitMaker: 1,846 posts
Armorama: 1,509 posts
Posted: Monday, March 14, 2011 - 05:27 PM UTC
So tonight I had a bit of time to putz around so I started work on the blazer setup on the hull. The instructions show the steps here:


You can see the placement of where "they" say the blazer should go and the stretcher too. The unfortunate thing is that the blazer blocks on the right side of the drivers hatch are NOT where the instructions say they should go. While this is an OOB, I reserve the right to make corrections that I think are more accurate and true to the actual tank (so there).
Most of the blazer pieces go on smoothly and quickly. I had a harder time getting some of the blocks around the drivers hatch lined up quickly and there is some "floating" on a few that will be fixed in "post" with some filler.


Here you can see where most things ended up on the left side, which is pretty accurate.
and the right side where things are a bit different than the instructions lead you to believe.


Again most of this is straight forward, but any one who is building this for the first time, consult your visuals prior to adding the blazer blocks. I had a few issues with the glue tonight, as I am sure many of you have too on occasion. Mostly it stems from trying to get glue on the piece prior to it drying (which doesn't happen) and then re applying MORE glue to make sure it is on good and tight. Did I mention the floaters? Here is one of those issues:


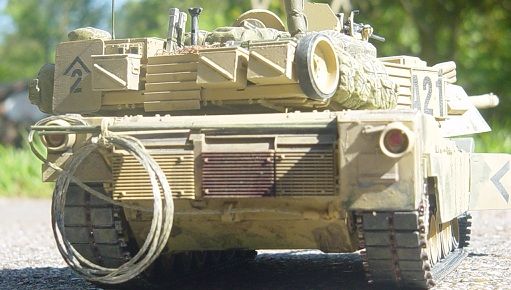
This is what the front slope looked like at the end of the night:


So that is the front glacis balzer kit and without too much headache. I really expected that to go much worse. I even managed to clean up that glue booger with some fine sand paper that I seem to be very fond of.
The last piece tonight was the start of the bustle rack, which I can already say is a giant pain in the a**! Seriously the most fiddly little pieces I have ever seen. AND there is the finest bit of flash on them. Serious pain to clean up. Trying to get the lower piece mated to the first rung was really frustrating so I left the rest of the bustle for another night. That and I think those pieces should really set up before adding the next and attempting to clean them up more.
So that is all for tonight. Hope you all are enjoying this as much as I am. Even the most frustrating couple of hours is like mothers milk right now. I am sooo enjoying getting back in to the hobby. Cheers.
didgeboy
Visit this Community
Washington, United States
Joined: September 21, 2010
KitMaker: 1,846 posts
Armorama: 1,509 posts
Posted: Monday, March 28, 2011 - 01:37 PM UTC
Ok, so last night was the first time in at least a week that I was able to spend some time. Needles to say things did not go as planned. I had been in the process of assembling the bustle rack, starting with the bottom part, which I had done at least a week before and was letting it "sit" for fear of the glue still being soft. I had planned on only leaving it for a day, but one of my employees quit suddenly (note to self, do not hire 23 year old girls, too much drama), which has left me working 7 days a week again. Woo Hoo.
So back to the bustle. I had trimmed the first two rungs of the bustle and the brackets and was starting to assemble, when I noticed that I had NO idea where the mesh netting was for the kit. Still have no clue, but the one I did find seemed too thin and flimsy to use. So I subbed in a piece of old nylon mesh I had and cut it too shape and viola. Well, not exactly. The second bracket has a support that juts out toward the turret back and the mesh is supped to fit over that and lay flat. This required some cutting and such and was quit the pain in the a**. But got that finished and it looked good enough to be stuffed with gear.

So, finished up the last rung at the top and then realized that I needed to secure the mesh to the rack. Not wanting to melt the entire assembly, I chose to reach for the CA glue. I had forgotten how much fun it is to unstick your fingers. . . .oh joy. Finally got that done and my fingers unstuck, and was ready to mount the finished rack to the turret. Now at this point I am going to say that the problems REALLY started to materialize. The instructions show that you are to add a piece to the right side of the rack so that it can mount to the turret. The problem is that they do not tell you WHICH part it is. Just a drawing of it attached and where to attach it to the turret. So after some choice words and about 15min later I finally figure out which piece it is. Cut, trim, glue. No problem.
Until I am ready to attach the rack to the turret. The brackets do not line up with the grooves in the turret bottom. Who the **** was going to mention the grooves? Fantastic. So I spent about 20min figuring out that even with trying to soften the glue this is NOT going to work. AT. ALL.
Solution, cut the whole damn thing apart and start over. So the rungs are destroyed, but I managed to save the brackets, which is the only good news here. I need to clean up the brackets and SCRATCHBUILD (you got that right? this was supposed to be OOB.) some new rungs for the bustle. So today I went and found some brass rod from the local ACE hardware and am hoping to have sometime on Friday to attempt this feat. Wish me luck. Cheers.
TankSGT
Visit this Community
New Jersey, United States
Joined: July 25, 2006
KitMaker: 1,139 posts
Armorama: 946 posts
Posted: Tuesday, March 29, 2011 - 04:59 AM UTC
Since I have this kit in my stash, I'm following this thread closely. I can tell you what this extra parts are for having crewed M60A1s and 3s. The long tube is indeed the heater exhaust but it has no connection to the engine except for a fuel line. It was a diesel space heater basicly with a combustion chamber and fan that heated the crew compartment. Unless you were moving with the hatches open, the draft would suck out all the warm air. CO gas could be a problem you had to make sure the exhaust pipes were well connected. they were unreliable and needed constant care if you wanted to be warm. A necessity on German winter nights.

The other bit looks like the bilge pump outlet pipe. The hull had a bilge pump part of the upgrade for tanks equiped with fording kits. My M60A1 came with a kit to allow it to ford to the turret top. Boy am I glad we never tried it. The bilge pump came in handy for getting water out of the hull that you would get from running large puddles that would flood over the lip of an open drivers hatch. All new drivers are baptized by being told to gun it going into a puddle.

Tom
didgeboy
Visit this Community
Washington, United States
Joined: September 21, 2010
KitMaker: 1,846 posts
Armorama: 1,509 posts
Posted: Tuesday, March 29, 2011 - 05:07 AM UTC
Got those extra bits figured out and will be covering those holes prior to painting. I was lucky enough to crew on M1A1's and heat was NEVER an issue in our tanks. Inside, it got so warm with the heater on it would put you to sleep. Outside we had the engine and the back deck for cooking and sleeping on. Toasty. So what unit were you with in Germany and when?
TankSGT
Visit this Community
New Jersey, United States
Joined: July 25, 2006
KitMaker: 1,139 posts
Armorama: 946 posts
Posted: Tuesday, March 29, 2011 - 02:31 PM UTC
I was in 1/11th ACR 1977-1979 A-trp, Fulda. I later joined the National Guard and finished my career as an M1 PSG. The back deck sure did get warm and the engine exhaust made a great clothes dryer. I'm using the ESCI M60A3 to build one of the A3s I commanded in the Guard. Its tough modeling the M1 style thermal shroud on the later A3s with TTS.

What unit and area were you stationed?

Tom
didgeboy
Visit this Community
Washington, United States
Joined: September 21, 2010
KitMaker: 1,846 posts
Armorama: 1,509 posts
Posted: Wednesday, March 30, 2011 - 03:46 AM UTC
4-8 Cav D Co. in Gelnhausen. Was one of the greatest adventures of my life and learned a lot about myself, life and people. And i still think riding beats walking anyday. . . cheers.
TankSGT
Visit this Community
New Jersey, United States
Joined: July 25, 2006
KitMaker: 1,139 posts
Armorama: 946 posts
Posted: Wednesday, March 30, 2011 - 01:28 PM UTC
We only had to walk to the motorpool. Armor crewman was the way to go. The Army was fairly rough back then and a lot of guys couldn't hang. But the only regrets I have was not getting off post early on, and there was this German girl, but it was the ride of a life time.

Tom
didgeboy
Visit this Community
Washington, United States
Joined: September 21, 2010
KitMaker: 1,846 posts
Armorama: 1,509 posts
Posted: Wednesday, March 30, 2011 - 01:58 PM UTC
you meant the tank, right?
TankSGT
Visit this Community
New Jersey, United States
Joined: July 25, 2006
KitMaker: 1,139 posts
Armorama: 946 posts
Posted: Thursday, March 31, 2011 - 03:25 AM UTC
Oh,... right the tank
rfbaer
Visit this Community
Texas, United States
Joined: June 12, 2007
KitMaker: 1,866 posts
Armorama: 1,696 posts
Posted: Sunday, April 03, 2011 - 04:44 AM UTC

Quoted Text

Rus, can you what you mean by "center them". I understand about the pulling and such but I think I am missing the idea about HOW I would do that. Cheers.


Sorry for the lack of a reply, my internet acces is spotty these days......
I was attempting to say that you could bring the guards down and forward, which would "center" the lights in the guard a little more. Michael Mass' book on the Magach 6B-Gal illustrates and explains this very nicely. I did a 6B-Gal a little while ago and found his book to be extremely helpful.
Still following, as best I can.
 _GOTOTOP