Chubut, Argentina
Joined: May 01, 2008
KitMaker: 83 posts
Armorama: 82 posts
Posted: Sunday, February 27, 2011 - 11:21 AM UTC
Michigan, United States
Joined: October 28, 2002
KitMaker: 4,021 posts
Armorama: 3,947 posts
Posted: Sunday, February 27, 2011 - 12:48 PM UTC
Thanks for posting your pics. May i suggest two corrections?
1) the antenna post is a mistake by Italeri. They provided a British mount. It should be an american mount
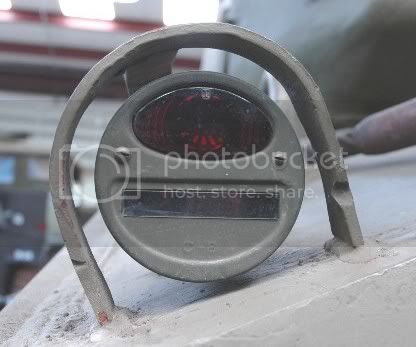
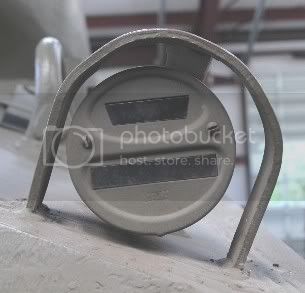
2) Only the top left oval light was red. The lower left light was black and both lenses on the right light were black
Roy Chow
Join AMPS!
www.amps-armor.org
Arkansas, United States
Joined: June 29, 2009
KitMaker: 11,610 posts
Armorama: 7,843 posts
Posted: Sunday, February 27, 2011 - 12:53 PM UTC
Excellent work despite the discrepensies. I still have to purchase a Sherman for a campaign. This has inspired me to go with the cheaper Italeri kit instead of the Dragon. Were there any major fit issues with this kit?
Ideals are peaceful. History is violent.
barkingdigger
 Associate Editor
#013
England - East Anglia, United Kingdom
Joined: June 20, 2008
KitMaker: 3,981 posts
Armorama: 3,403 posts
Posted: Sunday, February 27, 2011 - 08:56 PM UTC
Matt,
The Dragon kit is better (thus worth the money) but the old Italeri kit is still quite good with a little modelling effort - I've built several over the years.
The hull fits well, but be careful and do some dry-fitting around the front or you'll have trouble with that separate bolt strip. The tracks are tight and stiff - I've made stretching templates from scrap wood so I can gently heat them with a hairdryer to pre-set the bends for the sprocket and idler to reduce the stress on the suspension. (AM tracks can be used, but if the total cost reaches the DML level you lose any savings advantage...) On the turret the barrel has a strange "step" near the mantlet that isn't accurate - I sanded mine smooth with a bit of very fine wet'n'dry paper wrapped around the barrel and twisted back & forth by hand. The other turret boo-boo is the separate frame for the "pistol port" on the side - this was part of the casting on the real thing so needs blended in at the edges with some putty.
These minor snags aside, it still builds up to a decent model - especially if like me you search ebay for really cheap ones!
Tom
"Glue, or Glue Not - there is no Dry-Fit" - Yoda (original script from Return of the Jedi...)
Michigan, United States
Joined: October 28, 2002
KitMaker: 4,021 posts
Armorama: 3,947 posts
Posted: Sunday, February 27, 2011 - 11:24 PM UTC
Tom: the reason for the step in the barrel is that the Italeri designers used a de-milled MAP M4A1 that was on display in Italy. Its fake barrel had that step. Nice fidelity to detail by the designers but they didn't know they were looking at a poswar/de milled modification
Roy Chow
Join AMPS!
www.amps-armor.org
barkingdigger
Associate Editor #013
England - East Anglia, United Kingdom
Joined: June 20, 2008
KitMaker: 3,981 posts
Armorama: 3,403 posts
Posted: Monday, February 28, 2011 - 03:30 AM UTC
Roy,
Wow! That's a great story! I just thought it was mis-interpretation of the worn-bare section seen in photos. The truth is always weirder than fiction...
Tom
"Glue, or Glue Not - there is no Dry-Fit" - Yoda (original script from Return of the Jedi...)
British Columbia, Canada
Joined: October 16, 2006
KitMaker: 480 posts
Armorama: 399 posts
Posted: Monday, February 28, 2011 - 01:36 PM UTC
Omar, looks great . Good job on blending in the pistol port on the turret, I remember how that looked.
Matt, grab this old jewel if you can, the tracks are awful, the figure makes you cringe but it is a true classic on the lines of the old Monogram B-17G.
Michigan, United States
Joined: October 28, 2002
KitMaker: 4,021 posts
Armorama: 3,947 posts
Posted: Monday, February 28, 2011 - 03:11 PM UTC
Tom: This may very well be the tank that the designers used
http://www.modellismopiu.net/m+gallerie/main.php?g2_itemId=24629Note the barrel's step
Roy Chow
Join AMPS!
www.amps-armor.org
Missouri, United States
Joined: January 16, 2011
KitMaker: 96 posts
Armorama: 52 posts
Posted: Tuesday, March 01, 2011 - 02:07 AM UTC
Looks great!
I am starting a build of the Tamiya early Sherman soon.
What did you weather yours with?
California, United States
Joined: January 10, 2011
KitMaker: 135 posts
Armorama: 109 posts
Posted: Sunday, June 05, 2011 - 08:35 AM UTC
Roy--
Great pics of the taillights. But, do you have a pics of the British and US antenna mounts to show the difference? Thanks.
If I keep a lot of models in my stash, does this mean I will get to live till I finish them all?
Michigan, United States
Joined: October 28, 2002
KitMaker: 4,021 posts
Armorama: 3,947 posts
Posted: Sunday, June 05, 2011 - 09:45 AM UTC
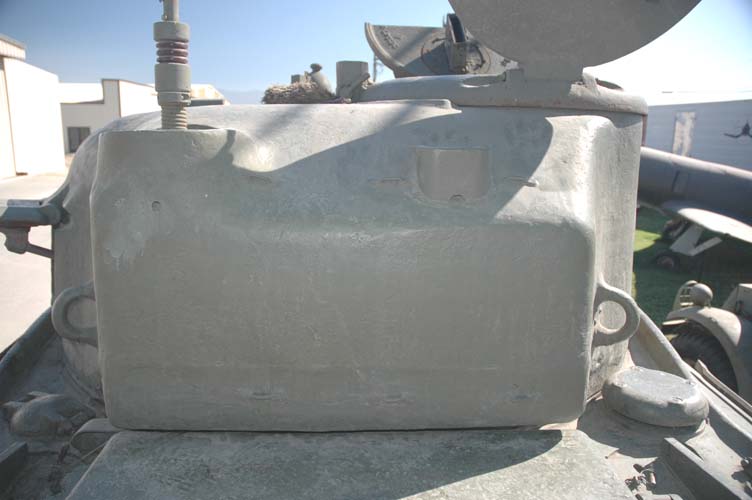
Here's your typical US antenna base

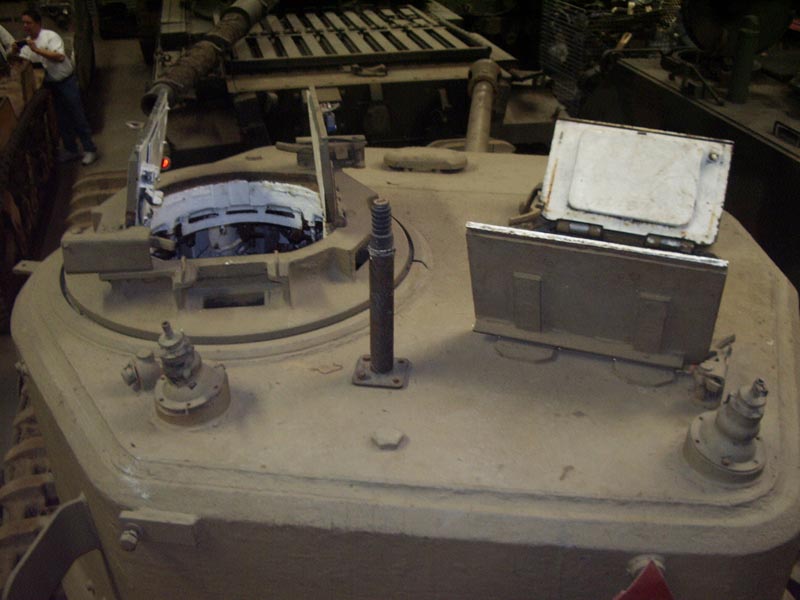
Here's your British antenna bases
Roy Chow
Join AMPS!
www.amps-armor.org
barkingdigger
Associate Editor #013
England - East Anglia, United Kingdom
Joined: June 20, 2008
KitMaker: 3,981 posts
Armorama: 3,403 posts
Posted: Sunday, June 05, 2011 - 10:31 AM UTC
Roy, that link to the M4A1 is great! (I've seen pics of the M32 behind it in the line-up, but never knew what else was there...)
Tom
"Glue, or Glue Not - there is no Dry-Fit" - Yoda (original script from Return of the Jedi...)
California, United States
Joined: January 10, 2011
KitMaker: 135 posts
Armorama: 109 posts
Posted: Wednesday, June 08, 2011 - 02:02 PM UTC
Roy--Thanks a lot. Also love the turret surface that you catch on your shots too.
If I keep a lot of models in my stash, does this mean I will get to live till I finish them all?


