ZTZ-99a1 Digital camouflage
British Columbia, Canada
Joined: March 05, 2009
KitMaker: 394 posts
Armorama: 380 posts
Posted: Thursday, March 10, 2011 - 07:22 AM UTC
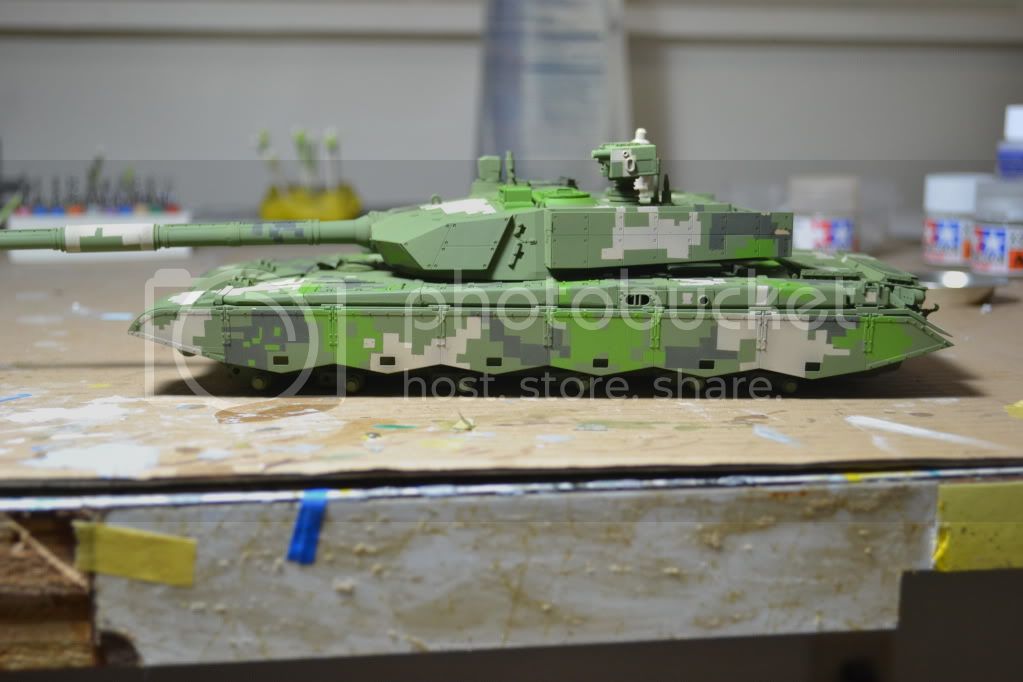
I love painting, it's my favorite part of the whole process. but this paintjob really kicked me in the butt. the first hurdle is the lousy bronco paint guide, which doesn't have a top view of the camo patern. masking was not too bad once i got the hang of it. but the worst part by far was REMOVING the masking tape.
every tiny little square of tamiya tape had to have the corner lifted then peeled off with a pair of tweezers, even though i was really careful i still managed to leave lots of marks where the tweezers dug into the paint.
I am a little discouraged for now but I'll be back at it later


even though i primed the P.E. bits some of the paint still peeled off

I was rather annoyed by this one


I think this one will have to spend some time on the shelf of shame for a while until i muster up the patience to finish it off.

#284
Northern Ireland, United Kingdom
Joined: October 04, 2006
KitMaker: 3,094 posts
Armorama: 2,942 posts
Posted: Thursday, March 10, 2011 - 09:16 AM UTC
Not the shelf of shame...surely it is too good for that?
To be honest it looks spot-on to me. This is a notoriously difficult camo to apply (I'm still trying to muster up the courage myself...) and there have only been a few attempts posted here. Yours is damn good and the paint, going by the references of the real thing, is spot on.
I think people always have problems with masking tape no matter how big or small the taped area is. My advice is to use the same constitency of paint you airbrushed with to touch up the exposed areas with a small brush. Then just add a bit of extra weathering in that area (if you plan to do that) to blend it in. Even drybrushing disguises it pretty well.
Hope you decide to keep it off the shelf of shame


!!
On The Bench:
Ethiopian BMP-1 (Trumpeter 1/35)
AMX-13/75 (Takom 1/35)
Texas, United States
Joined: June 29, 2010
KitMaker: 5,854 posts
Armorama: 4,817 posts
Posted: Thursday, March 10, 2011 - 10:08 AM UTC
I understand how you feel as I would feel the exact same way after going through such an experience. What I have trouble seeing is how successful I was at what I accomplished, especially when it is something that I have done for the first time. Looking at this here is what I see:
1) digital camo should make the tank look like it was built from lego bricks.
Accomplished
2) lack of top profile required guesswork on paint scheme, this should overall match the pattern of the rest of the tank.
Accomplished
3) pattern requires meticulous masking and careful removal of tape. this should leave hard edges
Accomplished
and care should be taken to minimize damage during removal of tape.
Accomplished
Being your first time doing this, it's a given that you will have a few nicks and that's where your skill sin touch-ups come in.
Well done on a mission accomplished Dylan!
British Columbia, Canada
Joined: March 05, 2009
KitMaker: 394 posts
Armorama: 380 posts
Posted: Thursday, March 10, 2011 - 04:39 PM UTC
thanks for the encouragement guys. I wrote that while i was pretty tired, so it seems like i am more disapointed with it than i am. although it is going to be waiting for the touchups. i also noticed that it is missing the dark green splotch on the front right of the turret, thats what i get for using the box art for reference.
#284
Northern Ireland, United Kingdom
Joined: October 04, 2006
KitMaker: 3,094 posts
Armorama: 2,942 posts
Posted: Friday, March 11, 2011 - 01:03 AM UTC
On The Bench:
Ethiopian BMP-1 (Trumpeter 1/35)
AMX-13/75 (Takom 1/35)
British Columbia, Canada
Joined: March 05, 2009
KitMaker: 394 posts
Armorama: 380 posts
Posted: Saturday, March 12, 2011 - 06:30 AM UTC
wow i sure could have used those a few days ago! thanks Karl.
Texas, United States
Joined: June 29, 2010
KitMaker: 5,854 posts
Armorama: 4,817 posts
Posted: Saturday, March 12, 2011 - 07:17 AM UTC
No kidding! Thanks for sharing Karl

Well now's the time to make any changes Dylan

British Columbia, Canada
Joined: March 05, 2009
KitMaker: 394 posts
Armorama: 380 posts
Posted: Monday, March 14, 2011 - 02:53 AM UTC
fixed the major problems and added some missing splotches of paint


#284
Northern Ireland, United Kingdom
Joined: October 04, 2006
KitMaker: 3,094 posts
Armorama: 2,942 posts
Posted: Monday, March 14, 2011 - 03:55 AM UTC
Looking good Dylan. Are you going for the parade ground look with the white strips on the tyres etc or just a more normal everyday service look?
On The Bench:
Ethiopian BMP-1 (Trumpeter 1/35)
AMX-13/75 (Takom 1/35)
British Columbia, Canada
Joined: March 05, 2009
KitMaker: 394 posts
Armorama: 380 posts
Posted: Monday, March 14, 2011 - 06:42 AM UTC
now with wheels.
Karl, I am going to dirty it up a bit but not too much. and I am going to skip the white stripes on the rims.


Arkansas, United States
Joined: June 29, 2009
KitMaker: 11,610 posts
Armorama: 7,843 posts
Posted: Monday, March 14, 2011 - 07:23 AM UTC
I've always been partial to the digital camo(though I haven't found time for it yet). You camo is very well done. Stick with what you have and move on. Remember, building a kit should first a foremost be fun.
Ideals are peaceful. History is violent.
British Columbia, Canada
Joined: March 05, 2009
KitMaker: 394 posts
Armorama: 380 posts
Posted: Tuesday, March 15, 2011 - 11:40 PM UTC
made a bit of progress today, first of was a wash of oils followed by some light drybrushing. I gave the lower hull, roadwheels and skirt armour a light coat of dust. I wanted to keep the weathering light but still give the tank some visual depth, i think i have achieved that.
the more i look at pictures of the real thing it becomes painfully aparent that the light green is too dark. I will just have to live with it but the next one will be a little better.
the tracks getting installed

some nice little detail on the gun

almost there


a light bit of dust on the rear of the tank

#284
Northern Ireland, United Kingdom
Joined: October 04, 2006
KitMaker: 3,094 posts
Armorama: 2,942 posts
Posted: Wednesday, March 16, 2011 - 05:40 AM UTC
That drybrushing and oil wash has really brought out the details and the dust is subtle. Nice work Dylan.
On The Bench:
Ethiopian BMP-1 (Trumpeter 1/35)
AMX-13/75 (Takom 1/35)
Texas, United States
Joined: June 29, 2010
KitMaker: 5,854 posts
Armorama: 4,817 posts
Posted: Wednesday, March 16, 2011 - 12:31 PM UTC
Looking good, keep the weathering at a minimal and this is going to look real nice when you're done.
British Columbia, Canada
Joined: March 05, 2009
KitMaker: 394 posts
Armorama: 380 posts
Posted: Wednesday, March 16, 2011 - 05:24 PM UTC
Thanks guys. the weathering is pretty much done. I have to add a small bit of soot in the exhaust area, and a little more dust on the tracks. I just finished putting on the lousiest decals known to man, hopefully they dont silver too bad.
I should have her done by tomorrow
D
Scotland, United Kingdom
Joined: March 22, 2011
KitMaker: 51 posts
Armorama: 42 posts
Posted: Wednesday, March 23, 2011 - 09:25 AM UTC
Really nice work. Put's me in the mood to do a modern tank build soon.
http://thescalefactor.blogspot.com/
Maryland, United States
Joined: May 04, 2007
KitMaker: 1,132 posts
Armorama: 1,123 posts
Posted: Saturday, April 02, 2011 - 07:29 AM UTC
Sweet work! Camo pattern has turned out well! Nicely done for sure, looks great with the subtle weathering and light dust, what a difference from the initial photos to the latest ones.
Thanks for sharing your work! Cheers -
Tim

Current projects:
AFV 8.8cm Flak 18 (35088) (paint stage)
Academy Warrior MCV (OIF) (final touches...then paint)
Next up:
Revell A-6E Intruder (?)
New Jersey, United States
Joined: November 02, 2009
KitMaker: 609 posts
Armorama: 433 posts
Posted: Sunday, April 03, 2011 - 12:49 AM UTC
Dylan - Phenomenal paint work. You must have the patience of a saint. What are your thoughts on the kit overall? I don't normally build modern vehicles, but a member of my model club brought the ZTZ-99B (82440) to our last meeting and the kit went right on to my list.
Removed by original poster on 04/03/11 - 20:57:28 (GMT).
British Columbia, Canada
Joined: March 05, 2009
KitMaker: 394 posts
Armorama: 380 posts
Posted: Sunday, April 03, 2011 - 10:08 AM UTC
thanks Mark and Tim. the finished tank is here
https://armorama.kitmaker.net/forums/173305&page=1 Bill: The kit went together fairly well, i had problems with the fenders not sitting straight and the fuel tanks on them not sitting even. but that was a pretty easy fix.
the tracks however were a nightmare and after messing around with them for a few hours i just binned the whole set . I stole a set of rubber tracks from a HB leopard 2 kit (which are a really close match) and then moved on with my life.
the only real complaint i had with the kit is the sprue gates. they are usually undercut and make cleaning up parts a real pain , and the small parts even more difficult to clean up.
I'll try to take a few photos of what i mean when i get home later tonight
D
New York, United States
Joined: June 14, 2010
KitMaker: 702 posts
Armorama: 604 posts
Posted: Sunday, April 03, 2011 - 10:28 AM UTC
Hey Dylan..your build turned out fantastic! I might have to dig out my ZTZ 99b and fix the damage my kitten caused after checking out your work...like it will match your work..yeah right!
I was going for the parade look, but your subtle weathering really makes the details pop!
Keep em coming!
North Carolina, United States
Joined: December 24, 2007
KitMaker: 462 posts
Armorama: 262 posts
Posted: Monday, April 04, 2011 - 06:04 AM UTC
dylan. the digitial camo looks spot on to me nice work.
RANGERS We Lead The Way
on the bench:
swamp phase dio
maldorain protector
Colorado, United States
Joined: January 20, 2005
KitMaker: 7,219 posts
Armorama: 6,097 posts
Posted: Tuesday, April 05, 2011 - 11:23 AM UTC
Quoted Text
...one or two of these might be 96G's but they are fairly similar and the pattern would probably be close enough...

... as far as I can tell comparing the pictures above and your tank you have it close and since no two patterns would be the same I'd call that spot on.
You're right. The two in the foreground are 96G's. The rear row are 99A1's.
But even so, notice how the two 96G's have identical schemes. While they are differen from the 99A1's, the 99A1's also sport identical schemes as well. This is a trenad that has been carried out for some years - tactical numbers can be removed or covered over (we used to cover our bumper numbers over with snadbags and hundred mile an hour tape in Berlin) leaving prying eyes wondering how many vehicles of each type you really have. If they're all identically painted, it makesdifferentiating and counting the number of vehicles over time more difficult.
We even followed this in Iraq, painting out all the previous treams skulls and flames from the gun trucks, and had no bumber numbers. For our own command and control, we could number the vehicles with tspe if we needed to.
At any rate, I wanted to send you a scan of the top, and realized I have the same damned kit! Since I'm nowhere near the painting stage yet I didn't even notice the ommission. Yours looks good. I hope mine turns out half as well...
A strong man stands up for himself; A stronger man stands up for others.
Admit nothing. Deny everything. Make counter-accusations.
He is not Khan who calls himself Khan. Afghan proverb
British Columbia, Canada
Joined: March 05, 2009
KitMaker: 394 posts
Armorama: 380 posts
Posted: Tuesday, April 05, 2011 - 12:40 PM UTC
Robert this might help you out a bit

I have one of the ZTZ 96 kits on order and i am about 1/4 the way through painting one of the ZBD 04 apc's
once you get the hang of replicating the pattern it isn't so daunting
D
I am doing this one next

Colorado, United States
Joined: January 20, 2005
KitMaker: 7,219 posts
Armorama: 6,097 posts
Posted: Tuesday, April 05, 2011 - 01:52 PM UTC
Thanks! That'll definitely come in handy when the time comes.
I wish I could edit my last post - I only see the numerous spelling errors with my glasses on.
I wonder if you have seen this thread?
https://armorama.kitmaker.net/forums/155187#1300750As mentioned, it is possible to somewhat correct the postion of the turret even after building it is complete.
Can't wait to see you get those others painted.
A strong man stands up for himself; A stronger man stands up for others.
Admit nothing. Deny everything. Make counter-accusations.
He is not Khan who calls himself Khan. Afghan proverb


