_GOTOBOTTOM
Figures
Military figures of all shapes and sizes.
Men of the 761st Tank Btn.
PolishBrigade12
Visit this Community
Washington, United States
Joined: January 31, 2009
KitMaker: 380 posts
Armorama: 366 posts
Posted: Sunday, May 15, 2011 - 05:34 PM UTC
Yes, I would say that gal really can paint, very vivid colors, beautiful work. But, not blending colors doesn't fit into my vernacular because I'm an oiler and the spectrum is infinite. Acrylics remind me too much of enamels and they aren't very transparent. Feathering colors together is easier with oils for me. No offense to you acrylic addicts, it's just what works for me.

Love your work Don, keep er rolling and thx for sharing. Cheers, Ski.
jashby
Visit this Community
Queensland, Australia
Joined: July 01, 2009
KitMaker: 278 posts
Armorama: 248 posts
Posted: Monday, May 16, 2011 - 12:06 AM UTC
Is it me or does the bloke with the pencil mo have a remarkable resemblance to Rocky Carroll (Director Leon Vance, NCIS)?

Beautiful work. Have to bookmark this thread for further referrence.

Thanks ProfP.
ProfessorP
Visit this Community
Minnesota, United States
Joined: February 20, 2007
KitMaker: 339 posts
Armorama: 325 posts
Posted: Friday, May 20, 2011 - 05:58 PM UTC
It's done...with a little more than 9 hours to spare even!

Here's a teaser shot until after tomorrow's show.


Results and final build report to follow soon.

Now off to bed...haven't had much sleep in the last couple of days.

PolishBrigade12
Visit this Community
Washington, United States
Joined: January 31, 2009
KitMaker: 380 posts
Armorama: 366 posts
Posted: Sunday, May 22, 2011 - 03:01 AM UTC
Now that wasn't nice, but I do understand and hopefully you'll have a ribbon to go with the next photo. Great work Don!


Cheers, Ski.
ProfessorP
Visit this Community
Minnesota, United States
Joined: February 20, 2007
KitMaker: 339 posts
Armorama: 325 posts
Posted: Sunday, May 22, 2011 - 05:31 PM UTC
OK everyone, thanks for your patience. I hadn't had much sleep at all in the last few days and when I finished the figures, I was really just too tired to snap a bunch of good photos. I also didn't want to jinx myself before the competition so all you got was a teaser!

In any case, the project is now complete and I'm pleased to show you all the final results here, with appropriate photos.


Final Build Log
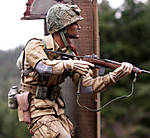
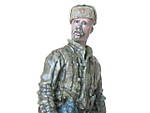
Jumping back a bit, following my last report on figure one, I did do some extra highlighting in order to make the seams in the uniform pop a bit more as well as the the top of some of the more prominent folds. I also added Captains bars to his helmet.

The second figure gave me fits during the last week and there were times I was convinced that I would not complete it in time for the competition. I had several setbacks and disappointments, likely due to fatigue, but probably just as much due to "relearning". I had great difficulty duplicating the colors or the "look" of the uniform that I had done on figure one, despite having written down the color mixes and ratios. Because of this, I essentially ended up painting large sections of the figure over in order to get the right colors and this slowed me down quite a bit, not to mention adding to my frustration level!

Once I had finally completed figure two, I painted the left shoulder area of both figures with some Future and when that had dried, I added Archer Transfers for the armored division patches. The 761st had custom division patches made that had their Battalion number stitched in, but some of my references also show that they could have just as likely had "blank" armored division patches. Since there was no way I was going to be able to paint in "761" to fit in that teeny tiny space, I opted for painting out the "3" in the transfer with a mix of yellow and white paint instead. Once dry, the pale yellow was given a thin glaze of raw sienna ink to add some richness and the patches were outlined with Khaki.

Display Base
(Sorry there are no "in progress" shots of the base construction as I was really crunched for time at this point! )

The idea for the base is that the men are standing in a muddy French field criss-crossed with tank tracks where the 761st sharpened their skills prior to heading off to battle. This would have been in November of '44, hence the winter gear.

I used a Thomas Art plinth base with a plaque that I had made at a local trophy shop for a very reasonable price. The groundwork for the base was created using Fast Maché which is a quicker drying version of Celluclay. I mixed it with water, white glue, sand and raw umber pigment to get a dark (rather than grey) textured mix and spread it onto the top of the base. A few patches of brown static grass were applied and using a section of track from my Sherman project, I put in a couple of treadmarks. I also removed the toothpicks locating the previously drilled holes for the figures and pressed their feet into the base to ensure they would not be "floating" on the groundwork once it was dry.

I used some cheap acrylic craft paints from Michael's to paint the base. After a dark earthy brown basecoat, I began drybrushing with lighter shades to bring out the tank tracks. After a couple of layers, I applied washes of dark brown ink mixed with Future to add depth to the track marks while at the same time making it look like very wet mud. I used a hair dryer to speed the drying process and then continued drybrushing with lighter shades of earth. This was to simulate slightly dryer mud on top and wet sloppy mud lower down. The static grass was drybrushed with pale browns and yellows to represent dead grass.

The figures were glued in place and I used artist pastels mixed alternately with Future, matte medium and plain water to weather them. The darker pastels were mixed with Future and applied where the feet meet the ground since this would be the wet mud. The lighter pastels were mixed with matte medium and applied slightly higher up for dried mud. A final mix of pastels was applied to the knees, seats, elbows, and helmets with plain water which allowed more flexibility to move it around or wash it off completely if I didn't like the effect.

Competition
I entered this piece in the Minnesota Military Figure Society "Boots and Treads II" show which uses the AMPS system of judging. Each entry is judged by a team of judges against specific criteria rather than against other models. Points are awarded based on the criteria met and awards are given according to the points earned.

It is with great pleasure that I can report that this piece earned a gold medal in the Advanced Figure category.


Thanks to everyone who supported this project with your suggestions, feedback and encouragement! As the project is now complete, this will be my last update but I'm happy to answer any questions about any part of the project that I failed to cover.

All the best and thanks again for following this project.

thomokiwi
Visit this Community
Christchurch, New Zealand
Joined: January 11, 2006
KitMaker: 438 posts
Armorama: 359 posts
Posted: Sunday, May 22, 2011 - 05:55 PM UTC
Well deserved, awesome painting
AgentG
Visit this Community
Nevada, United States
Joined: December 21, 2008
KitMaker: 1,109 posts
Armorama: 1,095 posts
Posted: Monday, May 23, 2011 - 02:12 PM UTC
Bravo!

G
Big-John
Visit this Community
Ohio, United States
Joined: August 12, 2010
KitMaker: 731 posts
Armorama: 711 posts
Posted: Monday, May 23, 2011 - 02:22 PM UTC
Don,

Thank you very much for sharing this project with us!

This is an inspiration to many of us.

Congratulations on your Gold Medal!
Belt_Fed
Visit this Community
New Jersey, United States
Joined: February 02, 2008
KitMaker: 1,388 posts
Armorama: 1,325 posts
Posted: Monday, May 23, 2011 - 02:48 PM UTC
Don-
I am currently working on some US tankers for my Jumbo from Tasca and am running into a lot of trouble with the shading and highlighting of their uniforms. Can you please type up a walkthrough on how you painted yours? It would be VERY much appreciated!
ProfessorP
Visit this Community
Minnesota, United States
Joined: February 20, 2007
KitMaker: 339 posts
Armorama: 325 posts
Posted: Monday, May 23, 2011 - 03:35 PM UTC
Jon, the process I went through in painting the uniforms wasn't a "clean" one...I had to remember old techniques and develop new ones in order to get a finish I was happy with. Therefore, i can't give you a step-by-step process since I didn't really use one. It was a bit of trial and error.

However, I did try very hard to stick with a basic 5-shade color palette with step 3 being the base color, 1 being the lightest highlight and 5 being the darkest shadow. This didn't always work as well as I planned so I just kept working the figure until it looked right. In the case of figure number 2, this was especially true since I couldn't seem to match the color or tone of the uniform I had already done on figure 1.

If you look at my post above from May 14th, I list the colors used for the base color, shadows and highlights on the tanker jacket and bibs. This should be a good starting point for you to at least get the colors closer to what they ought to be. Keep the paints quite thin (but not so they run all over the place) and build up your colors and depth gradually.

The other tip to remember is that assuming a halo light source from directly above, the shadows go UNDER the folds and the highlights go ON TOP of the folds. This is most true for arms that hang down by the figure's sides as well as for legs on a standing figure. When an arm is bent 90 degrees at the elbow, the darkest shadows will then be underneath the arm and the lightest lights will be on top of the arm, regardless of folds and creases. You still have to shade folds and creases on the top of the arm, but the shadows will be lighter than they would be on a arm hanging vertically. Also, the area between the figures legs and under the armpits will usually be #5 shadow since these areas are directly opposite the direct light source, again assuming it is coming from directly above.

Hope this helps. If you're still having trouble, shoot me a PM and I'll see what I can do!

Thanks to all for the kind comments.

wightlion
Visit this Community
Illinois, United States
Joined: May 11, 2004
KitMaker: 11 posts
Armorama: 10 posts
Posted: Monday, May 23, 2011 - 06:13 PM UTC
Superbly painted figures Don and a thoroughly deserved Gold !

Andy

PolishBrigade12
Visit this Community
Washington, United States
Joined: January 31, 2009
KitMaker: 380 posts
Armorama: 366 posts
Posted: Saturday, May 28, 2011 - 03:38 PM UTC
Bravo Don, sorry for the late reply and congrats and thx for including the ribbon. I knew it would be there too!!!!!


Cheers, Ski.
VLADPANZER
Visit this Community
Lebanon
Joined: December 20, 2010
KitMaker: 568 posts
Armorama: 549 posts
Posted: Thursday, June 02, 2011 - 10:04 AM UTC
Congratulations on the medal (You deserved it), beautiful work! Well-done!!

Regard,
fificat
Visit this Community
California, United States
Joined: January 10, 2011
KitMaker: 135 posts
Armorama: 109 posts
Posted: Sunday, August 28, 2011 - 06:24 AM UTC
Just ran into the 761st. This lead me to this thread. WOW, what talent you have Prof!!
Great tribute. I will be trying to repro the 761st, co. D, M5 Stuart waiting in Coburg, Germany to go into action from a National Achieves photo, but know I will never be able to do the four crew figures anywhere as well as you. Great job and well won award.
captnenglish
Visit this Community
California, United States
Joined: May 20, 2008
KitMaker: 1,184 posts
Armorama: 770 posts
Posted: Sunday, August 28, 2011 - 08:26 AM UTC
Outstanding work! Thanks for posting your mixes as a fellow acrylics painter, I find it nearly impossible to find a good mix for AA skintones.
LuizZaccaro
Visit this Community
Sao Paulo, Brazil
Joined: September 17, 2010
KitMaker: 57 posts
Armorama: 40 posts
Posted: Saturday, September 10, 2011 - 11:51 AM UTC
Paint is very good.

regards
L.ZACCARO
Grindcore
Visit this Community
New York, United States
Joined: September 23, 2006
KitMaker: 389 posts
Armorama: 358 posts
Posted: Saturday, September 10, 2011 - 03:25 PM UTC

I love the stache on that guy!
Pavlovsdog
Visit this Community
Carlow, Ireland
Joined: June 05, 2006
KitMaker: 438 posts
Armorama: 352 posts
Posted: Monday, September 12, 2011 - 11:36 PM UTC
very interesting subject beautifully execuited

thanks for the images .

Jerry
jrutman
Visit this Community
Pennsylvania, United States
Joined: April 10, 2011
KitMaker: 7,941 posts
Armorama: 7,934 posts
Posted: Tuesday, September 13, 2011 - 03:27 AM UTC
Well deserved award on a great subject. I am looking forward to seeing the Sherman project now!
J
ProfessorP
Visit this Community
Minnesota, United States
Joined: February 20, 2007
KitMaker: 339 posts
Armorama: 325 posts
Posted: Tuesday, September 13, 2011 - 11:29 AM UTC
Thank you all very much for your kinds words. I am very flattered to still be receiving kudos on this project even months after its completion! Now I've got to get cracking again on that darned Sherman...

Cheers!

Totalize
Visit this Community
Ontario, Canada
Joined: February 04, 2009
KitMaker: 743 posts
Armorama: 549 posts
Posted: Tuesday, September 13, 2011 - 01:06 PM UTC
Don,

I am with Jerry on this one. Fantastic work. phenominal painting and well executed indeed. The award is well deserved.

David.
 _GOTOTOP