_GOTOBOTTOM
Constructive Feedback
For in-progress or completed build photos. Give and get contructive feedback!
Canvas Top from tissue
windysean
Visit this Community
Wisconsin, United States
Joined: September 11, 2009
KitMaker: 1,917 posts
Armorama: 735 posts
Posted: Tuesday, April 12, 2011 - 02:50 AM UTC
I halted my Not Fighting Vehicle Campaign build to test out a technique for making a canvas top, so I pulled out this older build, a Dodge WC52:
CanvasTopGuineaPig-20110411-2143.jpg
So far all I've done is to lay down some aluminum foil to work on, and cut a tissue (with scissors because I didn't have an X-acto blade sharp enough to cut tissue without snagging):
TestTop-20110411-2155.jpg

Now, I had read earlier forum posts about using 50-50 silicone caulk with a soft brush to set the tissue, but others said PVA glue (my favorite being Elmer's School Glue), so I'll first try that, since I have it on hand, and it seems easier to work with. I realize it will be important to mix it so that it's wet enough to be workable by brush, but not so wet that the tissue falls apart. I'll use my softest household paintbrush to apply it to the tissue, laid-out flat on the foil.
I didn't have wax paper in the house, but I'm thinking the glue won't stick well to the foil. (I might regret that later.)

Please post any tips or thoughts! I'll go back to this tonight after work and dinner and time with the kids, etc.!
-Sean.
panzerbob01
Visit this Community
Louisiana, United States
Joined: March 06, 2010
KitMaker: 3,128 posts
Armorama: 2,959 posts
Posted: Tuesday, April 12, 2011 - 03:59 AM UTC
Sean;

Hi

Tissue for tarps and the like... an old fav of mine!

I have done a couple of approaches and both have worked well:

One is to pin the tissue down to a board or other painting surface (piece of cardboard works well) and spray it heavily with your chosen tarp color - get it nice and wet. Flip the tissue over while it is still damp with paint, and spray the other side (this is optional- if this side cannot be seen, don't bother). After painting, fit and form the still-wet tissue onto the frame or over the boxes or stuff the tarp is supposed to drape over. Applying and forming it while wet will get the right sags and form-fitting, which will be fully-retained when the tarp dries.

This technique works well with either enamels or acryls from the AB - actually a rattlecan of flat enamel works really well! A nice full load of paint will seal the tissue and smooth the surface pretty well. IF you want things still smoother - after it is set in place, formed and dried, spray the visible side again with your choice of color(s).

Alternatively, I use the PVA "wood glue" (as that's what I have around the house) but any "white" glue also works - thin it down maybe 1:3 - 1:4 glue to water, pin tissue down to a work surface as above, and pour the thinned glue over it and let it sop-up. (Brushing simply challenges the wet and feeble tissue to shred and tear, so I don't brush).

Drape and form the wet tissue over frame or boxes as above and let dry. You then spray over with the desired color(s). Do be sure and NOT apply the tissue "dripping wet" for forming! THAT can lead to really funky droplets and blobs of glue!

And a note on trimming and fitting: Fitting and sizing a tarp is something of a trick, I found... my approach has been to first dampen my tissue with water and trial-fit it over my target. I then trim this damp tissue and fiddle until I get it about the size and shape I want. I then spread it out, let it dry, and have at it with route 1 or 2 above. You can also trim and fiddle the shape and size of the late-stage (wet) tissue in above processes - of course this may be a little messier!, or you can trim and cut the dried end product.

Hope this helps!

Bob
windysean
Visit this Community
Wisconsin, United States
Joined: September 11, 2009
KitMaker: 1,917 posts
Armorama: 735 posts
Posted: Wednesday, April 13, 2011 - 06:25 AM UTC
Bob, I studied what you said, but instead of making a frame, I applied the diluted glue while the "canvas" was laid out flat (in an effort to prevent ripping the wet tissue and to get uniform glue coverage.
Before doing anything, I traced the shape onto a blank sheet of paper, in case I had to start over.
Gluebrushed-20110412-2134.jpg
After it wasn't runny anymore and started to set up, I gingerly pried it up.
PryingUp-20110412-2137.jpg
In my case, I wanted the side flaps rolled up, so I used some sprue to roll it-- this might have been a silly way to do this, and making separate rolls glued on later might have been the correct way...
RolledSides-20110412-2139.jpg
Continued prying it up off the foil work-surface, and affixed it to the truck. (This I'm sure is wrong-- I hadn't considered how to paint it.)
SetInPlace-20110412-2141.jpg
I also blew on it to work sags between the cross-bars. Pushing with my fingers would have been too heavy for the weak, wet tissue, I think.
The next morning, there were minor tearing and differing lengths that I trimmed up with a small scissors (the X-acto again wouldn't cut without something behind the tissue to hold everything still...)
Frayed-20110413-0655.jpg
Trimmed-20110413-0700.jpg
Note that last night, while it was wet, I had folded the rear overhang up against the top. In hindsight, I see that removing it to paint now would be a very difficult task.
Now that the glue is dry, the top seems relatively sturdy. I'm considering brush painting it, with a larger, softer hobby brush. My other option is spray-can, but masking now would be made more difficult by the open space underneath-- or maybe not if I slide a piece of newspaper through the body, under the canvas!
The toughness of the glue-saturated tissue is reassuring though, especially because on my Campaign build, I'll need to mask and paint crosses on the "canvas".
Again, comments, tips, and (constructive) criticism welcome!
thanks,
Sean.
panzerbob01
Visit this Community
Louisiana, United States
Joined: March 06, 2010
KitMaker: 3,128 posts
Armorama: 2,959 posts
Posted: Wednesday, April 13, 2011 - 10:51 AM UTC
Sean;

Looks really good, so far!

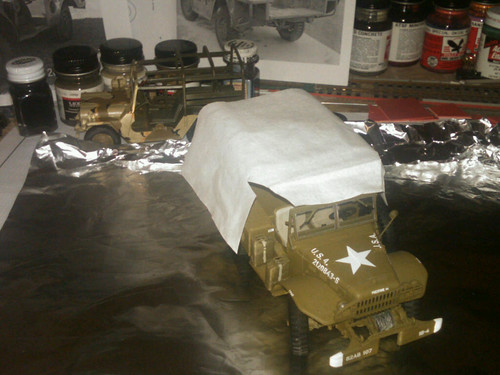
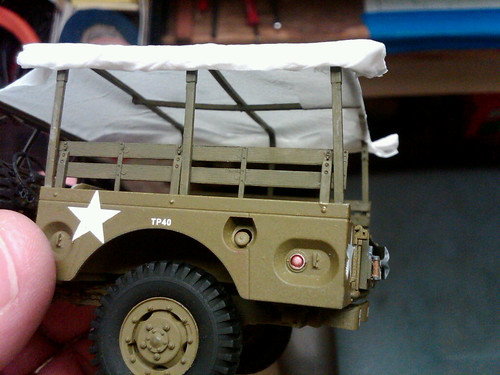
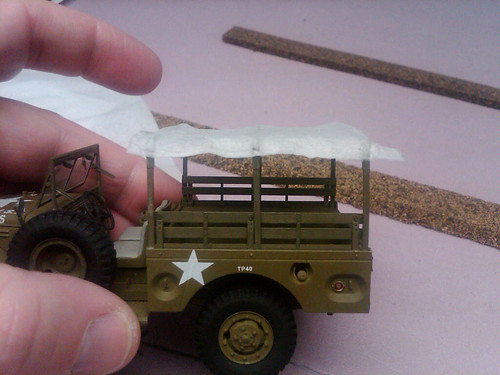
BTW, when I said "frame", I was meaning using that top frame such as your truck came with or has on it - as you did!

You've done all the right sorts of things. Now... a couple pointers BEFORE you get around to painting it (I hope!):

1) All the tarp / cover edges would be seamed or "beaded". (That is, in real life, the canvas would be rolled in a fold or 2 and stitched to form a tight edging. In some cases, this would have a piece of thin cord or rope inside to give it a little body. Probably not this, in your use-case.) You should edge your tarp... How to do this?

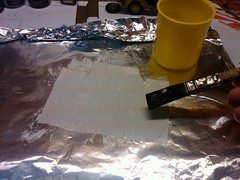
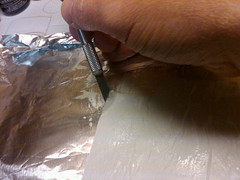
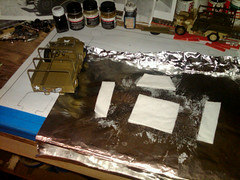
There are some options: None are real quick, but... You can 1) run a thin bead or line of PVA glue right along the edge to smooth and "close" it up, 2) make a separate small tarp piece that is flat, let this dry, and use the Exacto or scissors to cut very skinny strips out of this which you will then glue onto or along the outside (visible) edge of your tarp, 3) do about the same thing only using very thin (0.005) styrene sheet and strong cement - you cut a skinny styrene strip, fold in into a tiny trough (maybe using a PE folder or certes a metal straight edge), dip this in the cement, and "trough" the edge of your tarp. You then squeeze your styrene trough around the tarp tissue edge. IF you have soaked your styrene in cement, it will actually really soften and melt onto the tissue (which being paper will NOT melt away. ) and form a reinforcing edge.

AFTER you edge it you get to paint it!

2) Tarps and tops have seams as they were / are made of multiple pieces sewn together. So... maybe take a look at photos of tops and see where likely seams go, and do some version of above to create long skinny strips and glue onto the top for these seams...

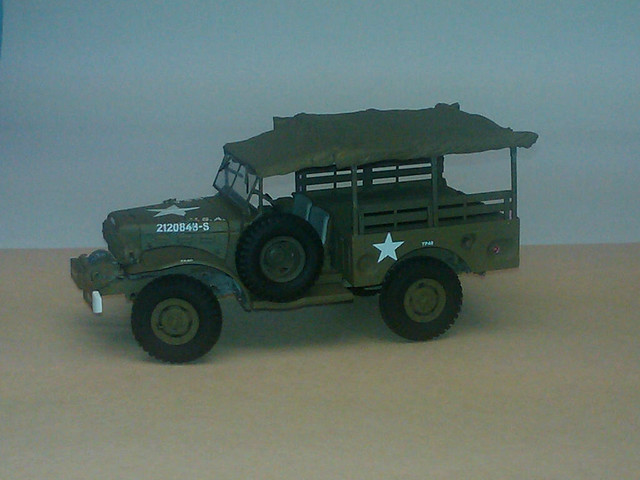
3) Painting... I would say you should do as much as possible with your AB - you have already created a great-looking tarp - the color coat need not be very thick (you are not using the paint to make the tarp in your case). Try cutting some AL foil or some clean tissue to fully mask the insides of your truck, and then have at it with the AB under and top of that tarp. You may well have to touch up the frame pieces, but probably will escape messing your interior, etc.

Of course, as you have pointed out, the tarp has firmed up, and it should be strong enough to be gently brushed with a SOFT brush, should you prefer to do that. After you get the base tarp colour on, you should of course work on some fading and dust accums! And pigments (I actually prefer coloured chalk) really can add some zing to this.

One last thought for you... BEFORE you paint it - take a GOOD look at its surface texture. IF it looks pretty rough and fibrous, apply on some more glue and let it dry. This will help smooth it down a bit and will add strength.

From where I sit - you have things really in control, and it is going to look SWEET!

Cheers!

Bob.
windysean
Visit this Community
Wisconsin, United States
Joined: September 11, 2009
KitMaker: 1,917 posts
Armorama: 735 posts
Posted: Thursday, April 14, 2011 - 01:49 AM UTC
And I'm back here.
Looking it over yesterday evening, I realized the frame bows had pulled out of line, whether they always were, or I pulled too tight when I tucked in the back, or the fabric shrank a bit as it dried.
PulledTooTight-20110413-2009.jpg
Here, after I pulled off the top, note the roof's too short:
ShortTopCutOff-20110413-2046.jpg
It may have been a combination of all those factors, but reading Bob's ideas above, I decided there were too separate panels front and back, so I'd take another try at this. I made the side rolls separate too this time, so I had more opportunity to work with them.
(The top pulled off pretty easily, except that I had to slit the folded parts. I think it can be painted off the model.)
Here I've cut the new pieces.
NewPiecesCut-20110414-0658.jpg
Then I was tired and called it a night.
thanks again,
-Sean.
panzerbob01
Visit this Community
Louisiana, United States
Joined: March 06, 2010
KitMaker: 3,128 posts
Armorama: 2,959 posts
Posted: Thursday, April 14, 2011 - 02:39 AM UTC
Sean;

Uh oh.

I sincerely apologize! I think I skipped in my enthusiasm but I should have warned you... PVA glues DO shrink when they dry, and so the larger the "tarp" item is, the more shrinkage there will be. What I SHOULD have told you is to 1) cut things overly - large (under the model you can always cut some excess off, but adding to cover a shortfall is, well, a B@*$H!), and 2) drape things loosely, with expectation that things will tighten-up as they dry. (BTW, this is what happens to "rag-tops" in the sunny climes - they shrink as they age and get ever tighter and then they split.).

My experience has been to make separate pieces and NOT try to make an entire fitted top in one go. You were BRAVE!

But I think you can fix by going along the route of adding separate "rolled pieces", etc.

Also- I was looking at the part over the crew door/ways up front... I THINK that there was a thin rod frame or connector between the windscreen and the first bow. There often is in such rag-top trucks. If so, add one in and this will anchor that part of the cover.

Had I been ahead of things further and actually thought closely on what you were going to fit your top onto, I think I would also have suggested that you make your tarp piece detachable - that is, you would have covered those bows with AL foil or saran wrap so that the top could drape and dry and then be pulled off for trimming and painting and then get re-installed. But I got ahead of myself. Sorry 'bout that, too!

Cheers!

Bob
windysean
Visit this Community
Wisconsin, United States
Joined: September 11, 2009
KitMaker: 1,917 posts
Armorama: 735 posts
Posted: Thursday, April 14, 2011 - 03:27 AM UTC
No sweat, Bob!
Practice makes perfect. Yes, making the smaller pieces should control shrinkage to manageable levels, as well as adding more realistic seams and breaks. I'll do some more studying of photos and see if I can make out more supports-- there might be cables between the top corners too. And that foil barrier is a good idea too.
So far this has been going better than expected. (Hopefully some non-posters are reading this and learning with me too, ha ha.)
It also occured to me what a noble end these tissues are going to, whereas their neighbors in the box don't have such a good future!
thanks again,
Sean.
Edit: Back from Google research. There are no photos of any support between the first bow and the windshield, and photos show some tight and some loose (probably badly applied by current owners), so there COULD be a stay sewn into the canvas at the edge, but none attached directly to the truck. Also, I was completely wrong about any cable support-- forgot the sag on the sides allows rain to drain out.
windysean
Visit this Community
Wisconsin, United States
Joined: September 11, 2009
KitMaker: 1,917 posts
Armorama: 735 posts
Posted: Saturday, April 16, 2011 - 10:39 AM UTC
I picked this up again.
I remade the top, but for whatever reason, it didn't lay quite as right. I may have been too concerned with pulling it tight and/or my glue was too watery this time. Here's the center panel:
Top2ndTry-20110415-0700.jpg
Thinking further, I'll cut out the rest from the first attempt, paint it and reattach it to the truck.
Regrouped-20110415-1944.jpg
thanks again,
Sean.
windysean
Visit this Community
Wisconsin, United States
Joined: September 11, 2009
KitMaker: 1,917 posts
Armorama: 735 posts
Posted: Tuesday, April 19, 2011 - 01:14 AM UTC
...and I'm back. I did cut apart the first, short top, and applied the good parts to the new top panel. I bonded and blended them with liberal brushings of the diluted glue mix. (The dried tissue parts are pretty sturdy now.)
Now I'm laying on straps made from strips of standard copier paper (cut from junk mail in the trash). The thicker paper should stand out from the larger "canvas" pieces.
StripStraps-20110418-2123.jpg
Should be all set to paint tonight.
-Sean.
windysean
Visit this Community
Wisconsin, United States
Joined: September 11, 2009
KitMaker: 1,917 posts
Armorama: 735 posts
Posted: Monday, April 25, 2011 - 03:09 AM UTC
Painted bottom, then top. Here it's ready to attach. (My apologies for the fingerprint on the camera lens, since corrected.)
DodgeCanvasDone-20110424-2147.jpg
Then glued on (with Aleene's Tacky Craft Glue)
DodgeCanvasAttached-20110424-2156.jpg
Here, with the flash, the color shows differently, but paintwork is required to highlight the bumps and folds. The monotone is too deadening.
DodgeWFlash-20110424-2159.jpg
Regardless, it's finished as far as what this thread was meant to show.
thanks for looking,
Sean.
panzerbob01
Visit this Community
Louisiana, United States
Joined: March 06, 2010
KitMaker: 3,128 posts
Armorama: 2,959 posts
Posted: Monday, April 25, 2011 - 05:05 AM UTC
NICE TOP!

Looks like it came out very neat and real-looking!

Having been thru this process with you, I am inspired to go and do another top myself ... I have this Horch truck project I've been kicking around in for awhile, now - been planning to eventually put a top on it. It's time, I do believe!

Bob
 _GOTOTOP