_GOTOBOTTOM
Constructive Feedback
For in-progress or completed build photos. Give and get contructive feedback!
HobbyBoss Land Rover WIMK
converse
Visit this Community
New South Wales, Australia
Joined: November 14, 2005
KitMaker: 26 posts
Armorama: 25 posts
Posted: Thursday, April 21, 2011 - 07:24 PM UTC
Hi everyone,

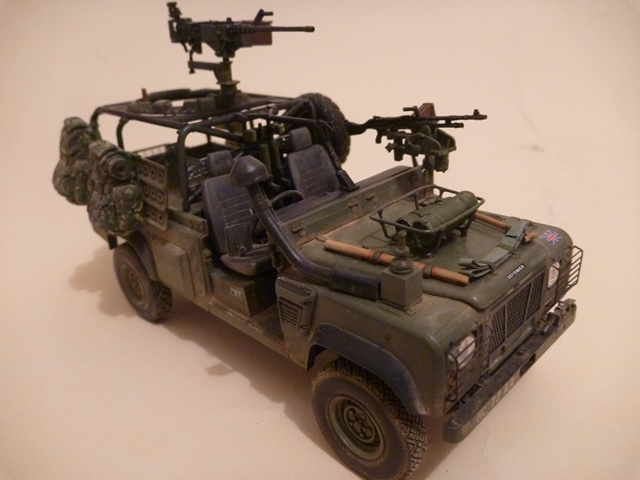
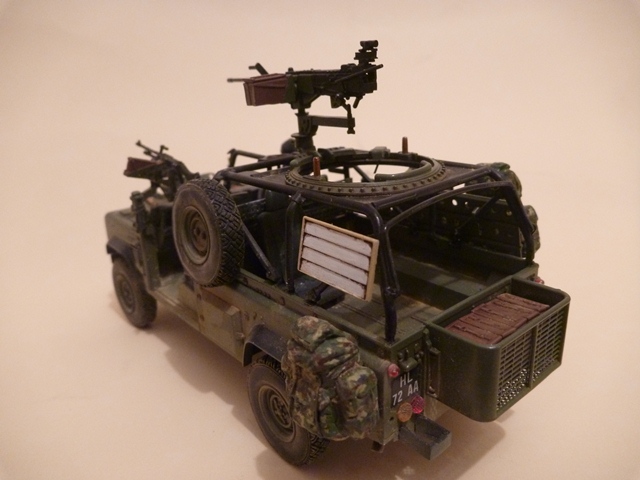
I thought I would post up my 1/35 Landover WIMK. Okay ist not quite finished but its almost there. It just needs lots and lots of little tweaks to make it right.
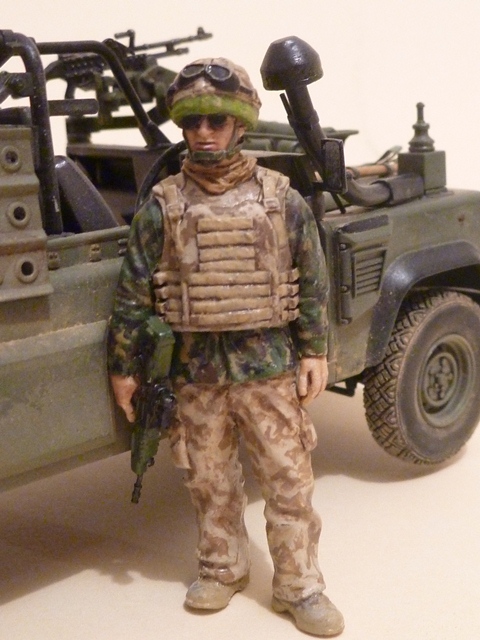
The figure is form accurate armour and was a joy to paint.
I hope you like where I am up to. Oh and if one of the wheels looks off the ground its because of the card I phtographed the vehicle on. It sits flat on a flat surface.


Cheers

Sean Lomas
grimmo
Visit this Community
Queensland, Australia
Joined: January 17, 2006
KitMaker: 752 posts
Armorama: 569 posts
Posted: Thursday, April 21, 2011 - 09:07 PM UTC
looking good sean. the figure is really well done too! now you need a base to put it on.
PHONETIC
Visit this Community
England - South East, United Kingdom
Joined: March 11, 2010
KitMaker: 232 posts
Armorama: 198 posts
Posted: Thursday, April 21, 2011 - 09:19 PM UTC
I just love it
luv the bonnet cradle
luv the strap on the front
luv the figure

if i may say one little bitty thing if you arnt going to get to it is the figure needs just a dusting of matt varnish (sorry if you have it in hand)
vonHengest
Visit this Community
Texas, United States
Joined: June 29, 2010
KitMaker: 5,854 posts
Armorama: 4,817 posts
Posted: Thursday, April 21, 2011 - 09:29 PM UTC
I haven't seen the WMIK in person yet and I was wondering if this is essentially box stock? This build came out really nice either way and your painting and subtle weathering look realy convincing.
callmehobbes
Visit this Community
England - North West, United Kingdom
Joined: April 17, 2005
KitMaker: 751 posts
Armorama: 740 posts
Posted: Friday, April 22, 2011 - 03:36 AM UTC
I've not yet started on mine but seeing this is making me want to get it out of the stash and onto the workbench. Nice work on the weathering.
converse
Visit this Community
New South Wales, Australia
Joined: November 14, 2005
KitMaker: 26 posts
Armorama: 25 posts
Posted: Friday, April 22, 2011 - 12:09 PM UTC
Thanks Matt,
Absolutely ity all looks a bit out of context doesn't it. I was thinking of popping along to Ikea and trying the old picture frame base for it.

Cheers

Sean
converse
Visit this Community
New South Wales, Australia
Joined: November 14, 2005
KitMaker: 26 posts
Armorama: 25 posts
Posted: Friday, April 22, 2011 - 12:11 PM UTC
Thanks Phonetic thats really nice to hear.
The Bonnet cradle is made out of fuse wire and was real easy to out together. Then mend and mend again when I kept dropping the bonnet on the floor!
You are right with the figure He needs a matt coat I just haven't got around to doign it. I use Windsor and Newton Matt Varnish. Its the best stuff around.

Cheers

Sean

converse
Visit this Community
New South Wales, Australia
Joined: November 14, 2005
KitMaker: 26 posts
Armorama: 25 posts
Posted: Friday, April 22, 2011 - 12:22 PM UTC

Quoted Text

I haven't seen the WMIK in person yet and I was wondering if this is essentially box stock? This build came out really nice either way and your painting and subtle weathering look realy convincing.


Hi Jeremy,
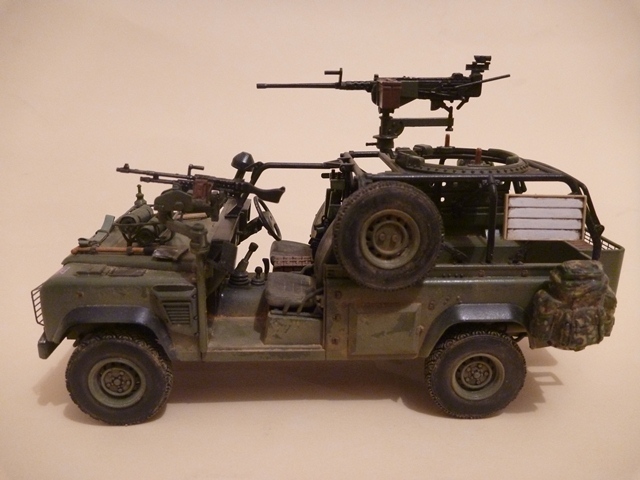
Thanks for the nice words. Its not really box stock. There were a few things that needed to be done.
1) The bonnet cradle (fuse wire)
2) Relocate the spare wheel (plasticard and plastic rod mount)
3) Redesign the .50cal quite dramatically. I used the sight from an SA80 I had left over from a Warrior MICV build and the rest is plasticard.
4) Relocate the seat in the rear to the left side form the right side.
5) Create a radio table (cannot see in these pics) on the right hand side.
6) Change the direction for the mounts of the 2 x SA80's from Horizontal (go figure) to vertical.
7) Create the front bonnet strap form Tamiya tape.
8) Remove the adjustable seat mount for the driver
9) create the seat belt mounts (still need to put the seat belts in!)
10) scratch build the deep water fording snorkel (plasticard, plasticrod and tamiya tape.

Thanks about the weathering. I have been getting into this hairspray technique thing. I use it under dust coats to show wear and tear as dust is never uniform. I did it on a 1/35th Buffalo I also built and it looks incredible with this technique.

I think thats it.
Don't get me wrong though I think this would make an awesome kit right out of the box. I really have enjoyed what great skill they have fashioned the kit. Its so good some of it isn't even glued! It slots together.

Cheers

Sean
converse
Visit this Community
New South Wales, Australia
Joined: November 14, 2005
KitMaker: 26 posts
Armorama: 25 posts
Posted: Friday, April 22, 2011 - 12:22 PM UTC
Cheers mate. I highly recomend getting on with this kit.

Its a great kit it really is.

Cheers

Sean
zontar
Visit this Community
Hawaii, United States
Joined: August 27, 2006
KitMaker: 1,646 posts
Armorama: 1,557 posts
Posted: Friday, April 22, 2011 - 08:47 PM UTC
Nice build of an interesting vehicle. I've only recently become aware of them, but it looks like they'd be really fun to bop around the desert in.

Happy Modelling, -zon
17741907
Visit this Community
Istanbul, Turkey / Türkçe
Joined: December 05, 2007
KitMaker: 953 posts
Armorama: 705 posts
Posted: Saturday, April 23, 2011 - 12:30 PM UTC
Looking good...I like it....Well done mate....
converse
Visit this Community
New South Wales, Australia
Joined: November 14, 2005
KitMaker: 26 posts
Armorama: 25 posts
Posted: Sunday, April 24, 2011 - 04:55 PM UTC
Thanks guys. It has been fun and I'm sure one would be fun in the desert, even if you felt wildly exposed and do not even go there with mines! I think you need serious guts to ride in one of these.

Cheers

Sean Lomas
 _GOTOTOP