25pdr Field Gun & Crew NWE
England - East Anglia, United Kingdom
Joined: August 12, 2005
KitMaker: 14,499 posts
Armorama: 11,675 posts
Posted: Friday, July 15, 2011 - 05:52 AM UTC
Hi folks,
A bit more work,
The melted barrel has been replaced, muzzle break drilled out and the 3 thrust collars added to the botton on the gun. Also added the stop stud.
On the firing platform, I've used the PE and added the butt straps, picket plates and toe plates. The hook brackets remain to be added to the arms.
If you don'r have or want to do the PE thing you could drill out the Picket Plates and add a small plate above them. You could also added the Butt Straps but the PE seemed easier and more appropriate here.


Al
'Action this Day'
Winston Spencer Churchill
United Kingdom
Joined: May 16, 2010
KitMaker: 16 posts
Armorama: 15 posts
Posted: Friday, July 15, 2011 - 09:04 AM UTC
OK, I confess - I've built the Tamiya 25 pounder with the Edouard PE. And very exacting and finicky it is. But it looks the business when it's done. The FAT is relatively straightforward, but the gun is quite tricky. And the limber.... well, let's just say it's still a work in progress after some weeks.
Can't comment on the scale thickness of the gunshield (not having seen an original recently) but the Edouard part showed no inclination to bend in building.
So, good luck with the build and I shall watch with interest.

Virginia, United States
Joined: June 24, 2005
KitMaker: 364 posts
Armorama: 355 posts
Posted: Friday, July 15, 2011 - 11:26 PM UTC
Quoted Text
...the shield looks too thin...
Al
Al:
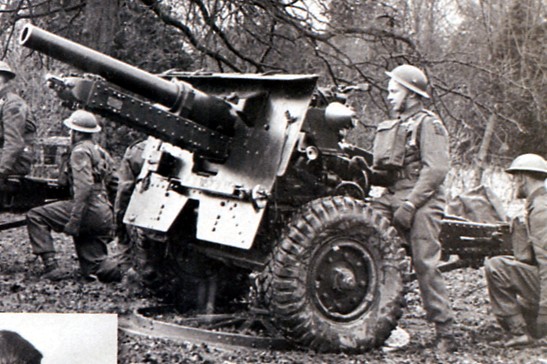
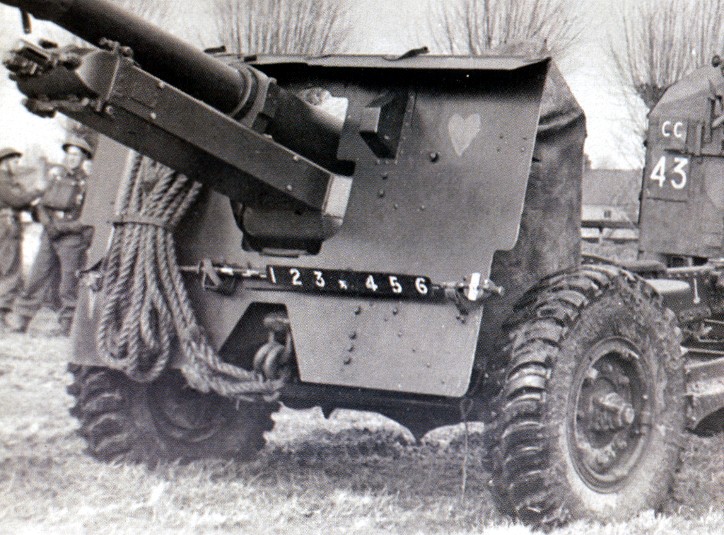
Here are a couple of photos from the June 2011 "Military Modelling" that give a good impression of the shield thickness. It looks to my untrained M45 eyeball that PE might pretty accurately portray the scale thickness.
Dave
"We've been looking for the enemy for some time now.
We've finally found him. We're surrounded.
That simplifies our problem of getting to these people and killing them." - Chesty Puller, at Chosin
England - East Anglia, United Kingdom
Joined: August 12, 2005
KitMaker: 14,499 posts
Armorama: 11,675 posts
Posted: Saturday, July 16, 2011 - 01:20 AM UTC
Hi Ian,
Thanks, would you post up a couple of pics of the finished gun, I'd like to see the PE shield with some paint on.
Hi Dave,
Yes I was studying some photographs this morning and I'd tend to agreen the PE part looks about right.
Thanks for the pics, I have a copy of the mag as I spotted the article on the Candaian 25pdrs a week or two ago.
Some progress later.
Thanks guys.
Al
'Action this Day'
Winston Spencer Churchill
England - East Anglia, United Kingdom
Joined: August 12, 2005
KitMaker: 14,499 posts
Armorama: 11,675 posts
Posted: Saturday, July 16, 2011 - 02:13 AM UTC
'Action this Day'
Winston Spencer Churchill
United Kingdom
Joined: May 16, 2010
KitMaker: 16 posts
Armorama: 15 posts
Posted: Saturday, July 16, 2011 - 03:54 AM UTC
Hi, yes, I'll try to take a couple of pics for you. I'll post them as soon as I can.
Liking the progress so far. Keep up the good work!
England - East Anglia, United Kingdom
Joined: August 12, 2005
KitMaker: 14,499 posts
Armorama: 11,675 posts
Posted: Saturday, July 16, 2011 - 04:19 AM UTC
'Action this Day'
Winston Spencer Churchill
United Kingdom
Joined: May 16, 2010
KitMaker: 16 posts
Armorama: 15 posts
Posted: Saturday, July 16, 2011 - 05:23 AM UTC
Hi, Alan.
I've placed 6 photos in the Armorama gallery. Described as "Tamiya 25 pounder with Edouard PE additions".
I'm afraid I can't make head nor tail of the instructions for uploading them to the forum, though

If you can't find them, let me know and I'll try again with uploading them to the forum.
England - East Anglia, United Kingdom
Joined: August 12, 2005
KitMaker: 14,499 posts
Armorama: 11,675 posts
Posted: Saturday, July 16, 2011 - 06:23 AM UTC
Thanks Ian,
I can get them from the gallery, Nice work so far. Don't forget the turning handles were brass.
Many thanks the shield looks looks fine, although there seems to be slightly more detail on the front of the kit one, more pronounced. I'll mull it over but I may go for the easy opion

.
Thanks again appreciated.
Al
'Action this Day'
Winston Spencer Churchill
England - East Anglia, United Kingdom
Joined: August 12, 2005
KitMaker: 14,499 posts
Armorama: 11,675 posts
Posted: Saturday, July 16, 2011 - 07:59 AM UTC
Hi Guys,
A bit more progress. I started adding the missing rivets to the rear RHS of the carriage. (I hate rivets
)

Also took a look at the kit shield. The details on the front are more pronounced that on the PE version so I cleaned up some sink marks on the rear and thinned the sides a bit. With the addition of some of the PE parts, this might pass muster and in truth is a lot easier for me. I can only deal with so much PE.

Al
'Action this Day'
Winston Spencer Churchill
Virginia, United States
Joined: June 24, 2005
KitMaker: 364 posts
Armorama: 355 posts
Posted: Saturday, July 16, 2011 - 09:37 AM UTC
Quoted Text
A bit more progress. I started adding the missing rivets to the rear RHS of the carriage. (I hate rivets )
The rivets certainly do improve the look. I, at least, think that they were worth the effort. I've not yet managed to cough-up the money for a punch set (so have never had to suffer the way that you did there), perhaps I'll someday look into the rivet decals or other cheaper options to improve the appearance of my models. (Though, I'm sure that if I did it, there would be glue smeared everywhere and erratic wanding rows of unevenly spaced rivets, so it's not clear that the final model would be "improved" by the effort.
)
Dave
"We've been looking for the enemy for some time now.
We've finally found him. We're surrounded.
That simplifies our problem of getting to these people and killing them." - Chesty Puller, at Chosin
England - East Anglia, United Kingdom
Joined: August 12, 2005
KitMaker: 14,499 posts
Armorama: 11,675 posts
Posted: Saturday, July 16, 2011 - 10:40 PM UTC
Hi Dave,
Not the neatest work I've ever done, but has the requried effect.
Bit more porgress, this leaves the LHS rivets, break and sight fittings and the shield to complete on the gun. There are some small fittings to go on the tow hook area and some straps on the inside leg of the carriage.

I'm quite pleased with the spikes on the RHS they look OK, a much better 3D look..
Cheers
Al
'Action this Day'
Winston Spencer Churchill
England - East Anglia, United Kingdom
Joined: August 12, 2005
KitMaker: 14,499 posts
Armorama: 11,675 posts
Posted: Sunday, July 17, 2011 - 02:07 AM UTC
Hi folks,
A bit more work on the shield. I tried to get the best of both worlds here, a bit more detail, keep life simple (use the plastic version) and still have some depth in the shield. The PE one looks too flat to me. Useful if you want a towed version but still not how you'd really want it. The Bronco kit should solve all these issues when it comes along.
Anyway some updates.
I used a mix of the kit and PE fitting on the rear:

The kit brackets for the pouch seem much better sized than the PE ones

I replaced the ugly looking logs on the front of the shield


The firing platform is complete and ready for further painting.

Same detail for the wheels

Break is on but a further small PE fitting to add there

test fitting


Next the fitting on the tow hook, gear myself up for more rivets and start on the sighting arrangement.
Cheers
Al
'Action this Day'
Winston Spencer Churchill
CMOT
 Editor-in-Chief
England - South West, United Kingdom
Joined: May 14, 2006
KitMaker: 10,954 posts
Armorama: 8,571 posts
Posted: Sunday, July 17, 2011 - 05:57 AM UTC
I have to say Alan you are really rocking along with this build and it looks to have a lot of promise.
England - East Anglia, United Kingdom
Joined: August 12, 2005
KitMaker: 14,499 posts
Armorama: 11,675 posts
Posted: Sunday, July 17, 2011 - 06:26 AM UTC
Hi Darren,
Thanks, apart form a lot of clean up it's a fairly simple build. I've kept the PE parts to those I think add something to the model.
OK last update for today. Fitted the 3 small Hand Spike Brackets on the tail (they look like pedals), very footery, added some rivet detail to the LHS and started work on the sighting arranngement. The PE instructions provide a small replacement unit but the instructions tell you to cut off part of part X8. That's the hollowed out bit sitting flat, and that part apears sort of accurate. I hollowed out the filled in bit. The sight should site to the right of part X8 so I will wait until I have the bits assembled to see how the new part fits in be fore I cut anything off.
I also missed of part X3 from the gun barrel but removing it to fit the part shows the nice gun slide filler Eduard provide.


Got some straps and final thigns to add but almost done.
Al
'Action this Day'
Winston Spencer Churchill
England - East Anglia, United Kingdom
Joined: August 12, 2005
KitMaker: 14,499 posts
Armorama: 11,675 posts
Posted: Monday, July 18, 2011 - 05:58 AM UTC
Hi folks,
this is the altered site with the added PE part and some plastic rod. I drilled out the ends of the rod and after much fotering aded the sight. It moved the unit over about 2mm just make sure you line up the scope with the appature in the shield. It will be interesting to see the Bronco kit which hopefully will have a much more accurate part.
Part 3 is abit shapeless, so i aded a filler block with 4 small studs again another part that could be better.


Al
'Action this Day'
Winston Spencer Churchill
England - East Anglia, United Kingdom
Joined: August 12, 2005
KitMaker: 14,499 posts
Armorama: 11,675 posts
Posted: Monday, July 18, 2011 - 07:18 PM UTC
'Action this Day'
Winston Spencer Churchill
England - East Anglia, United Kingdom
Joined: August 12, 2005
KitMaker: 14,499 posts
Armorama: 11,675 posts
Posted: Tuesday, July 19, 2011 - 07:49 AM UTC
'Action this Day'
Winston Spencer Churchill
England - East Anglia, United Kingdom
Joined: August 12, 2005
KitMaker: 14,499 posts
Armorama: 11,675 posts
Posted: Thursday, July 21, 2011 - 05:49 AM UTC
'Action this Day'
Winston Spencer Churchill
England - East Anglia, United Kingdom
Joined: August 12, 2005
KitMaker: 14,499 posts
Armorama: 11,675 posts
Posted: Friday, July 22, 2011 - 05:07 AM UTC
Hi folks,
That completes the gun and trailer. I'll add a few stores to the trailer over the coming weeks. Considering that this was made in 1976 it is still a nice model to build. Lacking some imortant detail and requiring a fair bit of clean up it none the less builds into a half decent 25pdr.
The Eduard PE set adds some needed detail but I'd advise forming the parts first before removing any of the plastic bits as a wrong fold can mean that a correction will easily snap the part.

Cheers
Al
'Action this Day'
Winston Spencer Churchill
Dublin, Ireland
Joined: November 27, 2004
KitMaker: 6,048 posts
Armorama: 4,619 posts
Posted: Friday, July 22, 2011 - 09:39 PM UTC
Very good work Alan. The model looks very good. How much of the PE set is left unused?
Pat
work to become not to acquire
England - East Anglia, United Kingdom
Joined: August 12, 2005
KitMaker: 14,499 posts
Armorama: 11,675 posts
Posted: Saturday, July 23, 2011 - 05:01 AM UTC
Hi Pat,
Thanks, it was an interesting build and I learnt a lot about the 25pdr that I didn't know which will come in handy when the Bronco gun comes along.
The only major bit I can think of that I didn't add is the pick head, I think I have a resin one somewhere and if I come across it I'll add it in.
Parts left are mainly those required to make up the replacement shield, although I used what I thoguh would enhance the plalstic version where appropriate. Some were just too small for me to handle lol, lol.
A picture tells a 1000 words


I've been talking to Derek Barton about the crew and these chaps would suit an earlier gun better as responsibilities changed in the latter half of the war so trooper placement was slightly different. However, an earlier gun is in fact what they were designed for but they make a good crew none the less although the No 3 on the gun looks a little relaxed for the setting and might have been better with his hand on the firing lever and looking down the sight.
Cheers
Al

'Action this Day'
Winston Spencer Churchill
Dublin, Ireland
Joined: November 27, 2004
KitMaker: 6,048 posts
Armorama: 4,619 posts
Posted: Saturday, July 23, 2011 - 05:50 AM UTC
Quoted Text
A picture tells a 1000 words
Thanks for posting the pic it does indeed make it clear how much the PE resulted in an excellent model
Pat
work to become not to acquire
England - East Anglia, United Kingdom
Joined: August 12, 2005
KitMaker: 14,499 posts
Armorama: 11,675 posts
Posted: Saturday, July 23, 2011 - 06:52 AM UTC
Thanks again Pat, a few more pics of the finished gun and trailer.


I built it with a view of matching it to the Chevy Gun Tractor I built a few years ago:

I built quite afew vehicle linked to 151st (Ayrshire Yeomanry) Field Regiment, Royal Artillery, 11th Armoured Division and I'd quite like to see it parked near a German Bunker 'Under New Management'
.
I wounder if Italeri will re-release this one, for the pending new 25pdrs? It''s a nice vehicle even given the age.
Cheers
Al
'Action this Day'
Winston Spencer Churchill
England - South East, United Kingdom
Joined: January 11, 2003
KitMaker: 4,307 posts
Armorama: 2,130 posts
Posted: Saturday, July 23, 2011 - 07:32 AM UTC
Alan - re No3 (layer) looking relaxed...he should be leaning a bit forwards when you finally fix him in place but he'd be quite sensible in keeping his head back and away from the sights if it's loaded and ready to fire.
On the 105mm pak-how that replaced the 25pdr we saw a few black eyes and cut foreheads as even though the gun recoils on the slide the whole thing jumps a bit when fired!
Nice build mate. I'd like to see the Chevy released as well. The kit includes some of the parts for the 15cwt truck as well and has provided most of my scratch built and conversion material for years!
Bulldog#3
Grumpy Old Modeller No1
Growing old disgracefully!