_GOTOBOTTOM
Dioramas: Buildings & Ruins
Ruined buildings and city scenes.
Hosted by Darren Baker
R687 Pantherturm Bunker Berlin
VLADPANZER
Visit this Community
Lebanon
Joined: December 20, 2010
KitMaker: 568 posts
Armorama: 549 posts
Posted: Friday, September 30, 2011 - 03:58 AM UTC
Hello everyone,

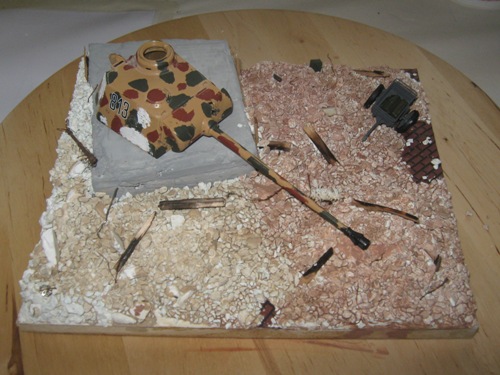
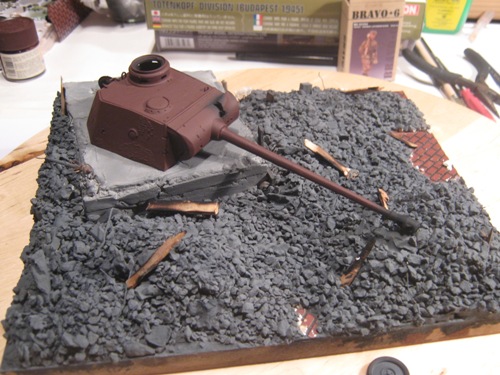
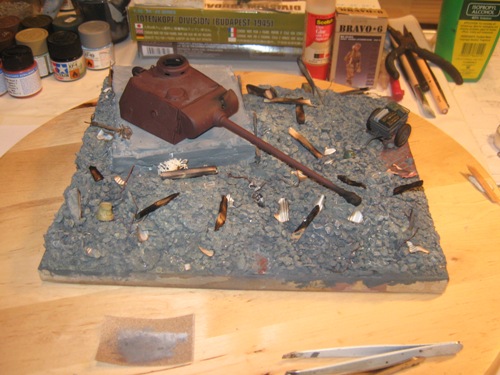
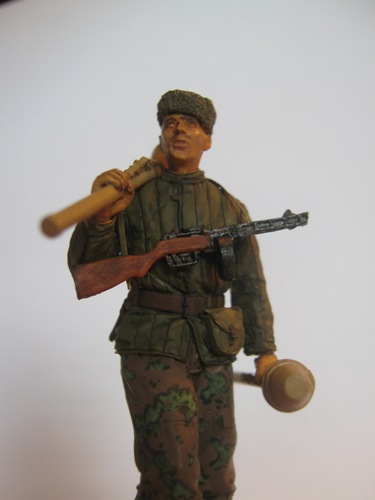
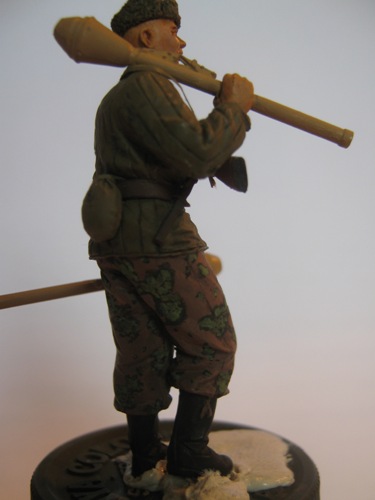
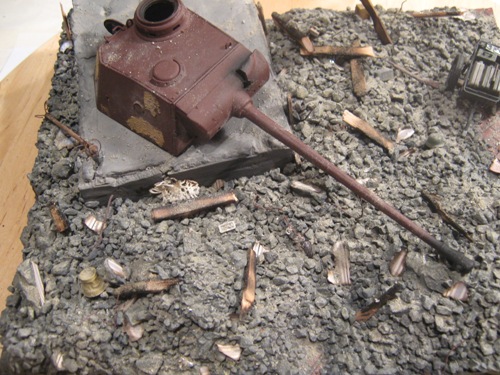
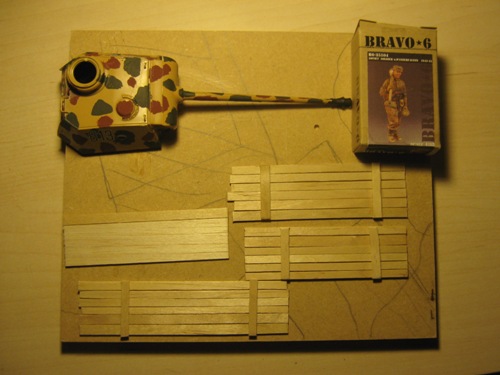
I have decided, after stumbling on a photo of the original, to build a R687 Pantherturm Bunker. I decided to try a method I am planning on using for the Atlantic Wall campaign. This diorama will consist of the R687 bunker, Bravo 6 Soviet soldier (my second resin figure), and a whole lot of ruble. The turret is from a really old model I will be repainting!!

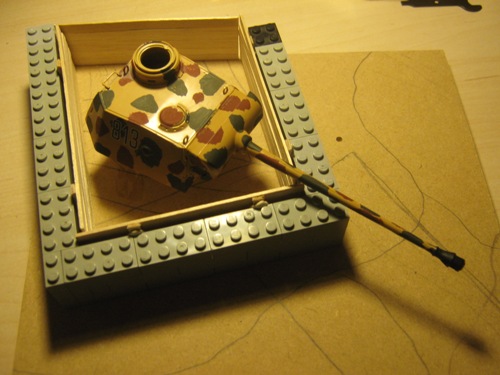
I built wooden walls using a mixture of stirring sticks and balsa wood. I then formed a mold using Lego’s, then I added already mixed plaster that I bought from the hardware store (this process was used by Roman). After waiting for it to dry, I noticed that plaster is not the right material to use, it started to crack. So I decided that the next bunker I build will be built using real cement.

This is the first time I try such a technique, and it will also be the first time I build a diorama with ruble (my 5th dio). I rarely ever finish something I start building, so recently I have been trying finish the dioramas I start.


I still have no name for it, so any suggestion would be nice. Comments and advice is appreciated!

Regards,
thewrongguy
Visit this Community
Ontario, Canada
Joined: October 17, 2002
KitMaker: 448 posts
Armorama: 306 posts
Posted: Friday, September 30, 2011 - 04:45 AM UTC
I like it and I think the cracked plaster might work in your favour. It looks a little beat up and abandoned. Except for not being at street level it seems to match a photo I found.


Cheers and keep us updated,

Jeff
WARDUKWNZ
Visit this Community
Auckland, New Zealand
Joined: June 01, 2011
KitMaker: 1,716 posts
Armorama: 1,638 posts
Posted: Friday, September 30, 2011 - 03:07 PM UTC
Vladimir .. mate great choice of dio bloody interesting subject and not one you see that often ,will be watching this one

TacFireGuru
Visit this Community
Colorado, United States
Joined: December 25, 2004
KitMaker: 3,770 posts
Armorama: 2,263 posts
Posted: Friday, September 30, 2011 - 03:45 PM UTC
Agreed. Looking forward to how this pans out.

Heheheh....I'll have a spare Panther turret once done with a BergePanther.

Should be fun to watch.

Mike
VLADPANZER
Visit this Community
Lebanon
Joined: December 20, 2010
KitMaker: 568 posts
Armorama: 549 posts
Posted: Saturday, October 01, 2011 - 07:31 AM UTC
Thanks a lot guy’, I hope this dio will work out.

@ Jeff: I was just thinking, maybe if it was bombarded or if the munitions exploded the concrete would have cracked.
@ Phill: Thanx for
@ Mike: If you plan a similar bunker do post the pictures!

I have added the rubble and I added some zimmerit and battle damage to the turret. Pictures to follow soon. I can’t wait to start painting the figure, looking forward to it with great zeal.

Regards,
VLADPANZER
Visit this Community
Lebanon
Joined: December 20, 2010
KitMaker: 568 posts
Armorama: 549 posts
Posted: Sunday, October 02, 2011 - 02:30 AM UTC
Hi again,
Well I have added the rubble and debris; I have also added a scratch built coat hanger (the brown thing leaning on the bunker. I have no idea what color to paint the debris! If anyone can advise me on painting the rubble, I would be much obliged.


So any help on the rubble would be great!!
Regards,
zontar
Visit this Community
Hawaii, United States
Joined: August 27, 2006
KitMaker: 1,646 posts
Armorama: 1,557 posts
Posted: Sunday, October 02, 2011 - 06:52 AM UTC
Vlad: Nice looking dio. Can't help much with the rubble, but I would think reds for brick, greys for stone and lighter shades for the dust. You might look at Bruce's Red Rain dio. His building was brick and concrete.

Happy Modelling, -zon
bill1
Visit this Community
West-Vlaaderen, Belgium
Joined: August 14, 2005
KitMaker: 3,938 posts
Armorama: 520 posts
Posted: Monday, October 03, 2011 - 09:25 AM UTC
Yo Vladimir,

Nice subject. Nice groundwork so far!

Greetz Nico
VLADPANZER
Visit this Community
Lebanon
Joined: December 20, 2010
KitMaker: 568 posts
Armorama: 549 posts
Posted: Tuesday, October 04, 2011 - 03:29 AM UTC

Hi all,

@ Zon: Thanks’ for the hint. I followed Bruces build, but when I started this diorama I failed to paint the pieces first and then heap them up. I guess I will do that next time.
@ Nico: Thanks’ for looking, I am really worried about the ground work!

I took Zon’s advice and painted the rubble grey, and I have decided I need to add more wood and perhaps add some broken glass, finer grit, and some wallpaper. I have painted the panther turret with Tamiya (XF-9) hull red, not thinking of painting it yellow (would that be historically wrong?). Also I would appreciate it if someone could tell me what color the zimmerit should be! I am planning on adding the wallpaper and extra pieces of rubble tonight, perhaps start weathering the turret and adding some Russian graffiti to it as well. I might start painting the figure tomorrow if I have the time for it.


Thanks’ for looking, any comment and advice is welcomed,

Regards,
rodrigo_sartori
Visit this Community
Sao Paulo, Brazil
Joined: January 16, 2007
KitMaker: 160 posts
Armorama: 159 posts
Posted: Tuesday, October 04, 2011 - 05:00 AM UTC
Vald Nice work!
The ruins are very cool. I think when you make a weathering and dry brush to highlight shadows and lights will be even nicer. Congratulations!
I will follow it!

Regards,
Rodrigo
VLADPANZER
Visit this Community
Lebanon
Joined: December 20, 2010
KitMaker: 568 posts
Armorama: 549 posts
Posted: Wednesday, October 05, 2011 - 07:53 AM UTC
Hi again,

@ Rodrigo: Thanks’ for the kind words, I hope it’s as good as it should be!

Here it is weathered, I have given it two washes and a light grey dry brush run. I have also painted the few items that are scattered in the rubble, I have also added some burned pieces of wall paper and some broken glass. The pipes and metal supports have been painted and I have added some extra pieces of wood. I have loaded the abandoned cart (to the right of the turret) with some equipment, mostly ammunition. I have also given the turret a black wash and I am to start weathering it soon. I am not very satisfied with the rubble, but I don’t know what else to do/add specially now that I glued down the wallpaper.


I have just started painting my figure, so pictures to follow soon!
Thanks’ for looking, advice and remarks are welcomed!

Regards,
zontar
Visit this Community
Hawaii, United States
Joined: August 27, 2006
KitMaker: 1,646 posts
Armorama: 1,557 posts
Posted: Wednesday, October 05, 2011 - 11:38 AM UTC
Vlad: I think it is starting to shape up. For the rubble, I would suggest picking out individual pieces, in random groups, and painting them slightly lighter or slightly darker shades of grey. Use a couple different variants of lighter and darker. This will put more variety into the color mix. Hope this makes sense and helps.

Happy Modelling, -zon
ophelia53
Visit this Community
Missouri, United States
Joined: March 10, 2010
KitMaker: 254 posts
Armorama: 226 posts
Posted: Thursday, October 06, 2011 - 04:15 PM UTC
Hi Vlad. this is looking fantastic! I love the attention to detail in this, can't wait to see it progress! Great work!
WARDUKWNZ
Visit this Community
Auckland, New Zealand
Joined: June 01, 2011
KitMaker: 1,716 posts
Armorama: 1,638 posts
Posted: Thursday, October 06, 2011 - 04:52 PM UTC
Nice going so far mate you been jumping leaps and bounds with this ,hell you'll be finished next week if this keeps up

Its rockin Vladimir ,really looking forward to its completion

Phill
VLADPANZER
Visit this Community
Lebanon
Joined: December 20, 2010
KitMaker: 568 posts
Armorama: 549 posts
Posted: Friday, October 07, 2011 - 07:52 AM UTC
Hi again,

@ Zon: Thanks’ for the tip Zon, unfortunately once I added the pastel weathering it made them all look the same.
@ Brandi: Thanks’ a lot for the support really means a lot!!
@ Phill: Thanks’ mate, I am actually hoping to finish sooner!!

I have almost finished painting my figure, I will post some pictures when the oil paint wash dries! I still have to paint the zimmerit a dark yellow. The base is almost complete, just need to glue down the abandoned cart and a rifle. So eager to get some work done tomorrow morning, hope this dio turns out well.

Regards,
WARDUKWNZ
Visit this Community
Auckland, New Zealand
Joined: June 01, 2011
KitMaker: 1,716 posts
Armorama: 1,638 posts
Posted: Friday, October 07, 2011 - 10:25 AM UTC
Waiting to see that figure dude .. never used oil's before so this will be interesting to see how it turns out
VLADPANZER
Visit this Community
Lebanon
Joined: December 20, 2010
KitMaker: 568 posts
Armorama: 549 posts
Posted: Sunday, October 09, 2011 - 04:02 AM UTC
Hi again,
@ Phill: I am still new to the figure field so I hope it looks ok, and I hope the pictures are clear enough!

So here is my figure!! It just needs to be weathered with some pastel powder! The diorama is almost complete, looks a bit uniform but I guess the next diorama would be more successful. The method used to paint the fur hat, I learned from Bruce. D from his red rain diorama.


Any advice is welcomed!

Regards,
rodrigo_sartori
Visit this Community
Sao Paulo, Brazil
Joined: January 16, 2007
KitMaker: 160 posts
Armorama: 159 posts
Posted: Sunday, October 09, 2011 - 06:39 AM UTC
Wow!
It was nice to your figure!
I also enjoyed the weathering that has at its base.
I will follow until the end. Congratulations!

hugs,
Rodrigo
exer
Visit this Community
Dublin, Ireland
Joined: November 27, 2004
KitMaker: 6,048 posts
Armorama: 4,619 posts
Posted: Sunday, October 09, 2011 - 11:32 AM UTC
The figure looks great Vladimir


Quoted Text

I am not very satisfied with the rubble, but I don’t know what else to do/add specially now that I glued down the wallpaper.

<


Add dust! That will tie everything together. When a building is blown up or collapses a layer of dust will settle over everything. You very rarely see broken glass in rubble-not because it's not there but because it's hidden by dust.

Not sure if the burnt wallpaper makes sense to me. Where would it come from?

WARDUKWNZ
Visit this Community
Auckland, New Zealand
Joined: June 01, 2011
KitMaker: 1,716 posts
Armorama: 1,638 posts
Posted: Sunday, October 09, 2011 - 12:54 PM UTC
Hey ya Vlad ,, mate the figure looks pretty good ,,that PPSH 41 don't ,,one thing you will want to do is start buying model sets of figures ..just for there weapons and parts ..best way is to look for specials ,,they might not what your looking for but the parts alone can come in handy for many other things ..i have something like 30 sets of figures with no other plans but to use them for parts .trust me its brilliant
and Pat nails it with his suggestion ,,small rubble and dust ..works a treat and ties everything together nicely

Phill
VLADPANZER
Visit this Community
Lebanon
Joined: December 20, 2010
KitMaker: 568 posts
Armorama: 549 posts
Posted: Monday, October 10, 2011 - 06:10 AM UTC

Hello everyone,

@ Rodrigo: Thanks’ again for the kind words, I hope to improve my figs!
@ Pat: Thanks for looking and for the tip, I thought that if a shell hit a building the wall collapses or explodes then the wallpaper would tear (or burn) and fall to the ground. It would be really hard for me to remove it, I guess next time I will avoid it. Thanks’ again for the tip!
@ Phill: Thanks’ again, yea I get what ur saying about the weapons, I had to swap out a Anti-tank rifle for my first resin figure (and I bought a set just for that). Not sure how my family would feel if I stocked several boxes of plastic figures!
I hope I added the dust correctly.


So here is my progress, painted the zimmret on the turret (not really happy with it) and some black pastel powder around the exits of the turret. I have also added some dust (crushed gravel powder, at least I think it’s gravel) all over the base.


I am also looking for a good name, I am pretty sure that “Berlin 1945 … the war is over” has been used hundreds of times. (exaggerated)

As always advice and tips are welcomed,
Regards,
WARDUKWNZ
Visit this Community
Auckland, New Zealand
Joined: June 01, 2011
KitMaker: 1,716 posts
Armorama: 1,638 posts
Posted: Wednesday, October 12, 2011 - 08:09 PM UTC
Vladimir ,, check this place out ,,you will find some very nice things here and they are cheap ,,you can see from what they have ,,other sell this stuff too

http://www.bnamodelworld.com/index.php?main_page=index&manufacturers_id=48?&max_display=75

Enjoy mate

Phill
zontar
Visit this Community
Hawaii, United States
Joined: August 27, 2006
KitMaker: 1,646 posts
Armorama: 1,557 posts
Posted: Thursday, October 13, 2011 - 02:28 PM UTC
Vlad: nice work on the figure. The rest looks good as well!!

Happy Modelling, -zon
meaty_hellhound
Visit this Community
Alberta, Canada
Joined: July 23, 2010
KitMaker: 786 posts
Armorama: 753 posts
Posted: Thursday, October 13, 2011 - 02:48 PM UTC
very nicely done dio with great work on those crazy camo pants for the figure. look forward to seeing this one come together. cheers, bd.
VLADPANZER
Visit this Community
Lebanon
Joined: December 20, 2010
KitMaker: 568 posts
Armorama: 549 posts
Posted: Saturday, October 15, 2011 - 12:49 AM UTC
@ Phill: Thanks’ for the link Phill, have u ever used tank products? I am really curious about them!
@ Zon: Thanks’ a bunch Zon!!
@ Bruce: Thanks’ a lot for the kind words!

I have been very busy lately, so I haven’t had much time (not that I have much work left on it)! But I wanted to take the pictures outside (with natural light) but there was a sand storm the other day and so couldn’t do that either. Maybe I will be able to upload the pictures tomorrow; I have also abandoned the idea of graffiti on the turret.

Again, thanks’ for looking!!
Regards,
 _GOTOTOP