1/35 Bushmaster PMV (Yes, the SMA one!)
Victoria, Australia
Joined: November 03, 2008
KitMaker: 294 posts
Armorama: 291 posts
Posted: Saturday, October 08, 2011 - 09:31 PM UTC
Quoted Text
I reckon maybe you have modified the suspension too much....making it lower than it should be....I have seen this kit built and it sits just right on the one I have seen
Hi Knackers,
I've built it
exactly out of box, as per the kit instructions. Every one I've seen, even the one on display in Showcase's er.. showcase, has the suspension the same way. It will take some modifying to get the ride height right, as if you just move the suspension, you will throw out the camber.
Sam
Al Qahirah, Egypt / لعربية
Joined: July 23, 2004
KitMaker: 6,856 posts
Armorama: 6,363 posts
Posted: Saturday, October 08, 2011 - 09:33 PM UTC
Here's a pic of it built up and it seems to sit higher.. maybe something changed in the final production model?

Hisham
Victoria, Australia
Joined: November 03, 2008
KitMaker: 294 posts
Armorama: 291 posts
Posted: Saturday, October 08, 2011 - 09:46 PM UTC
Quoted Text
Here's a pic of it built up and it seems to sit higher.. maybe something changed in the final production model?
Hisham
Hi Hisham,
Yeah i have that photo too, and that is the model on display in the store - you'll note that the upper hull isn't 100% fitted correctly to the lower, there is a slight ridge above each wheel well - i think if that one just had the upper pushed down 1-2mm, it would sit as poorly as mine.

Sam
Victoria, Australia
Joined: November 03, 2008
KitMaker: 294 posts
Armorama: 291 posts
Posted: Saturday, October 08, 2011 - 09:52 PM UTC
Here is where I'm at with it so far. Im back at work tomorrow, so there goes any chance of getting the build done quickly!
its a big bugger!!


So, the interior. Its passable, but needs LOTS!! Again, I'm building out of box, so here it is:
Nice driver's station, but there are parts called out in the instructions that just aren't in the kit, specifically the side pieces for the driver's air con


The front seats aren't bad:


The etch side plates are nice, but are too tall, i trimmed 1.5mm of all 4:


Sort of dreading building all the seats for the infantry types in the back, i HATE doing seat belts!
Sam
Victoria, Australia
Joined: October 08, 2011
KitMaker: 35 posts
Armorama: 34 posts
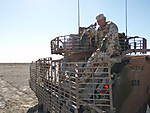
Posted: Saturday, October 08, 2011 - 10:06 PM UTC
This is U55A in country, ride height not too far out....
Just click on the question mark!!! Don't know how to post fotos here

Victoria, Australia
Joined: October 08, 2011
KitMaker: 35 posts
Armorama: 34 posts
Posted: Saturday, October 08, 2011 - 10:52 PM UTC
Still looks as though you have modified it a little bit......if it is out a little, it's not by much.....I don't often see people with rulers and scale drawings at model shows measuring lol.....even the big companies kits are no always to the mm....
As for stowage, packs nd othe pers kit bigge thsn a day pack was kept in the side bins. In the rear rack we would have a few boxes of US MRE, boxes of botteled water secured with the straps in there. Nothing was left loose, in case of a IED, less stuff flying around inside the better.
Radio stacks will have to be guessed at, I doubt that kinda info is in the public domain.....we always had the radio stacks completely covered anyway, usually with a shemagh, or a flag,i had a eureka flag covering mine for a bit....they were covered for security reasons, as we carried some foreign forces at times....the shelving forward of the radio stack was stowed as per individual crew choices for the stores in there. You would normally find a day pack stuffed behind the passengers seat, this was th supervisors grab bag if things went air shaped ...
Queensland, Australia
Joined: January 17, 2006
KitMaker: 752 posts
Armorama: 569 posts
Posted: Sunday, October 09, 2011 - 01:27 AM UTC
looking good mate! i cant wait to get my hands on mine when they turn up!
knackers: just wondering if you had weapons like the laws and the old charlie g in the racks? i've seen the mounting points/straps in a few i've crawled around on, and just wondered if you had them loaded up when you were in country. (thanks for all the info you are providing too!)
Queensland, Australia
Joined: July 01, 2009
KitMaker: 278 posts
Armorama: 248 posts
Posted: Sunday, October 09, 2011 - 02:22 AM UTC
Sorry Sam. I just wanted to point out what I have been trying to say as it seems to be getting lost in translation.
Hope you don't mind.


In the above photos you can see the height difference when compared together.


When compared to the ASLAV 25 the Bushie is taller. Standing in the Commanders Hatch I was looking down onto an ASLAV's turret.
@Grimmo the 84mm was always carried in Afghanistanand it was stowed in the rack on the left inside of the door. 66's were always carried by the Infantry and we carried a resupply for them with some of the vehicles having a rack mounted on the inside of the rear door. My vehicle was a command variant and I carried enough ammunition to resupply the blokes on the ground along with the ammunition for the vehicle and its CES like the generator. All cars carried HE rounds and Illum rounds for the 84. At some stages we carried enough ammunition for a section to last a company with everything from 5.56mm Ball, 5.56mm 5B1T, 7.62 5B1T, grenades (smoke and frag), Claymores, Trip Flares, 66 SRAAW, 84mm, 40mm GLS, 40mm MK19, 9mm and on occasion .50 5B1T. Not to mention rations, water, etc. It got to be quite the squeeze sometimes. For cars fitted with the PWS they carried at least 2600 rnds of 7.62 5B1T whilst I carried considerably less for my flex MAG58's. OMLT-D carried 2 MAG58's per car.
Cheers, John
I'm not a Tanker, I'm better than that. I'm Cavalry.
Distrito Federal, Brazil
Joined: April 03, 2006
KitMaker: 284 posts
Armorama: 273 posts
Posted: Sunday, October 09, 2011 - 02:58 AM UTC
Can you post the instructions photos, mainly the painting and decal options.
Thanks
Victoria, Australia
Joined: November 03, 2008
KitMaker: 294 posts
Armorama: 291 posts
Posted: Sunday, October 09, 2011 - 09:29 AM UTC
Quoted Text
Sorry Sam. I just wanted to point out what I have been trying to say as it seems to be getting lost in translation.
Hope you don't mind.
When compared to the ASLAV 25 the Bushie is taller. Standing in the Commanders Hatch I was looking down onto an ASLAV's turret.
Cheers, John
Hi John,
No dramas here - the more people contribute (specially those that crewed them in AFG) the more chance that we'll highlight areas of improvement etc.
My point is that i built the thing as per the kit instructions, and ended up with the incorrect ride height. There's been mention that I modified the suspension - not so.
Maybe there's scope for a ride height kit to be released in the future, along with stowage, RWS, tools, ambo kit, interior.. who can say!
Sam
Victoria, Australia
Joined: October 08, 2011
KitMaker: 35 posts
Armorama: 34 posts
Posted: Sunday, October 09, 2011 - 10:29 AM UTC
Yes I carried a 66 in the rack by the rear door. In Iraq on AMTG 1/2 the bushes were used more as armoured trucks and were crewed by royal Australia corps of transport members....in afghan they would have been used more as there intended roll as IMV's..... We towed 8 tone trailers behind our a fair bit too and supported AATT-I a lot......we carried everything from mail, stores, pax and logistics stuff.....we were used more in the protected mobility role, did VIP work etc....we carried our own personal weapons, steyr and9 mm pistol and front line ammo for those, then ammo fir the 58, a minimi stored in the rear, an ammo for that. When we carried infantry theyvwould normally bring their own gear and anything extra they needed they stored in the side bins....we normaly carried a fair few MRE, and boxes of water.....I even remember carrying British EOD team and their dog in the back.....as for the ride height, I don't really think it detracts from th overall look and feel of the kit
Rhone, France
Joined: December 02, 2002
KitMaker: 12,719 posts
Armorama: 12,507 posts
Posted: Sunday, October 09, 2011 - 10:31 AM UTC
Quoted Text
Don't know how to post fotos here

Just put the image url between "img" and "/img" (and replace " with brackets of course

)
Frenchy
"Find the Bastards, then Pile On"
Col. George W.Patton III 's standing order for the troopers of the 11th Armoured Cavalry Regiment
Victoria, Australia
Joined: October 08, 2011
KitMaker: 35 posts
Armorama: 34 posts
Posted: Sunday, October 09, 2011 - 11:20 AM UTC
Thanks for that mate....
I appreciate a more experienced modeler pointing little flaws out, I'm not having a go at anyone here.
I think we shouldnt get wrapped round the axles, so to speak over this, I'm just really stoked that someone has gone to the trouble of filling the hole with this kit, I'm sure if dragon put this kit out there would be flaws in it as well.....I'm just really passionate about this vehicle, I loved my bushy, it was a real change in role for me being in one of these wonderful vehicles and a huge experience.....I can onlybtell you what we carried at the time I was there, when we were rotated out, infantry crews took over and they hav their own SOPs etc, we had ours, being transport....and we pretty much did a bit of everything with these vehicles....at thr end of the day it looks like a bushy, it's pretty dam accurate......
Istanbul, Turkey / Türkçe
Joined: December 05, 2007
KitMaker: 953 posts
Armorama: 705 posts
Posted: Sunday, October 09, 2011 - 12:18 PM UTC
Looks interesting so far...Good luck Sam....

Queensland, Australia
Joined: January 17, 2006
KitMaker: 752 posts
Armorama: 569 posts
Posted: Monday, October 10, 2011 - 12:29 AM UTC
kanckers and john: thanks for the info. i cant wait to get started on mine!
South Australia, Australia
Joined: November 06, 2010
KitMaker: 537 posts
Armorama: 474 posts
Posted: Monday, October 10, 2011 - 12:41 AM UTC
hows the anti slip texture? is it correct and are you happy with it or is it something that might need attention ?
this could be very hard to fix, but i'm hoping it good.!
A
Aussies in Afghan diorama (PMV & T55)
European Union
Joined: March 09, 2003
KitMaker: 831 posts
Armorama: 791 posts
Posted: Monday, October 10, 2011 - 05:21 AM UTC
One thing to consider: Did anybody check the dimensions of the Trumpeter LAV-25 family?
Thomas
Punctuation, grammar and orthography are completely fictitious.
Any accordance with current or former rules would be completely random and not intended.
Victoria, Australia
Joined: November 03, 2008
KitMaker: 294 posts
Armorama: 291 posts
Posted: Monday, October 10, 2011 - 08:47 AM UTC
Quoted Text
hows the anti slip texture? is it correct and are you happy with it or is it something that might need attention ?
this could be very hard to fix, but i'm hoping it good.!
A
Anti slip is good, i haven't checked the pattern as yes (i.e. where its applied) but the texture is OK. Its the rolled on type (a'la Trumpeters' M1117 Guardian). Ive seen both rolled and sprayed texture on Bushmaster.
Sam
Victoria, Australia
Joined: October 08, 2011
KitMaker: 35 posts
Armorama: 34 posts
Posted: Monday, October 10, 2011 - 09:48 AM UTC
Antis ip looks good and in scale....I remember someone telling me that they thought there was an " export" version, the ones the Dutch have, that had a different anti slip pattern...the bushes the Dutch got are exactly the same basic bushy that we have, they were destined for an austrlalian unit, but came right off the production line and diverted to the Dutch in a " fast track" to get them to the Dutch...I don't know what mods the Dutch have done since then, but when they recieved them they were basic pattern Aussie bushmasters.
Victoria, Australia
Joined: October 08, 2011
KitMaker: 35 posts
Armorama: 34 posts
Posted: Monday, October 10, 2011 - 10:12 AM UTC
I'm not too sure on the accuracy of the specs on the trumpeter ASLAV, I have only half built mine......but then again I don't really look into that kinda thing too much...
Victoria, Australia
Joined: October 08, 2011
KitMaker: 35 posts
Armorama: 34 posts
Posted: Monday, October 10, 2011 - 11:17 AM UTC
I'd like to explain just a little on how these vehicles were fitted out. Please bear in mind I am talking about 2005/6......we took over the bushmasters in country, so the first rotation had them already fitted out for the role they were intended at the time. The bushes were pretty much brand new when the first mob went over and the unit fitted them out with radios and weapons etc....appropriate to the mission at hand. During training for our tour, we were using unimogs as pretend bush maters, however we were lucky enough to secure 5 or 6, I'm not sure now brand new bushys. They we're delivered with the basic fit out of CES for the vehicles, still in boxes, so we set them up, as per SOP as to which equipment went into which bin....it was then up to the unit to fit them out with radios and weapons...for instance the first rotation used minimis up top for their tour, however we were able to acquire 10 MAG 58's ( GPMG) from the grunts for our tour, so a first rotation vehicle had minimi, and ours had 58's, with the minim stored in the rear of the vehicle. So for instance if you choose to build the U55A version of this
vehicle, and you chose a first in vehicle (AMTG 1), you would have the minimi up top, and leave off the pigs head decals....if you were to build a AMTG 2 vehicle you would have a 58 on top and include the pigs head insignia......a bit of trivia for you, the Australian flags stickers on the front and back of the vehicle were applied by AMTG 1...., they are actually stickers from a souvenir shop that one of the mums sent over, so they could be more readily identified as Aussie. The little flag is actually a decal of the Royal Australian Corps of Transport flag that I had made up and sent to me and I had it flying underneath the Aussie flag on the aerial...I figured if the CAV blokes could have their own squadron pennants, I wanted a RACT flag for my car!!!! I still have both flags here at home....
If you were to go the whole hog and try to open up a few of the bins and scratch build the interior of them, you would need really good pics of each pin as there were some weird angles inside those things.....
Australia
Joined: August 12, 2009
KitMaker: 93 posts
Armorama: 91 posts
Posted: Tuesday, October 11, 2011 - 01:38 AM UTC
Hi Sam, dude you dont mess around do ya, top stuff. Readind all the info being thrown back n forward is a good thing, something for us all to look out for. Waiting for Al to bring my lot back to Sydney, yours will probably be done by then LOL.
Cant wait to see yours all painted up, top work mate.
Victoria, Australia
Joined: October 08, 2011
KitMaker: 35 posts
Armorama: 34 posts
Posted: Friday, October 14, 2011 - 07:42 PM UTC
Just picked up my bushy's today.....Very very nice.....will have to get started and build up my U55A!!!!!!
Victoria, Australia
Joined: March 14, 2006
KitMaker: 1,973 posts
Armorama: 1,843 posts
Posted: Saturday, October 15, 2011 - 01:50 AM UTC
Mine arrived in the mail on Thursday


I'll look to see how some of you guys put yours together first I think
The ride height is a bit disconcerting ATM.
OddBall: "It's a wasted trip baby. Nobody said nothing about locking horns with no Tigers"
KIlgore: " I love the smell of napalm in the morning. ...The smell, you know that gasoline smell, the whole hill. Smelled like... victory."
Victoria, Australia
Joined: October 08, 2011
KitMaker: 35 posts
Armorama: 34 posts
Posted: Saturday, October 15, 2011 - 11:54 AM UTC
I wouldn't bee too concerned, looking at the instructions it is pretty straight forward, if you take it slow it will sit right, if anything it's a couple of MM's out, doesn't detract from the kit.....as for the photos of the built kit in the showcase models store, I was in there yesterday, and it looks great, the hull is sitting correctly on the model, and the ride height looks fine.
As for the PE interior sides, they are meant to be a tight fit and no need to trim anything off....