_GOTOBOTTOM
Constructive Feedback
For in-progress or completed build photos. Give and get contructive feedback!
1/35 SSys Schwerer Plattformwagen test build
grave_digger
Visit this Community
Clare, Ireland
Joined: December 30, 2008
KitMaker: 952 posts
Armorama: 834 posts
Posted: Wednesday, October 12, 2011 - 11:24 AM UTC
Evening gentlemen
one of three SSy variants of 50t famous heavy flatbeds, used by the Deutsche Reichsbahn to transport armored fighting vehicles such Panthers, Tigers and other heavy armor throughout Europe for the German Wehrmacht during the WWII
There are a few resin parts and couple of PE bits involved in this build - as per standard
Frame construction. Some large parts, here is "Sprue shot 1" and "Sprue shot 2", many parts are multiple . The construction is actually very easy, all parts fit in slots made in opposite parts. I started with inner floor sections, added 3 cross beams (high one in the middle), assembled both side beams - they have to meet each other exactly in the middle of the floor, and all secured with drop of C/A. I used some thicker black C/A to make welding lines look in areas where the cross beams are joined together and fill any tiny gaps during assembly


There are still some small parts to be added....

Cheers
Libor
grave_digger
Visit this Community
Clare, Ireland
Joined: December 30, 2008
KitMaker: 952 posts
Armorama: 834 posts
Posted: Thursday, October 13, 2011 - 06:00 AM UTC
I added the hook spring and got ready some parts for brake equipment. So far the parts are just dry-fitted, and they will be assembled properly together with PE parts. Now lets take it more seriously :lol:


Cheers
Libor
Rouse713
Visit this Community
Wisconsin, United States
Joined: February 03, 2009
KitMaker: 367 posts
Armorama: 326 posts
Posted: Thursday, October 13, 2011 - 05:36 PM UTC
What are all the PE parts for?

Also, what time period would this build be for?


Thanks. It looks really good so far!!!
json
Visit this Community
Aarhus, Denmark
Joined: December 04, 2004
KitMaker: 257 posts
Armorama: 156 posts
Posted: Friday, October 14, 2011 - 12:44 AM UTC

I'm guessing WWII, with Panthers and Tigers mentioned.

What is this kit based on? Du you have the blue-prints for this wagon or where do you have the dimensions from? (I plan on scratching on for 1/72).

Thanks,
Steen
grave_digger
Visit this Community
Clare, Ireland
Joined: December 30, 2008
KitMaker: 952 posts
Armorama: 834 posts
Posted: Friday, October 14, 2011 - 10:17 AM UTC
Mark, Steen, thank you for your comments guys. These wagons were used during WWII by German Deutsche Reichsbahn, and similar variants slightly modified can be seen in use until now. The PE parts will be used in my next steps very soon
All my projects are based on original factory drawings, if you are interested, drop me your email address Steen, and I will send you a copy of drawings for this wagon
Cheers
Libor
grave_digger
Visit this Community
Clare, Ireland
Joined: December 30, 2008
KitMaker: 952 posts
Armorama: 834 posts
Posted: Saturday, October 15, 2011 - 01:17 AM UTC
Now I got ready some PE parts needed for another progress. Many of them are two halves soldered together to get right thickness. Then I assembled first part of equipment which passes movement of hand brakes to the wagon brake system. More of that soon. Then I started with other parts of the brake system. This wagon had more advanced Hildebrand-Knorr brake - graduated-release brake that simultaneously affects all cars of a train. I could also mention that many parts have pre-marked small holes which can be adjusted later for wires and rods assembly, always to make joints stronger


More to come soon, thanks for looking
Cheers
Libor
rholmstr
Visit this Community
Oregon, United States
Joined: September 30, 2010
KitMaker: 28 posts
Armorama: 18 posts
Posted: Monday, October 17, 2011 - 04:40 PM UTC
Libor - looks fantastic as always my friend

Bob
grave_digger
Visit this Community
Clare, Ireland
Joined: December 30, 2008
KitMaker: 952 posts
Armorama: 834 posts
Posted: Friday, October 21, 2011 - 10:31 AM UTC
Bob, many thanks buddy. I had gone in Czech for a few days, and returned last night, so here is more progress....
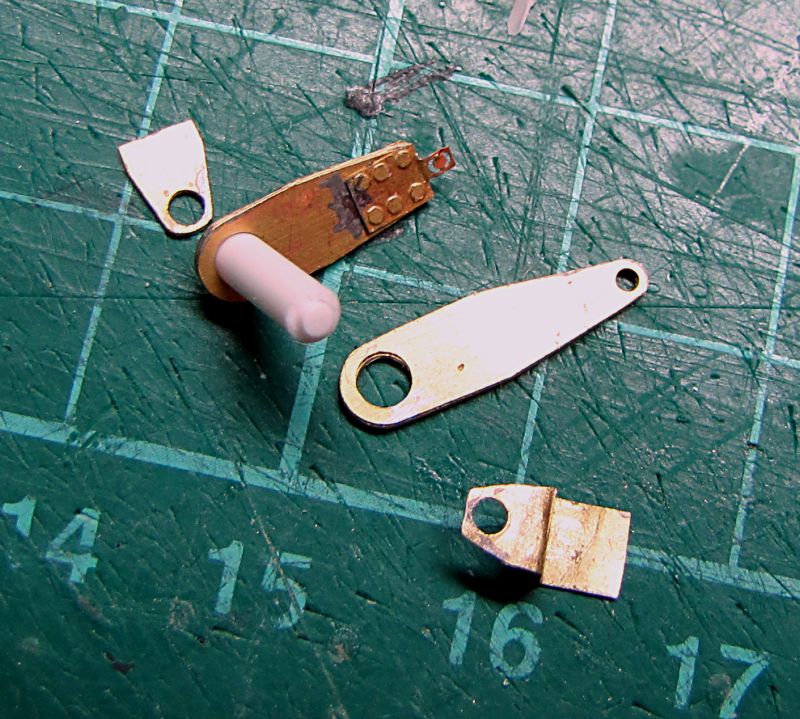
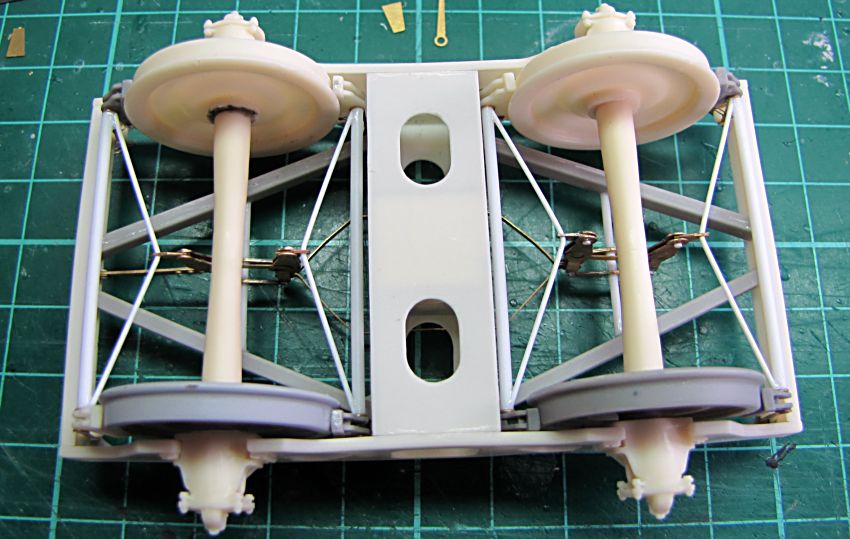
I have found some unexpected issue that needs to be solved... I worked on base of two different drawings, one from my collection, which is more complex, but some small details missing, and another that sent me friend of mine scaned on paper, very large one, with many detailed drawings and cuts. I used it to create exactly the frame and some other parts, some brake parts I made on base of my drawing - in digital format in my PC just ideal to do PE design and prints for further work - so far so good - but never noticed that both drawings had different brake model. Large brake cylinder in one - Hildebrand brake I mentioned earlier, which I used - thin brake cylinder - probably the same manufacturer, but older make - in other. Well, I made more advanced large cylinder from one drawing, and the brake arms to operate whole system from another, where the cylinder was smaller - and the result is that 2 of 3 holes on one side are too close to the third one - all right for thin cylinder, but trouble for the other one - there is a crossing rod to be assembled in second holes - it has to pass the cylinder body, but that is too thick and it just wont

Not a problem to fix it, I could do either new older cylinder or change the PE parts for production. Easier way is to keep the advanced cylinder and change the PE parts. It is just about to move two holes a small bit inside, following the other drawing with large cylinder now... exactly what the test build is here for - to get everything right for the kit. For my test build I filled wrong hole with solder and made new one in correct distance.

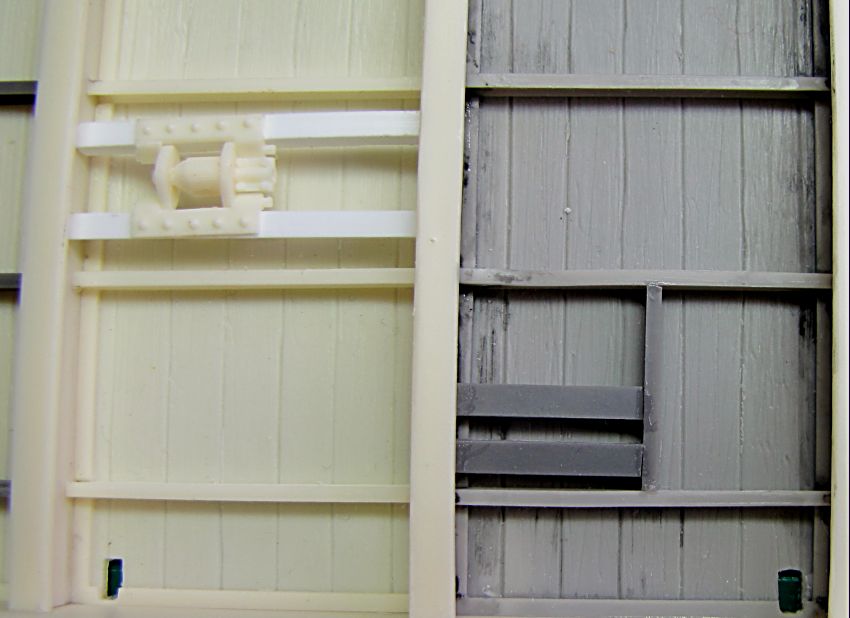
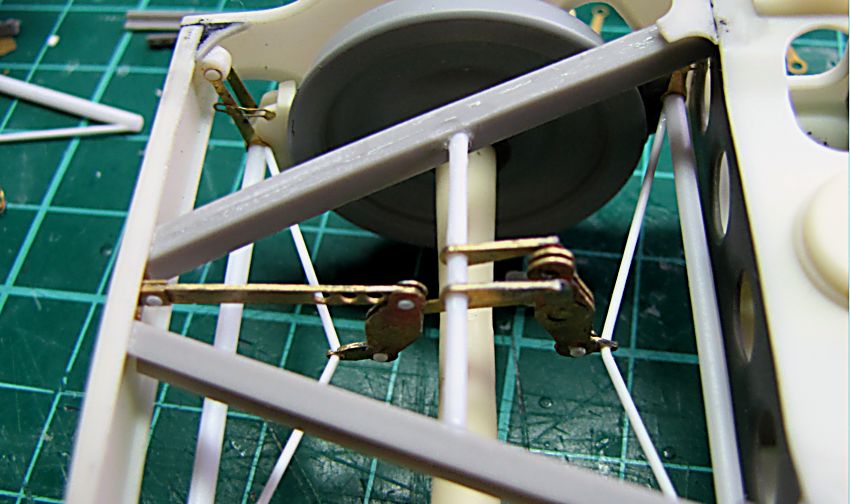
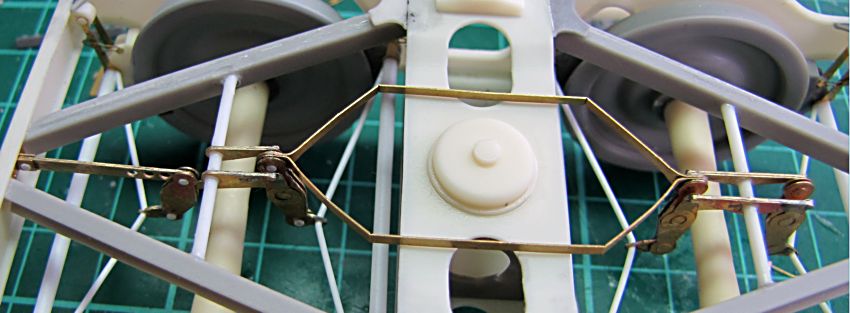
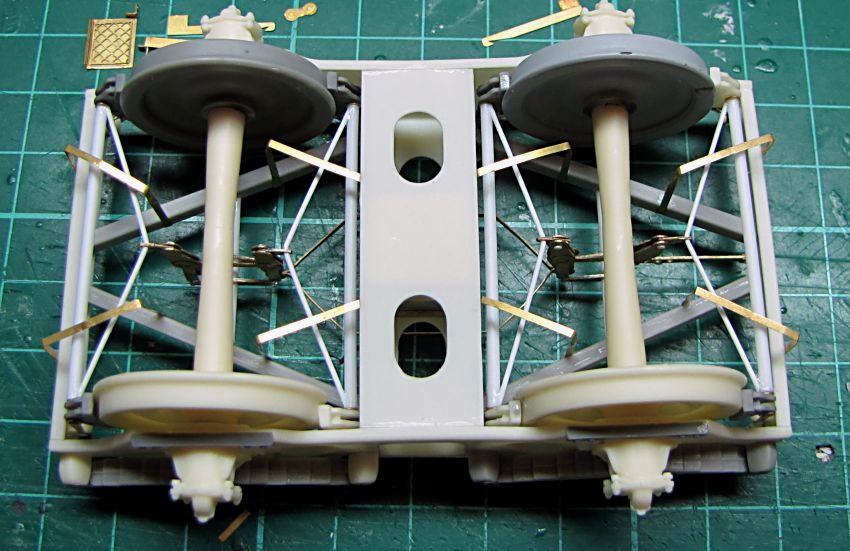
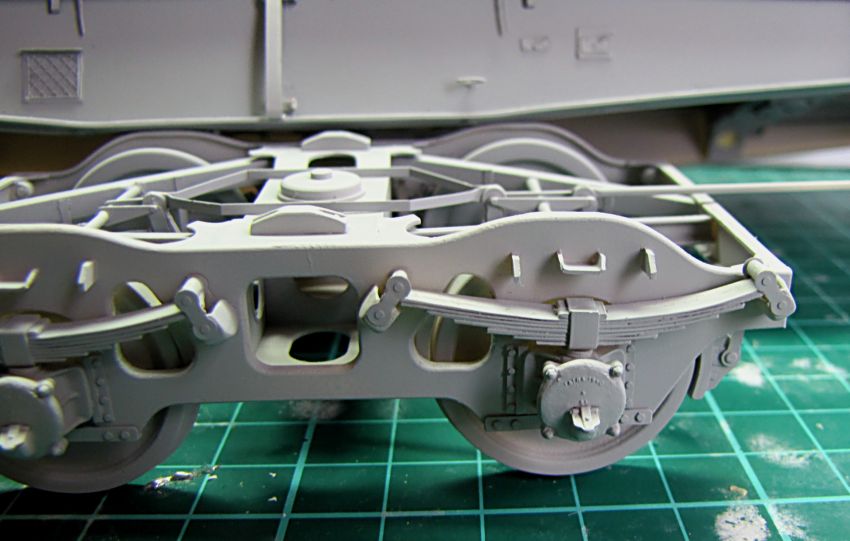
I have added all the resin reinforcements underneath (thin pieces with holes are simply cut by the side edge, and then pushed in and securet with a drop of glue) and also other small details - another part of hand brake equipment - little cogwheel is placet exactly opposite to the sliding rod at the other side. Next picture shows final version of brake arms, which are now used to get together whole thing. There are some plastic rods involved, exact dimensions will be shown in assembly instructions, so just to mention that they have flattened ends which are to be placed between two PE arms. This is easy done with suitable pliers


Cheers
Libor
grave_digger
Visit this Community
Clare, Ireland
Joined: December 30, 2008
KitMaker: 952 posts
Armorama: 834 posts
Posted: Friday, October 21, 2011 - 09:43 PM UTC
Continued with brake system assembly, I put together all the parts and secured with a drop of glue. The brake cylinder is placed in its position and a connecting rod for the hand brake assembly is also on its place. Finally I closed holes in PE arms with thin slices of 1,2mm rod do get nice looking pins


Cheers
Libor
grave_digger
Visit this Community
Clare, Ireland
Joined: December 30, 2008
KitMaker: 952 posts
Armorama: 834 posts
Posted: Saturday, October 22, 2011 - 03:48 AM UTC
More parts added to the brake assembly. PE sliders for bogies glued in position to fit with opposite parts mounted on bogies. Then continued with brake power switch and air tank cylinder


Cheers
Libor
Rouse713
Visit this Community
Wisconsin, United States
Joined: February 03, 2009
KitMaker: 367 posts
Armorama: 326 posts
Posted: Saturday, October 22, 2011 - 07:26 AM UTC
I really like the bevel gears! What campaign of WW2 is this going to be for?

Very clean building!
grave_digger
Visit this Community
Clare, Ireland
Joined: December 30, 2008
KitMaker: 952 posts
Armorama: 834 posts
Posted: Saturday, October 22, 2011 - 10:26 AM UTC
Many thanks Mark. This wagon was introduced in 1942 and would suit in any dio dated after it.
Cheers
Libor
grave_digger
Visit this Community
Clare, Ireland
Joined: December 30, 2008
KitMaker: 952 posts
Armorama: 834 posts
Posted: Sunday, October 23, 2011 - 02:17 AM UTC
All the air pipes and connections done. Also releasing lever for brake power switch has taken its place. Another little job in this area will follow later - but there are some really tiny levers which cannot be done in 1/35 scale at all...


Cheers
Libor
Plasticbattle
#003
Visit this Community
Donegal, Ireland
Joined: May 14, 2002
KitMaker: 9,763 posts
Armorama: 7,444 posts
Posted: Sunday, October 23, 2011 - 02:33 AM UTC
Amazing work again Libor. Really shows up the lack of detail on the Dragon model.
grave_digger
Visit this Community
Clare, Ireland
Joined: December 30, 2008
KitMaker: 952 posts
Armorama: 834 posts
Posted: Sunday, October 23, 2011 - 10:46 PM UTC
Hi Frank, many thanks - good to see you around
Bogie assembly. These parts are very thin and easy to work with. To shape the top piece with turning base properly I glued it in the middle area first, and then I used hot cloth to warm it up a bit and bend it easily. Finally a drop of C/A used to secure it in position. Extra care has to be taken to assembly bogie sides. I marked centre on all pieces first to fit it right, and then I used flat surface to make sure that all the angles are correct, before all parts are secured with glue. Wheels mounted on axles, bearing housings added and whole things slided in slots. Their right position is shown in picture - so far they are just dry-fitted. Now there are some PE parts to deal with....


Cheers
Libor
grave_digger
Visit this Community
Clare, Ireland
Joined: December 30, 2008
KitMaker: 952 posts
Armorama: 834 posts
Posted: Monday, October 24, 2011 - 11:13 AM UTC
First batch of PE bits soldered together to create various brake assembly parts.


Now most of the PE parts is ready to be assembled. I soldered together the brake holders, glued hangers on brake blocks and added spacers - four on the left and four on the right. Just a couple of more small things to be done before everything will be stuck together


Now I got ready four operating rods for the brakes and hung completed brakes in the bogie. Also cross beams added and some small bits to get the right look.


Cheers
Libor
grave_digger
Visit this Community
Clare, Ireland
Joined: December 30, 2008
KitMaker: 952 posts
Armorama: 834 posts
Posted: Tuesday, October 25, 2011 - 05:19 AM UTC
Continued with brake assembly, pictures will explain better than words...


Cheers
Libor
grave_digger
Visit this Community
Clare, Ireland
Joined: December 30, 2008
KitMaker: 952 posts
Armorama: 834 posts
Posted: Tuesday, October 25, 2011 - 11:25 PM UTC
Continued with brake system, I have assembled second half of the boggie and also the springs are in position. Just very few small jobs to be done to finish it


Cheers
LiborLibor
Rouse713
Visit this Community
Wisconsin, United States
Joined: February 03, 2009
KitMaker: 367 posts
Armorama: 326 posts
Posted: Wednesday, October 26, 2011 - 03:02 PM UTC
This build is powered by win!

Your PE and styrene work are very clean. What color are you going to paint it:

Grey or yellow? I was never up to speed on the german railway coloring schemes.
grave_digger
Visit this Community
Clare, Ireland
Joined: December 30, 2008
KitMaker: 952 posts
Armorama: 834 posts
Posted: Thursday, October 27, 2011 - 04:27 AM UTC
Hi Mark, many thanks. As per test build I will finish probably with surfacer grey. These wagons were always painted in black from manufacturer, and personally I have never seen any other color - though available references for these wagons are very rare....
More parts added on the bogie, though these spring bumpers in first picture will be made of PE in the kit. Also all the secure holders assembled. Once all finished, the bogies can be connected to the main brake assembly through 1mm rod with flattened end. At the end I glued on buffers, coupling, air hose assembly and few other details


Cheers
Libor
grave_digger
Visit this Community
Clare, Ireland
Joined: December 30, 2008
KitMaker: 952 posts
Armorama: 834 posts
Posted: Friday, October 28, 2011 - 12:47 AM UTC
Now the build is almost finished... I added some tiny PE parts for brake assembly, and wires for brake system air release and brake power switch. On sides there are almost all the parts mounted as well. I used just one safety hook for stanchions made of wire to show, there will be resin ones in the kit. There will be also additional PE holders for stanchions stored on wagon sides, I will add them once received prom PE producer. Also plates for brake power switches are temporary ones, there will be slightly different ones in the kit. Before that I will stick my build in surfacer coat.....


Cheers
Libor
grave_digger
Visit this Community
Clare, Ireland
Joined: December 30, 2008
KitMaker: 952 posts
Armorama: 834 posts
Posted: Friday, October 28, 2011 - 09:09 AM UTC
I have applied surfacer coat. I will add decals and few more bits when PE parts arrive, but generally it is almost finished...


Cheers
Libor
SHarjacek
Visit this Community
Croatia Hrvatska
Joined: January 29, 2011
KitMaker: 977 posts
Armorama: 553 posts
Posted: Friday, October 28, 2011 - 12:09 PM UTC
Outstanding!
grave_digger
Visit this Community
Clare, Ireland
Joined: December 30, 2008
KitMaker: 952 posts
Armorama: 834 posts
Posted: Saturday, October 29, 2011 - 09:38 PM UTC
Swen, many thanks!
Cheers
Libor
grave_digger
Visit this Community
Clare, Ireland
Joined: December 30, 2008
KitMaker: 952 posts
Armorama: 834 posts
Posted: Thursday, November 17, 2011 - 09:23 PM UTC
Just gotta finnish this - I received some additional PE and got done the rest. Stanchions missing in my build so far are done. According to the reference pictures, they were mostly missing anyway, though they came as a part of the wagon from production. They can be assembled standing or stored on holders on both sides - or they can be just left of course.


Cheers
Libor
 _GOTOTOP