Armor/AFV: Braille Scale
1/72 and 1/76 Scale Armor and AFVs.
Hosted by Darren Baker
StuG. III Ausf.G with Wintertracks
SchoeniR6
Visit this Community
Germany
Joined: November 21, 2010
KitMaker: 189 posts
Armorama: 189 posts
Posted: Wednesday, November 16, 2011 - 06:59 AM UTC
Sooooooooo

Thanks for the comments.

@Pedro: I think the work with your self-constructed is much higher.
The work with pe´s is not so hard than it looks. And it´is the first time i use a pe set. Before that i only use the pe parts in the box.

@Antoine: It´snot so hard to use pe parts on a model in braille scale. And you must not use all the parts in the set. I use only the parts i like. :-)
Looking forward to see the kingtiger.


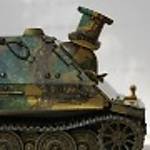
I drilled out the tubs a little bit more!?!?!
The pe part for this is very good.


On the backside i glue the wires.


Here on the model.


The same on the other side. I think it looks better than the plastic part from dragon. ;-)


Only a little step today.....

Cheers Daniel
SchoeniR6
Visit this Community
Germany
Joined: November 21, 2010
KitMaker: 189 posts
Armorama: 189 posts
Posted: Monday, November 21, 2011 - 04:39 AM UTC
Hello

Today the last pictures befor I began with the color.

The complete tank without color. Most of the part are placed on it without glue.
It´only for a good view befor the grey color comes. ;-)
Next pictures come i a few days.


A little handle on the hatch and it looks much better. ;-)


Here the figures for this project. They are from MIG. But i change one head.


Hope you like it!

Regards

Gruß Daniel
Korpse
Visit this Community
Queensland, Australia
Joined: October 06, 2009
KitMaker: 382 posts
Armorama: 378 posts
Posted: Monday, November 21, 2011 - 09:41 AM UTC
Hi Daniel

Your stug is vey eye catching, even in unpainted form. I'm looking forward to seeing it painted

cheers
Neil
PanzerAlexander
Visit this Community
Attica, Greece / Ελλάδα
Joined: February 17, 2010
KitMaker: 625 posts
Armorama: 608 posts
Posted: Sunday, November 27, 2011 - 10:33 AM UTC
Excellent build, and eyecatching result.

P.A.
erhntly
Visit this Community
Izmir, Turkey / Türkçe
Joined: June 11, 2004
KitMaker: 1,426 posts
Armorama: 464 posts
Posted: Wednesday, November 30, 2011 - 10:22 AM UTC
Hi Daniel,

Please do not paint, it's very nice ..
SchoeniR6
Visit this Community
Germany
Joined: November 21, 2010
KitMaker: 189 posts
Armorama: 189 posts
Posted: Friday, February 03, 2012 - 03:07 AM UTC
Hi


Long time ago I start this BB here. ;-)
It´s time to continue......


I start with the first colors. For the Dark yellow I take Tamiyas Dark yellow. The yellow is a bit brighter, because of the small scale. After that I will make the brown camo-stripes.


Here the pictures!!!!


Clean model......


There a few parts from my Dragon HMMWV under the StuG parts ;-)


First I start with skygrey from Tamiya.
After that i made tha preshading. There is not a picture of it.


First the dark yellow.


Here are the first brown stripes
Later I will overspray the model with buff.


Here are the decals on the model, They are very good.


That are the pictures from the model with the winter camo.
I make the white color a bit darker. But on the pictures you dont see it.


Hope you like the model...

Next pictures comes faster ;-)


Cheers Daniel
SchoeniR6
Visit this Community
Germany
Joined: November 21, 2010
KitMaker: 189 posts
Armorama: 189 posts
Posted: Saturday, February 04, 2012 - 01:00 AM UTC
Hi


Next steps!

But much to do!
You can see where it goes to.


Not much to say!


Regards Daniel
vonHengest
Visit this Community
Texas, United States
Joined: June 29, 2010
KitMaker: 5,854 posts
Armorama: 4,817 posts
Posted: Saturday, February 04, 2012 - 06:35 AM UTC
Nice work Daniel! I did not realize this was braille, and I'm glad I looked
Plasticbattle
#003
Visit this Community
Donegal, Ireland
Joined: May 14, 2002
KitMaker: 9,763 posts
Armorama: 7,444 posts
Posted: Saturday, February 04, 2012 - 11:18 AM UTC
Beautifil build Daniel. Very neat. The StuG looks so cool with the winterketten. Your winter camo is really nice done as well. Will be interested to see how this looks after weathering. The brown coming through the worn whitewash, looks "warm" and contrasts with maybe the effect you´re loking for?
PanzerMaker
Visit this Community
New Caledonia
Joined: July 20, 2011
KitMaker: 35 posts
Armorama: 35 posts
Posted: Sunday, February 05, 2012 - 02:10 AM UTC
wow verry nice build,
1/35 niveau of building on 1/72 scale.
i like the winter white camouflage to!

jan.
SchoeniR6
Visit this Community
Germany
Joined: November 21, 2010
KitMaker: 189 posts
Armorama: 189 posts
Posted: Monday, February 06, 2012 - 04:19 AM UTC
Hi


Thank you guys!


Next step.


The angel mirrors. They are made from sheet. First paint the inside silver. After that I paint it dark yellow. I´m happy with it.


Now on the top of the StuG. OK, but in the end you can´t see much of them.


One of the MIG figures. I made the microphone by wire.


The second one is also MIG figure. But with another head.
I do the same with the wire.


So. That´s it so far. I am happy about every commend!


Regards Daniel
SchoeniR6
Visit this Community
Germany
Joined: November 21, 2010
KitMaker: 189 posts
Armorama: 189 posts
Posted: Thursday, February 09, 2012 - 06:03 AM UTC
Hello


Here the next pictures. This time from the build of the dio.
It is a winter scene. But at the end of a long and very cold winter.


First step.....Cutting a big block who looks like the terrain i will have.


I cut a shelf with the jig saw and glue it into a picture frame. I make a skech of the positions from the Stug and the trees. The glue line shows the water line of the little lake.


I use black sheet for the framing. The cork should imitate stones. First water in the lake.....


Holes for the trees.


I litte detail from the lake. Here you can see the groundwork.


Molto is used for the ground. I is rockhard in a couple of hours.


I use Busch ground-elements, color, pigments, spices and some stones.


First add test with the trees and the StuG.


There is much work on the trees...............


Some branches made by copper wire.
This is much fun. I like to work with wire.


Last picture for today. Bushes are from Mininatur!
In the end everything is oversprayed with some vallejo colores for a better finish.


Hope you enjoy the pictures.

Comments and questions welcome. :-)


Cheers Daniel
vonHengest
Visit this Community
Texas, United States
Joined: June 29, 2010
KitMaker: 5,854 posts
Armorama: 4,817 posts
Posted: Thursday, February 09, 2012 - 03:08 PM UTC
Beautiful!

I would like to know more details about how you create the trees and vegetation in 1/72, specifically what materials you are using. Thanks in advance
SchoeniR6
Visit this Community
Germany
Joined: November 21, 2010
KitMaker: 189 posts
Armorama: 189 posts
Posted: Monday, February 13, 2012 - 11:32 PM UTC
Hi Jeremy

It´s how I write before. I only use green-tea, spices, and some products from Busch and Mininatur. From Minitatur specially the trees and the grass clumps. Mininatur has got many produkts for winter, summer and fall. The trees are kits from Mininatur. For the rest i use little stones and cork.
Hope that helps you.

Cheers Daniel
tread_geek
Visit this Community
Ontario, Canada
Joined: March 23, 2008
KitMaker: 2,847 posts
Armorama: 2,667 posts
Posted: Tuesday, February 14, 2012 - 04:43 AM UTC
Daniel,

Super job on the StuG and the base is extremely impressive. Glad I don't have to compete against you. Who Knows, maybe some day.

Cheers,
Jan
r2d2
Visit this Community
England - South East, United Kingdom
Joined: April 13, 2006
KitMaker: 424 posts
Armorama: 419 posts
Posted: Tuesday, February 14, 2012 - 11:07 AM UTC
I'm just lovin what i'm seeing! Well done Daniel!
domingowin
Visit this Community
Singapore / 新加坡
Joined: December 16, 2011
KitMaker: 46 posts
Armorama: 45 posts
Posted: Tuesday, February 14, 2012 - 09:07 PM UTC
Looks very good, Daniel.I love the last photo you uploaded. Would be better looking if you add those trees and some more rocks around the tank, I guess
SchoeniR6
Visit this Community
Germany
Joined: November 21, 2010
KitMaker: 189 posts
Armorama: 189 posts
Posted: Wednesday, February 15, 2012 - 08:06 AM UTC
Hi


Thank you all for writing comments. I´m glad you like it. :-):-).-)


The work is complete. Here the final pictures.


I hope for many comments here! Work is complete!


Cheers Daniel
IrishGreek
Visit this Community
Michigan, United States
Joined: October 17, 2010
KitMaker: 627 posts
Armorama: 571 posts
Posted: Wednesday, February 15, 2012 - 08:34 AM UTC
That is a beautiful job! I hope my skills someday are able to approach yours. Thanks for sharing.

Wow.
domingowin
Visit this Community
Singapore / 新加坡
Joined: December 16, 2011
KitMaker: 46 posts
Armorama: 45 posts
Posted: Wednesday, February 15, 2012 - 02:12 PM UTC
Fantastic!! It's really an eyecatching build. Keep on,Daniel.
Chrisk-K
Visit this Community
Maryland, United States
Joined: January 09, 2012
KitMaker: 310 posts
Armorama: 294 posts
Posted: Wednesday, February 15, 2012 - 05:10 PM UTC
FREAKING Unbelievable!

Could you please answer two questions?

1. How did you mount the model on the black round plastic thing?

2. What is the white boxy stuff where you put toothpicks?
Braille
#135
Visit this Community
California, United States
Joined: August 05, 2007
KitMaker: 1,501 posts
Armorama: 1,485 posts
Posted: Friday, February 17, 2012 - 07:04 PM UTC
@SchoeniR6 - Daniel,

TOP NOTCH WORK!

~Eddy
skala72
Visit this Community
Warszawa, Poland
Joined: February 17, 2010
KitMaker: 109 posts
Armorama: 106 posts
Posted: Sunday, February 19, 2012 - 03:10 AM UTC
I am impressed. Amazing workshop, the model looks great, but with stand very good. Congratulations.
SchoeniR6
Visit this Community
Germany
Joined: November 21, 2010
KitMaker: 189 posts
Armorama: 189 posts
Posted: Monday, February 20, 2012 - 01:59 AM UTC
Hi

Thank you for your good opinions.
I´m glad that you like it!

@Chris-K: I mount the model with a screw by the bottom of the model. You can´t see nothing after you place teh model on the base. It is the packing from blank CD´s. It is very good for painting a model.
And the toothpicks ar put in a block polystyrene.
Hope that helps you a little bit.

Regards to all of you.

Daniel
PedroA
Visit this Community
Valencia, Spain / España
Joined: December 27, 2010
KitMaker: 324 posts
Armorama: 322 posts
Posted: Sunday, March 04, 2012 - 12:24 AM UTC
Great scene Daniel. Excellent work with trees and snow. It is a good inspiration for us.

Regards.

Pedro.