Armor/AFV: AA/AT/Artillery
For discussions about artillery and anti-aircraft or anti-tank guns.
Hosted by Darren Baker
WIP - (1/35 Dragon) M270 MLRS
Boris1991
Visit this Community
Zuid-Holland, Netherlands
Joined: October 13, 2009
KitMaker: 307 posts
Armorama: 278 posts
Posted: Friday, January 06, 2012 - 06:10 AM UTC

Quoted Text

Its coming out well. A few corrections.

On the tracks, the rectangular pads on the back side with the bolt are also rubber and should be black as well.

I would also paint over or remove the INERT labels on the tops and sides of the launch pod containers too. These are only on practice rocket pods without actual rockets in them.

Lastly, Dragon messed up the ranks on the crew names. ASCP should be SPC for Specialist and SBG should be SSG for Staff Sergeant.

Keep up the good work.


thanks for your corrections ! I will look after the rubber pads, think these are very difficult to paint since there in almost no depth difference between them and the steel, any tips?
I will cover the inert decals and will look after the ranks, might be difficult to paint the corrections on them....


Quoted Text

@Boris: I'm Dutch too , but have lived in the US for 20 years now.....


nice! my dream is to move to the USA when Im older


Quoted Text

ummm....

The IPMS "national" location moves depending on what club wins the bid for it. Last year it was in Nebraska, Before that Arizona... It hasnt been in florida for over a decade! Last time it was close was in 2005 Atlanta Georgia. But they are being held in Florida this year.

Great looking build so far! Insprired me to think about starting mine!


ohh now I get it
thanks for the compliment! this is a great vehicle and the kit is nice, except for the rail system in the launcher.....
Boris1991
Visit this Community
Zuid-Holland, Netherlands
Joined: October 13, 2009
KitMaker: 307 posts
Armorama: 278 posts
Posted: Saturday, January 14, 2012 - 07:00 AM UTC
ok, I made progress, the model itself is finished at the moment very happy about the result.
I am planning to make a base for it.
somewhere random in the desert with one rocket pod on the ground.
off course I need figures for this... i found this on luckymodel. it says US tankers from desert storm....
Are those figures the right ones?
I would like them to stand in front or next to the M270.

please someone respond so I can order some figures.
Pictures of finished model will be posted tomorrow, check it out.

thanks for the help!
Boris1991
Visit this Community
Zuid-Holland, Netherlands
Joined: October 13, 2009
KitMaker: 307 posts
Armorama: 278 posts
Posted: Sunday, January 15, 2012 - 04:12 AM UTC
anyone with info on my last post?

anyway, as promised, here are the pictures of the finished model.
I can now move on to the Diorama, which in fact I already started with! see below.

The pictures of the M270! would be nice if you let me nknow what you think about it:


I am very happy with the result!
As said on top, I started with the Diorama:


Its gonna be a desert with a small slope on the end (where the evergreen is made)

Let me know what you think about it
thanks for watching!

See more of the M270 LRS build on my website
retiredyank
Visit this Community
Arkansas, United States
Joined: June 29, 2009
KitMaker: 11,610 posts
Armorama: 7,843 posts
Posted: Sunday, January 15, 2012 - 04:23 AM UTC
A very nice looking finish. My only observation is the road wheels. I imagine you are going for a weathered look. However, the chipping should be a dark grey to represent steel; not the same color as the rubber. Also, you seem to have the same color of the wheels on the outside edge. This looks more like a sloppy paint job. Just a small acknoweledgement that would take off points under a judge's scrutiny and again just MHO. Can't wait to see the base.
HeavyArty
Visit this Community
Florida, United States
Joined: May 16, 2002
KitMaker: 17,694 posts
Armorama: 13,742 posts
Posted: Sunday, January 15, 2012 - 05:44 AM UTC
It looks good. Nice job on it. As to figures, and modern tanker will work. MLRS Crewmen wear the same uniforms and use the standard CVC helmets that tankers wear.

I used Dragon's ODS-era tank crew figures on mine.
Boris1991
Visit this Community
Zuid-Holland, Netherlands
Joined: October 13, 2009
KitMaker: 307 posts
Armorama: 278 posts
Posted: Sunday, January 15, 2012 - 11:51 PM UTC

Quoted Text

A very nice looking finish. My only observation is the road wheels. I imagine you are going for a weathered look. However, the chipping should be a dark grey to represent steel; not the same color as the rubber. Also, you seem to have the same color of the wheels on the outside edge. This looks more like a sloppy paint job. Just a small acknoweledgement that would take off points under a judge's scrutiny and again just MHO. Can't wait to see the base.


thanks.
as for the roadwheels, i wasnt going for a weathered look with chips, since this didnt happen in real. the paint came under the tape while spraying the black on it. that is what you see. I should have fixed this.
Thanks for your reply!
updates on the base tonight or tomorrow.


Quoted Text

It looks good. Nice job on it. As to figures, and modern tanker will work. MLRS Crewmen wear the same uniforms and use the standard CVC helmets that tankers wear.

I used Dragon's ODS-era tank crew figures on mine.


thanks! So the figures I linked (luckymodel) will do just fine? please confirm.
thank you!
Boris1991
Visit this Community
Zuid-Holland, Netherlands
Joined: October 13, 2009
KitMaker: 307 posts
Armorama: 278 posts
Posted: Monday, January 16, 2012 - 12:31 AM UTC
this morning I added the plaster to the base:
Now it is time to apply the very fine sand with thinned woodglue.


See more of the M270 LRS build on my website
Brobru
Visit this Community
Warszawa, Poland
Joined: October 10, 2011
KitMaker: 95 posts
Armorama: 86 posts
Posted: Monday, January 16, 2012 - 12:00 PM UTC
Wow! Great work! I like your superdetailing very much!
Looking forward to see finished dio! Keep up the good work!
HeavyArty
Visit this Community
Florida, United States
Joined: May 16, 2002
KitMaker: 17,694 posts
Armorama: 13,742 posts
Posted: Monday, January 16, 2012 - 02:41 PM UTC

Quoted Text

thanks! So the figures I linked (luckymodel) will do just fine? please confirm.


Yes, the figures are appropriate for ODS. They are pretty poor figures though. I don't like CMK figures. They are too chunky looking and just don't look right to me.
TacticalSquirrel
Visit this Community
Connecticut, United States
Joined: May 12, 2010
KitMaker: 546 posts
Armorama: 538 posts
Posted: Monday, January 16, 2012 - 03:38 PM UTC

Quoted Text


Quoted Text

thanks! So the figures I linked (luckymodel) will do just fine? please confirm.


Yes, the figures are appropriate for ODS. They are pretty poor figures though. I don't like CMK figures. They are too chunky looking and just don't look right to me.


So you're saying they are National Guard figures then?
Boris1991
Visit this Community
Zuid-Holland, Netherlands
Joined: October 13, 2009
KitMaker: 307 posts
Armorama: 278 posts
Posted: Monday, January 16, 2012 - 11:35 PM UTC

Quoted Text

Wow! Great work! I like your superdetailing very much!
Looking forward to see finished dio! Keep up the good work!


thanks!


Quoted Text

Yes, the figures are appropriate for ODS. They are pretty poor figures though. I don't like CMK figures. They are too chunky looking and just don't look right to me.


ok, thanks for your confirmation what other figures should I use then?


HeavyArty
Visit this Community
Florida, United States
Joined: May 16, 2002
KitMaker: 17,694 posts
Armorama: 13,742 posts
Posted: Monday, January 16, 2012 - 11:58 PM UTC
These are the figures I used. They are really nice and come out well.


Boris1991
Visit this Community
Zuid-Holland, Netherlands
Joined: October 13, 2009
KitMaker: 307 posts
Armorama: 278 posts
Posted: Wednesday, April 04, 2012 - 08:15 AM UTC
Thanks you for the figures Gino.
sorry to answer this late, but those figures seem to be out of stock everywhere and are no longer produced I heard at my local hobby shop.

At this moment I am spending a lot of time creating my website but managed to do some work on my M270 & AAVP-7A1 aswell.

I painted the base and added the rocket pod underneath the rail system (how do you say that in English )
Pics:


I think it is to simple as it is right now. Will look after figures, but any additions are very welcome.
how do you like it so far?

thanks for watching!

See more of the M270 LRS build on my website
HeavyArty
Visit this Community
Florida, United States
Joined: May 16, 2002
KitMaker: 17,694 posts
Armorama: 13,742 posts
Posted: Wednesday, April 04, 2012 - 08:28 AM UTC
Looking pretty good. Only a couple things I see.

One is the cable supporting the pods under the boom. It looks as though you have one cable going down then up again. There are about 8 cables here that wrap around the pully multiple times to lessen the load.

It should look like this.


The track looks too loose to me too. They are pretty tight and have very little sag to them. Maybe remove a link or two per side.


Lastly, Dragon messed up on the upper hatch. It is molded 180 degrees from what it actually is. The handle should be at the top or rear of the hatch, opposite the hinges when opened. The easiest way to fix it is to remove the hinges and turn it around. Hope that makes sense.

Other than the above, it looks really good. Good job on it.
Boris1991
Visit this Community
Zuid-Holland, Netherlands
Joined: October 13, 2009
KitMaker: 307 posts
Armorama: 278 posts
Posted: Thursday, April 05, 2012 - 03:37 AM UTC

Quoted Text

Looking pretty good. Only a couple things I see.

One is the cable supporting the pods under the boom. It looks as though you have one cable going down then up again. There are about 8 cables here that wrap around the pully multiple times to lessen the load.

It should look like this.


The track looks too loose to me too. They are pretty tight and have very little sag to them. Maybe remove a link or two per side.


Lastly, Dragon messed up on the upper hatch. It is molded 180 degrees from what it actually is. The handle should be at the top or rear of the hatch, opposite the hinges when opened. The easiest way to fix it is to remove the hinges and turn it around. Hope that makes sense.

Other than the above, it looks really good. Good job on it.


thanks!
pff, I searched a pretty long time for a pic like the first one but couldnt find any, an you come up with one right after my update. thanks for that, will see what I can do.

The tracks can be made tighter without removing a track. will show next update.

well, too bad dragon messed up the upper hatch. will try to fix that without damaging to much...

thanks for the corrections! but what do you think of the base? a bit empty right?


retiredyank
Visit this Community
Arkansas, United States
Joined: June 29, 2009
KitMaker: 11,610 posts
Armorama: 7,843 posts
Posted: Thursday, April 05, 2012 - 03:57 AM UTC

Quoted Text


Quoted Text

Nationals are always held in Florida. Regionals are usually held in the city I live in. I don't have to travel very far to get to either of them.


ummm....

The IPMS "national" location moves depending on what club wins the bid for it. Last year it was in Nebraska, Before that Arizona... It hasnt been in florida for over a decade! Last time it was close was in 2005 Atlanta Georgia. But they are being held in Florida this year.

Great looking build so far! Insprired me to think about starting mine!


My bad. I thought it was held in Florida, last year.
Boris1991
Visit this Community
Zuid-Holland, Netherlands
Joined: October 13, 2009
KitMaker: 307 posts
Armorama: 278 posts
Posted: Thursday, April 05, 2012 - 05:39 AM UTC

Quoted Text

My bad. I thought it was held in Florida, last year.


well im glad you like my model
zapper
Visit this Community
Skåne, Sweden
Joined: October 18, 2005
KitMaker: 745 posts
Armorama: 734 posts
Posted: Thursday, April 05, 2012 - 08:51 AM UTC

Quoted Text


thanks for the corrections! but what do you think of the base? a bit empty right?


Howdy Boris,

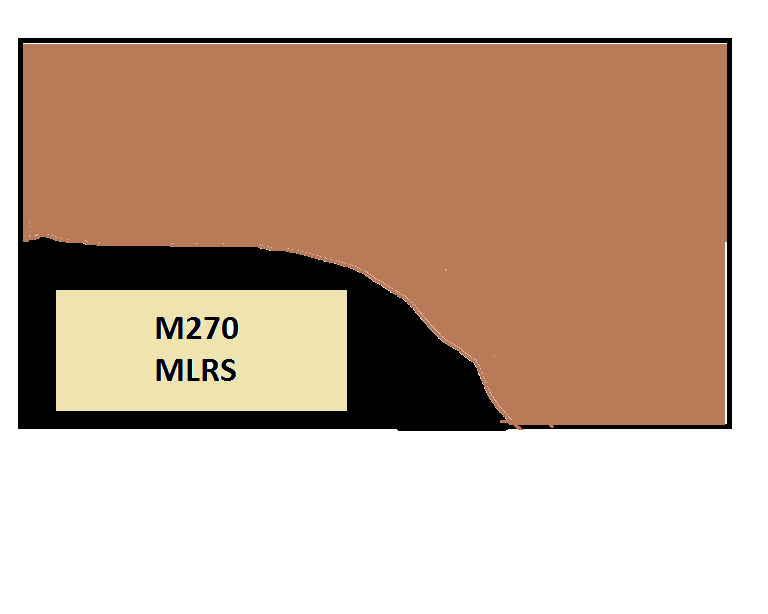
Nice work on the MLRS! I agree that the base look a bit empty in the left corner. Is it possible to remove some of the ground work and place a name plate onto the base itself?

I made a crappy PAINT drawing to illustrate what I mean:


Cheers,
/E
retiredyank
Visit this Community
Arkansas, United States
Joined: June 29, 2009
KitMaker: 11,610 posts
Armorama: 7,843 posts
Posted: Thursday, April 05, 2012 - 11:05 PM UTC
Following this build really makes me want to try my hand at one. I will definitely have to try some of your techniqes on my Abrams. Looking forward to the figures. These are on my list, again for the Abrams.
HeavyArty
Visit this Community
Florida, United States
Joined: May 16, 2002
KitMaker: 17,694 posts
Armorama: 13,742 posts
Posted: Friday, April 06, 2012 - 12:25 AM UTC
I agree, the base looks kind of empty. I think Erik's name plaque would look good.
Boris1991
Visit this Community
Zuid-Holland, Netherlands
Joined: October 13, 2009
KitMaker: 307 posts
Armorama: 278 posts
Posted: Friday, April 06, 2012 - 12:49 AM UTC

Quoted Text


Howdy Boris,

Nice work on the MLRS! I agree that the base look a bit empty in the left corner. Is it possible to remove some of the ground work and place a name plate onto the base itself?

Cheers,


thanks! now that would be a nice addition! will check where I can get those nameplates.


Quoted Text

Following this build really makes me want to try my hand at one. I will definitely have to try some of your techniqes on my Abrams. Looking forward to the figures. These are on my list, again for the Abrams.


well thats good to hear! I hope I got the motivation to add the figures soon.


Quoted Text

I agree, the base looks kind of empty. I think Erik's name plaque would look good.


Yeah, that would be a great addition! will go after it
Boris1991
Visit this Community
Zuid-Holland, Netherlands
Joined: October 13, 2009
KitMaker: 307 posts
Armorama: 278 posts
Posted: Sunday, April 29, 2012 - 06:14 AM UTC
This week my order was delivered.
see the additions right here:


One thing, it is nearly impossible to add some footprints to the base since the base is completely dryed and hard.
anyone got a suggestion?

what do you think of this setup? comments are appreciated so I can start painting and fixing them tommorrow.

thanks for watching!

See more of the M270 LRS build on my website
Boris1991
Visit this Community
Zuid-Holland, Netherlands
Joined: October 13, 2009
KitMaker: 307 posts
Armorama: 278 posts
Posted: Wednesday, May 16, 2012 - 03:30 AM UTC
During this week I made some progress with the diorama / base and the figures.
CMK's US Desert tankers figures (#F35016) are completely painted and weathered. At this moment I have them attached to the base with poster buddies, this way I can move them around to find the best place to put them. What do you think of the way I placed them?

After some comments about the diorama being to dark, I tried to lighten it a bit. I think it looks better this way.
The grass clumps and dead tree's have been added aswell. For the grass and tree I used J's Model items, worked fine with me and the tree has a lot of detail on it.
The grass was more green at first, but I toned it down a bit with some sand colors.

Enough talking, lets see some pictures:

These were the unpainted figures:


The next four pictures show the diorama from all angles.


Next four pictures show the figures. You like them or not? what dou you think of the way I placed them? let me know


Detail shot of one of the dead tree stumps. Note the detail


At last, top view of the diorama!


Thats it for now, comments and tips are welcome especially on the figures.
Only painted a few figures in my life so far.


Thanks for watching!

See more of the M270 LRS build on my website
HeavyArty
Visit this Community
Florida, United States
Joined: May 16, 2002
KitMaker: 17,694 posts
Armorama: 13,742 posts
Posted: Wednesday, May 16, 2012 - 08:25 AM UTC
Looks good. The "chocolate chip" camo looks good too. The only thing I would add is either clear or green-tinted resin to the goggles on the guy with the map. I see you were able to fix the top hatch too, good deal.
Boris1991
Visit this Community
Zuid-Holland, Netherlands
Joined: October 13, 2009
KitMaker: 307 posts
Armorama: 278 posts
Posted: Monday, May 21, 2012 - 03:46 AM UTC

Quoted Text

Looks good. The "chocolate chip" camo looks good too. The only thing I would add is either clear or green-tinted resin to the goggles on the guy with the map. I see you were able to fix the top hatch too, good deal.


thanks for your answer Gino!glad you like the figures.
I will see what I can do about the goggles.
yeah, I fixed the hatch. bended a nice lever from some leftover PE.

does anyone else have an oppinion about my model?

thanks !