_GOTOBOTTOM
Constructive Feedback
For in-progress or completed build photos. Give and get contructive feedback!
Tamiya Ardennes King Tiger
der_leutnant
Visit this Community
Singapore / 新加坡
Joined: November 13, 2011
KitMaker: 58 posts
Armorama: 58 posts
Posted: Saturday, November 12, 2011 - 04:56 PM UTC
my first kit in a while, let me know what you think guys
criticism welcome. let me improve from it

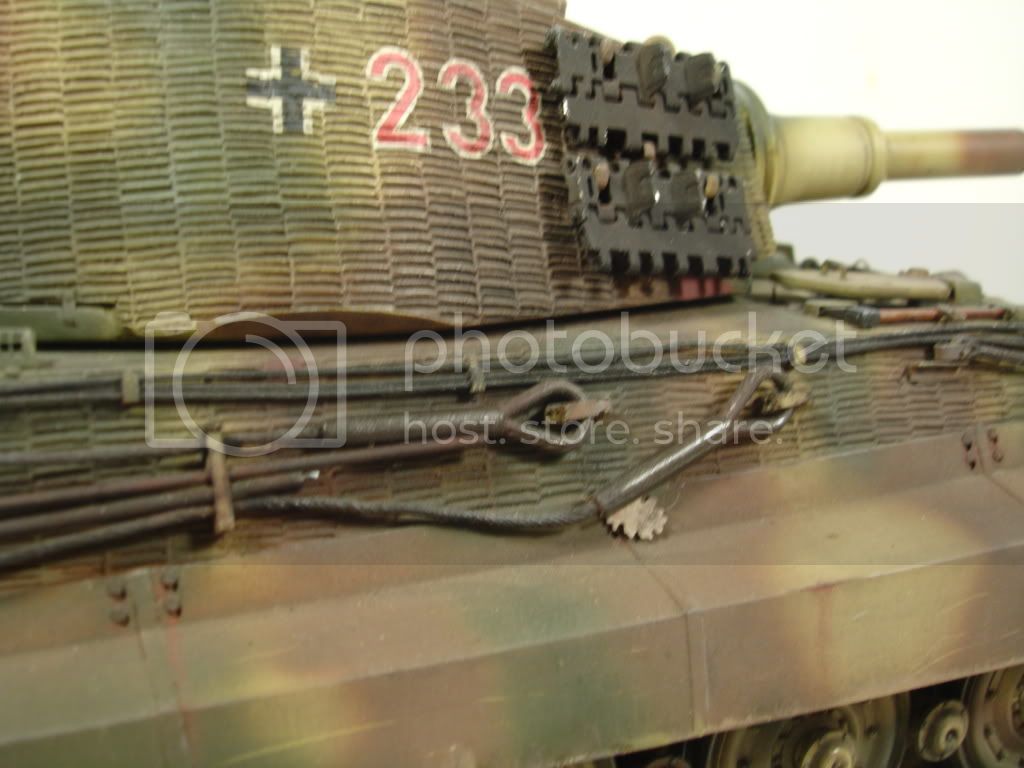
wanted to go a few tones lighter than its supposed to be, but the red brown seems off. anyone else think so?


PS: it's not done yet. Haven't got the time to complete it, i know i'm just making up excuses
SgtRam
Staff MemberContributing Writer
AEROSCALE
#197
Visit this Community
Ontario, Canada
Joined: March 06, 2011
KitMaker: 3,971 posts
Armorama: 2,859 posts
Posted: Sunday, November 13, 2011 - 02:17 AM UTC
Good work, nice camo job, and the weathering on the wheels looks good. My only comment would be the skirt are a little thick, but I know that is what comes with the kit.

Overall great build and paint job. Keep up the good work.
nathan211
Visit this Community
Michigan, United States
Joined: October 21, 2007
KitMaker: 96 posts
Armorama: 89 posts
Posted: Sunday, November 13, 2011 - 03:31 AM UTC
I think you did a pretty good job with the paint, I like the red brown color. I know you said you weren't finished so I am not sure what you plan on doing going forward but I may suggest a few things. First I would paint and weather you spare links you have hanging on turret. I would also pick out and paint the tow cable and barrel cleaning rods, and some of the engineering tools. This to me makes the model stand out a little more. I know that the tanks are often painted with everything on them, and modelers will finish their models this way, but by picking out those things and painting them you give the tank more interest, and it shows that the tank has been used for any length of time.
I am also assuming that you plan on giving it a wash to bring out the details.
One other thing I may point out is the thickness of the track guards. If you use the kit supplied track guards sand them down to they are very thin, this will make the damage and bullet holes seem more realistic.
Overall you are doing very good work, and I would like to see you keep us posted.
der_leutnant
Visit this Community
Singapore / 新加坡
Joined: November 13, 2011
KitMaker: 58 posts
Armorama: 58 posts
Posted: Sunday, November 13, 2011 - 11:58 AM UTC
thanks for the comments
few questions i would like to ask,
do i paint the tow cables and such black, dry brush silver, then add pigments?
does the same thing apply to the spare tracks as well?
and about the wash, will a mixture of black and brown be alright?
does anyone still dry brush the kit after washes?
retiredyank
Visit this Community
Arkansas, United States
Joined: June 29, 2009
KitMaker: 11,610 posts
Armorama: 7,843 posts
Posted: Sunday, November 13, 2011 - 12:43 PM UTC
I dry brush after a wash. Generally, I'll pick out the highlights before the wash. I wouldn't pick out the tools. Although, you could show some weathering by pulling some steel along the edge of the shovel and around the eyelets of the tow cable. I would highlight the spare tracks by drybrushing them with steel. As is, it looks to be an excellent start. As for the colors being off, weathering will dull and blend all of the colors. The weathering shouldn't be too heavy, as the KTs hardly saw service. Hope this is helpfull.
nathan211
Visit this Community
Michigan, United States
Joined: October 21, 2007
KitMaker: 96 posts
Armorama: 89 posts
Posted: Sunday, November 13, 2011 - 03:46 PM UTC

Quoted Text

thanks for the comments
few questions i would like to ask,
do i paint the tow cables and such black, dry brush silver, then add pigments?
does the same thing apply to the spare tracks as well?
and about the wash, will a mixture of black and brown be alright?
does anyone still dry brush the kit after washes?


I usually will paint the tow cables black or gunmetal to start, then I will add various pigments to it till it looks right, and a few highlights of silver, and last I sand some graphite from a pencil and rub it with you fingers, or q-tip. Sometimes using your fingure will work better because of the oils from your skin. I slide a post it under neath my cables between the tank so you don't have to worry about getting anything on the tank.
The track links are harder, I will use some sort of black-grey color to paint first, followed by dry brushing of silver, and adding a dark wash. After that I add a few pigments of dust, and rust in certain crevices.
As far as the wash goes, black and Burnt or Raw umber work really good. I like to use oil paints with thinner for this.
nathan211
Visit this Community
Michigan, United States
Joined: October 21, 2007
KitMaker: 96 posts
Armorama: 89 posts
Posted: Sunday, November 13, 2011 - 03:58 PM UTC

Quoted Text

thanks for the comments
few questions i would like to ask,
do i paint the tow cables and such black, dry brush silver, then add pigments?
does the same thing apply to the spare tracks as well?
and about the wash, will a mixture of black and brown be alright?
does anyone still dry brush the kit after washes?


I usually will paint the tow cables black or gunmetal to start, then I will add various pigments to it till it looks right, and a few highlights of silver, and last I sand some graphite from a pencil and rub it with you fingers, or q-tip. Sometimes using your fingure will work better because of the oils from your skin. I slide a post it under neath my cables between the tank so you don't have to worry about getting anything on the tank.
The track links are harder, I will use some sort of black-grey color to paint first, followed by dry brushing of silver, and adding a dark wash. After that I add a few pigments of dust, and rust in certain crevices.
As far as the wash goes, black and Burnt or Raw umber work really good. I like to use oil paints with thinner for this.

Here is what I did using those techniques described-


Pops53
Visit this Community
United States
Joined: November 05, 2011
KitMaker: 100 posts
Armorama: 98 posts
Posted: Sunday, November 13, 2011 - 06:41 PM UTC
Another image you may find of interest: http://tinyurl.com/c9gp67l
Best of luck with this attractive build!

der_leutnant
Visit this Community
Singapore / 新加坡
Joined: November 13, 2011
KitMaker: 58 posts
Armorama: 58 posts
Posted: Monday, November 21, 2011 - 11:12 PM UTC
Thanks for the tips guys, keep it coming

finally got the time to progress it a little, did the wash with a mixture of brown and black enamels.

edit: looking back, i think i kind of over did it with the wash, looks a little too weathered? what do you guys think?
retiredyank
Visit this Community
Arkansas, United States
Joined: June 29, 2009
KitMaker: 11,610 posts
Armorama: 7,843 posts
Posted: Tuesday, November 22, 2011 - 12:56 AM UTC
It's a little on the dark side, overall. Unless of course it is Vader's tank. Remember, the KTs weren't in service for very long. The only way, I know of, to fix this is to repaint the kit. Or, you could do a what if KT in night time camo.
der_leutnant
Visit this Community
Singapore / 新加坡
Joined: November 13, 2011
KitMaker: 58 posts
Armorama: 58 posts
Posted: Tuesday, November 22, 2011 - 01:12 AM UTC
haha, good thing i didn't coat the wash yet
will get back to the cotton bud and enamel thinner again tomorrow i guess!
der_leutnant
Visit this Community
Singapore / 新加坡
Joined: November 13, 2011
KitMaker: 58 posts
Armorama: 58 posts
Posted: Wednesday, November 23, 2011 - 04:17 AM UTC
alright, removed most of the enamel wash already, believe it looks much better.

now as for the paint chips, not sure how to go about this, i tried experimenting painting a mixture of umber and back acrylics, and painted on with a toothpick.
what do you guys think? i've only done the left side of the turret. if it looks alright, i guess i'll go ahead and do the rest of the tank like that. any tips in doing this? help would be greatly appreciated!


oh and please note that i am able to remove the "paint chips". i haven't coated over them yet. so changes advised would be able to be implemented. thanks once again guys!
retiredyank
Visit this Community
Arkansas, United States
Joined: June 29, 2009
KitMaker: 11,610 posts
Armorama: 7,843 posts
Posted: Wednesday, November 23, 2011 - 06:30 AM UTC
Don't use the metallic steel most paint companies try to push on you. It can't be further from the real thing. I used to work in a steel mill. The closest color is dark grey (Tamiya or MM). Polly Scale has grimy black. You can afford to go a little lighter. Polished steel is closer to aluminum. But, you won't find polished steel on a military vehicle(the exceptions to this being the area of the barrel that rubs against the mantlet when it recoils, and hydraulics). Bare steel doesn't stay grey for long. It rusts quite rapidly, unless meticulously maintaned or constantly polished as is the case with recoil. You may want to consider show some of the base coat, rather than bare metal. This is where it is just MHO.
der_leutnant
Visit this Community
Singapore / 新加坡
Joined: November 13, 2011
KitMaker: 58 posts
Armorama: 58 posts
Posted: Sunday, November 27, 2011 - 01:47 AM UTC
hmmm how do i go about showing the base coat? drybrush some dark yellow at the green portions etc?

also, planning to do a diorama for it too. noticed on the box art, theres snow, but there seems to be no snow on the vehicle? but do i still assume there will be a degree of snow on the tracks / roadwheels as well?
Rouse713
Visit this Community
Wisconsin, United States
Joined: February 03, 2009
KitMaker: 367 posts
Armorama: 326 posts
Posted: Wednesday, November 30, 2011 - 06:22 AM UTC
I think the weathering is good where its at. I wouldn't change much, you may start lifting the paint if you are not careful.

I think the colors are spot on. There are some brown spots on the turret, and I can't tell if they are mud or chipping. Aside from that I think this looks very good as is.

Congradulations on making it this far. I have about a 50% success rate of reaching this stage before my models get dropped, paint incompatibilty, or the hulk smash from me. Looking forward to the diorama.
 _GOTOTOP