_GOTOBOTTOM
Armor/AFV: Braille Scale
1/72 and 1/76 Scale Armor and AFVs.
Hosted by Darren Baker
Dragon Sd. Kfz 223
tread_geek
Visit this Community
Ontario, Canada
Joined: March 23, 2008
KitMaker: 2,847 posts
Armorama: 2,667 posts
Posted: Sunday, January 22, 2012 - 06:59 AM UTC
Greetings all!

Just a brief preamble before I start. I unfortunately have several Blogs running at the moment due to numerous circumstances. I've done a fair number of reviews this past year and several are of the build nature and "1+1" (twin pack) variety. I've also been exploring numerous finishing techniques for both models and bases (which are new to me). I will attempt to complete as many of these partial builds as possible as a large local show will occur in early February and I'd like to enter a few.

------------------------------------------------------------------

On with the show! :-)

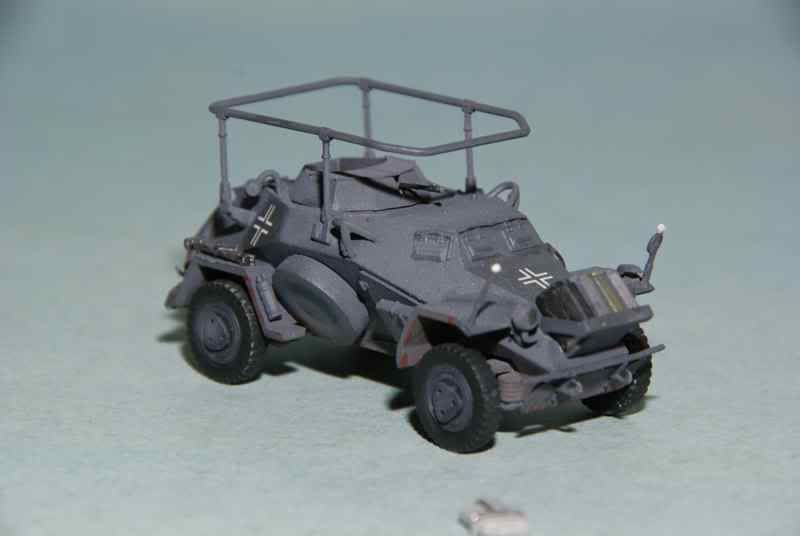
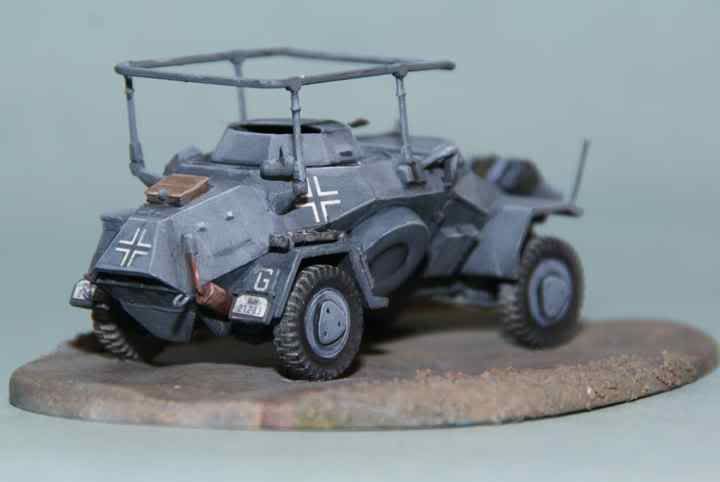
Back in October one review was of the Dragon Sd. Kfz. 223 Armoured Car. I built one of the vehicles for that review and it was basically OOTB. The whole purpose was to let Braille builders know what surprises might be in store for them. If you haven't read the review, you can find it HERE

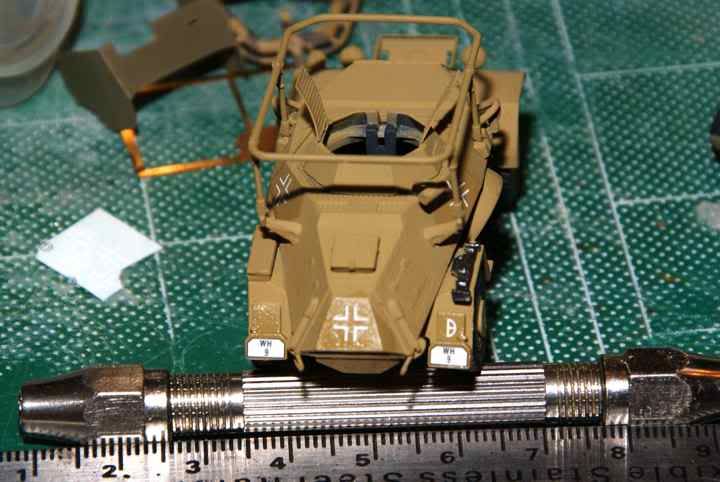
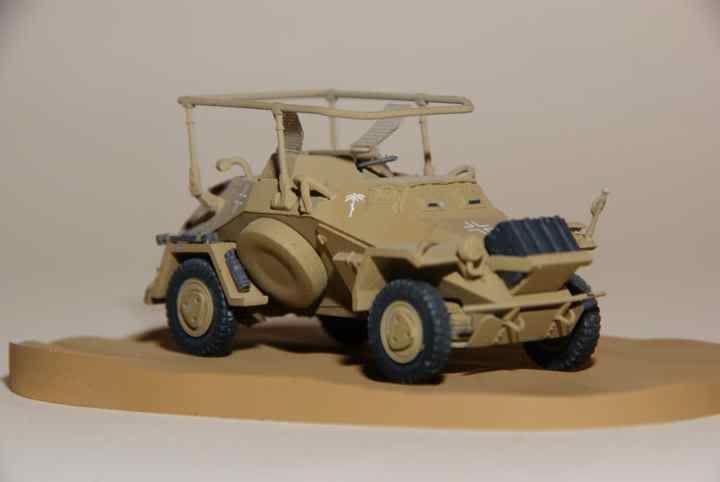
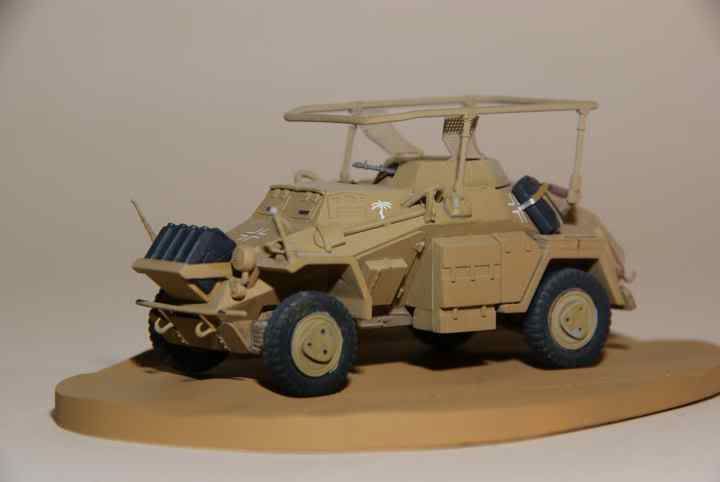
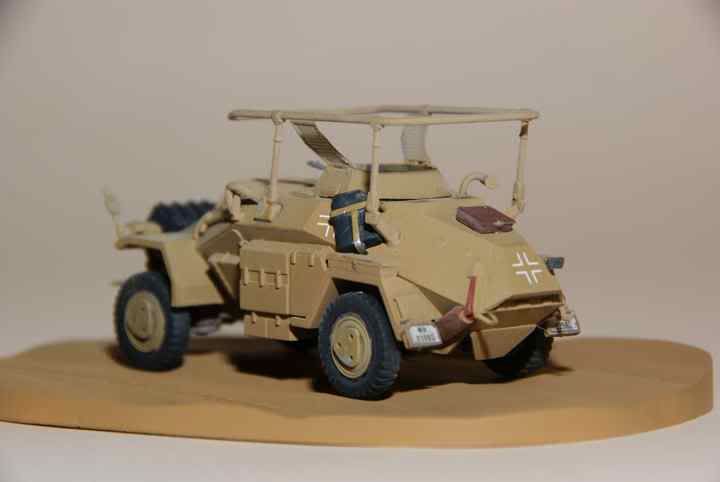
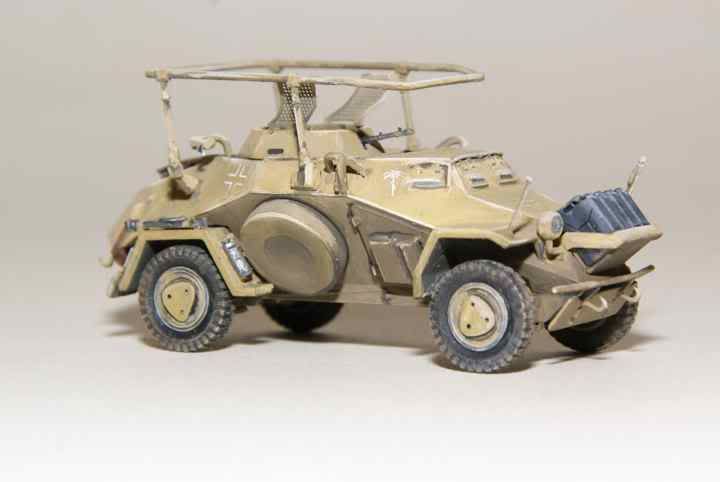
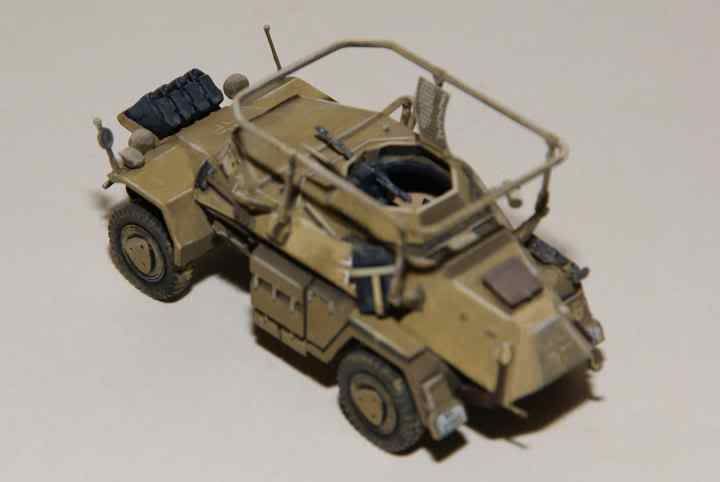
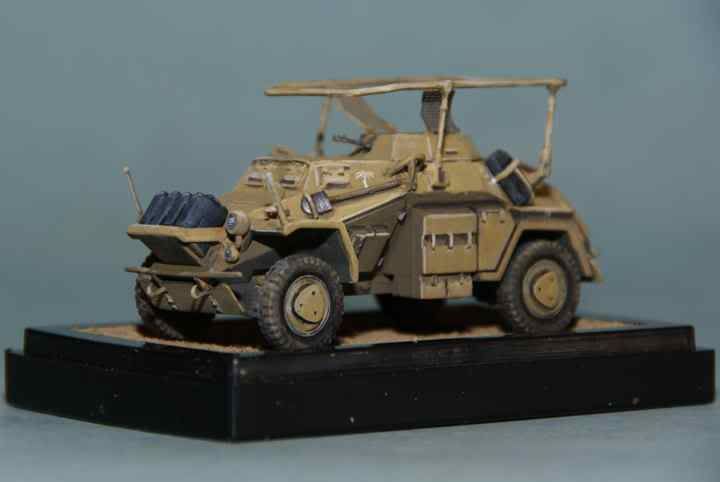
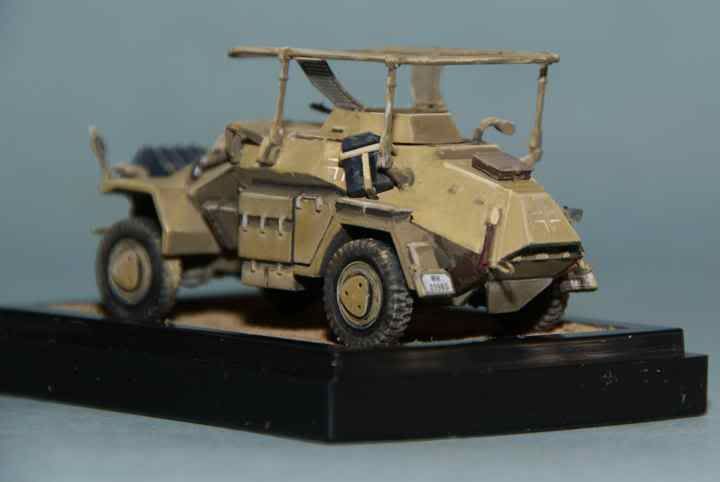
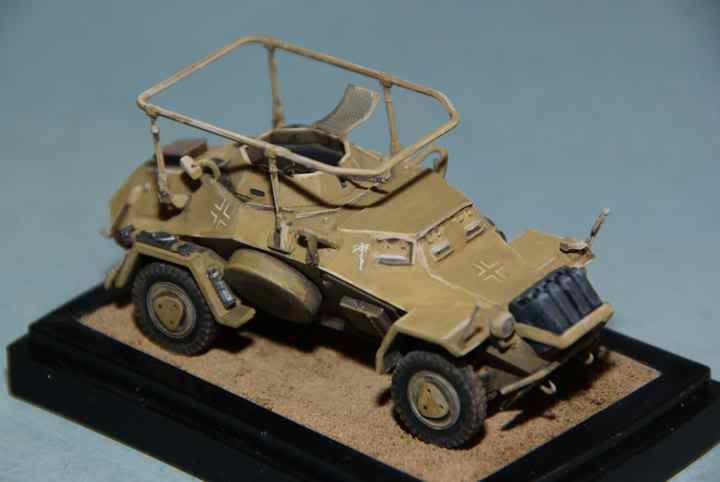
In this thread I will build the second vehicle from the kit but will be doing a bit of enhancing of it. The first 223 was built as a vehicle on the Eastern Front and at the moment I am leaning toward making the second a North African version.
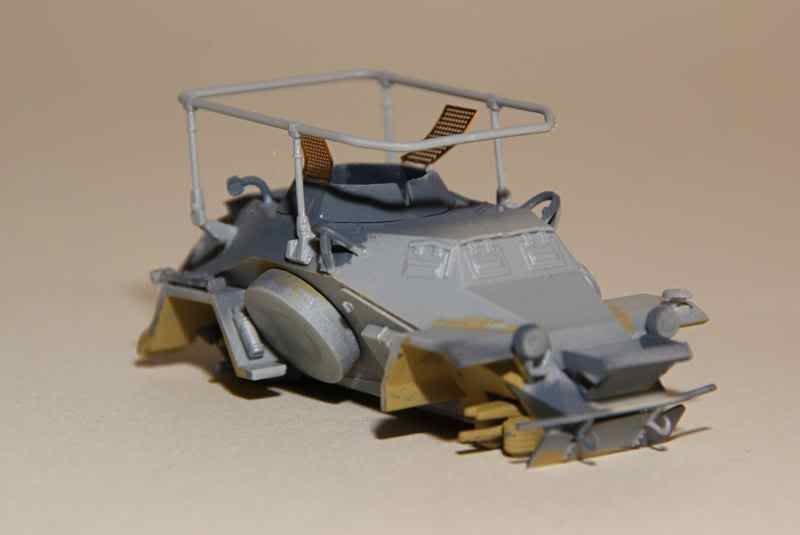
Preliminary stages.

Building the suspension. More detailed explanations can be found in the review.


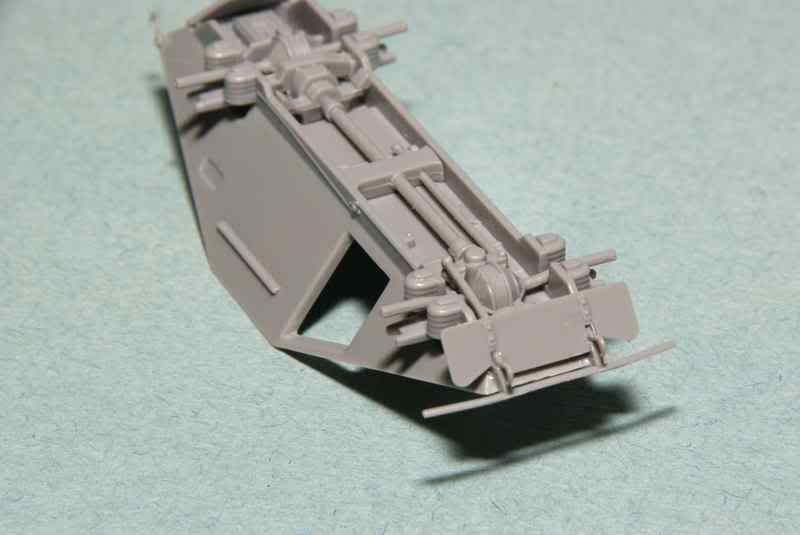
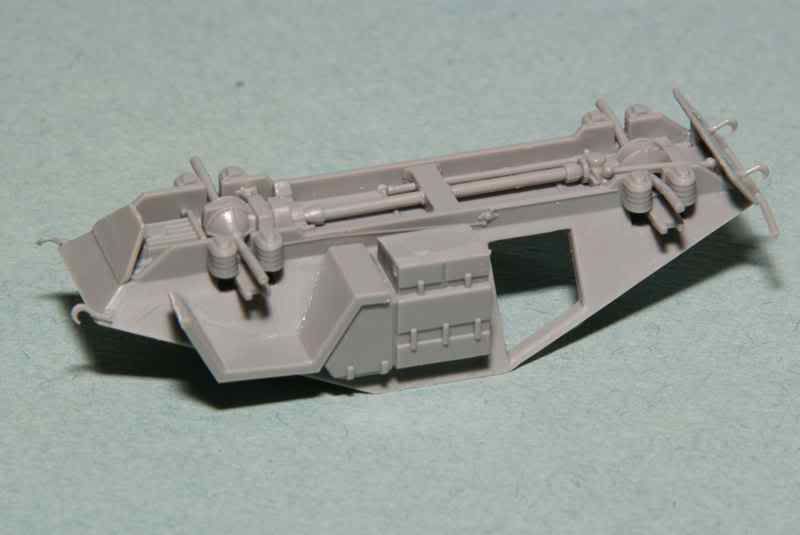
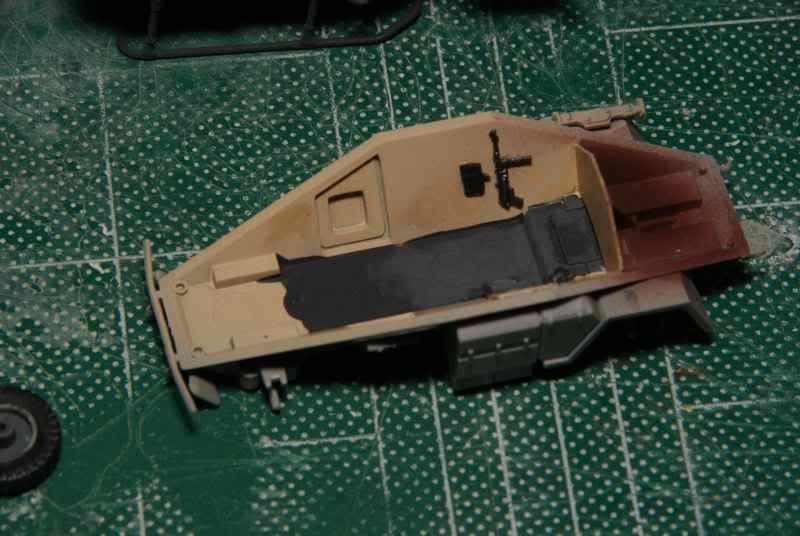
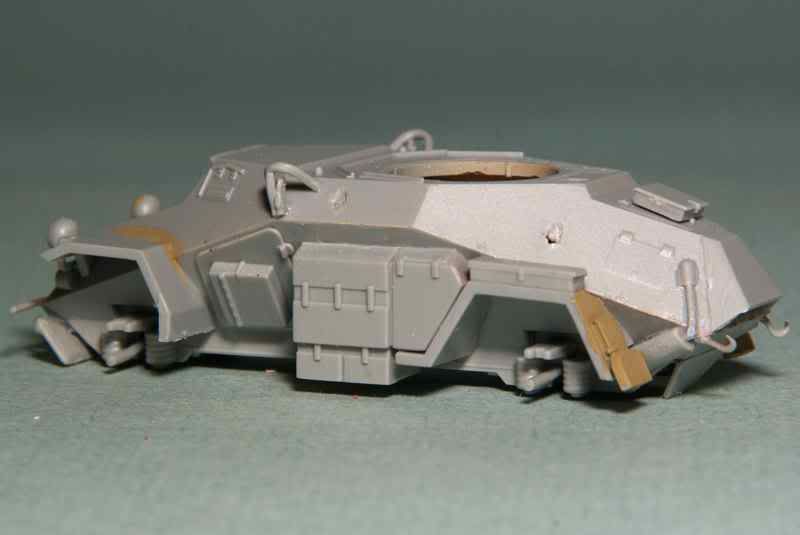
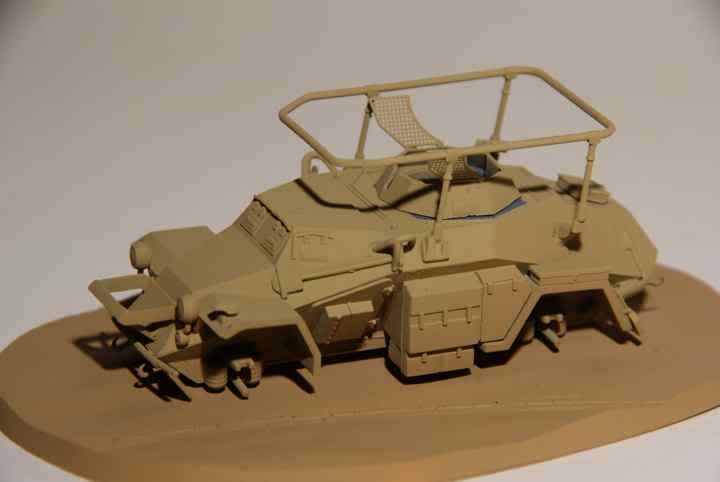
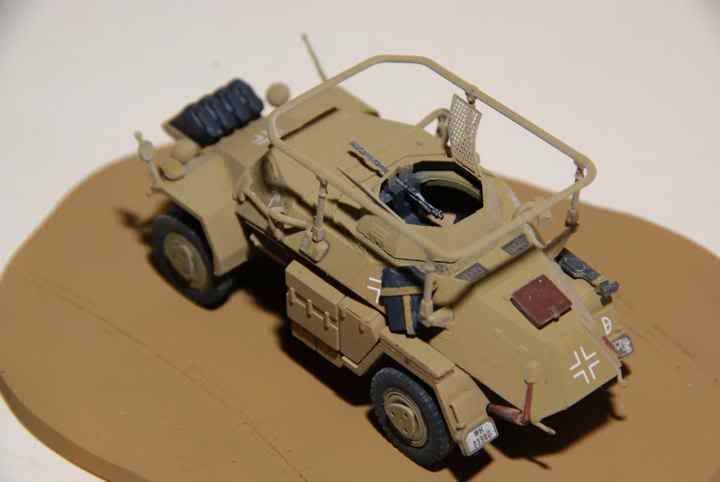
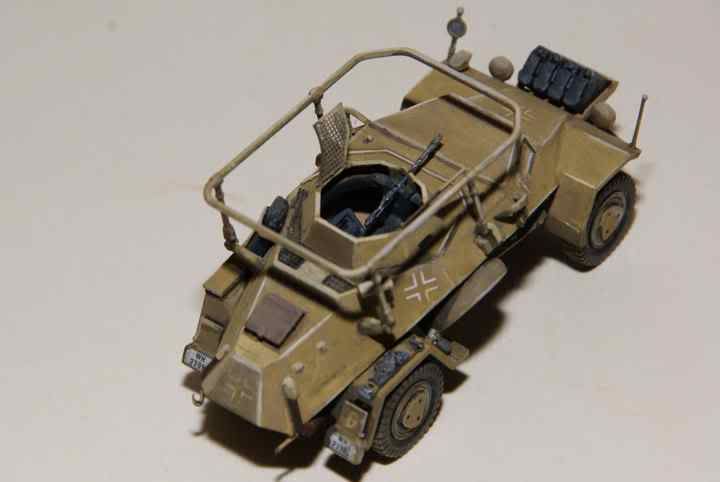
Now I veer from the standard build in that I want to add a partial interior. I plan to have the grenade screens open but even still, the view inside might not be too great. Here's the preliminary interior pieces of a floor and the firewall fitted.


These aren't glued yet and required some extra trimming of the firewall due to the complex shape of the body.

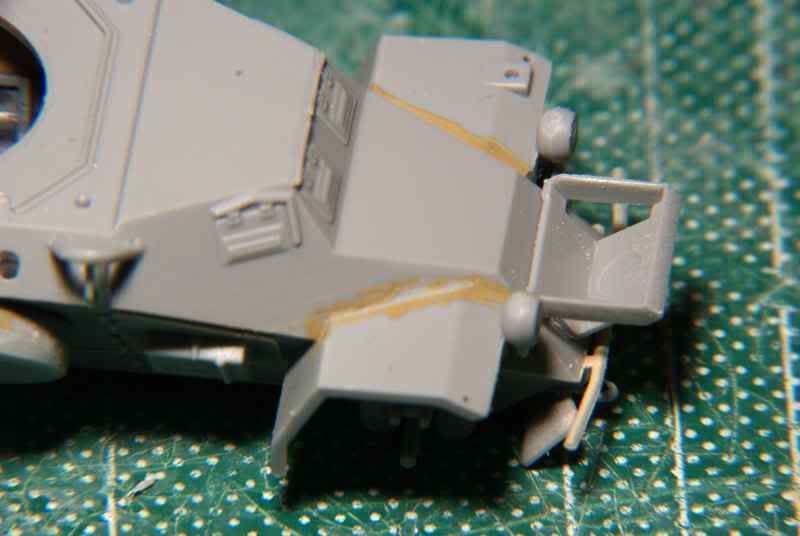
Test fit of the upper hull.


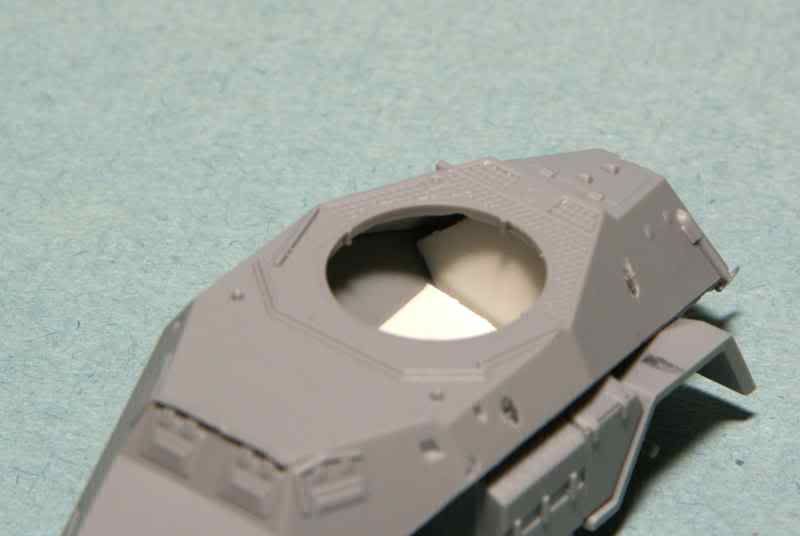
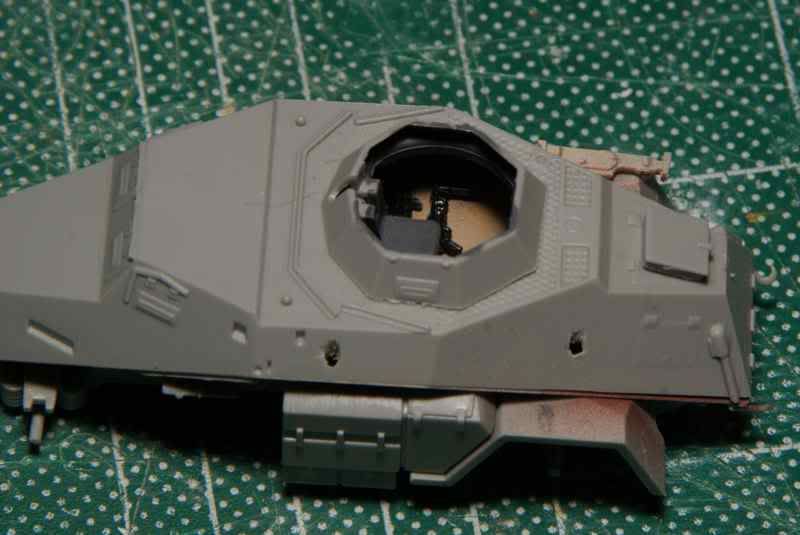
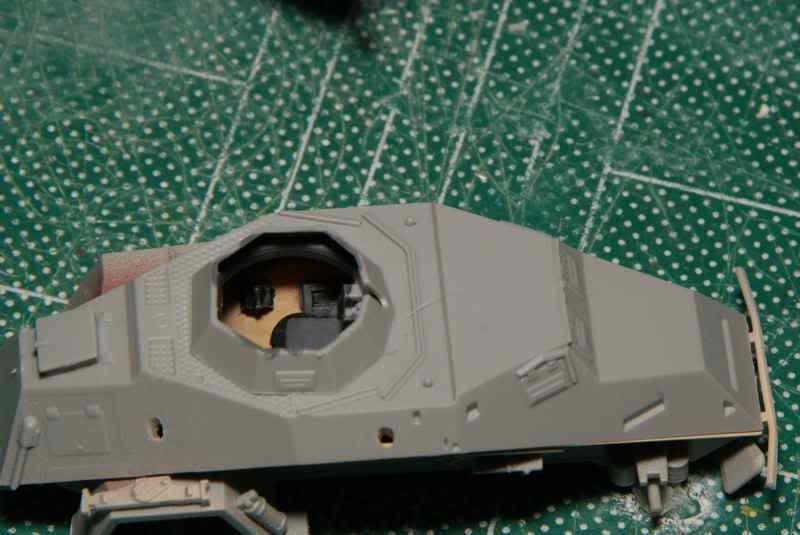
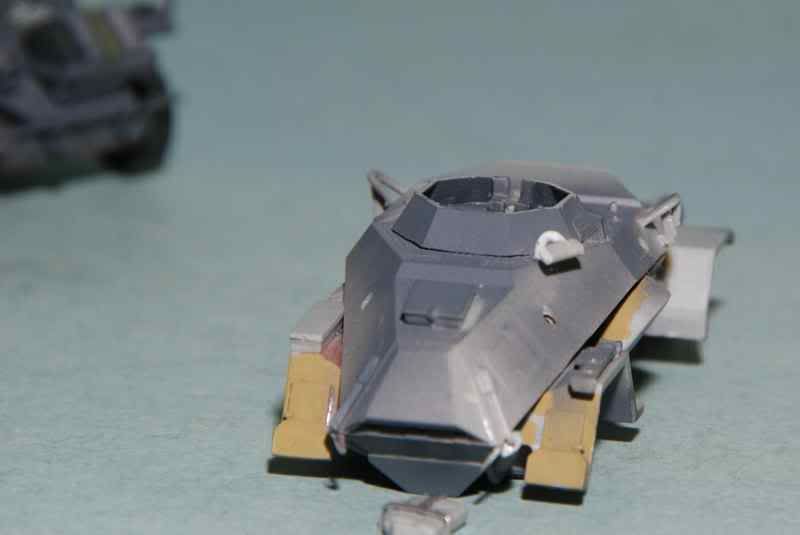
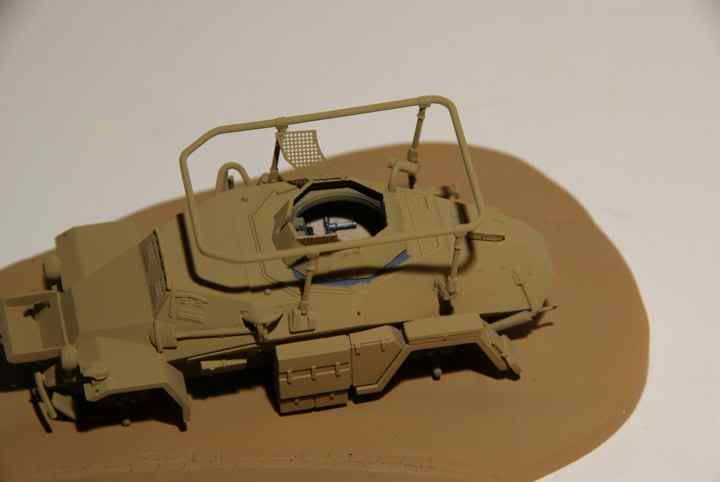
The initial announcement thread of the review has some discussion about the inaccuracy and faulty instructions associated with the turret interior. The picture below is from that discussion.


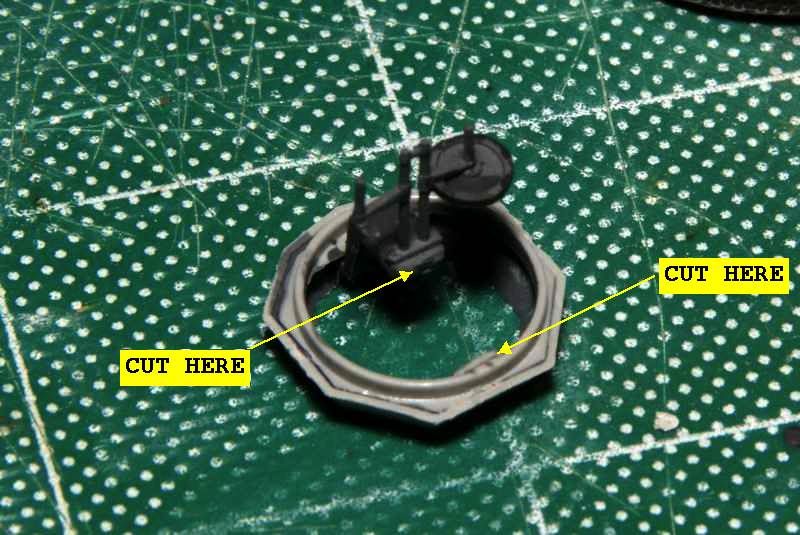
The parts used are part of the kit but modified to at least be somewhat closer to the actuals turret interior. While this build is of the second vehicle, I will also have the occasional note about the first one as it progresses toward being finished.

Thanks for looking,
Jan
Jerry_larkin
Joined: July 06, 2007
KitMaker: 11 posts
Armorama: 10 posts
Posted: Monday, January 23, 2012 - 12:47 PM UTC
Hello Jan, I enjoyed your review on the first kit. I look forward to seeing what you do with this one. I am very partial to North Africa themes. In a touch of insanity for my age and eyesight. I switched exclusively to braile a few years ago. I'm sure you'll work up a great kit. Have fun! Jerry
tread_geek
Visit this Community
Ontario, Canada
Joined: March 23, 2008
KitMaker: 2,847 posts
Armorama: 2,667 posts
Posted: Tuesday, January 24, 2012 - 07:50 AM UTC
@Jerry_Larkin - I'm glad you liked the review and also to hear that you read it and took the time to comment here. Age and eyesight are often an excuse for people switching to a larger scale but does it really have to be so? With all the tools and gadgets available to modellers these days there's always a way around a difficulty. My personal opinion is that Braille as it is, can present the builder with many unique challenges that require some ingenuity and forethought (such as finding the perfect tweezers to hold that microscopic piece that needs to be glued on).

------------------------------------------------------------------------------------

More progress on the build. I am still struggling to find the elusive and perfect camera settings to show things at this scale. First up is the interior of the beast. The colours don't always show up as they do to the naked eye. I used left over items from a Dragon kit that includes figures to add some interest to the interior. I sprayed it initially with a rough match of typical German primer colour. Based on photos of a 223 being restored I then sprayed the cabin with a mixture approximating the standard ivory interior colour. The floor and the pedestal of the turret is Panzer grey, again based on interior photos.


Here are a couple of shots that give an idea of what will be visible after completion. I've also added a few things like the jack and fire extinguisher.


The body halves and turret are just dry fit at this point. I could have detailed the forward part of the interior further but none of it would be visible after everything is together.

A bit of work on the front exterior with the body halves glued. I thinned the sides of the Jerry can rack quite a bit compared to the first vehicle.


Finally, an overall shot with the lower mufflers added. They are side specific and have no definite mounting feature so took a while to get them just right.


I did a bit of filling here and there with gap filling CA glue. As I mention in the article, some parts fit fine but others could be better. But then where would be the challenge if everything just fell together!

Cheers,
Jan
PedroA
Visit this Community
Valencia, Spain / España
Joined: December 27, 2010
KitMaker: 324 posts
Armorama: 322 posts
Posted: Wednesday, January 25, 2012 - 05:38 AM UTC
Hi Jan.

Great review . It seems a very nice model. I wait the next step of your model.

Regards.

Pedro.
SchoeniR6
Visit this Community
Germany
Joined: November 21, 2010
KitMaker: 189 posts
Armorama: 189 posts
Posted: Wednesday, January 25, 2012 - 06:53 AM UTC
Hi

I like what I see. Nice kit.
Looking forward to see the next pictures from you.

Cheers
Braille
#135
Visit this Community
California, United States
Joined: August 05, 2007
KitMaker: 1,501 posts
Armorama: 1,485 posts
Posted: Wednesday, January 25, 2012 - 04:54 PM UTC
@tread_geek – Jan,

Good initial progress, the small vehicle seems to be loaded with lots of detail. I like the interior walls and flooring that you’ve made and that suspension looks like its packed with detail for such a small model.

I found your build review of this vehicle most informative and have answered all of my questions and concerns regarding the quality, molding and options for this kit. I will be adding this one to the stash. I will be keeping an eye on this build as you proceed along. Looks good so far.

The photography issue is not any easy one to solve because of the many variables involved, lighting, exposure time, camera settings, etc. But with practice and a little experimenting here and there it will come to you. I will be trying a blue colored tungsten bulb along with a few 200W tungsten photo bulbs for lighting to see if I can get better pictures. I really need to get a better camera too! I hope you find this posting of interest? I did. It mostly deals with the camera but there are some good tips too.

~ Eddy
tread_geek
Visit this Community
Ontario, Canada
Joined: March 23, 2008
KitMaker: 2,847 posts
Armorama: 2,667 posts
Posted: Thursday, January 26, 2012 - 06:17 AM UTC
@Pedro and Daniel - Thank you for commenting, it in certain ways is a very nice model. The few problems there are should be easily handle-able by someone with modest building experience. ;-)

@Braille - Eddy, for the most part it does have some quite nice detailing for it's size. With the one I built for the article I had the grenade screens closed so there isn't much opportunity to see inside. The most visible is the pedestal and crew seats (which I didn't realize were wrong) but even those are barely visible. This second one will have the grenade screens open so will hopefully expose a bit more of the interior.

Actually, if I ever built another one of these or the 222 version, I'd consider an even more detailed interior. The two side doors are separate parts but would need some work if you wanted to position them open as they have a depression for the storage box on the exterior in their inner face.

-------------------------------------------------------------------------------------------

The most dramatic progress for today was the completion of the exterior body on vehicle number two. The only remaining parts are the two fender width markers. I don't know about any more exterior stowage at the moment.

One thing that I didn't like is that the fuel can that's supposed to reside on the left rear upper body had no indications as to how it attached to the body. What I did was use some thin metal strips to form a frame to hold the can. It's only placed on the body where it will be located based on some images that I found on the Internet and the Panzer Colors book. The way it looks in the first picture is one of two options. The other option needs the frame antenna in place before I see if it might look better in the alternate location.


THe first vehicle is now complete and some very initial weathering has been started. The main or last item(s) attached were the Jerry cans to the front rack. I'm not sure if I mentioned it in the article but I found that the rack would sit too high if you used the locating pin that Dragon provided. With the cans in place they would obscure vision from the forward view ports. My research revealed that these cans came in a number of colours, not just Panzer Grey. To add a bit of interest to the vehicle I painted one can black and another Dunkelgrun.


I'm still leaning towards a North Africa vehicle for the second one so don't take a bit of Panzer Grey on it as an indication of the final scheme.

Cheers,
Jan
weathering_one
Visit this Community
Ontario, Canada
Joined: April 04, 2009
KitMaker: 458 posts
Armorama: 456 posts
Posted: Friday, January 27, 2012 - 06:46 AM UTC
Jan, I read your build review and while it's like a step by step examination of this kit, these types of build logs are what I really enjoy. Between you and Neil (Korpse) I am losing track of the the blogs going on. This is one that I might give a try if I can find this kit or the 222 version. BTW, love the little touches that you added to the interior. Thanks for sharing.

Regards,
AJ
Korpse
Visit this Community
Queensland, Australia
Joined: October 06, 2009
KitMaker: 382 posts
Armorama: 378 posts
Posted: Sunday, January 29, 2012 - 10:44 PM UTC
Hi Jan

Good to see you are not letting the grass grow under your feet, you are off and away again on a fresh build.

Somehow I missed your earlier review. It was a good read, & useful and informative, thanks for posting the link.

Its good to see you have some extra improvements underway on this 223 too.

You know I have the ICM kit of the 223 almost completed, its my oldest unfinished build, has been maybe 2 years now. I'm tempted to spend a couple of hours finishing it off, but now I have too many fresher irons in the fire, so I'll see to them first and deal with the ICM 223 in the future for a small diorama with some other 'Blitzkrieg era' vehicles.

The ICM kit of this was of a high standard, and went together with no dramas, looks like Dragon has trumped it with a little bit of extra detail.

I'll be checking in for progress on this (as much as my frequently dying internet connection will allow )

cheers
Neil


tread_geek
Visit this Community
Ontario, Canada
Joined: March 23, 2008
KitMaker: 2,847 posts
Armorama: 2,667 posts
Posted: Tuesday, January 31, 2012 - 06:24 AM UTC
@AJB - Thanks for the compliments, AJ. It's not too bad a kit except for the tube antenna (more on that further down). The 222 version might be a tad easier except for bending the PE anti-grenade screens. Then again, not all 222's had them in place.

@Korpse - Neil, too darn many "fresh" builds going on at the same time. I hope the review proved helpful, despite that it's pretty much out of the box. If it's a review item I try to keep it with minimal modifications so viewers can see what they have to work with. The nice thing about these "1+1" kits is one can go a touch further with a second vehicle and explore the potential.

As part of my review research I did check out the ICM offerings of both the 223 and 222. From the instructions and sprue shots, both share a frightening similarity to the newer Dragon offerings. From some build pictures of these vehicles I'd have to say that the Dragon kits do offer improved detail.

-----------------------------------------------------------------------

Having already built one vehicle for the review I had presumed that the second would go faster. To a large extent it did but the frame antenna and the open screens proved problematic. While I drilled out the holes for the vertical supports of the antenna prior to gluing the body together, the rear most pair proved to not have a perfect contour to fit the parts. I had to reshape those holes with a pointed EXCEL super sharp blade and fine needle files to get them right.

The instructions direct the builder to assemble all the antenna pieces before putting them on the body but I can't see this working. I started by gluing the front pair first using their locating holes in the top part as a template. Once those were securely dry, I fitted each rear support individually, again using the upper part as a guide. When all were secure I glued the top part of the frame to their supports,

For the PE screens I created a small jig to hold them at the correct angle while the glue dried. Even with the jig they were quite fiddley to position. I used a gap filling 15 second CA glue for this purpose. Even so it took three attempts to get them the way I wanted. After they dried I applied a few extra tiny dabs of the glue to the contact points between screen and turret top.

Here are the results:


Next up will be some base coating to check for flaws, a preliminary base colour and then completion of the suspension and adding the width markers.

Cheers,
Jan
tread_geek
Visit this Community
Ontario, Canada
Joined: March 23, 2008
KitMaker: 2,847 posts
Armorama: 2,667 posts
Posted: Monday, February 06, 2012 - 07:02 AM UTC
Well, the pressure is on! :-) I have six days left before a big fairly local show and have been trying to get all my entries ready. The first 223 (223-A) is done and its base has been completed. There are also two other builds revamped and complete that have appeared in this forum. Unfortunately, due to "security" reasons (people from local clubs check out this site) I won't post them until after the show.

As far as the second 223 (223-B) is concerned, I am focussing on it at the moment. A base is started (base coated) I used a light Panzer Grey as a basecoat and then sprayed the entire vehicle with combinations of Dark Yellow and Desert Yellow. The variations doesn't really show up too well in the pictures.

These are the bases that I am preparing for two models. One is earmarked for 223-B.


Here are a couple of shots of the overall vehicle. Note that the bit of grey exposed was a result of masking the turret opening. It has since been corrected.


I took a couple of pictures to show the interior but just couldn't get the perfect camera angle.


I took time to post this while the Future is drying. I've finished the preliminary painting of the wheels and decals are next. If you haven't already guessed, this will be an Afrika Korps vehicle of the 21st Panzer Division. :-)

Cheers,
Jan
weathering_one
Visit this Community
Ontario, Canada
Joined: April 04, 2009
KitMaker: 458 posts
Armorama: 456 posts
Posted: Tuesday, February 07, 2012 - 07:42 AM UTC
Jan, some interesting progress and possibly a desert vehicle to boot! It's also nice to see two blogs of these combo kits going on at once. The bases look interesting and on my monitor they seem to already have a variation of the sand colour in them. It looks like a roadway but what is lining the edges of the road? Rocks, stones? Are these commercial bases and is there a review of them here?


Quoted Text

Unfortunately, due to "security" reasons (people from local clubs check out this site) I won't post them until after the show.


Is this the show at a certain location south-west of Toronto? If it is I might try to get there. If not, good luck for your entries.

Regards,
AJ
tread_geek
Visit this Community
Ontario, Canada
Joined: March 23, 2008
KitMaker: 2,847 posts
Armorama: 2,667 posts
Posted: Tuesday, February 07, 2012 - 09:44 AM UTC
@AJ - Thanks for dropping back and having a look. As for you first questions, the bases were painted with the two types of desert colours mentioned in my previous post. It was a bit of experimentation but I varied air pressure and spray angles to see what would happen. The bases are commercial products available in a few Ontario hobby shops and by mail order. They are by Astra Scale Models Models Inc and you can read more about their products in the Armorama News Story. These are part of their small base line. The road edge is supposed to be bricks of some sort although I will probably cover it for the desert scene.

I believe that you have the correct geographical location of the upcoming show. I went last year and it was quite something so you should try to attend. Sadly, there wasn't much Braille stuff available with the vendors.


----------------------------------------------------------------------

My start point this morning was with the "roll your own" licence plates. To put it very mildly, they are insane!!!! Dragon only gives you one set of full plates and I used them on the first 223. I also got the wheels on and a bit of preliminary detail painting.

Here's where I stopped with the plates yesterday.


With the wheels and a bit of painting.


Been working on it most of today and the plates are done, the last parts glued and just about ready for weathering. No pictures yet but I try to take some tomorrow.

Cheers,
Jan
SchoeniR6
Visit this Community
Germany
Joined: November 21, 2010
KitMaker: 189 posts
Armorama: 189 posts
Posted: Thursday, February 09, 2012 - 04:24 AM UTC
Hi

Very nice work!
Like your model. The build looks very clean.
Looking forward to see it on the diorama base.

Regards Daniel
tread_geek
Visit this Community
Ontario, Canada
Joined: March 23, 2008
KitMaker: 2,847 posts
Armorama: 2,667 posts
Posted: Thursday, February 09, 2012 - 05:41 AM UTC
@SchoeniR6 - Thanks for the compliment and for looking, Daniel. Not only am I starting to like these little vehicles but my SWMBO thinks they are "cute!"

Time is running out but I finally have all the parts glued on and have just started a bit of touch-up and detail painting. I've also changed some camera settings that I hope will generally improve future pictures. The pictures below will be the last until the after the show this Sunday. The base in the pictures has had some extra washes applied bit is by no means finished.


For those that are curious, I'll update of my blogs of other builds that were changed and prepared for the show.

Thanks for looking,
Jan
weathering_one
Visit this Community
Ontario, Canada
Joined: April 04, 2009
KitMaker: 458 posts
Armorama: 456 posts
Posted: Saturday, February 11, 2012 - 03:41 AM UTC
This model is really coming along. I can't wait to see the finished product. I can't believe that you managed to create those license plates with individual characters or that Dragon wouldn't provide ready made alternatives to them. Short of going cross-eyed, how the dickens did you position all those microscopic letters and numbers?

Regards,
AJ
tread_geek
Visit this Community
Ontario, Canada
Joined: March 23, 2008
KitMaker: 2,847 posts
Armorama: 2,667 posts
Posted: Monday, February 13, 2012 - 07:35 AM UTC
@AJB - It's hit or miss if Dragon provides you with full license plates or you have to make your own. This kit gives you one full set and the other is up to the builder. As for how I did it, VERY slowly with positioning being done by a sharpened cocktail stick. You must wait for each character to dry and set before doing the next.

--------------------------------------------------------------------------

Okay, the show is over and went very smoothly except for driving through a couple of snow squalls. here's some images of the final weathering almost done on the Afrika Korps version.


As luck would have it I ran out the "desert" paints that I was using Saturday. The local Hobby Shop was also out of the colours I needed so I created a smaller base with the little that was left over.

This one was entered in the show in the Armoured Car/Half-Track/APC category and had some rather stiff competition. Here's how it went to the show.


It won Silver (second place) losing out to a Dragon Sd. Kfz. 251/17 half-track.

Thanks for the interest,
Jan

P.S. - I'll put pictures of the Russian Front version up later after I upload them to my hosting site.
tread_geek
Visit this Community
Ontario, Canada
Joined: March 23, 2008
KitMaker: 2,847 posts
Armorama: 2,667 posts
Posted: Monday, February 13, 2012 - 07:50 AM UTC
Got the pictures up quite quickly so here are the one's of the Russian Front 223. It was entered in the Out of the Box category.


Not as much competition as the other one had and it took Gold!

Cheers,
Jan
Korpse
Visit this Community
Queensland, Australia
Joined: October 06, 2009
KitMaker: 382 posts
Armorama: 378 posts
Posted: Monday, February 13, 2012 - 12:31 PM UTC
Hi Jan

nice work, I think these are the best work I've seen you post here, and well done on the awards

cheers
Neil
SchoeniR6
Visit this Community
Germany
Joined: November 21, 2010
KitMaker: 189 posts
Armorama: 189 posts
Posted: Tuesday, February 14, 2012 - 12:04 AM UTC
Hi Jan

Nice little Kfz 223!

Cheers Daniel
tread_geek
Visit this Community
Ontario, Canada
Joined: March 23, 2008
KitMaker: 2,847 posts
Armorama: 2,667 posts
Posted: Tuesday, February 14, 2012 - 05:13 AM UTC

Quoted Text

Hi Jan

nice work, I think these are the best work I've seen you post here, and well done on the awards

cheers
Neil


Hmmm, Neil, I guess I'll take the ""best work" as a compliment. Thanks for the congratulations, I am still somewhat stunned by how well these little guys did. The kit that these come in is still not available in my area and I was barraged with questions about what it was and where I got it. A flurry of compliments also came from viewers and that was also quite unexpected.

@Daniel - Thanks you for commenting. I am glad you found these interesting but far happier that the judges at the show also did. The Afrika Korps one had some very impressive competition in its category and I was shocked how well it did.

Cheers,
Jan
 _GOTOTOP