_GOTOBOTTOM
Constructive Feedback
For in-progress or completed build photos. Give and get contructive feedback!
T-34WIP
lespauljames
Visit this Community
England - South West, United Kingdom
Joined: January 06, 2007
KitMaker: 3,661 posts
Armorama: 2,764 posts
Posted: Tuesday, January 31, 2012 - 05:15 AM UTC
Hey guys, here is my t034 WIP.
please let ne know if you see anything that can be improved.


Tojo72
Visit this Community
North Carolina, United States
Joined: June 06, 2006
KitMaker: 4,691 posts
Armorama: 3,509 posts
Posted: Tuesday, January 31, 2012 - 05:53 AM UTC
Outstanding work on your chipping and wear James,which kit is this ?
Spiderfrommars
Visit this Community
Milano, Italy
Joined: July 13, 2010
KitMaker: 3,845 posts
Armorama: 3,543 posts
Posted: Tuesday, January 31, 2012 - 06:52 AM UTC
Well done, I like it a lot

Is it the AFV model? I have this model in my stash I'm quite interested in your job

Cheers
lespauljames
Visit this Community
England - South West, United Kingdom
Joined: January 06, 2007
KitMaker: 3,661 posts
Armorama: 2,764 posts
Posted: Tuesday, January 31, 2012 - 07:11 AM UTC
Thanks Anthony!
Chipping is down to my new Pro arte brush, i branched out and went for a no2 series 107 spotter. my fave brush yet. Hehe.

Mauro Thanks!

Unfortunately, It is not the AFV kit, If i had the cash it would be 
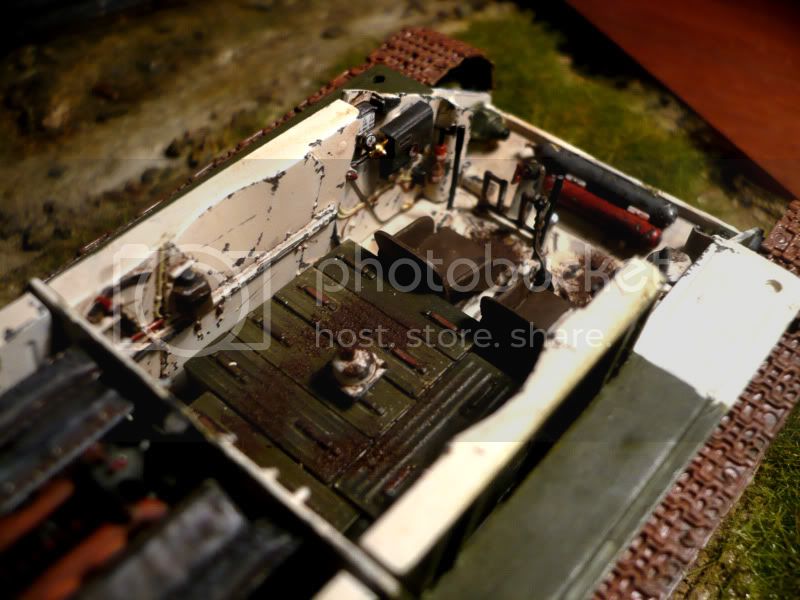
We have Hobbyboss 1.48 angle jointed turret.!

Spiderfrommars
Visit this Community
Milano, Italy
Joined: July 13, 2010
KitMaker: 3,845 posts
Armorama: 3,543 posts
Posted: Tuesday, January 31, 2012 - 07:18 AM UTC
Well it doesn't matter. However I'm interested in t-34 interior rendition

Congrats
lespauljames
Visit this Community
England - South West, United Kingdom
Joined: January 06, 2007
KitMaker: 3,661 posts
Armorama: 2,764 posts
Posted: Thursday, February 02, 2012 - 05:52 AM UTC
Haha thanks Mauro., I have been using this link cs.finescale.com/FSMCS/forums/t/90787.aspx to model my turret. Hth
Pops53
Visit this Community
United States
Joined: November 05, 2011
KitMaker: 100 posts
Armorama: 98 posts
Posted: Thursday, February 02, 2012 - 08:23 AM UTC
I love the well-worn and chipped interior, which has plenty of that "lived-in" look. I'll be anxious to see what others suggest. Other than a bit of brownish mud & dirt where the boots land, it looks superb to me.
lespauljames
Visit this Community
England - South West, United Kingdom
Joined: January 06, 2007
KitMaker: 3,661 posts
Armorama: 2,764 posts
Posted: Friday, February 03, 2012 - 07:47 AM UTC
Thanks Pops53, That there is something I didn't think of. Add that one to the list ...

more soon...
lespauljames
Visit this Community
England - South West, United Kingdom
Joined: January 06, 2007
KitMaker: 3,661 posts
Armorama: 2,764 posts
Posted: Sunday, February 05, 2012 - 07:36 AM UTC
The Basecolours of the interior are done. they need loads of washes.
Pops53 i added the mud. needs a light wash now!


I will borrow the Real camera again soon for detailed shots!

Oops missed the turret


Spiderfrommars
Visit this Community
Milano, Italy
Joined: July 13, 2010
KitMaker: 3,845 posts
Armorama: 3,543 posts
Posted: Sunday, February 05, 2012 - 07:56 AM UTC
It looks very good James

What color did you use to replicate the 4BO green?

It seems to me that you've chosen the right shade of it
retiredyank
Visit this Community
Arkansas, United States
Joined: June 29, 2009
KitMaker: 11,610 posts
Armorama: 7,843 posts
Posted: Sunday, February 05, 2012 - 08:23 AM UTC
The interior is spectacular. It looks well used. Hopefully, you will weather the exterior to match that of the interior. Always like seeing the different 4BO colors people come up with.
lespauljames
Visit this Community
England - South West, United Kingdom
Joined: January 06, 2007
KitMaker: 3,661 posts
Armorama: 2,764 posts
Posted: Monday, February 06, 2012 - 02:10 AM UTC
Thanks Mauro! My 4bo is a custom mix of tamiya flat green, dark green, Olive Drab, Olive Green and Dark Yellow.
I Mixed a LOT!!!

Thanks Matt, I'm hoping my exterior is as good, i have chosen to use some techniques i wouldnt usually. A hand painted number. And The technique where you pick out details in different shades of green. and i have decided to add gloss to replicate wet patches on the vehicle, something i see a lot on photos but rarely ever depicted on a kit.

A Small update. I have completed all the acylic work. after a long dry to make sure it is all cured, i will start with an oil pinwash. then dot filtering.

I am leaving the upper hull detatchable so i can desplay the interior if i want!

Weathering will tone down the gloss.


retiredyank
Visit this Community
Arkansas, United States
Joined: June 29, 2009
KitMaker: 11,610 posts
Armorama: 7,843 posts
Posted: Monday, February 06, 2012 - 02:54 AM UTC
IMHO you should have chipped the paint before adding the gloss. Actually, the wet look is something I have been consider for quite some time. Glad to see someone put it to use. What did you use for the "wet" spots?
lespauljames
Visit this Community
England - South West, United Kingdom
Joined: January 06, 2007
KitMaker: 3,661 posts
Armorama: 2,764 posts
Posted: Monday, February 06, 2012 - 03:00 AM UTC
Hey Matt, Chipping was done before, quite liberally, when I borrow Dads camera It will all be a lot clearer!

wet spots were Vallejo gloss varnish. diluted a little. !

More soon, maybe better photos before progress shots, im not sure yet! Im going to get to work on the rest of the figures anyway.
Spiderfrommars
Visit this Community
Milano, Italy
Joined: July 13, 2010
KitMaker: 3,845 posts
Armorama: 3,543 posts
Posted: Monday, February 06, 2012 - 04:35 AM UTC

Quoted Text

Thanks Mauro! My 4bo is a custom mix of tamiya flat green, dark green, Olive Drab, Olive Green and Dark Yellow.
I Mixed a LOT!!!


...and I guess you don't know the exact ratio don't you?

Great job so far james!


Quoted Text

Always like seeing the different 4BO colors people come up with.


Well Matt ,as you probably already known, reliable Russian sources sais that actually 4bo green was closer to olive drab rather than olive green.

cheers
lespauljames
Visit this Community
England - South West, United Kingdom
Joined: January 06, 2007
KitMaker: 3,661 posts
Armorama: 2,764 posts
Posted: Monday, February 06, 2012 - 06:37 AM UTC
I wish I could tell you the mix Mate! I should write these things down.....
Spiderfrommars
Visit this Community
Milano, Italy
Joined: July 13, 2010
KitMaker: 3,845 posts
Armorama: 3,543 posts
Posted: Monday, February 06, 2012 - 10:30 AM UTC

Quoted Text

I wish I could tell you the mix Mate! I should write these things down.....


Thanks in advance mate!

And take a look here

http://dishmodels.ru/gshow.htm?p=10686

I think you'll like it
lespauljames
Visit this Community
England - South West, United Kingdom
Joined: January 06, 2007
KitMaker: 3,661 posts
Armorama: 2,764 posts
Posted: Tuesday, February 07, 2012 - 09:43 AM UTC
thats Pretty awesome, Thanks for the share. I tried scratching an electric guitar in 1/35/ didnt go to well...


so, Some good photos. and the beginning of the drawn out process of dusting and filtering. I'm not 100% happy at the moment, but hopefully some more good weathering will make it better.


and a shot of the base so far.
Spiderfrommars
Visit this Community
Milano, Italy
Joined: July 13, 2010
KitMaker: 3,845 posts
Armorama: 3,543 posts
Posted: Tuesday, February 07, 2012 - 12:31 PM UTC

Quoted Text

thats Pretty awesome, Thanks for the share. I tried scratching an electric guitar in 1/35/ didnt go to well...


Well, looking at your progresses, it seems that tanks are far better for you!

Congrats! I really like also your graund work !
GregCloseCombat
Visit this Community
California, United States
Joined: June 30, 2008
KitMaker: 2,408 posts
Armorama: 2,394 posts
Posted: Tuesday, February 07, 2012 - 12:34 PM UTC
Kick -ss!
 _GOTOTOP