_GOTOBOTTOM
Armor/AFV: Allied - WWII
Armor and ground forces of the Allied forces during World War II.
Hosted by Darren Baker
DUKW with Piper Cub load
MrRoo
Visit this Community
Queensland, Australia
Joined: October 07, 2002
KitMaker: 3,856 posts
Armorama: 2,984 posts
Posted: Friday, April 13, 2012 - 01:02 PM UTC
This is one I have been working on bit by bit for about a year now. I found a series of Photos on the Australian War Memorial site showing Australian DUKW's loading and delivering from cargo ships off shore Auster light aircraft to use as artillery spotting aircraft. The beaches of the Pacific Islands would be the landing strips.

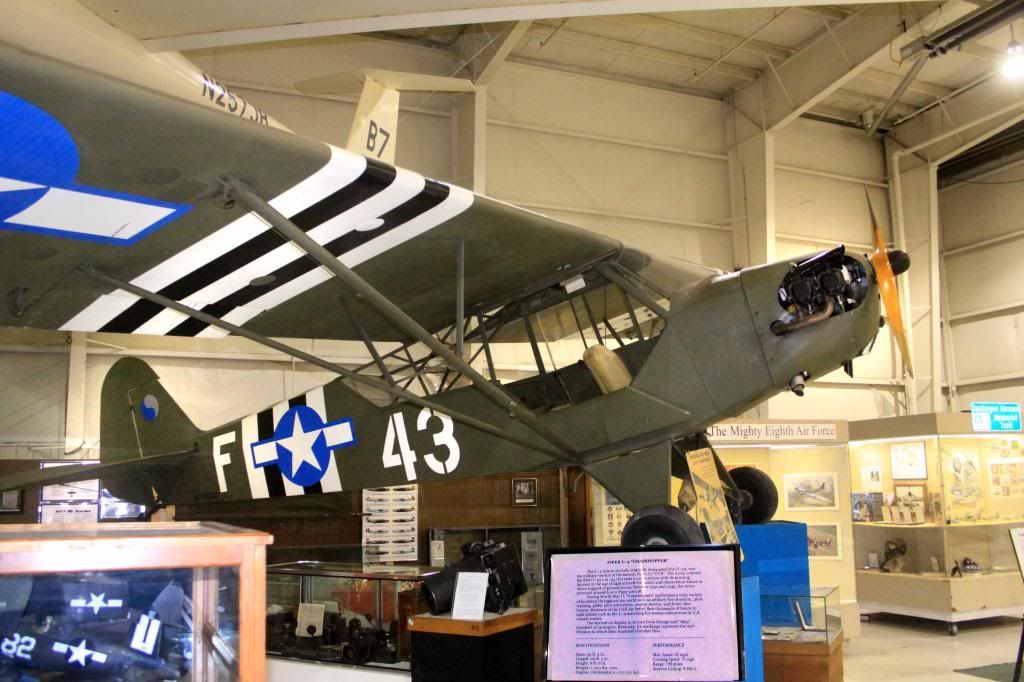
Now as there is no 1/35 scale Auster I decided to use Bronco's 1/35 Piper Cub which the RAAF also used on loan from the USA. The other kit is the Italeri DUKW. A few years back I built the Italeri DUKW with the crane boom on it and intended to do a small diorama using the crane DUKW as well as the load carrying one to create a similar situation of the DUKW arrived ashore and being unloaded so crews could reasemble the plane which was stripped down for the trip.

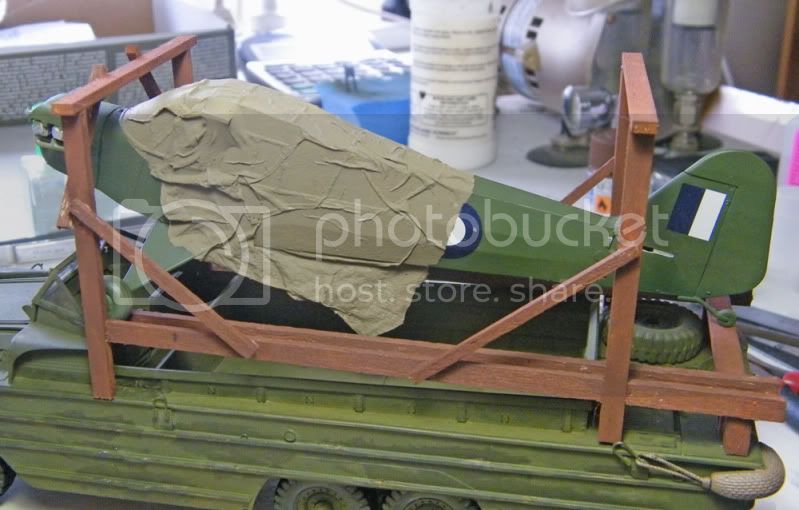
The Bronco Piper Cub has had it's wings and tail horizontal fins removed for transport and these will be crated up as in the ref. photos. Apart from the mods to strip it down it has been built OOB and painted Australian colors and will be marked with Australian Roundals. This posed a few problems as the wings and tail fins have to be completely finished before 'crating'! I stuffed up putting the canopy on so will cover this area with a 'tissue' tarp.

The Italeri DUKW was built OOB with no mods except for things left off to allow the plane and load to sit right.

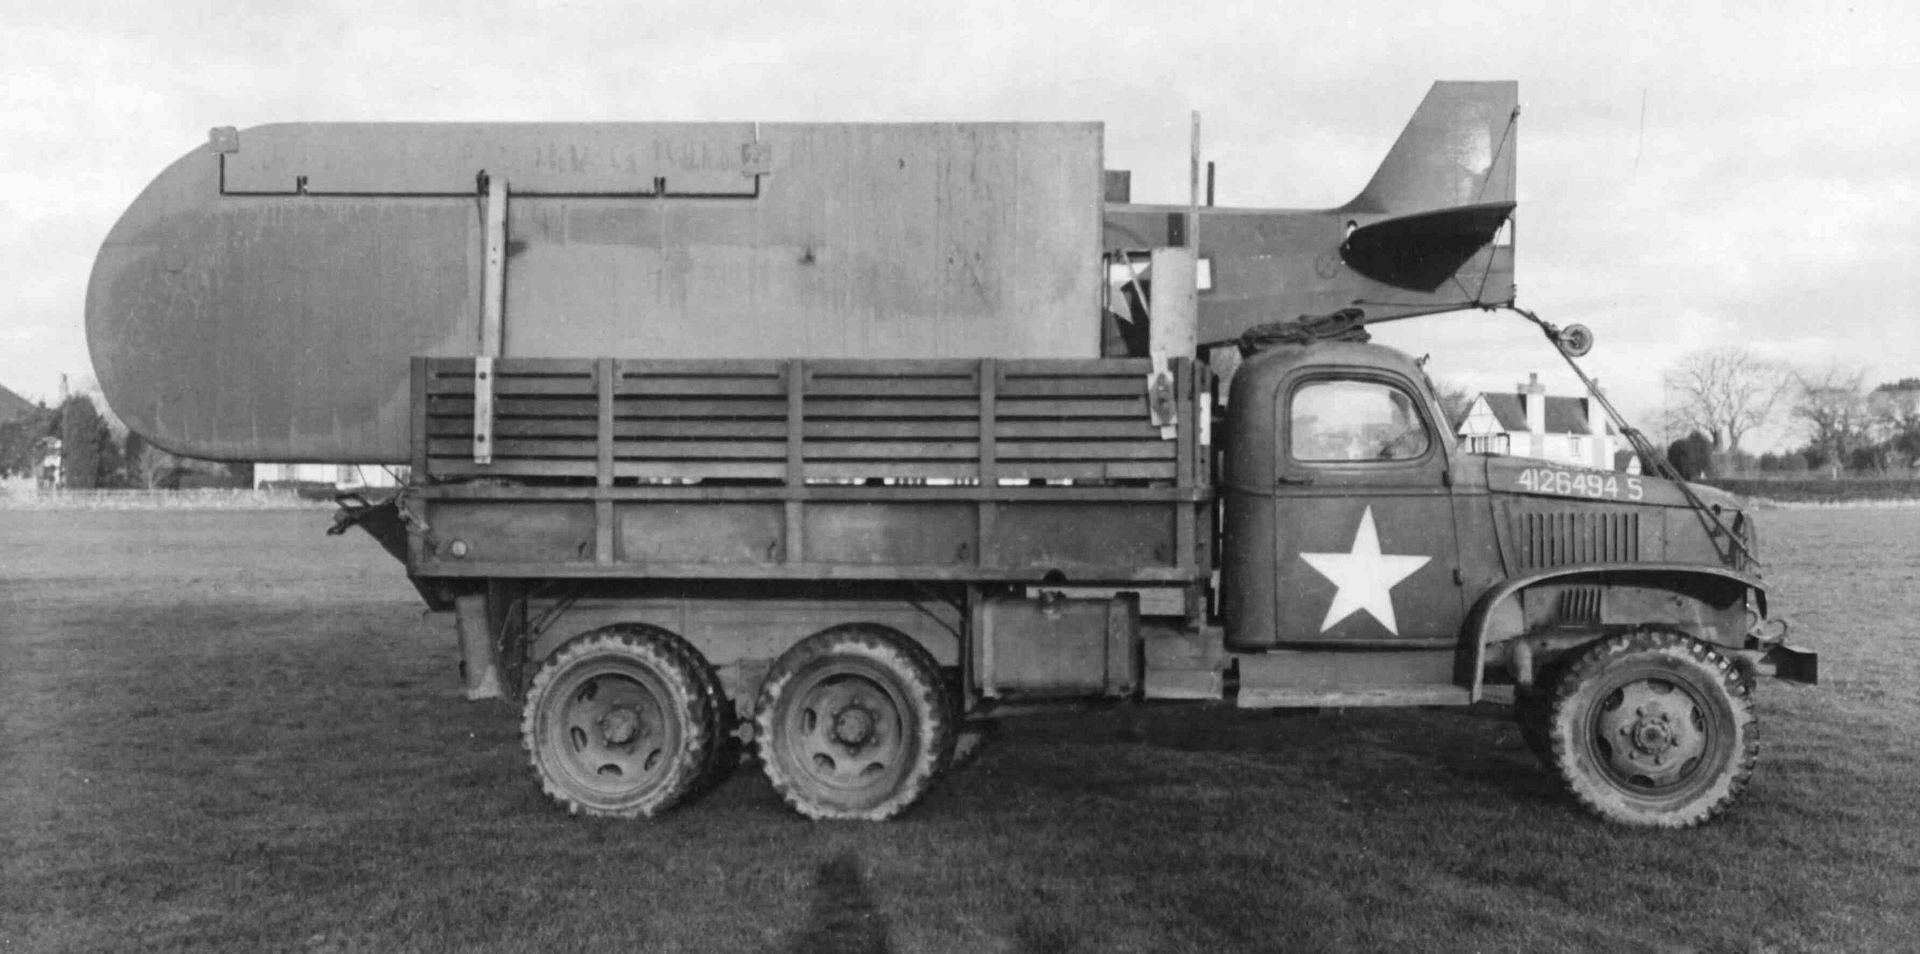
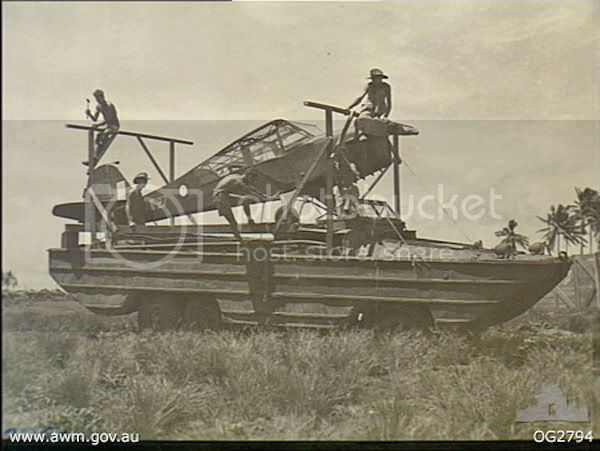
These are my two AWM reference photos


A couple of the mocked up finished model to see how the crating was made. It was at this stage I realised I had to remove the Tail fins that I had fitted.


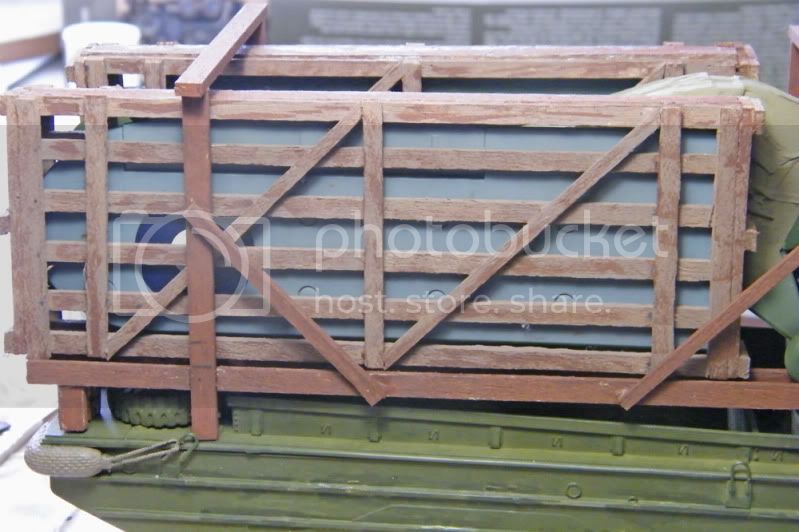
And here is the first of 4 crate sides for the wings. Pinned togeather for now as I am making all the crates out of Balsa wood for ease of making.


I will continue this as I go but as I have 4 or 5 on the go at present I do things as I wait for other things to dry or for glue to set.

Comments welcomed on any stage of this

Both kits have basic paint on them and need detailing.

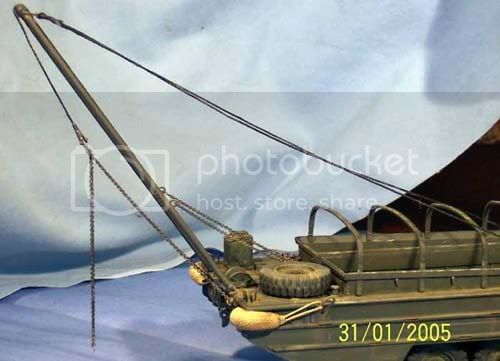
For interest here is a photo of the 'Lifting Boom' on my original DUKW

Spuds
Visit this Community
Georgia, United States
Joined: August 31, 2002
KitMaker: 393 posts
Armorama: 287 posts
Posted: Friday, April 13, 2012 - 01:30 PM UTC
Well, Cliff, once again you've come up with another intriguing project. Your projects are always interesting and never disappointing. As usual, I'll be following this one closely.
Tom
Ironmike
Visit this Community
California, United States
Joined: March 28, 2006
KitMaker: 287 posts
Armorama: 270 posts
Posted: Friday, April 13, 2012 - 01:35 PM UTC
Excellent, Cliff, nicely done thus far. Very clever diorama you have going. Do keep us posted with lots of photos. Great stuff.
Ironmike
AlanL
Visit this Community
England - East Anglia, United Kingdom
Joined: August 12, 2005
KitMaker: 14,499 posts
Armorama: 11,675 posts
Posted: Friday, April 13, 2012 - 11:57 PM UTC
Hi Cliff,

This looks like an excellent project, terrific stuff.

Al
parrot
Visit this Community
Ontario, Canada
Joined: March 01, 2002
KitMaker: 1,607 posts
Armorama: 1,581 posts
Posted: Saturday, April 14, 2012 - 04:30 AM UTC
Great idea!
Keep the pics coming.Very original dio.

Tom
DaveCox
Visit this Community
England - South East, United Kingdom
Joined: January 11, 2003
KitMaker: 4,307 posts
Armorama: 2,130 posts
Posted: Saturday, April 14, 2012 - 05:19 AM UTC
I really like the look of this Cliff, nice one mate!
MrRoo
Visit this Community
Queensland, Australia
Joined: October 07, 2002
KitMaker: 3,856 posts
Armorama: 2,984 posts
Posted: Monday, April 16, 2012 - 01:10 PM UTC
Thanks for the comments guys.

I have finished building the crates for the wings and tail fins & will paint them all once I have made the crates for the struts and propeller.


Once the roundals are added to the wings and the paint is dry on the crates I will finish closing the crates with the items inside. Once they are totally finished I can then start putting the load togeather in the correct places and paint the rest of the balsa frame holding the aircraft.

The Aussie Roundals supplied by a friend who at present (I hope) is going through his aircraft decals looking for the aircraft numbers themselves that I can add to the plane.

All comments welcomed
MrRoo
Visit this Community
Queensland, Australia
Joined: October 07, 2002
KitMaker: 3,856 posts
Armorama: 2,984 posts
Posted: Monday, April 16, 2012 - 06:53 PM UTC
well the building went well this afternoon and the crates are finished except for painting and their loads. I could not resist seeing what she will look like so here is 3 new pics


Cheers
AlanL
Visit this Community
England - East Anglia, United Kingdom
Joined: August 12, 2005
KitMaker: 14,499 posts
Armorama: 11,675 posts
Posted: Monday, April 16, 2012 - 09:02 PM UTC
Hi Cliff,

Very fine work. Looking good.

Al
JClapp
#259
Visit this Community
Massachusetts, United States
Joined: October 23, 2011
KitMaker: 2,265 posts
Armorama: 180 posts
Posted: Tuesday, April 17, 2012 - 12:11 AM UTC
oh man, that's beautiful ! a nice job of carpentry as well as kit building !
panzerserra
Visit this Community
Goias, Brazil
Joined: March 29, 2002
KitMaker: 730 posts
Armorama: 688 posts
Posted: Tuesday, April 17, 2012 - 04:28 AM UTC
Beautiful project !!!

Love oddballs based in real pics...

Keep going...
tommy1drop
Visit this Community
England - East Midlands, United Kingdom
Joined: February 07, 2011
KitMaker: 131 posts
Armorama: 116 posts
Posted: Tuesday, April 17, 2012 - 04:33 AM UTC
Hi Cliff

Great looking project, looking forward to seeing more.
Tom
bat-213
Visit this Community
Canada
Joined: December 30, 2011
KitMaker: 902 posts
Armorama: 788 posts
Posted: Tuesday, April 17, 2012 - 08:17 AM UTC
that is a real cool idea,great what you have done,your pics are nice and clear.
what a great job you are doing,more pics please.
MrRoo
Visit this Community
Queensland, Australia
Joined: October 07, 2002
KitMaker: 3,856 posts
Armorama: 2,984 posts
Posted: Saturday, April 28, 2012 - 01:33 PM UTC
I have done a bit more on this one (or is that two ). Wings are crated and crates weathered a bit. Base coat on the frame the Piper Cub sits on. Tissue Tarp over cockpit area plus a tiny amount of weathering on the DUKW as well.

Crates are just sitting on the frame at present and have not been fixed down which is why they are leaning in.

Any comments welcomed


Another update due soon
sweaver
Visit this Community
Kentucky, United States
Joined: April 19, 2007
KitMaker: 759 posts
Armorama: 410 posts
Posted: Saturday, April 28, 2012 - 01:49 PM UTC
VERY unusual and intriguing subject, Cliff. I'll be following this one with interest.

An innovative vehicle with an iconic plane.....doesn't get much better than that!
sweaver
Visit this Community
Kentucky, United States
Joined: April 19, 2007
KitMaker: 759 posts
Armorama: 410 posts
Posted: Friday, December 28, 2012 - 03:49 AM UTC
Any further progress, Cliff?

FYI I did notice that your engine "shrouds" are reversed on the Cub.....
MrRoo
Visit this Community
Queensland, Australia
Joined: October 07, 2002
KitMaker: 3,856 posts
Armorama: 2,984 posts
Posted: Friday, December 28, 2012 - 09:21 AM UTC
While the DUKW and plane are finished I have gone no further with the planned diorama yet and in fact have done no modelling for some time now. Thanks for the heads up on the engine shouds I'll have a look and see if I can correct them but if not that's how they will have to stay.

Cheers
Cliff
Joel_W
Staff MemberAssociate Editor
AUTOMODELER
Visit this Community
New York, United States
Joined: December 04, 2010
KitMaker: 11,666 posts
Armorama: 1,143 posts
Posted: Friday, December 28, 2012 - 09:55 AM UTC
Cliff, just an outstanding idea, one that I've never seen before. The Cub is a personal favorite of mine, since I spent a fair amount of time in one with my brother whose a pilot back in the 70s.

Looking forward to the finished diorama.
Joel
sweaver
Visit this Community
Kentucky, United States
Joined: April 19, 2007
KitMaker: 759 posts
Armorama: 410 posts
Posted: Friday, January 04, 2013 - 06:31 AM UTC

Quoted Text

While the DUKW and plane are finished I have gone no further with the planned diorama yet and in fact have done no modelling for some time now. Thanks for the heads up on the engine shouds I'll have a look and see if I can correct them but if not that's how they will have to stay.

Cheers
Cliff


Sorry to hear you haven't been able to get to the bench recently. Let us know when you do. This is shaping up nicely. Your canvas is excellent, and the wood crate is perfect.

Yeah, make every effort to turn those shrouds. As I'm sure you know, they're a pretty prominent feature on the real plane and will look pretty odd backwards. Sorry if you can't tell...I'm kinda partial to this plane.

MrRoo
Visit this Community
Queensland, Australia
Joined: October 07, 2002
KitMaker: 3,856 posts
Armorama: 2,984 posts
Posted: Friday, January 04, 2013 - 09:22 AM UTC
I am not really a plane man (sic) so I did everything to try and simplify the construction part of it. In fact I only did this because a 1/35th scale Piper Cub was available. Got a great idea for a Dakota (DC3) as well if one is available in 1/35 scale LOL!
165thspc
#521
Visit this Community
Kentucky, United States
Joined: April 13, 2011
KitMaker: 9,465 posts
Armorama: 8,695 posts
Posted: Wednesday, February 13, 2013 - 06:14 AM UTC
How about something different but on a similar topic?
165thspc
#521
Visit this Community
Kentucky, United States
Joined: April 13, 2011
KitMaker: 9,465 posts
Armorama: 8,695 posts
Posted: Wednesday, February 13, 2013 - 06:21 AM UTC

Kentucky Aviation Museum, Bluegrass Field, Lexington, KY
MrRoo
Visit this Community
Queensland, Australia
Joined: October 07, 2002
KitMaker: 3,856 posts
Armorama: 2,984 posts
Posted: Wednesday, February 13, 2013 - 09:19 AM UTC

Quoted Text

How about something different but on a similar topic?


I like that. Have started assembling some more truck kits and will move onto finishing some other projects including this one over time.
 _GOTOTOP